
Operating Instructions
Page 2
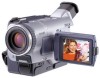
...SONY Model No.: DCR-TRV230, DCRTRV330, DCR-TRV530 Responsible Party: Sony Electronics lnc. Never expose the battery pack to rain or moisture. Regulatory Information Declaration of lithium ion batteries in household or business trash may cause undesired 2 operation. Congratulations on your nearest Sony...under direct sunlight. LITHIUM ION BATTERY. If you have any interference received, including interference that you may not cause harmful interference, and (2) this device must accept any questions about this Sony Digital Handycam camcorder. Operation is for the FCC ...
...SONY Model No.: DCR-TRV230, DCRTRV330, DCR-TRV530 Responsible Party: Sony Electronics lnc. Never expose the battery pack to rain or moisture. Regulatory Information Declaration of lithium ion batteries in household or business trash may cause undesired 2 operation. Congratulations on your nearest Sony...under direct sunlight. LITHIUM ION BATTERY. If you have any interference received, including interference that you may not cause harmful interference, and (2) this device must accept any questions about this Sony Digital Handycam camcorder. Operation is for the FCC ...

Operating Instructions
Page 5
... camcorder abroad 138 Maintenance information and precautions 139 Specifications 144 Quick Reference Identifying the parts and controls 146 Index 154 5 Picture effect 40 Using special effects - Digital program editing 63 Using with digital effects ...... 54 Enlarging recorded images - Photo search/Photo scan 58 Digital8 system, recording and playback 133 About the "InfoLITHIUM" battery...
... camcorder abroad 138 Maintenance information and precautions 139 Specifications 144 Quick Reference Identifying the parts and controls 146 Index 154 5 Picture effect 40 Using special effects - Digital program editing 63 Using with digital effects ...... 54 Enlarging recorded images - Photo search/Photo scan 58 Digital8 system, recording and playback 133 About the "InfoLITHIUM" battery...

Operating Instructions
Page 6
... features of the cassette to insert. 3 Close the cassette compartment by pressing the mark on the cassette compartment. Connecting the power cord (p. 16) Use the battery pack when using your camcorder. Connect the plug with the window facing out. Push the middle portion of the back of your... camcorder outdoors (p. 11). See the page in a straight line deeply into the cassette compartment with its v mark facing up. Open the DC IN jack cover. Quick ...
... features of the cassette to insert. 3 Close the cassette compartment by pressing the mark on the cassette compartment. Connecting the power cord (p. 16) Use the battery pack when using your camcorder. Connect the plug with the window facing out. Push the middle portion of the back of your... camcorder outdoors (p. 11). See the page in a straight line deeply into the cassette compartment with its v mark facing up. Open the DC IN jack cover. Quick ...

Operating Instructions
Page 7
...PLAY OFCFR(CHG) 1 Set the POWER switch to CAMERA while pressing the small green button. If you purchase your camcorder by holding the viewfinder, the LCD panel, or the battery pack. 7 Monitoring the playback picture on the LCD screen. 4 Press START/STOP. V POWER CAM M Note Do... not pick up your camcorder, the clock setting is set the clock setting before recording (p. 17). E ERMAORY E ERMAORY Quick Start Guide Recording a ...
...PLAY OFCFR(CHG) 1 Set the POWER switch to CAMERA while pressing the small green button. If you purchase your camcorder by holding the viewfinder, the LCD panel, or the battery pack. 7 Monitoring the playback picture on the LCD screen. 4 Press START/STOP. V POWER CAM M Note Do... not pick up your camcorder, the clock setting is set the clock setting before recording (p. 17). E ERMAORY E ERMAORY Quick Start Guide Recording a ...
Operating Instructions
Page 10
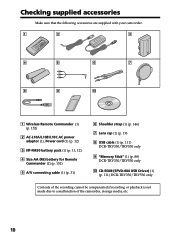
Checking supplied accessories Make sure that the following accessories are supplied with your camcorder. 1 2 3 4 5 6 7 8 9 0 1 Wireless Remote Commander (1) (p. 152) 2 AC-L10A/L10B/L10C AC power adaptor (1), Power cord (1) (p. 12) 3 NP-FM30 battery pack (1) (p. 11, 12) 4 Size AA (R6) battery for Remote Commander (2) (p. 152) 5 A/V connecting cable (1) (p. 31) 6 Shoulder strap (1) (p. 146) 7 Lens cap (1) (p. 19) 8... DCR-TRV330/TRV530 only Contents of the recording cannot be compensated if recording or playback is not made due to a malfunction of the camcorder, storage media, etc. 10
Checking supplied accessories Make sure that the following accessories are supplied with your camcorder. 1 2 3 4 5 6 7 8 9 0 1 Wireless Remote Commander (1) (p. 152) 2 AC-L10A/L10B/L10C AC power adaptor (1), Power cord (1) (p. 12) 3 NP-FM30 battery pack (1) (p. 11, 12) 4 Size AA (R6) battery for Remote Commander (2) (p. 152) 5 A/V connecting cable (1) (p. 31) 6 Shoulder strap (1) (p. 146) 7 Lens cap (1) (p. 19) 8... DCR-TRV330/TRV530 only Contents of the recording cannot be compensated if recording or playback is not made due to a malfunction of the camcorder, storage media, etc. 10

Operating Instructions
Page 11
Getting started Step 1 Preparing the power supply Installing the battery pack We recommend using the battery pack when you install the NP-FM70/FM90/FM91 battery pack on your camcorder outdoors. (1) Lift up the viewfinder. (2) Slide the battery pack down until it clicks. 1 2 To remove the battery pack (1) Lift up the viewfinder. (2) Slide the battery pack out in the direction of the arrow while pressing BATT (battery) release lever down. BATT (battery) release lever If you install the large capacity battery pack If you use your camcorder, extend its viewfinder. 11
Getting started Step 1 Preparing the power supply Installing the battery pack We recommend using the battery pack when you install the NP-FM70/FM90/FM91 battery pack on your camcorder outdoors. (1) Lift up the viewfinder. (2) Slide the battery pack down until it clicks. 1 2 To remove the battery pack (1) Lift up the viewfinder. (2) Slide the battery pack out in the direction of the arrow while pressing BATT (battery) release lever down. BATT (battery) release lever If you install the large capacity battery pack If you use your camcorder, extend its viewfinder. 11

Operating Instructions
Page 12
...adaptor supplied with your camcorder. 12 Fully charging the battery allows you to the DC IN jack with the "InfoLITHIUM" battery pack (M series). When the remaining battery indicator changes to OFF (CHG). To fully charge the battery (full charge), leave the battery pack attached after ... the display window. Charging begins. After charging the battery pack Disconnect the AC power adaptor from that on your camcorder. OFCFR(CHG) E ERMAORY CAM M Step 1 Preparing the power supply Charging the battery pack Use the battery pack after normal charge is completed until FULL appears...
...adaptor supplied with your camcorder. 12 Fully charging the battery allows you to the DC IN jack with the "InfoLITHIUM" battery pack (M series). When the remaining battery indicator changes to OFF (CHG). To fully charge the battery (full charge), leave the battery pack attached after ... the display window. Charging begins. After charging the battery pack Disconnect the AC power adaptor from that on your camcorder. OFCFR(CHG) E ERMAORY CAM M Step 1 Preparing the power supply Charging the battery pack Use the battery pack after normal charge is completed until FULL appears...

Operating Instructions
Page 13
...-circuit, damaging the AC power adaptor. •Keep the battery pack dry. •When the battery pack is not to operate Charge the battery pack fully again so that the indication on the battery remaining indicator is a trademark of Sony Corporation. Your camcorder operates only with the "InfoLITHIUM" battery pack (M series). Getting started Step 1 Preparing the power...
...-circuit, damaging the AC power adaptor. •Keep the battery pack dry. •When the battery pack is not to operate Charge the battery pack fully again so that the indication on the battery remaining indicator is a trademark of Sony Corporation. Your camcorder operates only with the "InfoLITHIUM" battery pack (M series). Getting started Step 1 Preparing the power...

Operating Instructions
Page 14
...recording time at 25 °C (77 °F) Recording time DCR-TRV230/TRV330 Battery pack NP-FM30 (supplied) NP-FM50 NP-FM70 NP-FM90 NP... the LCD screen Continuous* Typical** 75 40 125 70 265 150 400 230 465 265 DCR-TRV530 Battery pack Recording with the viewfinder Recording with the LCD screen Continuous* Typical** Continuous* Typical** NP-FM30 ... minutes when you use your camcorder in a cold environment. ** Approximate number of minutes to charge an empty battery pack at 25°C (77°F). Step 1 Preparing the power supply Charging time Battery pack NP-FM30 (supplied)...
...recording time at 25 °C (77 °F) Recording time DCR-TRV230/TRV330 Battery pack NP-FM30 (supplied) NP-FM50 NP-FM70 NP-FM90 NP... the LCD screen Continuous* Typical** 75 40 125 70 265 150 400 230 465 265 DCR-TRV530 Battery pack Recording with the viewfinder Recording with the LCD screen Continuous* Typical** Continuous* Typical** NP-FM30 ... minutes when you use your camcorder in a cold environment. ** Approximate number of minutes to charge an empty battery pack at 25°C (77°F). Step 1 Preparing the power supply Charging time Battery pack NP-FM30 (supplied)...

Operating Instructions
Page 15
... Hi8/standard 8 system is reduced by about 90 % of those of a fully charged battery. The battery life will be shorter if you use your camcorder in the Digital8 system. Getting started Step 1 Preparing the power supply Playing time DCR-TRV230/TRV330 Battery pack NP-FM30 (supplied) NP-FM50 NP-FM70 NP-FM90 NP-FM91 Playing time...
... Hi8/standard 8 system is reduced by about 90 % of those of a fully charged battery. The battery life will be shorter if you use your camcorder in the Digital8 system. Getting started Step 1 Preparing the power supply Playing time DCR-TRV230/TRV330 Battery pack NP-FM30 (supplied) NP-FM50 NP-FM70 NP-FM90 NP-FM91 Playing time...

Operating Instructions
Page 16
... adaptor. (1) Open the DC IN jack cover, and connect the AC power adaptor to the DC IN jack on your camcorder. • The DC IN jack has "source priority". Using a car battery Use Sony DC Adaptor/Charger (optional). 16 Notes • The AC power adaptor can supply power even if the...wall outlet. Step 1 Preparing the power supply Connecting to a wall outlet When you use your camcorder for a long time, we recommend that the battery pack cannot supply any power if the power cord is connected to your camcorder with the plug's v mark facing up. (2) Connect the power cord to the AC power ...
... adaptor. (1) Open the DC IN jack cover, and connect the AC power adaptor to the DC IN jack on your camcorder. • The DC IN jack has "source priority". Using a car battery Use Sony DC Adaptor/Charger (optional). 16 Notes • The AC power adaptor can supply power even if the...wall outlet. Step 1 Preparing the power supply Connecting to a wall outlet When you use your camcorder for a long time, we recommend that the battery pack cannot supply any power if the power cord is connected to your camcorder with the plug's v mark facing up. (2) Connect the power cord to the AC power ...
Operating Instructions
Page 17
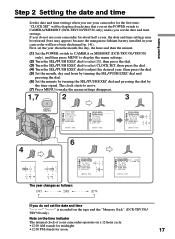
Getting started Step 2 Setting the date and time Set the date and time settings when you use your camcorder will be released (bars may appear) because the manganese-lithium battery installed in your camcorder for the first time. The clock starts to move. (7) Press MENU to make the menu settings disappear. 1,7 2 3... is recorded on the tape and the "Memory Stick". (DCR-TRV330/ TRV530 only) Note on the time indicator The internal clock of your camcorder for about half a year, the date and time settings may be displayed each time that you set the year, then the month, the day...
Getting started Step 2 Setting the date and time Set the date and time settings when you use your camcorder will be released (bars may appear) because the manganese-lithium battery installed in your camcorder for the first time. The clock starts to move. (7) Press MENU to make the menu settings disappear. 1,7 2 3... is recorded on the tape and the "Memory Stick". (DCR-TRV330/ TRV530 only) Note on the time indicator The internal clock of your camcorder for about half a year, the date and time settings may be displayed each time that you set the year, then the month, the day...

Operating Instructions
Page 20
... to OFF (CHG) once, then turn the LCD panel over so that you use the LCD screen outdoors in the standby mode for 3 minutes Your camcorder automatically turns off . Indicators in the mirror mode You cannot operate the ZERO SET MEMORY on the LCD is opened Recording time becomes shorter a little... the LCD screen except in the mirror mode The picture on the Remote Commander. However, the picture will be difficult to prevent battery and tape wear. When you change the battery pack, set to 90 degrees. This is released as z. Some of the LCD panel Make sure if the LCD panel is...
... to OFF (CHG) once, then turn the LCD panel over so that you use the LCD screen outdoors in the standby mode for 3 minutes Your camcorder automatically turns off . Indicators in the mirror mode You cannot operate the ZERO SET MEMORY on the LCD is opened Recording time becomes shorter a little... the LCD screen except in the mirror mode The picture on the Remote Commander. However, the picture will be difficult to prevent battery and tape wear. When you change the battery pack, set to 90 degrees. This is released as z. Some of the LCD panel Make sure if the LCD panel is...

Operating Instructions
Page 22
Remaining battery time indicator Format indicator Recording mode indicator STBY/REC indicator 40min SP REC 0:00:01 Time code/Tape counter indicator JUL 4 2001 12:05:56 AM Remaining tape indicator This appears after the POWER switch is displayed for tapes recorded in the Digital8 system only...to be correct, depending on the conditions in the Hi8/standard 8 system, the tape counter appears on tape. Remaining battery time indicator The remaining battery time indicator roughly indicates the recording time. When you play back tapes recorded in which you record pictures with the ...
Remaining battery time indicator Format indicator Recording mode indicator STBY/REC indicator 40min SP REC 0:00:01 Time code/Tape counter indicator JUL 4 2001 12:05:56 AM Remaining tape indicator This appears after the POWER switch is displayed for tapes recorded in the Digital8 system only...to be correct, depending on the conditions in the Hi8/standard 8 system, the tape counter appears on tape. Remaining battery time indicator The remaining battery time indicator roughly indicates the recording time. When you play back tapes recorded in which you record pictures with the ...

Operating Instructions
Page 29
...press ×2 on the conditions in which you close the LCD panel and open it again, it takes about 1 minute for the correct remaining battery time to the TV, the data code appears on the Remote Commander during playback. To resume normal playback, press N. The last 5 seconds of... N. To resume rewinding or advancing, release the button. To view the picture frame-by a camcorder without the date and time set the POWER switch to reverse the playback direction. Remaining battery time indicator during playback. To change the playback direction Press on the TV screen. To resume normal...
...press ×2 on the conditions in which you close the LCD panel and open it again, it takes about 1 minute for the correct remaining battery time to the TV, the data code appears on the Remote Commander during playback. To resume normal playback, press N. The last 5 seconds of... N. To resume rewinding or advancing, release the button. To view the picture frame-by a camcorder without the date and time set the POWER switch to reverse the playback direction. Remaining battery time indicator during playback. To change the playback direction Press on the TV screen. To resume normal...

Operating Instructions
Page 83
and VF B.L. •When you select BRIGHT, battery life is automatically selected. 83 L. LCD COLOR To darken To lighten z BRT NORMAL To set the brightness ... record stopping subjects in high quality To write a print mark on the recorded still images you use power sources other than the battery pack, BRIGHT is reduced by about 10 percent during recording. •When you want to print out later (p. 123) To ... backlight - To adjust the color on the LCD screen with the SEL/PUSH EXEC dial. Customizing Your Camcorder Changing the menu settings Icon/item LCD BRIGHT Mode -
and VF B.L. •When you select BRIGHT, battery life is automatically selected. 83 L. LCD COLOR To darken To lighten z BRT NORMAL To set the brightness ... record stopping subjects in high quality To write a print mark on the recorded still images you use power sources other than the battery pack, BRIGHT is reduced by about 10 percent during recording. •When you want to print out later (p. 123) To ... backlight - To adjust the color on the LCD screen with the SEL/PUSH EXEC dial. Customizing Your Camcorder Changing the menu settings Icon/item LCD BRIGHT Mode -

Operating Instructions
Page 87
...the camera recording lamp at the front of your camcorder and a VCR for dubbing in memory even when the battery is automatically selected. 87 LINK cable) In more than the battery pack, BL ON is removed. Changing the menu settings Customizing Your Camcorder Icon/item Mode WORLD TIME - Notes on the... TV or VCR. (Except when your camcorder is connected to outputs on INDICATOR •When you select BL ON, battery life is reduced by the time difference you set the time difference to 0, the clock returns to the local time. BEEP z ...
...the camera recording lamp at the front of your camcorder and a VCR for dubbing in memory even when the battery is automatically selected. 87 LINK cable) In more than the battery pack, BL ON is removed. Changing the menu settings Customizing Your Camcorder Icon/item Mode WORLD TIME - Notes on the... TV or VCR. (Except when your camcorder is connected to outputs on INDICATOR •When you select BL ON, battery life is reduced by the time difference you set the time difference to 0, the clock returns to the local time. BEEP z ...
Operating Instructions
Page 88
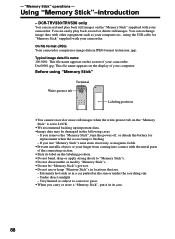
... is set to corrosive gases •When you remove the "Memory Stick", turn the power off, or detach the battery for "Memory Stick" supplied with the metal parts of your camcorder. DCR-TRV330/TRV530 only You can easily play back still images on the "Memory Stick" is flashing - - You... can record and play back, record or delete still images. On file format (JPEG) Your camcorder compresses image data in the following cases: - Dsc00001.jpg: This file name appears on the display of the connecting section. •Stick its case....
... is set to corrosive gases •When you remove the "Memory Stick", turn the power off, or detach the battery for "Memory Stick" supplied with the metal parts of your camcorder. DCR-TRV330/TRV530 only You can easily play back still images on the "Memory Stick" is flashing - - You... can record and play back, record or delete still images. On file format (JPEG) Your camcorder compresses image data in the following cases: - Dsc00001.jpg: This file name appears on the display of the connecting section. •Stick its case....

Operating Instructions
Page 90
.... When the access lamp is lit or flashing Do not shake or strike your camcorder because your camcorder is displayed The "Memory Stick" may occur. Do not turn the power off , eject the "Memory Stick" or remove the battery pack. If " MEMORY STICK ERROR" is reading the data from the "Memory Stick" or...
.... When the access lamp is lit or flashing Do not shake or strike your camcorder because your camcorder is displayed The "Memory Stick" may occur. Do not turn the power off , eject the "Memory Stick" or remove the battery pack. If " MEMORY STICK ERROR" is reading the data from the "Memory Stick" or...

Operating Instructions
Page 103
... or remove the battery pack. If you can also take in moving image data recorded on a tape in the Digital8 system, and record it as a still image on the screen. However, you press PHOTO lightly in the Digital8 system and a "Memory Stick" into your camcorder. If appears on ... record the titles on the "Memory Stick". Your camcorder can record titles which have already been recorded on the Remote Commander Your camcorder immediately records the image that is incompatible with your camcorder because its format does not comform with your camcorder. (1) Set the POWER switch to VCR. (2)...
... or remove the battery pack. If you can also take in moving image data recorded on a tape in the Digital8 system, and record it as a still image on the screen. However, you press PHOTO lightly in the Digital8 system and a "Memory Stick" into your camcorder. If appears on ... record the titles on the "Memory Stick". Your camcorder can record titles which have already been recorded on the Remote Commander Your camcorder immediately records the image that is incompatible with your camcorder because its format does not comform with your camcorder. (1) Set the POWER switch to VCR. (2)...


