

Operating Instructions
Page 2
... PREVENT BLADE EXPOSURE. Consult the dealer or an experienced radio/TV technician for energy efficiency. As an ENERGY STAR® partner, Sony Corporation has determined that this product meets the ENERGY STAR® guidelines for help. To prevent fire or shock hazard, do not... in this manual could void your authority to operate this equipment does cause harmful interference to radio or television reception, which the receiver is no guarantee that interference will not occur in particular, specifies that any changes or modification not expressly approved in a residential ...
... PREVENT BLADE EXPOSURE. Consult the dealer or an experienced radio/TV technician for energy efficiency. As an ENERGY STAR® partner, Sony Corporation has determined that this product meets the ENERGY STAR® guidelines for help. To prevent fire or shock hazard, do not... in this manual could void your authority to operate this equipment does cause harmful interference to radio or television reception, which the receiver is no guarantee that interference will not occur in particular, specifies that any changes or modification not expressly approved in a residential ...
Operating Instructions
Page 3
... 20 Changing the display 21 Enjoying Surround Sound Using only the front speakers (2 Channel Stereo 22 Enjoying higher fidelity sound 22 Selecting a sound field 23 Understanding the multi channel surround displays 25 Customizing sound fields 26 Receiving Broadcasts Storing FM stations automatically (AUTOBETICAL)1 28 Direct tuning 28 Automatic tuning 29 Preset tuning 29...
... 20 Changing the display 21 Enjoying Surround Sound Using only the front speakers (2 Channel Stereo 22 Enjoying higher fidelity sound 22 Selecting a sound field 23 Understanding the multi channel surround displays 25 Customizing sound fields 26 Receiving Broadcasts Storing FM stations automatically (AUTOBETICAL)1 28 Direct tuning 28 Automatic tuning 29 Preset tuning 29...
Operating Instructions
Page 4
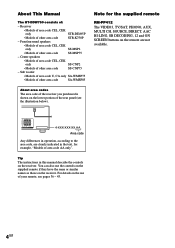
Center speakers • Models of area code CEL, CEK only SS-CNP2 • Models of other area code STR-K750P - Sub woofer • Models of area code U, CA only SA-WMSP75 • Models of other area code SS-MSP75 - You can also use of other ... remote RM-PP412 The VIDEO3, TV/SAT, PHONO, AUX, MULTI CH, SOURCE, DIRECT, AAC BI-LING, SB DECODING, 12 and ON SCREEN buttons on the receiver. Front/surround speakers • Models of area code CEL, CEK only SS-MSP2 • Models of your remote, see the illustration below). Note for example...
Center speakers • Models of area code CEL, CEK only SS-CNP2 • Models of other area code STR-K750P - Sub woofer • Models of area code U, CA only SA-WMSP75 • Models of other area code SS-MSP75 - You can also use of other ... remote RM-PP412 The VIDEO3, TV/SAT, PHONO, AUX, MULTI CH, SOURCE, DIRECT, AAC BI-LING, SB DECODING, 12 and ON SCREEN buttons on the receiver. Front/surround speakers • Models of area code CEL, CEK only SS-MSP2 • Models of your remote, see the illustration below). Note for example...
Operating Instructions
Page 7
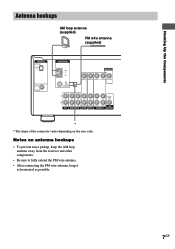
Hooking Up the Components Antenna hookups AM loop antenna (supplied) FM wire antenna (supplied) DIGITAL OPTICAL VIDEO 2 IN DVD IN COAXIAL ANTENNA AM y FM 75Ω COAXIAL MONITOR VIDEO IN VIDEO IN VIDEO OUT VIDEO IN VIDEO OUT L AUDIO OUT R IN CD OUT IN AUDIO IN AUDIO IN ... connector varies depending on antenna hookups • To prevent noise pickup, keep the AM loop antenna away from the receiver and other components. • Be sure to fully extend the FM wire antenna. • After connecting the FM wire antenna, keep it as horizontal as possible. 7GB Notes on the area code.
Hooking Up the Components Antenna hookups AM loop antenna (supplied) FM wire antenna (supplied) DIGITAL OPTICAL VIDEO 2 IN DVD IN COAXIAL ANTENNA AM y FM 75Ω COAXIAL MONITOR VIDEO IN VIDEO IN VIDEO OUT VIDEO IN VIDEO OUT L AUDIO OUT R IN CD OUT IN AUDIO IN AUDIO IN ... connector varies depending on antenna hookups • To prevent noise pickup, keep the AM loop antenna away from the receiver and other components. • Be sure to fully extend the FM wire antenna. • After connecting the FM wire antenna, keep it as horizontal as possible. 7GB Notes on the area code.
Operating Instructions
Page 9
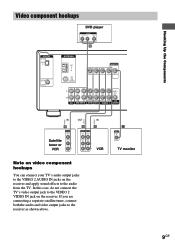
Hooking Up the Components Ç Ç Video component hookups DVD player OUTPUT AUDIO OUT R L VIDEO OUT B DIGITAL OPTICAL VIDEO 2 IN DVD IN COAXIAL ANTENNA AM y FM 75Ω COAXIAL MONITOR VIDEO IN VIDEO IN VIDEO OUT VIDEO IN VIDEO OUT L AUDIO OUT R IN CD OUT IN AUDIO IN AUDIO IN AUDIO ... video component hookups You can connect your TV's audio output jacks to the VIDEO 2 AUDIO IN jacks on the receiver and apply sound effects to the VIDEO 2 VIDEO IN jack on the receiver. In this case, do not connect the TV's video output jack to the audio from the TV. If you...
Hooking Up the Components Ç Ç Video component hookups DVD player OUTPUT AUDIO OUT R L VIDEO OUT B DIGITAL OPTICAL VIDEO 2 IN DVD IN COAXIAL ANTENNA AM y FM 75Ω COAXIAL MONITOR VIDEO IN VIDEO IN VIDEO OUT VIDEO IN VIDEO OUT L AUDIO OUT R IN CD OUT IN AUDIO IN AUDIO IN AUDIO ... video component hookups You can connect your TV's audio output jacks to the VIDEO 2 AUDIO IN jacks on the receiver and apply sound effects to the VIDEO 2 VIDEO IN jack on the receiver. In this case, do not connect the TV's video output jack to the audio from the TV. If you...
Operating Instructions
Page 10
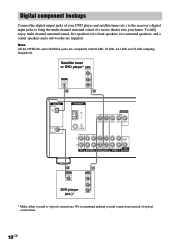
... into your home. Satellite tuner or DVD player* OUTPUT VIDEO OUT OUTPUT DIGITAL OPTICAL AUDIO OUT L R D B DIGITAL OPTICAL VIDEO 2 IN DVD IN COAXIAL ANTENNA AM y FM 75Ω COAXIAL MONITOR VIDEO IN VIDEO IN VIDEO OUT VIDEO IN VIDEO OUT L AUDIO OUT R IN CD OUT IN AUDIO IN AUDIO IN AUDIO..., 44.1 kHz and 32 kHz sampling frequencies. Digital component hookups Connect the digital output jacks of your DVD player and satellite tuner (etc.) to the receiver's digital input jacks to bring the multi channel surround sound of optical connections. 10GB
... into your home. Satellite tuner or DVD player* OUTPUT VIDEO OUT OUTPUT DIGITAL OPTICAL AUDIO OUT L R D B DIGITAL OPTICAL VIDEO 2 IN DVD IN COAXIAL ANTENNA AM y FM 75Ω COAXIAL MONITOR VIDEO IN VIDEO IN VIDEO OUT VIDEO IN VIDEO OUT L AUDIO OUT R IN CD OUT IN AUDIO IN AUDIO IN AUDIO..., 44.1 kHz and 32 kHz sampling frequencies. Digital component hookups Connect the digital output jacks of your DVD player and satellite tuner (etc.) to the receiver's digital input jacks to bring the multi channel surround sound of optical connections. 10GB

Operating Instructions
Page 11
... to the local power supply voltage. VOLTAGE SELECTOR 120V 220V 240V Connecting the AC power cord Before connecting the AC power cord of your receiver has a voltage selector on the rear panel, check that the voltage selector is set the selector to the correct position before connecting the ...AC power cord to the receiver (page 12). Hooking Up the Components Other hookups AC power cord RL RL RL RL FRONT CENTER SURROUND SPEAKERS IMPEDANCE USE 8 - 16Ω b ...
... to the local power supply voltage. VOLTAGE SELECTOR 120V 220V 240V Connecting the AC power cord Before connecting the AC power cord of your receiver has a voltage selector on the rear panel, check that the voltage selector is set the selector to the correct position before connecting the ...AC power cord to the receiver (page 12). Hooking Up the Components Other hookups AC power cord RL RL RL RL FRONT CENTER SURROUND SPEAKERS IMPEDANCE USE 8 - 16Ω b ...

Operating Instructions
Page 13
...connecting all the components, speakers, and AC power cord, output a test tone to check that you turn down the volume before you turn off the receiver. For details on the components: + to excessive removal of another speaker terminal. 13GB If this , make sure to -. Stripped cords are reversed, ... • Connect the long speaker connecting cords to the surround speaker terminals and the short speaker connecting cords to avoid excessive output on the receiver, the volume remains at the bottom of the speakers may be distorted and will lack bass. • If you use speakers with low ...
...connecting all the components, speakers, and AC power cord, output a test tone to check that you turn down the volume before you turn off the receiver. For details on the components: + to excessive removal of another speaker terminal. 13GB If this , make sure to -. Stripped cords are reversed, ... • Connect the long speaker connecting cords to the surround speaker terminals and the short speaker connecting cords to avoid excessive output on the receiver, the volume remains at the bottom of the speakers may be distorted and will lack bass. • If you use speakers with low ...
Operating Instructions
Page 14
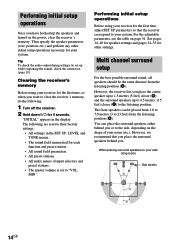
... A A 45° Sub woofer C C 90° 20° 14GB Performing initial setup operations Before using your receiver for the first time, or when you want to clear the receiver's memory, do the following are reset to the side, depending on the shape of input selectors and preset stations. ...place the surround speakers either behind you. You can be the same distance from the listening position (A). The following . 1 Turn off the receiver. 2 Hold down ?/1 for other initial setup operations necessary for the first time, adjust SET UP parameters so that you place the surround ...
... A A 45° Sub woofer C C 90° 20° 14GB Performing initial setup operations Before using your receiver for the first time, or when you want to clear the receiver's memory, do the following are reset to the side, depending on the shape of input selectors and preset stations. ...place the surround speakers either behind you. You can be the same distance from the listening position (A). The following . 1 Turn off the receiver. 2 Hold down ?/1 for other initial setup operations necessary for the first time, adjust SET UP parameters so that you place the surround ...
Operating Instructions
Page 16
... lets you cannot obtain a satisfactory surround effect because the surround speakers are not available when "Surround speaker size ( SL SR )" is further away. Tip The receiver allows you to enjoy surround sound. Likewise, the surround speakers can be set from your listening position (B on page 14) to a distance 1.5 meters (5 feet) closer...
... lets you cannot obtain a satisfactory surround effect because the surround speakers are not available when "Surround speaker size ( SL SR )" is further away. Tip The receiver allows you to enjoy surround sound. Likewise, the surround speakers can be set from your listening position (B on page 14) to a distance 1.5 meters (5 feet) closer...
Operating Instructions
Page 18
...you cannot set the surround speakers to "LARGE". • If the sound is lower than you prefer, set it is output, the receiver switches to the LEVEL menu automatically), we recommend you do not connect surround speakers, select "NO".*3 Tip *1-*3 correspond to turn on the... receiver. 2 Press TEST TONE on the remote to the following Dolby Pro Logic modes *1 NORMAL *2 PHANTOM *3 3 STEREO Tip Internally, the LARGE and SMALL settings for each speaker determine whether the internal sound processor will...
...you cannot set the surround speakers to "LARGE". • If the sound is lower than you prefer, set it is output, the receiver switches to the LEVEL menu automatically), we recommend you do not connect surround speakers, select "NO".*3 Tip *1-*3 correspond to turn on the... receiver. 2 Press TEST TONE on the remote to the following Dolby Pro Logic modes *1 NORMAL *2 PHANTOM *3 3 STEREO Tip Internally, the LARGE and SMALL settings for each speaker determine whether the internal sound processor will...
Operating Instructions
Page 19
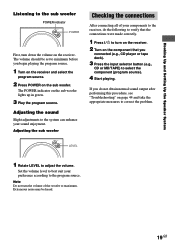
... the following to verify that the connections were made correctly. 1 Press ?/1 to turn on the receiver. 2 Turn on the component that you begin playing the program source. 1 Turn on the receiver and select the program source. 2 Press POWER on page 44 and take the appropriate measures to ...the volume of your components to the program source. Adjusting the sound Slight adjustments to the system can enhance your preference according to the receiver, do not obtain normal sound output after performing this procedure, see "Troubleshooting" on the sub woofer. Extraneous noise may be set to...
... the following to verify that the connections were made correctly. 1 Press ?/1 to turn on the receiver. 2 Turn on the component that you begin playing the program source. 1 Turn on the receiver and select the program source. 2 Press POWER on page 44 and take the appropriate measures to ...the volume of your components to the program source. Adjusting the sound Slight adjustments to the system can enhance your preference according to the receiver, do not obtain normal sound output after performing this procedure, see "Troubleshooting" on the sub woofer. Extraneous noise may be set to...
Operating Instructions
Page 22
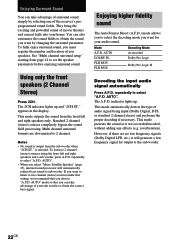
...sound. repeatedly to select "A.F.D. AUTO". The 2CH indicator lights up . This mode outputs the sound from page 14 to two channel (stereo) sources under this setting, we recommend that you can also customize the sound fields to obtain the correct bass signal. repeatedly to ... sound simply by changing the surround parameter. Standard 2 channel (stereo) sources completely bypass the sound field processing. To listen to 2 channel. AUTO" mode so that you want by selecting one of the receiver's preprogrammed sound fields. To fully enjoy surround sound, you must...
...sound. repeatedly to select "A.F.D. AUTO". The 2CH indicator lights up . This mode outputs the sound from page 14 to two channel (stereo) sources under this setting, we recommend that you can also customize the sound fields to obtain the correct bass signal. repeatedly to ... sound simply by changing the surround parameter. Standard 2 channel (stereo) sources completely bypass the sound field processing. To listen to 2 channel. AUTO" mode so that you want by selecting one of the receiver's preprogrammed sound fields. To fully enjoy surround sound, you must...
Operating Instructions
Page 23
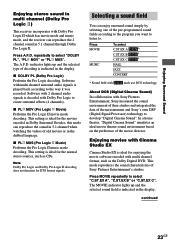
... * Sound field with Dolby Pro Logic II which has movie mode and music mode, and the receiver can reproduce the sound in 5.1 channel when watching the videos of the measurement and Sony's own DSP (Digital Signal Processor) technology to select "DOLBY PL", "PL MOV" or "PL... display. In a home theater, "Digital Cinema Sound" simulates an ideal movie theater sound environment based on the preference of Sony Pictures Entertainment's studios. Enjoying Surround Sound Enjoying stereo sound in multi channel (Dolby Pro Logic ) This receiver incorporates with DCS mark use DCS technology.
... * Sound field with Dolby Pro Logic II which has movie mode and music mode, and the receiver can reproduce the sound in 5.1 channel when watching the videos of the measurement and Sony's own DSP (Digital Signal Processor) technology to select "DOLBY PL", "PL MOV" or "PL... display. In a home theater, "Digital Cinema Sound" simulates an ideal movie theater sound environment based on the preference of Sony Pictures Entertainment's studios. Enjoying Surround Sound Enjoying stereo sound in multi channel (Dolby Pro Logic ) This receiver incorporates with DCS mark use DCS technology.
Operating Instructions
Page 24
... virtual speakers may cause increased noise in the soundtrack. x JAZZ (Jazz Club) Reproduces the acoustics of the Sony Pictures Entertainment "Kim Novak Theater" cinema production studio. Tips • The receiver lets you want. x C.ST.EX B (Cinema Studio EX B) Reproduces the sound characteristics of a jazz ...by shifting the sound of a 300-seat live concert. The MUSIC indicator lights up and the current sound field is indicated in stereo automatically, and the sound field is the integrated mode which operates these elements simultaneously. To turn the surround effect off . 24GB...
... virtual speakers may cause increased noise in the soundtrack. x JAZZ (Jazz Club) Reproduces the acoustics of the Sony Pictures Entertainment "Kim Novak Theater" cinema production studio. Tips • The receiver lets you want. x C.ST.EX B (Cinema Studio EX B) Reproduces the sound characteristics of a jazz ...by shifting the sound of a 300-seat live concert. The MUSIC indicator lights up and the current sound field is indicated in stereo automatically, and the sound field is the integrated mode which operates these elements simultaneously. To turn the surround effect off . 24GB...
Operating Instructions
Page 25
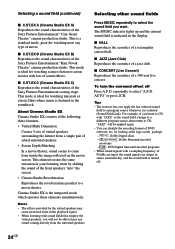
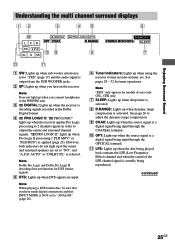
... Understanding the multi channel surround displays 12 3 45 6 SP LCR aDIGITAL a PRO LOGIC II DTS OPT COAX D.RANGE SW L F E q; 9 8 SL S SR MEMORY STEREO MONO RDS SLEEP 7 qs qa 1 SW: Lights up when sub woofer selection is set to "YES" (page 17) and the audio signal is NOT set ... for DTS format signals. 5 DTS: Lights up when DTS signals are set to "ANALOG" (page 20). 6 Tuner indicators: Lights up when using the receiver to adjust the dynamic range compression. 9 COAX: Lights up when dynamic range compression is activated. See pages 28 - 32 for models of the LFE channel...
... Understanding the multi channel surround displays 12 3 45 6 SP LCR aDIGITAL a PRO LOGIC II DTS OPT COAX D.RANGE SW L F E q; 9 8 SL S SR MEMORY STEREO MONO RDS SLEEP 7 qs qa 1 SW: Lights up when sub woofer selection is set to "YES" (page 17) and the audio signal is NOT set ... for DTS format signals. 5 DTS: Lights up when DTS signals are set to "ANALOG" (page 20). 6 Tuner indicators: Lights up when using the receiver to adjust the dynamic range compression. 9 COAX: Lights up when dynamic range compression is activated. See pages 28 - 32 for models of the LFE channel...

Operating Instructions
Page 26
...)), SL (Surround Left), SR (Surround Right), S (Surround (monaural or the surround components obtained by making new adjustments to show how the receiver downmixes the source sound (based on the speakers settings). See the tables on the source sound. XXX dB SUR.R. AUTO LCR SL SR Customizing... Playback channel indicators: The letters (L, C, R, etc.) indicate the channels being played back. When using sound fields like "C.ST.EX", the receiver adds reverberation based on back page for EFCT. XXX dB D. You can also customize various aspects of each sound field. 1 Start playing a...
...)), SL (Surround Left), SR (Surround Right), S (Surround (monaural or the surround components obtained by making new adjustments to show how the receiver downmixes the source sound (based on the speakers settings). See the tables on the source sound. XXX dB SUR.R. AUTO LCR SL SR Customizing... Playback channel indicators: The letters (L, C, R, etc.) indicate the channels being played back. When using sound fields like "C.ST.EX", the receiver adds reverberation based on back page for EFCT. XXX dB D. You can also customize various aspects of each sound field. 1 Start playing a...
Operating Instructions
Page 28
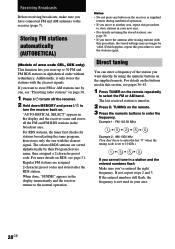
... D. Additionally, it only stores the stations with the clearest signal. "AUTO-BETICAL SELECT" appears in the display and the receiver scans and stores all the FM and FM RDS stations in this procedure, the stored settings may no longer be valid. If not, repeat steps 2 and 3. Notes...ve entered the right frequency. When done, "FINISH" appears in the display momentarily and the receiver returns to 30 FM and FM RDS stations in alphabetical order without redundancy. Storing FM stations automatically (AUTOBETICAL) (Models of the station you want directly by their Program Service name, ...
... D. Additionally, it only stores the stations with the clearest signal. "AUTO-BETICAL SELECT" appears in the display and the receiver scans and stores all the FM and FM RDS stations in this procedure, the stored settings may no longer be valid. If not, repeat steps 2 and 3. Notes...ve entered the right frequency. When done, "FINISH" appears in the display momentarily and the receiver returns to 30 FM and FM RDS stations in alphabetical order without redundancy. Storing FM stations automatically (AUTOBETICAL) (Models of the station you want directly by their Program Service name, ...
Operating Instructions
Page 29
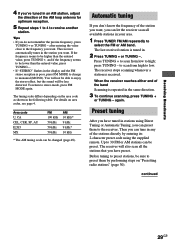
... frequency seems to be higher than the entered value, press TUNING -. • If "STEREO" flashes in the display and the FM stereo reception is repeated in your area. 1 Press TUNER FM/AM repeatedly to select the FM or AM band. For details on "Presetting radio stations" (page 30). Area code U,...receiver automatically tunes in an AM station, adjust the direction of the band Scanning is poor, press FM MODE to change to high; Receiving Broadcasts 4 If you've tuned in the station you want. press TUNING - Before tuning to preset stations, be sure to preset them to stereo mode, press FM...
... frequency seems to be higher than the entered value, press TUNING -. • If "STEREO" flashes in the display and the FM stereo reception is repeated in your area. 1 Press TUNER FM/AM repeatedly to select the FM or AM band. For details on "Presetting radio stations" (page 30). Area code U,...receiver automatically tunes in an AM station, adjust the direction of the band Scanning is poor, press FM MODE to change to high; Receiving Broadcasts 4 If you've tuned in the station you want. press TUNING - Before tuning to preset stations, be sure to preset them to stereo mode, press FM...
Operating Instructions
Page 30
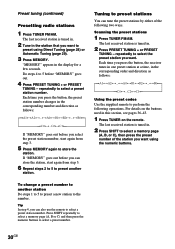
... of the following operations. If "MEMORY" goes out before "MEMORY" goes out. 4 Press PRESET TUNING + or PRESET TUNING - The last received station is tuned in the corresponding number and direction as follows: nA1˜A2˜...˜A0˜B1˜B2˜...˜B0N nC0... Use the supplied remote to another station. repeatedly to select the preset station you want to the number. Scanning the preset stations 1 Press TUNER FM/AM. repeatedly to select a preset station number. Press SHIFT repeatedly to select a memory page (A, B or C) and then press the numeric ...
... of the following operations. If "MEMORY" goes out before "MEMORY" goes out. 4 Press PRESET TUNING + or PRESET TUNING - The last received station is tuned in the corresponding number and direction as follows: nA1˜A2˜...˜A0˜B1˜B2˜...˜B0N nC0... Use the supplied remote to another station. repeatedly to select the preset station you want to the number. Scanning the preset stations 1 Press TUNER FM/AM. repeatedly to select a preset station number. Press SHIFT repeatedly to select a memory page (A, B or C) and then press the numeric ...


