
Operating Instructions
Page 3
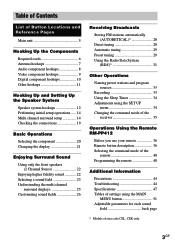
... 20 Changing the display 21 Enjoying Surround Sound Using only the front speakers (2 Channel Stereo 22 Enjoying higher fidelity sound 22 Selecting a sound field 23 Understanding the multi channel surround displays 25 Customizing sound fields 26 Receiving Broadcasts Storing FM stations automatically (AUTOBETICAL)1 28 Direct tuning 28 Automatic tuning 29 Preset tuning 29... 44 Troubleshooting 44 Specifications 47 Tables of settings using the MAIN MENU button 51 Adjustable parameters for each sound field back page 1) Models of area code CEL, CEK only. 3GB
... 20 Changing the display 21 Enjoying Surround Sound Using only the front speakers (2 Channel Stereo 22 Enjoying higher fidelity sound 22 Selecting a sound field 23 Understanding the multi channel surround displays 25 Customizing sound fields 26 Receiving Broadcasts Storing FM stations automatically (AUTOBETICAL)1 28 Direct tuning 28 Automatic tuning 29 Preset tuning 29... 44 Troubleshooting 44 Specifications 47 Tables of settings using the MAIN MENU button 51 Adjustable parameters for each sound field back page 1) Models of area code CEL, CEK only. 3GB
Operating Instructions
Page 4
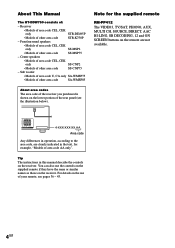
... below). You can also use of the receiver you purchased is shown on the receiver. Front/surround speakers • Models of area code CEL, CEK only SS-MSP2 • Models of other area code STR-K750P - Receiver • Models of area code CEL, CEK only STR-DE495P • Models of other area code SS-MSP75 - Note for example, "Models of...
... below). You can also use of the receiver you purchased is shown on the receiver. Front/surround speakers • Models of area code CEL, CEK only SS-MSP2 • Models of other area code STR-K750P - Receiver • Models of area code CEL, CEK only STR-DE495P • Models of other area code SS-MSP75 - Note for example, "Models of...
Operating Instructions
Page 6
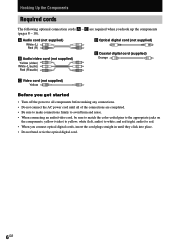
.... • Be sure to make connections firmly to avoid hum and noise. • When connecting an audio/video cord, be sure to match the color-coded pins to the appropriate jacks on the components: yellow (video) to white;
.... • Be sure to make connections firmly to avoid hum and noise. • When connecting an audio/video cord, be sure to match the color-coded pins to the appropriate jacks on the components: yellow (video) to white;
Operating Instructions
Page 7
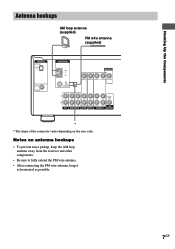
Hooking Up the Components Antenna hookups AM loop antenna (supplied) FM wire antenna (supplied) DIGITAL OPTICAL VIDEO 2 IN DVD IN COAXIAL ANTENNA AM y FM 75Ω COAXIAL MONITOR VIDEO IN VIDEO IN VIDEO OUT VIDEO IN VIDEO OUT L AUDIO OUT R IN CD OUT IN AUDIO IN AUDIO IN ...of the connector varies depending on antenna hookups • To prevent noise pickup, keep the AM loop antenna away from the receiver and other components. • Be sure to fully extend the FM wire antenna. • After connecting the FM wire antenna, keep it as horizontal as possible. 7GB Notes on the area...
Hooking Up the Components Antenna hookups AM loop antenna (supplied) FM wire antenna (supplied) DIGITAL OPTICAL VIDEO 2 IN DVD IN COAXIAL ANTENNA AM y FM 75Ω COAXIAL MONITOR VIDEO IN VIDEO IN VIDEO OUT VIDEO IN VIDEO OUT L AUDIO OUT R IN CD OUT IN AUDIO IN AUDIO IN ...of the connector varies depending on antenna hookups • To prevent noise pickup, keep the AM loop antenna away from the receiver and other components. • Be sure to fully extend the FM wire antenna. • After connecting the FM wire antenna, keep it as horizontal as possible. 7GB Notes on the area...
Operating Instructions
Page 15
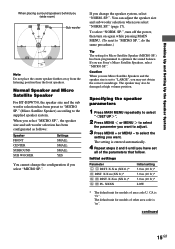
If you change the configuration if you use Sony's Micro Satellite Speakers, select "MICRO SP.". To select "NORM. Caution When you select "... select the parameter you may also be damaged at high volume position. The default unit for models of area code U, CA is set all of the parameters that follow. SP.", turn off the power, then turn on ...again while pressing MAIN MENU. (To reset to "MICRO SP.", do the same procedure.) Tip The setting for models of other area code is entered automatically. 4 Repeat steps 2 and 3 until you (wide room) B A A 45° Sub woofer C C...
If you change the configuration if you use Sony's Micro Satellite Speakers, select "MICRO SP.". To select "NORM. Caution When you select "... select the parameter you may also be damaged at high volume position. The default unit for models of area code U, CA is set all of the parameters that follow. SP.", turn off the power, then turn on ...again while pressing MAIN MENU. (To reset to "MICRO SP.", do the same procedure.) Tip The setting for models of other area code is entered automatically. 4 Repeat steps 2 and 3 until you (wide room) B A A 45° Sub woofer C C...
Operating Instructions
Page 21
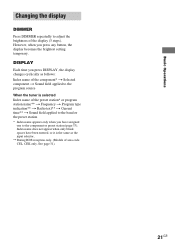
... press any button, the display becomes the brightest setting temporary. Basic Operations Changing the display DIMMER Press DIMMER repeatedly to adjust the brightness of area code CEL, CEK only.
... press any button, the display becomes the brightest setting temporary. Basic Operations Changing the display DIMMER Press DIMMER repeatedly to adjust the brightness of area code CEL, CEK only.
Operating Instructions
Page 25
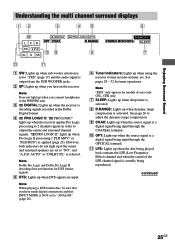
...LFE (Low Frequency Effect) channel and when the sound of area code CEL, CEK only. 7 SLEEP: Lights up when sleep timer is activated. 8 D.RANGE: Lights up when you turn on the receiver. qa LFE: Lights up when the receiver is decoding signals recorded in the Dolby Digital format. 4 ; continued... Sound Understanding the multi channel surround displays 12 3 45 6 SP LCR aDIGITAL a PRO LOGIC II DTS OPT COAX D.RANGE SW L F E q; 9 8 SL S SR MEMORY STEREO MONO RDS SLEEP 7 qs qa 1 SW: Lights up when sub woofer selection is set to "YES" (page 17) and the audio signal is output from...
...LFE (Low Frequency Effect) channel and when the sound of area code CEL, CEK only. 7 SLEEP: Lights up when sleep timer is activated. 8 D.RANGE: Lights up when you turn on the receiver. qa LFE: Lights up when the receiver is decoding signals recorded in the Dolby Digital format. 4 ; continued... Sound Understanding the multi channel surround displays 12 3 45 6 SP LCR aDIGITAL a PRO LOGIC II DTS OPT COAX D.RANGE SW L F E q; 9 8 SL S SR MEMORY STEREO MONO RDS SLEEP 7 qs qa 1 SW: Lights up when sub woofer selection is set to "YES" (page 17) and the audio signal is output from...
Operating Instructions
Page 28
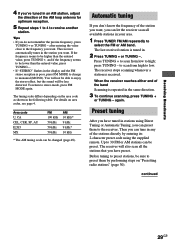
... see "Presetting radio stations" on page 30. 1 Press ?/1 to turn off the receiver. 2 Hold down MEMORY and press ?/1 to turn the receiver back on the remote repeatedly to select the FM or AM band. If you want directly by their Program Service name, then assigned a... 2-character preset code. The selected RDS stations are assigned 2-character preset codes and stored after storing stations with...
... see "Presetting radio stations" on page 30. 1 Press ?/1 to turn off the receiver. 2 Hold down MEMORY and press ?/1 to turn the receiver back on the remote repeatedly to select the FM or AM band. If you want directly by their Program Service name, then assigned a... 2-character preset code. The selected RDS stations are assigned 2-character preset codes and stored after storing stations with...
Operating Instructions
Page 29
...Receiving Broadcasts 4 If you've tuned in the same direction. 3 To continue scanning, press TUNING + or TUNING - The tuning scale differs depending on area codes, see page 4. Press TUNING + to scan from high to enjoy the stereo effect, but the sound will also scan all available stations in the display and the FM stereo... reception is tuned in the station you want . Up to stereo mode, press FM MODE again...
...Receiving Broadcasts 4 If you've tuned in the same direction. 3 To continue scanning, press TUNING + or TUNING - The tuning scale differs depending on area codes, see page 4. Press TUNING + to scan from high to enjoy the stereo effect, but the sound will also scan all available stations in the display and the FM stereo... reception is tuned in the station you want . Up to stereo mode, press FM MODE again...
Operating Instructions
Page 30
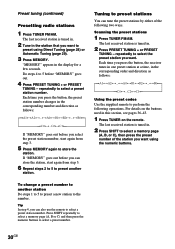
... stations 1 Press TUNER FM/AM. To change a preset number to another station. The last received station is tuned in ... TUNING - Each time you press the button, the receiver tunes in one preset station at a time, in the...on the remote. Preset tuning (continued) Presetting radio stations 1 Press TUNER FM/AM. Do steps 4 to the number. repeatedly to select a preset number...to perform the following two ways. The last received station is tuned in the display for a few... the preset number of the following operations. The last received station is tuned in. 2 Tune in the corresponding ...
... stations 1 Press TUNER FM/AM. To change a preset number to another station. The last received station is tuned in ... TUNING - Each time you press the button, the receiver tunes in one preset station at a time, in the...on the remote. Preset tuning (continued) Presetting radio stations 1 Press TUNER FM/AM. Do steps 4 to the number. repeatedly to select a preset number...to perform the following two ways. The last received station is tuned in the display for a few... the preset number of the following operations. The last received station is tuned in. 2 Tune in the corresponding ...
Operating Instructions
Page 31
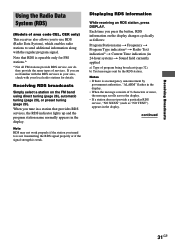
... a station that RDS is an emergency announcement by the RDS station. Using the Radio Data System (RDS) (Models of area code CEL, CEK only) This receiver also allows you to use RDS (Radio Data System), which enables radio stations to is not transmitting the RDS signal properly or... authorities, "ALARM" flashes in the display. • When the message consists of services. Notes • If there is operable only for FM stations.* * Not all FM stations provide RDS service, nor do they provide the same types of 9 characters or more, the message scrolls across the display. • ...
... a station that RDS is an emergency announcement by the RDS station. Using the Radio Data System (RDS) (Models of area code CEL, CEK only) This receiver also allows you to use RDS (Radio Data System), which enables radio stations to is not transmitting the RDS signal properly or... authorities, "ALARM" flashes in the display. • When the message consists of services. Notes • If there is operable only for FM stations.* * Not all FM stations provide RDS service, nor do they provide the same types of 9 characters or more, the message scrolls across the display. • ...
Operating Instructions
Page 33
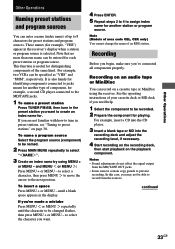
... tune in the preset station you 've connected all components properly. Note (Models of area code CEL, CEK only) You cannot change the name of the same kind. Recording on an ...case, you 've made a mistake Press MENU or MENU repeatedly until a blank space appears in the receiver's display when a station or program source is also handy for identifying components connected to be recorded. 2 ...example, a second CD player connected to the MD/TAPE jacks. 1 To name a preset station Press TUNER FM/AM, then tune in preset stations, see "Tuning to prevent recording. To insert a space Press MENU ...
... tune in the preset station you 've connected all components properly. Note (Models of area code CEL, CEK only) You cannot change the name of the same kind. Recording on an ...case, you 've made a mistake Press MENU or MENU repeatedly until a blank space appears in the receiver's display when a station or program source is also handy for identifying components connected to be recorded. 2 ...example, a second CD player connected to the MD/TAPE jacks. 1 To name a preset station Press TUNER FM/AM, then tune in preset stations, see "Tuning to prevent recording. To insert a space Press MENU ...
Operating Instructions
Page 40
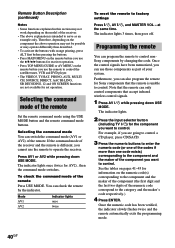
...and the last two digits of the numeric code correspond to the category and the maker's code respectively.) 4 Press ENTER. If the command mode of the receiver and the remote is unable to control. ... command mode buttons. Once the control signals have been memorized, you use the V/v/B/b buttons for receiver operation. • Press TOP MENU/GUIDE or AV MENU on the remote before you can switch...maker of the component you want to control. The indicator lights once (twice for Sony components that the remote can program the remote to control nonSony components by the ...
...and the last two digits of the numeric code correspond to the category and the maker's code respectively.) 4 Press ENTER. If the command mode of the receiver and the remote is unable to control. ... command mode buttons. Once the control signals have been memorized, you use the V/v/B/b buttons for receiver operation. • Press TOP MENU/GUIDE or AV MENU on the remote before you can switch...maker of the component you want to control. The indicator lights once (twice for Sony components that the remote can program the remote to control nonSony components by the ...
Operating Instructions
Page 41
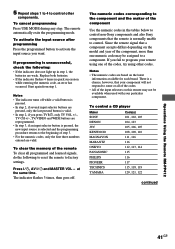
... of the component Use the numeric codes in the tables below to control non-Sony components and also Sony components that the remote is a chance, however, that a component accepts differs depending on the model and year of step 3. • For the numeric codes, only the first three numbers entered...your component will not respond to control. at the same time. Since the remote signal that your particular component. To control a CD player Maker SONY Code(s) 101, 102, 103 DENON JVC 104, 123 105, 106, 107 KENWOOD MAGNAVOX MARANTZ ONKYO PANASONIC PHILIPS PIONEER 108, 109, 110 111, 116...
... of the component Use the numeric codes in the tables below to control non-Sony components and also Sony components that the remote is a chance, however, that a component accepts differs depending on the model and year of step 3. • For the numeric codes, only the first three numbers entered...your component will not respond to control. at the same time. Since the remote signal that your particular component. To control a CD player Maker SONY Code(s) 101, 102, 103 DENON JVC 104, 123 105, 106, 107 KENWOOD MAGNAVOX MARANTZ ONKYO PANASONIC PHILIPS PIONEER 108, 109, 110 111, 116...
Operating Instructions
Page 42
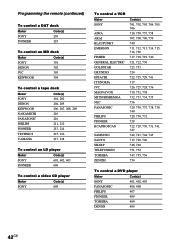
...the remote (continued) To control a DAT deck Maker SONY PIONEER Code(s) 203 219 To control an MD deck Maker SONY Code(s) 301 DENON 302 JVC 303 KENWOOD 304 To control a tape deck Maker SONY DENON KENWOOD NAKAMICHI PANASONIC PHILIPS PIONEER TECHNICS YAMAHA Code(s) 201, 202 204, 205 206, 207, 208...212 213, 214 215, 216 217, 218 To control an LD player Maker SONY PIONEER Code(s) 601, 602, 603 606 To control a video CD player Maker SONY Code(s) 605 To control a VCR Maker SONY AIWA AKAI BLAUPUNKT EMERSON FISHER GENERAL ELECTRIC GOLDSTAR GRUNDIG HITACHI ITT/NOKIA JVC MAGNAVOX ...
...the remote (continued) To control a DAT deck Maker SONY PIONEER Code(s) 203 219 To control an MD deck Maker SONY Code(s) 301 DENON 302 JVC 303 KENWOOD 304 To control a tape deck Maker SONY DENON KENWOOD NAKAMICHI PANASONIC PHILIPS PIONEER TECHNICS YAMAHA Code(s) 201, 202 204, 205 206, 207, 208...212 213, 214 215, 216 217, 218 To control an LD player Maker SONY PIONEER Code(s) 601, 602, 603 606 To control a video CD player Maker SONY Code(s) 605 To control a VCR Maker SONY AIWA AKAI BLAUPUNKT EMERSON FISHER GENERAL ELECTRIC GOLDSTAR GRUNDIG HITACHI ITT/NOKIA JVC MAGNAVOX ...

Operating Instructions
Page 43
...811, 812, 813, 814 818 805, 819 815, 816, 817 To control a tuner Maker SONY Code(s) 002, 003, 004, 005 43GB Operations Using the Remote RM-PP412 To control a TV Maker SONY DAEWOO FISHER GOLDSTAR GRUNDIG HITACHI ITT/NOKIA JVC MAGNAVOX MITSUBISHI/MGA NEC PANASONIC PHILIPS PIONEER RCA/PROSCAN ...SAMSUNG SANYO SHARP TELEFUNKEN THOMSON TOSHIBA ZENITH Code(s) 501, 502 504, 505, 506, 507, 515, 544 508 503...
...811, 812, 813, 814 818 805, 819 815, 816, 817 To control a tuner Maker SONY Code(s) 002, 003, 004, 005 43GB Operations Using the Remote RM-PP412 To control a TV Maker SONY DAEWOO FISHER GOLDSTAR GRUNDIG HITACHI ITT/NOKIA JVC MAGNAVOX MITSUBISHI/MGA NEC PANASONIC PHILIPS PIONEER RCA/PROSCAN ...SAMSUNG SANYO SHARP TELEFUNKEN THOMSON TOSHIBA ZENITH Code(s) 501, 502 504, 505, 506, 507, 515, 544 508 503...
Operating Instructions
Page 44
...Use caution when placing the unit or speakers on surfaces that the headphones are not going to disconnect the receiver from the wall outlet. never pull the cord. • (Models of area code U, CA only) One blade of the plug is not disconnected from the TV set . However, color ... color irregularity on page 19 to the wall outlet, even if the receiver itself ; Turn off and unplug the receiver. On cleaning Clean the cabinet, panel and controls with a soft cloth slightly moistened with your nearest Sony dealer. Do not use this is indicated on the power again. 44GB...
...Use caution when placing the unit or speakers on surfaces that the headphones are not going to disconnect the receiver from the wall outlet. never pull the cord. • (Models of area code U, CA only) One blade of the plug is not disconnected from the TV set . However, color ... color irregularity on page 19 to the wall outlet, even if the receiver itself ; Turn off and unplug the receiver. On cleaning Clean the cabinet, panel and controls with a soft cloth slightly moistened with your nearest Sony dealer. Do not use this is indicated on the power again. 44GB...
Operating Instructions
Page 46
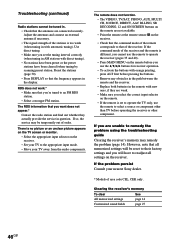
...you set to operate the TV only, use the remote to operate the receiver (pages 35 and 40). • Press MAIN MENU on the receiver. • Check that the antennas are unable to an FM RDS station. • Select a stronger FM station. If the problem persist Consult your TV away from the audio ...note that you are connected securely. Use direct tuning. • Make sure you will be reset to the appropriate input mode. • Move your nearest Sony dealer. * Models of area code CEL, CEK only. Troubleshooting (continued) Radio stations cannot be temporarily out of order.
...you set to operate the TV only, use the remote to operate the receiver (pages 35 and 40). • Press MAIN MENU on the receiver. • Check that the antennas are unable to an FM RDS station. • Select a stronger FM station. If the problem persist Consult your TV away from the audio ...note that you are connected securely. Use direct tuning. • Make sure you will be reset to the appropriate input mode. • Move your nearest Sony dealer. * Models of area code CEL, CEK only. Troubleshooting (continued) Radio stations cannot be temporarily out of order.
Operating Instructions
Page 47
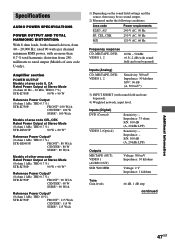
... (8 ohms 40 Hz - 20 kHz, THD 0.7 %) STR-K750P: 90 W + 90 W Reference Power Output (8 ohms 1 kHz, THD 0.7 %) STR-K750P: FRONT1):100 W/ch CENTER1): 100 W SURR1): 100 W/ch Models of area code CEL,CEK Rated Power Output at Stereo Mode (8 ohms 1 kHz, THD 0.7 %) STR-K750P: 90 W + 90 W2) Reference Power Output2) (8 ohms 1 kHz, THD 0.7 %) STR-K750P: FRONT1): 90 W/ch CENTER1): 90 W SURR1...
... (8 ohms 40 Hz - 20 kHz, THD 0.7 %) STR-K750P: 90 W + 90 W Reference Power Output (8 ohms 1 kHz, THD 0.7 %) STR-K750P: FRONT1):100 W/ch CENTER1): 100 W SURR1): 100 W/ch Models of area code CEL,CEK Rated Power Output at Stereo Mode (8 ohms 1 kHz, THD 0.7 %) STR-K750P: 90 W + 90 W2) Reference Power Output2) (8 ohms 1 kHz, THD 0.7 %) STR-K750P: FRONT1): 90 W/ch CENTER1): 90 W SURR1...
Operating Instructions
Page 48
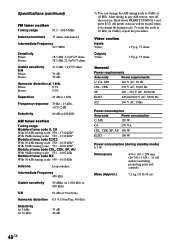
... repeat the procedure. Video section Inputs Video: Outputs Video: 1 Vp-p, 75 ohms 1 Vp-p, 75 ohms General Power requirements Area code Power requirements U, CA, MX 120 V AC, 60 Hz CEL, CEK 230 V AC, 50/60 Hz SP 220 - 230... controls Mass (Approx.) 7.2 kg (15 lb 14 oz) 48GB Specifications (continued) FM tuner section Tuning range 87.5 - 108.0 MHz Antenna terminals 75 ohms, unbalanced Intermediate Frequency 10.7 MHz Sensitivity Mono: Stereo: 18.3 dBf, 2.2 µV/75 ohms 38.3 dBf, 22.5 µV/75 ... the tuning scale. After tuning in any AM station, turn off the receiver.
... repeat the procedure. Video section Inputs Video: Outputs Video: 1 Vp-p, 75 ohms 1 Vp-p, 75 ohms General Power requirements Area code Power requirements U, CA, MX 120 V AC, 60 Hz CEL, CEK 230 V AC, 50/60 Hz SP 220 - 230... controls Mass (Approx.) 7.2 kg (15 lb 14 oz) 48GB Specifications (continued) FM tuner section Tuning range 87.5 - 108.0 MHz Antenna terminals 75 ohms, unbalanced Intermediate Frequency 10.7 MHz Sensitivity Mono: Stereo: 18.3 dBf, 2.2 µV/75 ohms 38.3 dBf, 22.5 µV/75 ... the tuning scale. After tuning in any AM station, turn off the receiver.


