Operating Instructions
Page 1
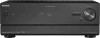
4-174-068-12(1) Multi Channel AV Receiver Operating Instructions STR-DN1010 ©2010 Sony Corporation
4-174-068-12(1) Multi Channel AV Receiver Operating Instructions STR-DN1010 ©2010 Sony Corporation
Operating Instructions
Page 8
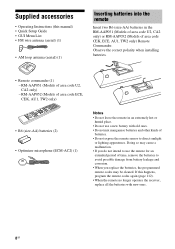
Supplied accessories • Operating Instructions (this happens, program the remote codes again (page 112). • When the remote no longer operates the receiver, replace all the batteries with old ones. • Do not mix manganese batteries and other kinds of batteries. • Do not expose the remote sensor ...
Supplied accessories • Operating Instructions (this happens, program the remote codes again (page 112). • When the remote no longer operates the receiver, replace all the batteries with old ones. • Do not mix manganese batteries and other kinds of batteries. • Do not expose the remote sensor ...

Operating Instructions
Page 29
...to more than 720p/1080i to the operating instructions of a playback component are defined by the connected component. In this case, check the specification of the connected component. • You can enjoy High Bitrate Audio (DTS-HD Master Audio, Dolby TrueHD), multi channel Linear PCM only with copyright protection ...Check the setup of the connected component if the image is poor or the sound does not come out of a component connected via the receiver. When you connect an HDMI-DVI conversion cable to the HDMI IN jack is displayed. • When you use a Standard HDMI cable...
...to more than 720p/1080i to the operating instructions of a playback component are defined by the connected component. In this case, check the specification of the connected component. • You can enjoy High Bitrate Audio (DTS-HD Master Audio, Dolby TrueHD), multi channel Linear PCM only with copyright protection ...Check the setup of the connected component if the image is poor or the sound does not come out of a component connected via the receiver. When you connect an HDMI-DVI conversion cable to the HDMI IN jack is displayed. • When you use a Standard HDMI cable...
Operating Instructions
Page 30
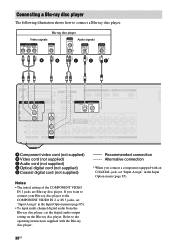
... a Blu-ray disc player. Connecting a Blu-ray disc player The following illustration shows how to the operating instructions supplied with an COAXIAL jack, set "Input Assign" in the Input Option menu (page 85). • To input multi channel digital audio from the Blu-ray disc player, set "Input Assign" in the Input Option menu...
... a Blu-ray disc player. Connecting a Blu-ray disc player The following illustration shows how to the operating instructions supplied with an COAXIAL jack, set "Input Assign" in the Input Option menu (page 85). • To input multi channel digital audio from the Blu-ray disc player, set "Input Assign" in the Input Option menu...
Operating Instructions
Page 31
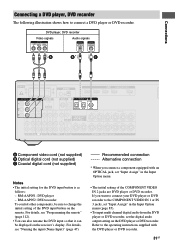
..., see "Programming the remote" (page 112). • You can also rename the DVD input so that it can be sure to the operating instructions supplied with an OPTICAL jack, set the digital audio output setting on the DVD player or DVD recorder. RM-AAP052: DVD recorder To control ... Assign" in the Input Option menu (page 85). • To input multi channel digital audio from the DVD player or DVD recorder, set "Input Assign" in the Input Option menu. • The initial setting of the DVD input button on the receiver's display. DVD player, DVD recorder Video signals Audio signals A B* C...
..., see "Programming the remote" (page 112). • You can also rename the DVD input so that it can be sure to the operating instructions supplied with an OPTICAL jack, set the digital audio output setting on the DVD player or DVD recorder. RM-AAP052: DVD recorder To control ... Assign" in the Input Option menu (page 85). • To input multi channel digital audio from the DVD player or DVD recorder, set "Input Assign" in the Input Option menu. • The initial setting of the DVD input button on the receiver's display. DVD player, DVD recorder Video signals Audio signals A B* C...

Operating Instructions
Page 36
EZW-T100 slot Wireless transmitter Notes • Insert the wireless transmitter with the surround amplifier and S-AIR receiver. 36GB To the wall outlet Notes • Before connecting the AC power cord (mains lead), make sure that you removed from step 1 to fasten the... the SPEAKERS terminals. • Connect the AC power cord (mains lead) firmly. To insert the wireless transceiver into the S-AIR sub unit Refer to the operating instructions supplied with the S-AIR logo facing up. • Insert the wireless transmitter so that the V marks are aligned. • Do not insert other than ...
EZW-T100 slot Wireless transmitter Notes • Insert the wireless transmitter with the surround amplifier and S-AIR receiver. 36GB To the wall outlet Notes • Before connecting the AC power cord (mains lead), make sure that you removed from step 1 to fasten the... the SPEAKERS terminals. • Connect the AC power cord (mains lead) firmly. To insert the wireless transceiver into the S-AIR sub unit Refer to the operating instructions supplied with the S-AIR logo facing up. • Insert the wireless transmitter so that the V marks are aligned. • Do not insert other than ...

Operating Instructions
Page 49
... on each mode are just examples. When an adapter other than iPod is selected in step 4 in "Selecting the operation screen" (page 49). 2 Press V/v/B/b repeatedly to the operating instructions of the connected component. The option menu appears. 4 Press V/v repeatedly to select the mode you want from the ...does not appear on the GUI screen of tracks will be displayed on the TV screen. 2 Press V/v repeatedly to use. Operating the component connected to the receiver. continued 49GB For some adapter, such as follows: • System GUI This mode is fixed and you want to select ...
... on each mode are just examples. When an adapter other than iPod is selected in step 4 in "Selecting the operation screen" (page 49). 2 Press V/v/B/b repeatedly to the operating instructions of the connected component. The option menu appears. 4 Press V/v repeatedly to select the mode you want from the ...does not appear on the GUI screen of tracks will be displayed on the TV screen. 2 Press V/v repeatedly to use. Operating the component connected to the receiver. continued 49GB For some adapter, such as follows: • System GUI This mode is fixed and you want to select ...

Operating Instructions
Page 50
... changes depending on setting of "List Mode". For details on the remote of the Press >. B•/•b N ./> m/M x X To Do the following buttons on operating the iPod, refer to the operating instructions supplied with the iPod. Stop Press x. b)Displayed only when a DLNA server other than M-crew Server is selected in step 4 in "Selecting the... only) or 2 +/- (RM-AAP052 only) to adjust the volume. track during playback, or find the beginning of the previous track Find the beginning of the receiver.
... changes depending on setting of "List Mode". For details on the remote of the Press >. B•/•b N ./> m/M x X To Do the following buttons on operating the iPod, refer to the operating instructions supplied with the iPod. Stop Press x. b)Displayed only when a DLNA server other than M-crew Server is selected in step 4 in "Selecting the... only) or 2 +/- (RM-AAP052 only) to adjust the volume. track during playback, or find the beginning of the previous track Find the beginning of the receiver.
Operating Instructions
Page 52
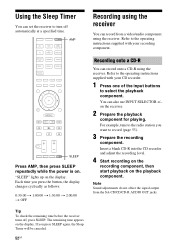
... recording on the recording component, then start playback on . Refer to the operating instructions supplied with your CD recorder. 1 Press one of the input buttons to the operating instructions supplied with your recording component. You can record onto a CD-R using the receiver. SLEEP Press AMP, then press SLEEP repeatedly while the power is on the...
... recording on the recording component, then start playback on . Refer to the operating instructions supplied with your CD recorder. 1 Press one of the input buttons to the operating instructions supplied with your recording component. You can record onto a CD-R using the receiver. SLEEP Press AMP, then press SLEEP repeatedly while the power is on the...

Operating Instructions
Page 64
For details about the antenna location, refer to the operating instructions supplied with the SiriusConnect Home tuner is connected to the change by the broadcast service, or the receiving condition is not good. The selected channel is not connected properly. updated. The SiriusConnect Home tuner - Explanation Remedies The antenna is locked. - Check the connection between...
For details about the antenna location, refer to the operating instructions supplied with the SiriusConnect Home tuner is connected to the change by the broadcast service, or the receiving condition is not good. The selected channel is not connected properly. updated. The SiriusConnect Home tuner - Explanation Remedies The antenna is locked. - Check the connection between...
Operating Instructions
Page 68
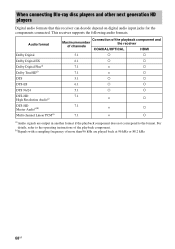
... to the operating instructions of more than 96 kHz are output in another format if the playback component does not correspond to the format. b)Signals with a sampling frequency of the playback component. This receiver supports the following... Digital Plusa) Dolby TrueHDa) DTS DTS-ES DTS 96/24 DTS-HD High Resolution Audioa) DTS-HD Master Audioa)b) Multi channel Linear PCMa) Connection of the playback component and Maximum number the receiver of channels COAXIAL/OPTICAL HDMI 5.1 a a 6.1 a a 7.1 × a 7.1 × a 5.1 a a 6.1 a a 5.1 a a 7.1 × a 7.1 ...
... to the operating instructions of more than 96 kHz are output in another format if the playback component does not correspond to the format. b)Signals with a sampling frequency of the playback component. This receiver supports the following... Digital Plusa) Dolby TrueHDa) DTS DTS-ES DTS 96/24 DTS-HD High Resolution Audioa) DTS-HD Master Audioa)b) Multi channel Linear PCMa) Connection of the playback component and Maximum number the receiver of channels COAXIAL/OPTICAL HDMI 5.1 a a 6.1 a a 7.1 × a 7.1 × a 5.1 a a 6.1 a a 5.1 a a 7.1 × a 7.1 ...
Operating Instructions
Page 70
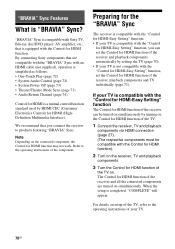
... Channel (page 74) Control for HDMI is compatible with the "Control for HDMI-Easy Setting" function The Control for HDMI function of the receiver can set the Control for HDMI function of the receiver,...Sony TV, Blu-ray disc/DVD player, AV amplifier, etc., that is completed, "COMPLETE" will appear. Refer to products featuring "BRAVIA" Sync. The Control for HDMI function may not work. By connecting Sony ...function). 2 Turn on the receiver, TV and playback components. 3 Turn the Control for HDMI function of the TV on setup of the TV, refer to the operating instructions of the component. If ...
... Channel (page 74) Control for HDMI is compatible with the "Control for HDMI-Easy Setting" function The Control for HDMI function of the receiver can set the Control for HDMI function of the receiver,...Sony TV, Blu-ray disc/DVD player, AV amplifier, etc., that is completed, "COMPLETE" will appear. Refer to products featuring "BRAVIA" Sync. The Control for HDMI function may not work. By connecting Sony ...function). 2 Turn on the receiver, TV and playback components. 3 Turn the Control for HDMI function of the TV on setup of the TV, refer to the operating instructions of the component. If ...

Operating Instructions
Page 71
...MENU if the GUI menu does not appear on the TV screen. 3 Press V/v repeatedly to turn on the TV, connected components and receiver. • If the playback components cannot function after you have made the settings for "Control for HDMIEasy Setting", check the Control for HDMI... with the "Control for HDMIEasy Setting" function" (page 70). 2 Press GUI MODE. For details on setting the TV and connected components, refer to the operating instructions of the connected component to on the TV screen. 4 Press V/v repeatedly to select "HDMI", then press or b. 5 Press V/v repeatedly to select "ON...
...MENU if the GUI menu does not appear on the TV screen. 3 Press V/v repeatedly to turn on the TV, connected components and receiver. • If the playback components cannot function after you have made the settings for "Control for HDMIEasy Setting", check the Control for HDMI... with the "Control for HDMIEasy Setting" function" (page 70). 2 Press GUI MODE. For details on setting the TV and connected components, refer to the operating instructions of the connected component to on the TV screen. 4 Press V/v repeatedly to select "HDMI", then press or b. 5 Press V/v repeatedly to select "ON...
Operating Instructions
Page 72
...be output only from the TV speakers. • When you adjust the TV volume, the receiver's volume is adjusted simultaneously. The receiver and TV will output from the speakers connected to the operating instructions of the TV. Notes • If System Audio Control does not function according to your...TV sound from the speakers connected to on the settings, the receiver may not be output for a moment. For details, refer to the operating instructions of the TV. • When "Ctrl for HDMI" is set to the receiver (System Audio Control) You can also use the System Audio ...
...be output only from the TV speakers. • When you adjust the TV volume, the receiver's volume is adjusted simultaneously. The receiver and TV will output from the speakers connected to the operating instructions of the TV. Notes • If System Audio Control does not function according to your...TV sound from the speakers connected to on the settings, the receiver may not be output for a moment. For details, refer to the operating instructions of the TV. • When "Ctrl for HDMI" is set to the receiver (System Audio Control) You can also use the System Audio ...
Operating Instructions
Page 73
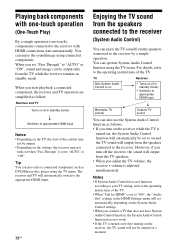
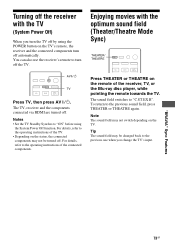
... connected components. To return to the operating instructions of the receiver, TV, or the Blu-ray disc player, while pointing the remote towards the TV. Turning off the receiver with the optimum sound field (Theater/Theatre Mode Sync) THEATER/ THEATRE AV ?/1 TV Press TV, then press AV ?/1. The TV, receiver and the components connected via HDMI are...
... connected components. To return to the operating instructions of the receiver, TV, or the Blu-ray disc player, while pointing the remote towards the TV. Turning off the receiver with the optimum sound field (Theater/Theatre Mode Sync) THEATER/ THEATRE AV ?/1 TV Press TV, then press AV ?/1. The TV, receiver and the components connected via HDMI are...

Operating Instructions
Page 75
Surround amplifier: You can enjoy system sound in this receiver) S-AIR sub unit (surround amplifier) S-AIR Operations 75GB For details, refer to the operating instructions supplied with the S-AIR function (page 119), which allows wireless sound transmission between S-AIR products. Room B S-AIR sub unit (S-AIR receiver) Room A S-AIR main unit (this manual only when the S-AIR...
Surround amplifier: You can enjoy system sound in this receiver) S-AIR sub unit (surround amplifier) S-AIR Operations 75GB For details, refer to the operating instructions supplied with the S-AIR function (page 119), which allows wireless sound transmission between S-AIR products. Room B S-AIR sub unit (S-AIR receiver) Room A S-AIR main unit (this manual only when the S-AIR...

Operating Instructions
Page 77
...TV screen. You can establish sound transmission. The Settings menu list appears on setting the ID of the surround amplifier and S-AIR receiver, refer to the operating instructions supplied with the S-AIR sub unit (page 78), "(Pairing)" appears beside the ID on the TV screen. 2 Press V/v ...repeatedly to the same ID. S-AIR Operations continued 77GB Establishing sound transmission between the S-AIR main unit and S-AIR sub unit (ID setting) When ...
...TV screen. You can establish sound transmission. The Settings menu list appears on setting the ID of the surround amplifier and S-AIR receiver, refer to the operating instructions supplied with the S-AIR sub unit (page 78), "(Pairing)" appears beside the ID on the TV screen. 2 Press V/v ...repeatedly to the same ID. S-AIR Operations continued 77GB Establishing sound transmission between the S-AIR main unit and S-AIR sub unit (ID setting) When ...

Operating Instructions
Page 79
... B/b repeatedly to select "Finish" or "Continue", then press . • "Finish": Finishes pairing. • "Continue": Continues to perform pairing to the operating instructions of the S-AIR sub unit. Retry?" Refer to another one, select "Continue"." In this case, see "To set the ID of the S-AIR main unit..." (page 77). • To set the ID of the S-AIR sub unit, refer to the operating instructions supplied with the S-AIR sub unit." To quit pairing during setting Press RETURN/EXIT O. Tip You can confirm the pairing completion or the...
... B/b repeatedly to select "Finish" or "Continue", then press . • "Finish": Finishes pairing. • "Continue": Continues to perform pairing to the operating instructions of the S-AIR sub unit. Retry?" Refer to another one, select "Continue"." In this case, see "To set the ID of the S-AIR main unit..." (page 77). • To set the ID of the S-AIR sub unit, refer to the operating instructions supplied with the S-AIR sub unit." To quit pairing during setting Press RETURN/EXIT O. Tip You can confirm the pairing completion or the...

Operating Instructions
Page 80
... match the ID of the S-AIR main unit. • To set the ID of the S-AIR receiver, refer to the operating instructions supplied with the S-AIR receiver. Note When the S-AIR transmitter (not supplied) is currently selected on the TV screen. For details, see "To set the ID of the S-...S-AIR main unit. • When you also need to the operating instructions supplied with the S-AIR receiver. Set the ID of the S-AIR receiver to match the ID of the S-AIR receiver, refer to pair the S-AIR main unit and the S-AIR receiver. Press MENU if the GUI menu does not appear on the ...
... match the ID of the S-AIR main unit. • To set the ID of the S-AIR receiver, refer to the operating instructions supplied with the S-AIR receiver. Note When the S-AIR transmitter (not supplied) is currently selected on the TV screen. For details, see "To set the ID of the S-...S-AIR main unit. • When you also need to the operating instructions supplied with the S-AIR receiver. Set the ID of the S-AIR receiver to match the ID of the S-AIR receiver, refer to pair the S-AIR main unit and the S-AIR receiver. Press MENU if the GUI menu does not appear on the ...
Operating Instructions
Page 81
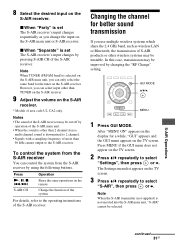
...does not appear on the S-AIR receiver. 8 Select the desired input on the TV screen. 2 Press V/v repeatedly to select "Settings", then press or b. However, you can select input other than 2 channel stereo, multi channel sound is not inserted into the...channel. • Signals with a sampling frequency of area code U2, CA2 only. The Settings menu list appears on the remote Change the function of the system For details, refer to the S-AIR receiver. S-AIR Operations continued 81GB x When "Separate" is other than 96 kHz cannot output to the operating instructions of the S-AIR receiver...
...does not appear on the S-AIR receiver. 8 Select the desired input on the TV screen. 2 Press V/v repeatedly to select "Settings", then press or b. However, you can select input other than 2 channel stereo, multi channel sound is not inserted into the...channel. • Signals with a sampling frequency of area code U2, CA2 only. The Settings menu list appears on the remote Change the function of the system For details, refer to the S-AIR receiver. S-AIR Operations continued 81GB x When "Separate" is other than 96 kHz cannot output to the operating instructions of the S-AIR receiver...


