Sony SRG120DU Research
Related Manual Pages


Related Videos

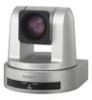
Kamera Sony SRG120DU
Duration: 8:25
Total Views: 389
Duration: 8:25
Total Views: 389
Tutorial To Take Apart and Repair Sony SRG-120DU High Definition PTZ Web Conference Camera
Duration: 22:05
Total Views: 112
Duration: 22:05
Total Views: 112
Sony SRG-120DU error
Duration: :18
Total Views: 330
Duration: :18
Total Views: 330
Similar Questions

How To Fix Standby Mode?
Camera cannot be detected and the standby LED kept on blinking. I resetting the PAN Tilt using the r...
Camera cannot be detected and the standby LED kept on blinking. I resetting the PAN Tilt using the r...
(Posted by leslievallega 7 years ago)


How To Recover Picturs Movie Snaps From Hard Disc Of Handy Cam Dcr Sr-68 ....
how to recover picturs movie snaps from Hard Disc of Handy Cam DCR sr-68 which i couls not download ...
how to recover picturs movie snaps from Hard Disc of Handy Cam DCR sr-68 which i couls not download ...
(Posted by chandrasanketi 11 years ago)
My Dcr-trv22e Handycam Problem Is Focus Out Recording Time.
I have a Sony Digital Video camera recorder Model DCR-TRV22E,My handycam problem is focus out record...
I have a Sony Digital Video camera recorder Model DCR-TRV22E,My handycam problem is focus out record...
(Posted by pkmjmc 11 years ago)