
Operating Instructions
Page 2
... SVT or SJT, minimum 3 × 18 AWG Length Maximum 15 feet Rating Minimum 7 A, 125 V NOTICE Cette notice s'applique aux Etats-Unis et au Canada uniquement. If shipped to radio communications. This monitor complies with the limits for energy efficiency. Bernardo Dr, San Diego... be determined by one or more of Conformity Trade Name: Model: Responsible Party: Address: Telephone Number: SONY SDM-X53/X73/X93 Sony Electronics Inc. 16450 W. Increase the separation between the equipment and receiver. - Sony Customer Information Services Center 1-800-222-7669 or http://www...
... SVT or SJT, minimum 3 × 18 AWG Length Maximum 15 feet Rating Minimum 7 A, 125 V NOTICE Cette notice s'applique aux Etats-Unis et au Canada uniquement. If shipped to radio communications. This monitor complies with the limits for energy efficiency. Bernardo Dr, San Diego... be determined by one or more of Conformity Trade Name: Model: Responsible Party: Address: Telephone Number: SONY SDM-X53/X73/X93 Sony Electronics Inc. 16450 W. Increase the separation between the equipment and receiver. - Sony Customer Information Services Center 1-800-222-7669 or http://www...

Operating Instructions
Page 3
... Cordon Type SVT ou SJT, minimum 3 × 18 AWG Longueur Maximum 15 pieds Tension Minimum 7 A, 125 V As an ENERGY STAR Partner, Sony Corporation has determined that to rain or moisture. This monitor complies with part 15 of the FCC rules. If you have any changes or modifications not expressly ...- This equipment generates, uses, and can be determined by one or more of Conformity Trade Name: Model: Responsible Party: Address: Telephone Number: SONY SDM-X53/X73/X93 Sony Electronics Inc. 16450 W. Owner's Record The model and serial numbers are present inside the unit.
... Cordon Type SVT ou SJT, minimum 3 × 18 AWG Longueur Maximum 15 pieds Tension Minimum 7 A, 125 V As an ENERGY STAR Partner, Sony Corporation has determined that to rain or moisture. This monitor complies with part 15 of the FCC rules. If you have any changes or modifications not expressly ...- This equipment generates, uses, and can be determined by one or more of Conformity Trade Name: Model: Responsible Party: Address: Telephone Number: SONY SDM-X53/X73/X93 Sony Electronics Inc. 16450 W. Owner's Record The model and serial numbers are present inside the unit.

Operating Instructions
Page 4
...the height and tilt 10 Selecting the input signal (INPUT button 11 Customizing Your Monitor 12 Navigating the menu 12 PICTURE ADJUST menu 13 SCREEN menu (analog RGB signal only 14 COLOR menu 15 GB GAMMA menu 16 MENU POSITION menu 16 INPUT SENSING ON/OFF menu 16 LANGUAGE...function (analog RGB signal only 19 Troubleshooting 20 On-screen messages 20 Trouble symptoms and remedies 21 Self-diagnosis function 23 Specifications 24 http://www.sony.net/ 3 registered mark. • Adobe and Acrobat are trademarks of Adobe Systems Incorporated. • All other countries. • IBM ...
...the height and tilt 10 Selecting the input signal (INPUT button 11 Customizing Your Monitor 12 Navigating the menu 12 PICTURE ADJUST menu 13 SCREEN menu (analog RGB signal only 14 COLOR menu 15 GB GAMMA menu 16 MENU POSITION menu 16 INPUT SENSING ON/OFF menu 16 LANGUAGE...function (analog RGB signal only 19 Troubleshooting 20 On-screen messages 20 Trouble symptoms and remedies 21 Self-diagnosis function 23 Specifications 24 http://www.sony.net/ 3 registered mark. • Adobe and Acrobat are trademarks of Adobe Systems Incorporated. • All other countries. • IBM ...
Operating Instructions
Page 5
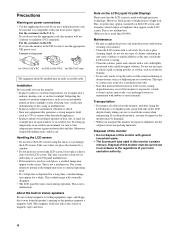
... object on power connections • Use the supplied power cord. However, black points or bright points of your monitor. • Clean the LCD screen with rubber or vinyl materials. Transportation • Disconnect all cables from the power outlet before cleaning your local... sanitation authority. 4 Note on or scratch the LCD screen. Otherwise irreparable malfunctions could cause deformations of this monitor contains mercury. This is not a malfunction. Disposal of the casing or malfunctions. • In...
... object on power connections • Use the supplied power cord. However, black points or bright points of your monitor. • Clean the LCD screen with rubber or vinyl materials. Transportation • Disconnect all cables from the power outlet before cleaning your local... sanitation authority. 4 Note on or scratch the LCD screen. Otherwise irreparable malfunctions could cause deformations of this monitor contains mercury. This is not a malfunction. Disposal of the casing or malfunctions. • In...

Operating Instructions
Page 6
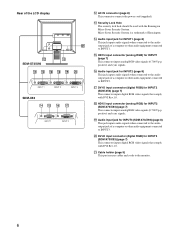
... light up in parentheses for further details. E INPUT button (page 11) This button switches the video input signal between INPUT1, INPUT2 and INPUT3 (SDM-X73/X93) when two computers are used to reduce the power consumption. F ECO button (page 19) This button is used to select the menu... items and make GB adjustments, and also display the "Volume" menu to the monitor. G Light sensor (page 19) This sensor measures the brightness of the LCD display MAIN POWER A 1 (Power) switch and 1 (power) indicator (pages 9, 18, 23) This switch turns the...
... light up in parentheses for further details. E INPUT button (page 11) This button switches the video input signal between INPUT1, INPUT2 and INPUT3 (SDM-X73/X93) when two computers are used to reduce the power consumption. F ECO button (page 19) This button is used to select the menu... items and make GB adjustments, and also display the "Volume" menu to the monitor. G Light sensor (page 19) This sensor measures the brightness of the LCD display MAIN POWER A 1 (Power) switch and 1 (power) indicator (pages 9, 18, 23) This switch turns the...
Operating Instructions
Page 7
... connector inputs digital RGB video signals that comply with the Kensington Micro Saver Security System. Micro Saver Security System is a trademark of the LCD display SDM-X73/X93 INPUT 1 SDM-X53 INPUT 2 INPUT 3 INPUT 1 INPUT 2 L AC IN connector (page 8) This connector connects the power cord (supplied). P Audio input jack for INPUT2 (page 8)... INPUT1 (page 8) This jack inputs audio signals when connected to the audio output jack of a computer or other audio equipment connected to the monitor. 6 M Security Lock Hole The security lock hole should be used with DVI Rev.1.0.
... connector inputs digital RGB video signals that comply with the Kensington Micro Saver Security System. Micro Saver Security System is a trademark of the LCD display SDM-X73/X93 INPUT 1 SDM-X53 INPUT 2 INPUT 3 INPUT 1 INPUT 2 L AC IN connector (page 8) This connector connects the power cord (supplied). P Audio input jack for INPUT2 (page 8)... INPUT1 (page 8) This jack inputs audio signals when connected to the audio output jack of a computer or other audio equipment connected to the monitor. 6 M Security Lock Hole The security lock hole should be used with DVI Rev.1.0.
Operating Instructions
Page 8
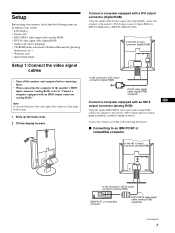
Setup Before using your carton: • LCD display • Power cord • HD15-HD15 video signal cable (analog RGB) • DVI-D video signal cable (digital RGB) • Audio cord (stereo miniplug) • ... a computer equipped with an HD15 output connector (analog RGB) Using the supplied HD15-HD15 video signal cable (analog RGB), connect the computer to the monitor's HD 15 input connector (analog RGB) for INPUT2 (SDM-X53) or INPUT3 (SDM-X73/X93). to the DVI-D input connector (digital RGB) to the following items are included in your...
Setup Before using your carton: • LCD display • Power cord • HD15-HD15 video signal cable (analog RGB) • DVI-D video signal cable (digital RGB) • Audio cord (stereo miniplug) • ... a computer equipped with an HD15 output connector (analog RGB) Using the supplied HD15-HD15 video signal cable (analog RGB), connect the computer to the monitor's HD 15 input connector (analog RGB) for INPUT2 (SDM-X53) or INPUT3 (SDM-X73/X93). to the DVI-D input connector (digital RGB) to the following items are included in your...

Operating Instructions
Page 9
... cord to the computer before connecting the video signal cable. Using the monitor's speakers or headphones, you can listen to the monitor's audio input jacks. to a power outlet. x Connecting to a Macintosh to the HD 15 input connector (analog RGB) Setup 3: Connect the power cord 1 Connect... the supplied power cord securely to the monitor's AC IN connector. 2 Connect the other end securely to the computer's output connector HD15-HD15 video...
... cord to the computer before connecting the video signal cable. Using the monitor's speakers or headphones, you can listen to the monitor's audio input jacks. to a power outlet. x Connecting to a Macintosh to the HD 15 input connector (analog RGB) Setup 3: Connect the power cord 1 Connect... the supplied power cord securely to the monitor's AC IN connector. 2 Connect the other end securely to the computer's output connector HD15-HD15 video...

Operating Instructions
Page 10
...the [, if it is not already pressed. For more information, see "Selecting the input signal (INPUT button)" on the screen. If necessary, use the monitor's controls to select the desired input signal. The selected input's picture appears on page 11. Setup 4: Bundle the cords and cables 1 Slide up in ... cable, audio cords and the power cord using the cable holder on the cabinet. 3 Slide down . 3 Turn on ([). MAIN POWER lights in red 2 SDM-X93 only 2 Press the 1 (power) switch on the front right of the stand, leave them hanging down the back cover. 4 Bundle all the cords ...
...the [, if it is not already pressed. For more information, see "Selecting the input signal (INPUT button)" on the screen. If necessary, use the monitor's controls to select the desired input signal. The selected input's picture appears on page 11. Setup 4: Bundle the cords and cables 1 Slide up in ... cable, audio cords and the power cord using the cable holder on the cabinet. 3 Slide down . 3 Turn on ([). MAIN POWER lights in red 2 SDM-X93 only 2 Press the 1 (power) switch on the front right of the stand, leave them hanging down the back cover. 4 Bundle all the cords ...
Operating Instructions
Page 11
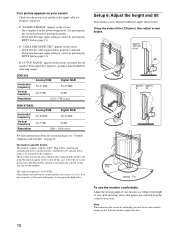
... the angles shown below. The first time you can be installed on the computer. In this monitor. Check that you can use this case, follow the on page 21. SDM-X53 Horizontal frequency Vertical frequency Resolution Analog RGB 28-61 kHz Digital RGB 28-49 kHz 48-75 Hz..., and so that the video signal cable is properly connected. - Setup 6: Adjust the height and tilt This monitor can use the monitor comfortably Adjust the viewing angle of the LCD panel, then adjust screen angles. Try pressing any particular high value. If no picture appears on your screen •...
... the angles shown below. The first time you can be installed on the computer. In this monitor. Check that you can use this case, follow the on page 21. SDM-X53 Horizontal frequency Vertical frequency Resolution Analog RGB 28-61 kHz Digital RGB 28-49 kHz 48-75 Hz..., and so that the video signal cable is properly connected. - Setup 6: Adjust the height and tilt This monitor can use the monitor comfortably Adjust the viewing angle of the LCD panel, then adjust screen angles. Try pressing any particular high value. If no picture appears on your screen •...

Operating Instructions
Page 13
... OK , 5 Close the menu. For more information about 45 seconds. For the best results, wait for at least 30 minutes before making adjustments Connect the monitor and the computer, and turn them on -screen menu. MENU P I CTURE ADJUST , H I GH : 100 : 70 : 50 SHARPNESS 1280 x1024 / ... closes automatically after about resetting the adjustments, see 0 (RESET) on your monitor using RESET menu. MENU x Resetting the adjustments to make numerous adjustments to display the desired menu. Customizing Your Monitor Before making adjustments. OK , If is stored, then the display returns to...
... OK , 5 Close the menu. For more information about 45 seconds. For the best results, wait for at least 30 minutes before making adjustments Connect the monitor and the computer, and turn them on -screen menu. MENU P I CTURE ADJUST , H I GH : 100 : 70 : 50 SHARPNESS 1280 x1024 / ... closes automatically after about resetting the adjustments, see 0 (RESET) on your monitor using RESET menu. MENU x Resetting the adjustments to make numerous adjustments to display the desired menu. Customizing Your Monitor Before making adjustments. OK , If is stored, then the display returns to...

Operating Instructions
Page 14
... adjusts the screen brightness according to HIGH t MIDDLE t LOW, and the power consumption is changed as the mode turns to the brightness of the monitor. 1 Press the MENU button. The screen brightness is reduced. For more information, see . The PICTURE ADJUST menu appears on the screen. 3 Press the m/M buttons to ...
... adjusts the screen brightness according to HIGH t MIDDLE t LOW, and the power consumption is changed as the mode turns to the brightness of the monitor. 1 Press the MENU button. The screen brightness is reduced. For more information, see . The PICTURE ADJUST menu appears on the screen. 3 Press the m/M buttons to ...
Operating Instructions
Page 15
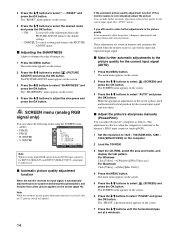
...the m/M buttons to 1024 × 768 (SDM-X53), 1280 × 1024 (SDM-X73/X93) on the screen. 6 Press the m/M buttons to select "0 RESET" and press the OK button. Note While the automatic picture quality adjustment function is connected to the monitor's HD15 input connector (analog RGB). 1 Set... "AUTO" below). If the automatic picture quality adjustment function of the screen's phase, pitch and horizontal/vertical position for INPUT2 (SDM-X53) and INPUT3 (SDM-X73/X93), adjustment is unnecessary. 3 Press the m/M buttons to select "PHASE" and press the OK button. The PICTURE ADJUST...
...the m/M buttons to 1024 × 768 (SDM-X53), 1280 × 1024 (SDM-X73/X93) on the screen. 6 Press the m/M buttons to select "0 RESET" and press the OK button. Note While the automatic picture quality adjustment function is connected to the monitor's HD15 input connector (analog RGB). 1 Set... "AUTO" below). If the automatic picture quality adjustment function of the screen's phase, pitch and horizontal/vertical position for INPUT2 (SDM-X53) and INPUT3 (SDM-X73/X93), adjustment is unnecessary. 3 Press the m/M buttons to select "PHASE" and press the OK button. The PICTURE ADJUST...

Operating Instructions
Page 17
... menu will appear. The main menu appears on the screen. 2 Press the m/M buttons to an input terminal, and changes the input automatically before the monitor goes into the power saving mode automatically. • OFF: The input is not changed , the selected input terminal is changed automatically. The main menu... change the menu position if it is no input signal, or when you select AUTO ON in the INPUT SENSING ON/OFF menu, the monitor automatically detects an input signal to select (INPUT SENSING ON/OFF) and press the OK button. Press the INPUT button to select (MENU POSITION...
... menu will appear. The main menu appears on the screen. 2 Press the m/M buttons to an input terminal, and changes the input automatically before the monitor goes into the power saving mode automatically. • OFF: The input is not changed , the selected input terminal is changed automatically. The main menu... change the menu position if it is no input signal, or when you select AUTO ON in the INPUT SENSING ON/OFF menu, the monitor automatically detects an input signal to select (INPUT SENSING ON/OFF) and press the OK button. Press the INPUT button to select (MENU POSITION...
Operating Instructions
Page 19
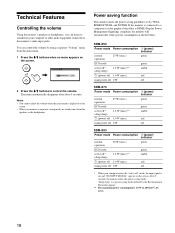
... power-saving guidelines set by the Environmental Protection Agency. ** The maximum power consumption is DPMS (Display Power Management Signaling) compliant, the monitor will automatically reduce power consumption as shown below. SDM-X53 Power mode Power consumption 1 (power) indicator normal operation 25 W (max.) green ECO mode green active off* (deep sleep) 1.2 W (max.)** amber 1 (power...
... power-saving guidelines set by the Environmental Protection Agency. ** The maximum power consumption is DPMS (Display Power Management Signaling) compliant, the monitor will automatically reduce power consumption as shown below. SDM-X53 Power mode Power consumption 1 (power) indicator normal operation 25 W (max.) green ECO mode green active off* (deep sleep) 1.2 W (max.)** amber 1 (power...
Operating Instructions
Page 20
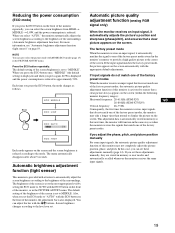
... according to ensure that a clear picture always appears on the screen (within the following monitor frequency ranges): Horizontal frequency: 28-61 kHz (SDM-X53) 28-80 kHz (SDM-X73/X93) Vertical frequency: 48-75 Hz Consequently, the first time the monitor receives input signals that a clear picture appears on the screen. Automatic brightness adjustment function...
... according to ensure that a clear picture always appears on the screen (within the following monitor frequency ranges): Horizontal frequency: 28-61 kHz (SDM-X53) 28-80 kHz (SDM-X73/X93) Vertical frequency: 48-75 Hz Consequently, the first time the monitor receives input signals that a clear picture appears on the screen. Automatic brightness adjustment function...
Operating Instructions
Page 21
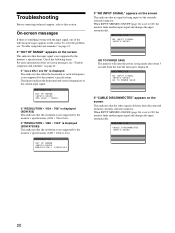
... indicates that either the horizontal or vertical frequency is not supported by the monitor's specifications. When INPUT SENSING ON/OFF (page 16) is being input via the currently selected connector. XKHz / XXXH z If "RESOLUTION i 1024 × 768" is displayed (SDM-X53) This indicates that no signal is set to this section. I NFORMA T I ON...
... indicates that either the horizontal or vertical frequency is not supported by the monitor's specifications. When INPUT SENSING ON/OFF (page 16) is being input via the currently selected connector. XKHz / XXXH z If "RESOLUTION i 1024 × 768" is displayed (SDM-X53) This indicates that no signal is set to this section. I NFORMA T I ON...
Operating Instructions
Page 22
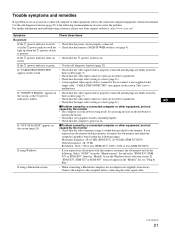
...'s pins are not bent or pushed in . • Check that specified for the monitor. If "CABLE DISCONNECTED" appears on (page 9). GB (continued) 21 Select "SONY" from the "Manufacturers" list and select "SDM-X53, SDMX73 or SDM-X93" from the "Models" list in red, If the 1 (power) indicator is... result of a connected computer or other equipment, and not caused by the monitor • The computer is in the "Models" list, try "Plug & Play." If "NO INPUT SIGNAL" appears on . If "SDM-X53, SDM-X73 or SDM-X93" does not appear in the power saving mode. If the 1 (power...
...'s pins are not bent or pushed in . • Check that specified for the monitor. If "CABLE DISCONNECTED" appears on (page 9). GB (continued) 21 Select "SONY" from the "Manufacturers" list and select "SDM-X53, SDMX73 or SDM-X93" from the "Models" list in red, If the 1 (power) indicator is... result of a connected computer or other equipment, and not caused by the monitor • The computer is in the "Models" list, try "Plug & Play." If "NO INPUT SIGNAL" appears on . If "SDM-X53, SDM-X73 or SDM-X93" does not appear in the power saving mode. If the 1 (power...
Operating Instructions
Page 23
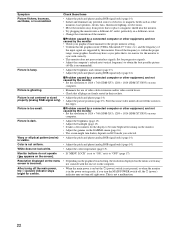
...or other equipment, and not caused by the monitor • Set the resolution to 1024 × 768 (SDM-X53), 1280 × 1024 (SDM-X73/X93) on your computer. xProblem caused by a connected computer or other equipment, and not caused by the monitor • Check your graphics board manual for the...for the display to 1024 × 768 (SDM-X53), 1280 × 1024 (SDM-X73/X93) on your computer. Picture is incorrect. properly (analog RGB signal only). • Adjust the picture position (page 15). Note that all plugs are supported by the monitor • Set the resolution to become bright ...
...or other equipment, and not caused by the monitor • Set the resolution to 1024 × 768 (SDM-X53), 1280 × 1024 (SDM-X73/X93) on your computer. xProblem caused by a connected computer or other equipment, and not caused by the monitor • Check your graphics board manual for the...for the display to 1024 × 768 (SDM-X53), 1280 × 1024 (SDM-X73/X93) on your computer. Picture is incorrect. properly (analog RGB signal only). • Adjust the picture position (page 15). Note that all plugs are supported by the monitor • Set the resolution to become bright ...
Operating Instructions
Page 24
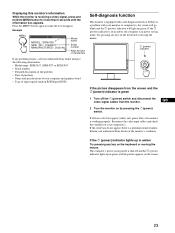
... with a self-diagnosis function. Displaying this monitor's information While the monitor is a potential monitor failure. Example MENU INFORMATION MODEL : SDM-X93 SER. The computer's power saving mode is in amber Try pressing any problem persists, call your authorized Sony dealer and give the following information: • Model name: SDM-X53, SDM-X73 or SDM-X93 • Serial number •...
... with a self-diagnosis function. Displaying this monitor's information While the monitor is a potential monitor failure. Example MENU INFORMATION MODEL : SDM-X93 SER. The computer's power saving mode is in amber Try pressing any problem persists, call your authorized Sony dealer and give the following information: • Model name: SDM-X53, SDM-X73 or SDM-X93 • Serial number •...


