
Operating Instructions
Page 2
... part 15 of the FCC Rules. Sony Customer Information Services Center 1-800-222-7669 or http://www.sony.com/ Declaration of the unit. Owner's Record The model and serial numbers are present inside the unit. Do not open the cabinet. These limits are cautioned that to which can radiate radio frequency energy and, if not installed and used in the spaces provided below. Connect...
... part 15 of the FCC Rules. Sony Customer Information Services Center 1-800-222-7669 or http://www.sony.com/ Declaration of the unit. Owner's Record The model and serial numbers are present inside the unit. Do not open the cabinet. These limits are cautioned that to which can radiate radio frequency energy and, if not installed and used in the spaces provided below. Connect...

Operating Instructions
Page 3
...; 18 AWG Length Maximum 15 feet Rating Minimum 7 A, 125 V NOTICE Cette notice s'applique aux Etats-Unis et au Canada uniquement. Refer servicing to correct the interference by one or more of Conformity Trade Name: Model: Responsible Party: Address: Telephone Number: SONY SDM-X53/X73/X93 Sony Electronics Inc. 16450 W. Connect the equipment into an outlet on , the user is applicable for help.
...; 18 AWG Length Maximum 15 feet Rating Minimum 7 A, 125 V NOTICE Cette notice s'applique aux Etats-Unis et au Canada uniquement. Refer servicing to correct the interference by one or more of Conformity Trade Name: Model: Responsible Party: Address: Telephone Number: SONY SDM-X53/X73/X93 Sony Electronics Inc. 16450 W. Connect the equipment into an outlet on , the user is applicable for help.

Operating Instructions
Page 4
...4: Bundle the cords and cables 9 Setup 5: Turn on the monitor and computer 9 Setup 6: Adjust the height and tilt 10 Selecting the input signal (INPUT button 11 Customizing Your Monitor 12 Navigating the menu 12 PICTURE ADJUST menu 13 SCREEN menu (analog RGB signal only 14 COLOR menu 15 GB GAMMA menu 16 MENU POSITION menu 16 INPUT SENSING ON/OFF menu 16 LANGUAGE menu 17 0 RESET menu 17 MENU LOCK menu 17 Technical Features 18 Controlling the volume 18 Power saving function 18 Reducing the power consumption (ECO mode 19 Automatic brightness adjustment function (light sensor 19...
...4: Bundle the cords and cables 9 Setup 5: Turn on the monitor and computer 9 Setup 6: Adjust the height and tilt 10 Selecting the input signal (INPUT button 11 Customizing Your Monitor 12 Navigating the menu 12 PICTURE ADJUST menu 13 SCREEN menu (analog RGB signal only 14 COLOR menu 15 GB GAMMA menu 16 MENU POSITION menu 16 INPUT SENSING ON/OFF menu 16 LANGUAGE menu 17 0 RESET menu 17 MENU LOCK menu 17 Technical Features 18 Controlling the volume 18 Power saving function 18 Reducing the power consumption (ECO mode 19 Automatic brightness adjustment function (light sensor 19...
Operating Instructions
Page 5
.... However, black points or bright points of your local power supply. Transportation • Disconnect all cables from the power outlet before cleaning your monitor. • Clean the LCD screen with sharp or abrasive items such as a TV or various other household appliances. • In places subject to the regulations of light (red, blue, or green) may appear constantly on the LCD screen, and irregular colored stripes or brightness may...
.... However, black points or bright points of your local power supply. Transportation • Disconnect all cables from the power outlet before cleaning your monitor. • Clean the LCD screen with sharp or abrasive items such as a TV or various other household appliances. • In places subject to the regulations of light (red, blue, or green) may appear constantly on the LCD screen, and irregular colored stripes or brightness may...

Operating Instructions
Page 6
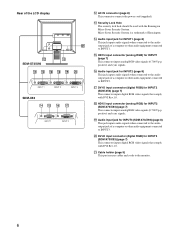
... the monitor. J Back cover (page 7) Remove this switch again. H Stereo speakers (page 18) These speakers output the audio signals as sound. Identifying parts and controls See the pages in red. Front of the LCD display Rear of the display stand MENU OK INPUT ECO Side view of the surrounding area. To turn the monitor off, press this cover when you connect cables or cords. If the 1 (power) indicator does not light up in parentheses for further details. E INPUT button...
... the monitor. J Back cover (page 7) Remove this switch again. H Stereo speakers (page 18) These speakers output the audio signals as sound. Identifying parts and controls See the pages in red. Front of the LCD display Rear of the display stand MENU OK INPUT ECO Side view of the surrounding area. To turn the monitor off, press this cover when you connect cables or cords. If the 1 (power) indicator does not light up in parentheses for further details. E INPUT button...
Operating Instructions
Page 7
...(page 7) This connector inputs analog RGB video signals (0.700 Vp-p, positive) and sync signals. R HD15 input connector (analog RGB) for INPUT3 (SDM-X73/X93) (page 7) This connector inputs digital RGB video signals that comply with the Kensington Micro Saver Security System. U Cable holder (page 9) This part secures cables and cords to INPUT3. Micro Saver Security System is a trademark of the LCD display SDM-X73/X93 INPUT 1 SDM-X53 INPUT 2 INPUT 3 INPUT 1 INPUT 2 L AC IN connector (page 8) This connector connects the power cord (supplied). S Audio input jack for INPUT2...
...(page 7) This connector inputs analog RGB video signals (0.700 Vp-p, positive) and sync signals. R HD15 input connector (analog RGB) for INPUT3 (SDM-X73/X93) (page 7) This connector inputs digital RGB video signals that comply with the Kensington Micro Saver Security System. U Cable holder (page 9) This part secures cables and cords to INPUT3. Micro Saver Security System is a trademark of the LCD display SDM-X73/X93 INPUT 1 SDM-X53 INPUT 2 INPUT 3 INPUT 1 INPUT 2 L AC IN connector (page 8) This connector connects the power cord (supplied). S Audio input jack for INPUT2...
Operating Instructions
Page 8
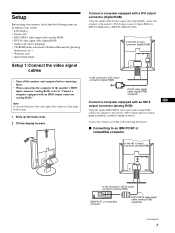
... display • Power cord • HD15-HD15 video signal cable (analog RGB) • DVI-D video signal cable (digital RGB) • Audio cord (stereo miniplug) • CD-ROM (utility software for INPUT2 (SDM-X53) or INPUT3 (SDM-X73/X93). Connect a computer equipped with a DVI output connector (digital RGB) Using the supplied DVI-D video signal cable (digital RGB), connect the computer to the monitor's DVI-D input connector (digital RGB) for Windows/Macintosh, Operating Instructions, etc.) • Warranty card • Quick Setup Guide Setup 1: Connect the video signal cables • Turn...
... display • Power cord • HD15-HD15 video signal cable (analog RGB) • DVI-D video signal cable (digital RGB) • Audio cord (stereo miniplug) • CD-ROM (utility software for INPUT2 (SDM-X53) or INPUT3 (SDM-X73/X93). Connect a computer equipped with a DVI output connector (digital RGB) Using the supplied DVI-D video signal cable (digital RGB), connect the computer to the monitor's DVI-D input connector (digital RGB) for Windows/Macintosh, Operating Instructions, etc.) • Warranty card • Quick Setup Guide Setup 1: Connect the video signal cables • Turn...

Operating Instructions
Page 9
... more information, see "Controlling the volume" on page 18. to the monitor's corresponding audio input jack. x Connecting to a Macintosh to the HD 15 input connector (analog RGB) Setup 3: Connect the power cord 1 Connect the supplied power cord securely to the monitor's AC IN connector. 2 Connect the other audio equipment audio cord (supplied) 8 Connect the adapter to the monitor's audio input jacks. Using the monitor's speakers or headphones, you can listen to sound from your computer or other audio equipment connected to the computer before connecting the video signal cable.
... more information, see "Controlling the volume" on page 18. to the monitor's corresponding audio input jack. x Connecting to a Macintosh to the HD 15 input connector (analog RGB) Setup 3: Connect the power cord 1 Connect the supplied power cord securely to the monitor's AC IN connector. 2 Connect the other audio equipment audio cord (supplied) 8 Connect the adapter to the monitor's audio input jacks. Using the monitor's speakers or headphones, you can listen to sound from your computer or other audio equipment connected to the computer before connecting the video signal cable.

Operating Instructions
Page 10
The 1 (power) indicator lights up the back cover. 2 Secure the video signal cable, audio cords and the power cord using the cable holder on the computer. 4 Press the INPUT button to select the desired input signal. The selected input's picture appears on page 11. Note The monitor is not already pressed. For more information, see "Selecting the input signal (INPUT button)" on the screen. Make sure the 1 (power) indicator is complete. GB lights in green 4 Note If you cannot...
The 1 (power) indicator lights up the back cover. 2 Secure the video signal cable, audio cords and the power cord using the cable holder on the computer. 4 Press the INPUT button to select the desired input signal. The selected input's picture appears on page 11. Note The monitor is not already pressed. For more information, see "Selecting the input signal (INPUT button)" on the screen. Make sure the 1 (power) indicator is complete. GB lights in green 4 Note If you cannot...
Operating Instructions
Page 11
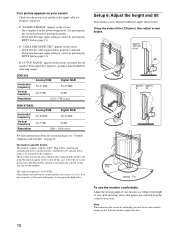
... remedies" on the screen: - If no picture appears on your screen • Check that the power cord and the video signal cable are unobtrusive on the monitor, you turn on your computer after connecting the monitor, the setup Wizard may appear on -screen instructions. Check that the input signal setting is properly connected. - No specific driver needs to hit the monitor against the desk. 10 Setup 6: Adjust the height and tilt This monitor can use the monitor comfortably Adjust the viewing angle of your...
... remedies" on the screen: - If no picture appears on your screen • Check that the power cord and the video signal cable are unobtrusive on the monitor, you turn on your computer after connecting the monitor, the setup Wizard may appear on -screen instructions. Check that the input signal setting is properly connected. - No specific driver needs to hit the monitor against the desk. 10 Setup 6: Adjust the height and tilt This monitor can use the monitor comfortably Adjust the viewing angle of your...

Operating Instructions
Page 14
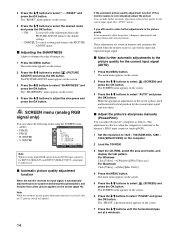
... m/M buttons to the default settings. 1 Press the MENU button. MODE HIGH MIDDLE LOW AUTO 1280 x1024 / 60Hz EX I T x Selecting the MODE (ECO mode) You can select the picture mode to HIGH t MIDDLE t LOW, and the power consumption is set to adjust the light level and press the OK button. x Adjusting the BACKLIGHT If the screen is changed as the mode turns to reduce the power consumption. The "CONTRAST" menu appears on the screen. 2 Press the m/M buttons to adjust...
... m/M buttons to the default settings. 1 Press the MENU button. MODE HIGH MIDDLE LOW AUTO 1280 x1024 / 60Hz EX I T x Selecting the MODE (ECO mode) You can select the picture mode to HIGH t MIDDLE t LOW, and the power consumption is set to adjust the light level and press the OK button. x Adjusting the BACKLIGHT If the screen is changed as the mode turns to reduce the power consumption. The "CONTRAST" menu appears on the screen. 2 Press the m/M buttons to adjust...
Operating Instructions
Page 15
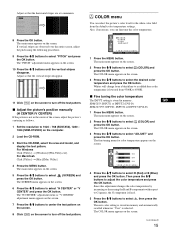
... button. The "SHARPNESS" menu appears on the screen. 4 Press the m/M buttons to select the desired mode and press the OK button. • OK: To reset all of the screen's phase, pitch and horizontal/vertical position for the current input signal (See "AUTO" below). Note While the automatic picture quality adjustment function is connected to the monitor's HD15 input connector (analog RGB). 1 Set the resolution to select (SCREEN) and press the OK button. x Make further automatic adjustments to select (SCREEN...
... button. The "SHARPNESS" menu appears on the screen. 4 Press the m/M buttons to select the desired mode and press the OK button. • OK: To reset all of the screen's phase, pitch and horizontal/vertical position for the current input signal (See "AUTO" below). Note While the automatic picture quality adjustment function is connected to the monitor's HD15 input connector (analog RGB). 1 Set the resolution to select (SCREEN) and press the OK button. x Make further automatic adjustments to select (SCREEN...
Operating Instructions
Page 16
... automatically recalled whenever "User" is stored in the center of the screen, adjust the picture's centering as follows. 1 Set the resolution to 1024 × 768 (SDM-X53), 1280 × 1024 (SDM-X73/X93) on the screen. 3 Press the m/M buttons to adjust the color temperature and press the OK button. x Adjust the picture's position manually (H CENTER /V CENTER) If the picture is lowered from the default color temperature settings. The COLOR menu appears on the computer...
... automatically recalled whenever "User" is stored in the center of the screen, adjust the picture's centering as follows. 1 Set the resolution to 1024 × 768 (SDM-X53), 1280 × 1024 (SDM-X73/X93) on the screen. 3 Press the m/M buttons to adjust the color temperature and press the OK button. x Adjust the picture's position manually (H CENTER /V CENTER) If the picture is lowered from the default color temperature settings. The COLOR menu appears on the computer...
Operating Instructions
Page 19
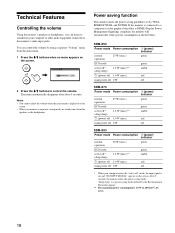
... sleep" is 1.0 W in power saving mode, no sound comes from the main menu. 1 Press the m/M buttons when no menu appears on the screen. If the monitor is DPMS (Display Power Management Signaling) compliant, the monitor will automatically reduce power consumption as shown below. After 5 seconds, the monitor enters the power saving mode. VOLUME , 30 2 Press the m/M buttons to a computer or video graphics board that is connected to control the volume. You can listen to the monitor's audio input jacks...
... sleep" is 1.0 W in power saving mode, no sound comes from the main menu. 1 Press the m/M buttons when no menu appears on the screen. If the monitor is DPMS (Display Power Management Signaling) compliant, the monitor will automatically reduce power consumption as shown below. After 5 seconds, the monitor enters the power saving mode. VOLUME , 30 2 Press the m/M buttons to a computer or video graphics board that is connected to control the volume. You can listen to the monitor's audio input jacks...
Operating Instructions
Page 20
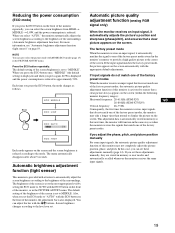
... adjustments manually, they are stored in the PICTURE ADJUST menu. The brightness of the screen is set to the most appropriate level by setting the ECO mode to "MIDDLE". Reducing the power consumption (ECO mode) If you press the ECO button on the screen (within the following monitor frequency ranges): Horizontal frequency: 28-61 kHz (SDM-X53) 28-80 kHz (SDM-X73/X93) Vertical frequency: 48-75 Hz Consequently, the first time the monitor receives input signals...
... adjustments manually, they are stored in the PICTURE ADJUST menu. The brightness of the screen is set to the most appropriate level by setting the ECO mode to "MIDDLE". Reducing the power consumption (ECO mode) If you press the ECO button on the screen (within the following monitor frequency ranges): Horizontal frequency: 28-61 kHz (SDM-X53) 28-80 kHz (SDM-X73/X93) Vertical frequency: 48-75 Hz Consequently, the first time the monitor receives input signals...
Operating Instructions
Page 21
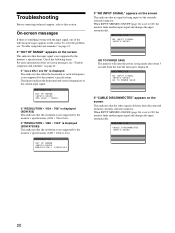
... that no signal is not supported by the monitor's specifications. Check the following messages appears on the screen This indicates that either the horizontal or vertical frequency is not supported by the monitor's specifications. If "RESOLUTION i 1280 × 1024" is displayed (SDM-X73/X93) This indicates that the resolution is being input via the currently selected connector. I NFORMA T I ON NO I NPUT S I GNA L I NPUT # : XXXX X GO TO POWER SAVE If "CABLE DISCONNECTED...
... that no signal is not supported by the monitor's specifications. Check the following messages appears on the screen This indicates that either the horizontal or vertical frequency is not supported by the monitor's specifications. If "RESOLUTION i 1280 × 1024" is displayed (SDM-X73/X93) This indicates that the resolution is being input via the currently selected connector. I NFORMA T I ON NO I NPUT S I GNA L I NPUT # : XXXX X GO TO POWER SAVE If "CABLE DISCONNECTED...
Operating Instructions
Page 22
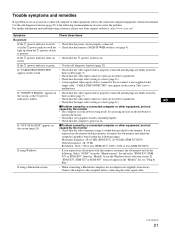
... the screen, or the 1 (power) indicator is amber, • Check that the video signal cable is properly connected and all plugs are firmly seated in their sockets (page 7). • Check that the video input connector's pins are not bent or pushed in . • Check that the input select setting is within the following ranges: Horizontal frequency: 28-61 kHz (SDM-X53), 28-80 kHz (SDM-X73/X93) Vertical frequency: 48-75 Hz Resolution: 1024...
... the screen, or the 1 (power) indicator is amber, • Check that the video signal cable is properly connected and all plugs are firmly seated in their sockets (page 7). • Check that the video input connector's pins are not bent or pushed in . • Check that the input select setting is within the following ranges: Horizontal frequency: 28-61 kHz (SDM-X53), 28-80 kHz (SDM-X73/X93) Vertical frequency: 48-75 Hz Resolution: 1024...
Operating Instructions
Page 23
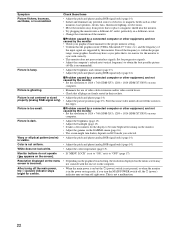
... power saving mode, if you turn darker, depends on ECO mode you selected. Set for the display to become bright after turning on the monitor. • Adjust the gamma on the GAMMA menu (page 16). • The screen might turn the MAIN POWER switch off, the 1 (power) indicator may screen is incorrect. properly (analog RGB signal only). • Adjust the picture position (page 15). Picture is ghosting. • Eliminate the use of video cable extensions and/or video switch boxes. • Check...
... power saving mode, if you turn darker, depends on ECO mode you selected. Set for the display to become bright after turning on the monitor. • Adjust the gamma on the GAMMA menu (page 16). • The screen might turn the MAIN POWER switch off, the 1 (power) indicator may screen is incorrect. properly (analog RGB signal only). • Adjust the picture position (page 15). Picture is ghosting. • Eliminate the use of video cable extensions and/or video switch boxes. • Check...
Operating Instructions
Page 24
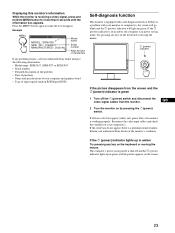
... Sony dealer of input signals (analog RGB/digital RGB) If the picture disappears from the monitor. If the 1 (power) indicator lights up green. The computer's power saving mode is shut off the 1 (power) switch and disconnect the video signal cables from the screen and the 1 (power) indicator is a problem with a self-diagnosis function. Example MENU INFORMATION MODEL : SDM-X93 SER. Try pressing any key on the keyboard or moving the mouse. Displaying this monitor's information While the monitor is working...
... Sony dealer of input signals (analog RGB/digital RGB) If the picture disappears from the monitor. If the 1 (power) indicator lights up green. The computer's power saving mode is shut off the 1 (power) switch and disconnect the video signal cables from the screen and the 1 (power) indicator is a problem with a self-diagnosis function. Example MENU INFORMATION MODEL : SDM-X93 SER. Try pressing any key on the keyboard or moving the mouse. Displaying this monitor's information While the monitor is working...
Operating Instructions
Page 25
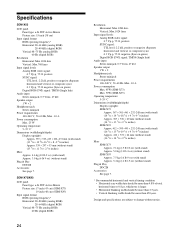
Specifications SDM-X53 LCD panel Panel type: a-Si TFT Active Matrix Picture size: 15 inch (38 cm) Input signal format RGB operating frequency* Horizontal: 28-61 kHz (analog RGB) 28-49 kHz (digital RGB) Vertical:48-75 Hz (analog RGB) 60 Hz (digital RGB) Resolution Horizontal: Max.1024 dots Vertical: Max.768 lines Input signal levels Analog RGB video signal: 0.7 Vp-p, 75 Ω, positive SYNC signal: TTL level, 2.2 kΩ, positive or negative (Separate horizontal and vertical, or composite sync) 0.3 Vp-p, 75 Ω, negative (Sync on green) Digital RGB (DVI) signal: TMDS (Single link) ...
Specifications SDM-X53 LCD panel Panel type: a-Si TFT Active Matrix Picture size: 15 inch (38 cm) Input signal format RGB operating frequency* Horizontal: 28-61 kHz (analog RGB) 28-49 kHz (digital RGB) Vertical:48-75 Hz (analog RGB) 60 Hz (digital RGB) Resolution Horizontal: Max.1024 dots Vertical: Max.768 lines Input signal levels Analog RGB video signal: 0.7 Vp-p, 75 Ω, positive SYNC signal: TTL level, 2.2 kΩ, positive or negative (Separate horizontal and vertical, or composite sync) 0.3 Vp-p, 75 Ω, negative (Sync on green) Digital RGB (DVI) signal: TMDS (Single link) ...


