Operating Instructions (primary manual)
Page 4
...the U.S.A. Disposal of the monitor • Do not dispose of your Sony dealer when replacing the fluorescent tube. If you use any equipment that the LCD screen is used in direct sunlight. If you place the monitor by a window. • Do not push on the LCD screen. Installation Do not ...install or leave the monitor: • In ...
...the U.S.A. Disposal of the monitor • Do not dispose of your Sony dealer when replacing the fluorescent tube. If you use any equipment that the LCD screen is used in direct sunlight. If you place the monitor by a window. • Do not push on the LCD screen. Installation Do not ...install or leave the monitor: • In ...

Operating Instructions (primary manual)
Page 5
...Hole The security lock hole should be applied with M/m buttons (3). H MAIN POWER switch (page 9) This switch turns the monitor's main power on and off . To turn the monitor off, press this button when the displayed picture seems poorly adjusted. G ECO button (page 17) This button is a ...Power) switch and 1 (Power) indicator (pages 9, 17, 21) This switch turns the monitor on and off . Identifying parts and controls See the pages in red. Front of the LCD display Side view of the LCD display Rear of the picture quality for further details. B MENU button (page 11) This ...
...Hole The security lock hole should be applied with M/m buttons (3). H MAIN POWER switch (page 9) This switch turns the monitor's main power on and off . To turn the monitor off, press this button when the displayed picture seems poorly adjusted. G ECO button (page 17) This button is a ...Power) switch and 1 (Power) indicator (pages 9, 17, 21) This switch turns the monitor on and off . Identifying parts and controls See the pages in red. Front of the LCD display Side view of the LCD display Rear of the picture quality for further details. B MENU button (page 11) This ...

Operating Instructions (primary manual)
Page 6
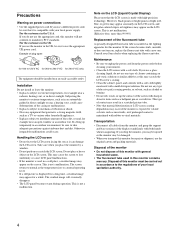
Rear of the LCD display q; qg qh 6 K DVI-D input connector (digital RGB) for INPUT1 (page 7) This connector inputs analog RGB video signals (0.700 Vp-p, positive) and sync signals. N AC ... (page 9) This part secures cables and cords to bundle connecting cords and cables. qa qs qd qf J Back cover (page 7) Remove this cover to the monitor.
Rear of the LCD display q; qg qh 6 K DVI-D input connector (digital RGB) for INPUT1 (page 7) This connector inputs analog RGB video signals (0.700 Vp-p, positive) and sync signals. N AC ... (page 9) This part secures cables and cords to bundle connecting cords and cables. qa qs qd qf J Back cover (page 7) Remove this cover to the monitor.
Operating Instructions (primary manual)
Page 7
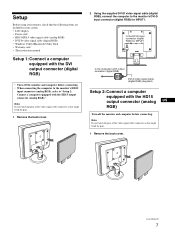
... signal cable (digital RGB) (supplied) Setup 2: Connect a computer equipped with the HD15 output connector (analog RGB)." Setup Before using your monitor, check that the following items are included in your carton: • LCD display • Power cord • HD15-HD15 video signal cable (analog RGB) • DVI-D video signal cable (digital RGB...
... signal cable (digital RGB) (supplied) Setup 2: Connect a computer equipped with the HD15 output connector (analog RGB)." Setup Before using your monitor, check that the following items are included in your carton: • LCD display • Power cord • HD15-HD15 video signal cable (analog RGB) • DVI-D video signal cable (digital RGB...
Operating Instructions (primary manual)
Page 10
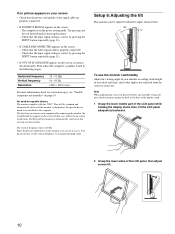
...eyes. No need to set the vertical frequency to 60 Hz. Setup 6: Adjusting the tilt This monitor can use the monitor comfortably Adjust the viewing angle of your monitor according to the height of the LCD panel, then adjust screen tilt. 10 The computer is properly connected. - The first time you can... be installed to hit the monitor against the desk or the base of the display stand. 1 Grasp the lower middle part of the LCD panel while holding the display stand, then, tilt the LCD panel adequately backward. 2 Grasp the lower sides of your desk ...
...eyes. No need to set the vertical frequency to 60 Hz. Setup 6: Adjusting the tilt This monitor can use the monitor comfortably Adjust the viewing angle of your monitor according to the height of the LCD panel, then adjust screen tilt. 10 The computer is properly connected. - The first time you can... be installed to hit the monitor against the desk or the base of the display stand. 1 Grasp the lower middle part of the LCD panel while holding the display stand, then, tilt the LCD panel adequately backward. 2 Grasp the lower sides of your desk ...

Operating Instructions (primary manual)
Page 21
... off the 1 (power) switch and disconnect the video signal cables from the monitor. 2 Turn the monitor on the keyboard or moving the mouse. Reconnect the video input cables and check the condition of your authorized Sony dealer of total horizontal time or 0.8 µs, whichever is larger. •... Horizontal blanking width should be more than 2.5 µsec. • Vertical blanking width should be more than 450 µsec. Specifications LCD panel Panel type: a-Si TFT...
... off the 1 (power) switch and disconnect the video signal cables from the monitor. 2 Turn the monitor on the keyboard or moving the mouse. Reconnect the video input cables and check the condition of your authorized Sony dealer of total horizontal time or 0.8 µs, whichever is larger. •... Horizontal blanking width should be more than 2.5 µsec. • Vertical blanking width should be more than 450 µsec. Specifications LCD panel Panel type: a-Si TFT...
Read Me First for Setup Instructions
Page 2
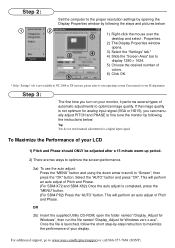
... file is launched, follow the short step-by-step instruction to maximize the performance of your LCD 1) Pitch and Phase should ONLY be adjusted after a 15 minute warm-up period. 2) There... the file named "Display_Adjust for analog input signal (VGA or HD15), you turn on your monitor, it performs several types of automatic adjustments to optimize image quality. Step 2: Set the computer....sony.com/displays/support or call 866-357-7669 (SONY) This will perform an auto adjust of Pitch and Phase. (For SDM-X72 and SDM-X82) Once the auto adjust is completed, press the "MENU" button. (For SDM-P82...
... file is launched, follow the short step-by-step instruction to maximize the performance of your LCD 1) Pitch and Phase should ONLY be adjusted after a 15 minute warm-up period. 2) There... the file named "Display_Adjust for analog input signal (VGA or HD15), you turn on your monitor, it performs several types of automatic adjustments to optimize image quality. Step 2: Set the computer....sony.com/displays/support or call 866-357-7669 (SONY) This will perform an auto adjust of Pitch and Phase. (For SDM-X72 and SDM-X82) Once the auto adjust is completed, press the "MENU" button. (For SDM-P82...
Comparison Chart: Flat Panel LCD
Page 2
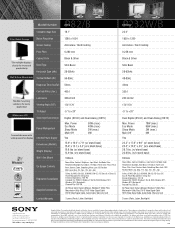
...lu.g.an.d.P.la.y:.D.D.C.2B P.lug. While Sony representatives or Sony authorized dealers may make any particular software packages and/or non-Sony add-on hardware option except those mentioned here. These monitors are a multitude of this disclaimer. ...FCC Class B, IC Class B; P82/B Model Number P82/B P232W/B P232W/B Viewable Image...Sony Electronics Inc. x 9.9" .x.4..5. Sleep Mode . . . . . . . .6.9.W. .(.m. ". Sleep Mode . . . . . . . .4.8.W. .(m. .a.x..). 3W (max.) . . . . . . . . . . . . . . . .E.c.o.M. .o.d.e. . Widescreen LCD...
...lu.g.an.d.P.la.y:.D.D.C.2B P.lug. While Sony representatives or Sony authorized dealers may make any particular software packages and/or non-Sony add-on hardware option except those mentioned here. These monitors are a multitude of this disclaimer. ...FCC Class B, IC Class B; P82/B Model Number P82/B P232W/B P232W/B Viewable Image...Sony Electronics Inc. x 9.9" .x.4..5. Sleep Mode . . . . . . . .6.9.W. .(.m. ". Sleep Mode . . . . . . . .4.8.W. .(m. .a.x..). 3W (max.) . . . . . . . . . . . . . . . .E.c.o.M. .o.d.e. . Widescreen LCD...


