Operating Instructions (primary manual)
Page 2
... to radio or television reception, which can radiate radio frequency energy and, if not installed and used in a residential installation. Owner's Record The model and serial numbers are located at the rear of the following specifications: SPECIFICATIONS Plug Type Nema-Plug 5-15p Cord Type SVT or SJT, minimum 3 × 18 AWG Length Maximum 15 feet Rating Minimum 7 A, 125 V NOTICE Cette notice s'applique aux Etats...
... to radio or television reception, which can radiate radio frequency energy and, if not installed and used in a residential installation. Owner's Record The model and serial numbers are located at the rear of the following specifications: SPECIFICATIONS Plug Type Nema-Plug 5-15p Cord Type SVT or SJT, minimum 3 × 18 AWG Length Maximum 15 feet Rating Minimum 7 A, 125 V NOTICE Cette notice s'applique aux Etats...
Operating Instructions (primary manual)
Page 3
... in this manual. Precautions 4 Identifying parts and controls 5 Setup 7 Setup 1: Connect a computer equipped with the DVI output connector (digital RGB 7 Setup 2: Connect a computer equipped with the HD15 output connector (analog RGB 7 Setup 3: Connect the power cord 8 Setup 4: Bundle the cords and cables 9 Setup 5: Turn on the monitor and computer 9 Setup 6: Adjusting the tilt 10 Selecting the input signal (INPUT button 11 Customizing Your Monitor 11 Navigating the menu 11 BACKLIGHT 12 US CONTRAST 12 BRIGHTNESS 12 SCREEN (analog RGB signal only 12 COLOR 14 GAMMA 15...
... in this manual. Precautions 4 Identifying parts and controls 5 Setup 7 Setup 1: Connect a computer equipped with the DVI output connector (digital RGB 7 Setup 2: Connect a computer equipped with the HD15 output connector (analog RGB 7 Setup 3: Connect the power cord 8 Setup 4: Bundle the cords and cables 9 Setup 5: Turn on the monitor and computer 9 Setup 6: Adjusting the tilt 10 Selecting the input signal (INPUT button 11 Customizing Your Monitor 11 Navigating the menu 11 BACKLIGHT 12 US CONTRAST 12 BRIGHTNESS 12 SCREEN (analog RGB signal only 12 COLOR 14 GAMMA 15...
Operating Instructions (primary manual)
Page 4
... the monitor and grasp the support and base sections of the screen with a soft cloth. This may appear on power connections • Use the supplied power cord. The screen returns to mechanical vibration or shock. • Near any type of abrasive pad, scouring powder, or solvent, such as alcohol or benzine. • Do not rub, touch, or tap the surface of the display stand...
... the monitor and grasp the support and base sections of the screen with a soft cloth. This may appear on power connections • Use the supplied power cord. The screen returns to mechanical vibration or shock. • Near any type of abrasive pad, scouring powder, or solvent, such as alcohol or benzine. • Do not rub, touch, or tap the surface of the display stand...

Operating Instructions (primary manual)
Page 5
... switch turns the monitor on when the 1 (power) indicator lights up in parentheses for further details. It makes further automatic adjustment of the picture quality for switching the video input signals, and the corresponding indicator, (INPUT1 or INPUT2) lights up , press the MAIN POWER switch (8). H MAIN POWER switch (page 9) This switch turns the monitor's main power on and off , press this button when the displayed picture seems poorly adjusted. Identifying parts and controls See the pages in red...
... switch turns the monitor on when the 1 (power) indicator lights up in parentheses for further details. It makes further automatic adjustment of the picture quality for switching the video input signals, and the corresponding indicator, (INPUT1 or INPUT2) lights up , press the MAIN POWER switch (8). H MAIN POWER switch (page 9) This switch turns the monitor's main power on and off , press this button when the displayed picture seems poorly adjusted. Identifying parts and controls See the pages in red...
Operating Instructions (primary manual)
Page 7
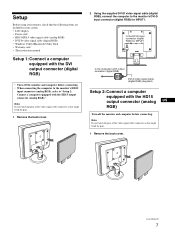
...display • Power cord • HD15-HD15 video signal cable (analog RGB) • DVI-D video signal cable (digital RGB) • Windows Utility/Macintosh Utility Disk • Warranty card • This instruction manual Setup 1: Connect a computer equipped with the DVI output connector (digital RGB) • Turn off the monitor and computer before connecting. Note Do not touch the pins of the video signal cable connector as this might bend the pins. 1 Remove the back cover. 2 Using the supplied DVI-D video signal cable (digital RGB), connect the computer to the monitor's DVI-D input...
...display • Power cord • HD15-HD15 video signal cable (analog RGB) • DVI-D video signal cable (digital RGB) • Windows Utility/Macintosh Utility Disk • Warranty card • This instruction manual Setup 1: Connect a computer equipped with the DVI output connector (digital RGB) • Turn off the monitor and computer before connecting. Note Do not touch the pins of the video signal cable connector as this might bend the pins. 1 Remove the back cover. 2 Using the supplied DVI-D video signal cable (digital RGB), connect the computer to the monitor's DVI-D input...

Operating Instructions (primary manual)
Page 9
... cables inside of the stand. 3 Secure the cables and cords with the cable holder. 4 Replace the arm cover and back cover. 1 arm cover 2 4 back cover Setup 5: Turn on the monitor and computer 1 Press the MAIN POWER switch on the left side of your monitor is complete. The installation of the monitor in green. If necessary, use the monitor's controls to adjust the picture (page 11). (continued) 9 Setup 4: Bundle the cords and cables 1 Remove the arm cover. 2 Bundle the cords and cables...
... cables inside of the stand. 3 Secure the cables and cords with the cable holder. 4 Replace the arm cover and back cover. 1 arm cover 2 4 back cover Setup 5: Turn on the monitor and computer 1 Press the MAIN POWER switch on the left side of your monitor is complete. The installation of the monitor in green. If necessary, use the monitor's controls to adjust the picture (page 11). (continued) 9 Setup 4: Bundle the cords and cables 1 Remove the arm cover. 2 Bundle the cords and cables...
Operating Instructions (primary manual)
Page 10
... on page 19. If no picture appears on your screen • Check that the power cord and the video signal cable are unobtrusive on the screen: - The computer is properly connected. - No need to set the vertical frequency to hit the monitor against the desk or the base of the display stand. 1 Grasp the lower middle part of the LCD panel while holding the display stand, then, tilt the LCD panel adequately backward. 2 Grasp the lower...
... on page 19. If no picture appears on your screen • Check that the power cord and the video signal cable are unobtrusive on the screen: - The computer is properly connected. - No need to set the vertical frequency to hit the monitor against the desk or the base of the display stand. 1 Grasp the lower middle part of the LCD panel while holding the display stand, then, tilt the LCD panel adequately backward. 2 Grasp the lower...
Operating Instructions (primary manual)
Page 12
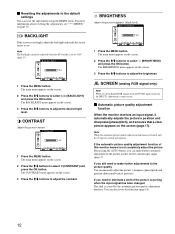
... the MENU button. The main menu appears on the screen. 3 Press the M/m buttons to select 6 (CONTRAST) and press the OK button. SCREEN (analog RGB signal only) Note When receiving digital RGB signals from the DVI-D input connector for the current input signal (page 5). x Resetting the adjustments to the default settings You can manually adjust the picture's sharpness (phase/pitch) and position (horizontal/vertical position). The BACKLIGHT menu appears on the screen. 2 Press the M/m buttons to adjust the desired light level. BRIGHTNESS Adjust the picture brightness (black level). If...
... the MENU button. The main menu appears on the screen. 3 Press the M/m buttons to select 6 (CONTRAST) and press the OK button. SCREEN (analog RGB signal only) Note When receiving digital RGB signals from the DVI-D input connector for the current input signal (page 5). x Resetting the adjustments to the default settings You can manually adjust the picture's sharpness (phase/pitch) and position (horizontal/vertical position). The BACKLIGHT menu appears on the screen. 2 Press the M/m buttons to adjust the desired light level. BRIGHTNESS Adjust the picture brightness (black level). If...

Operating Instructions (primary manual)
Page 14
... the white color field from the default color temperature settings. The SCREEN menu appears on the screen. 2 Press the M/m buttons to select , then press the OK button. COLOR You can select the picture's color level of the picture caused by increasing or decreasing the R and B components with respect to G (green), the G component is fixed. 3 Press the M/m buttons to select R (Red) or B (Blue) and press the OK button. COLOR 9300K 6500K USER ADJUST 1280...
... the white color field from the default color temperature settings. The SCREEN menu appears on the screen. 2 Press the M/m buttons to select , then press the OK button. COLOR You can select the picture's color level of the picture caused by increasing or decreasing the R and B components with respect to G (green), the G component is fixed. 3 Press the M/m buttons to select R (Red) or B (Blue) and press the OK button. COLOR 9300K 6500K USER ADJUST 1280...

Operating Instructions (primary manual)
Page 15
...-based applications.) • STANDARD (The default setting): Standard smoothing effect. • GRAPHICS: To make the pictures appear clean. (This US mode is suited for CD-ROM software such as photo images or illustrations.) Notes • When you use the picture smoothing function. The smoothing effect becomes stronger in the order of the picture's mode or resolution. • FULL1: The input signal is set to display the picture on the signal...
...-based applications.) • STANDARD (The default setting): Standard smoothing effect. • GRAPHICS: To make the pictures appear clean. (This US mode is suited for CD-ROM software such as photo images or illustrations.) Notes • When you use the picture smoothing function. The smoothing effect becomes stronger in the order of the picture's mode or resolution. • FULL1: The input signal is set to display the picture on the signal...

Operating Instructions (primary manual)
Page 16
... x 0 RESET Reset the adjustments to the default settings. 1 Press the M/m buttons to select the desired menu and press the OK button. The LANGUAGE menu appears on the screen. 2 Press the M/m buttons to select ON or OFF. • ON: Only the 1 (power) switch and INPUT button will appear. Note that the (LANGUAGE) setting is being input via currently selected computer. • OFF: Not enter the power saving mode. The main menu appears on the screen. 2 Keep...
... x 0 RESET Reset the adjustments to the default settings. 1 Press the M/m buttons to select the desired menu and press the OK button. The LANGUAGE menu appears on the screen. 2 Press the M/m buttons to select ON or OFF. • ON: Only the 1 (power) switch and INPUT button will appear. Note that the (LANGUAGE) setting is being input via currently selected computer. • OFF: Not enter the power saving mode. The main menu appears on the screen. 2 Keep...

Operating Instructions (primary manual)
Page 17
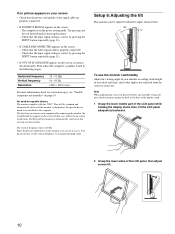
... Automatic picture quality adjustment function (analog RGB signal only) When the monitor receives an input signal, it automatically matches the signal to OFF (page 16), the monitor does not enter the power saving mode. The factory preset mode When the monitor receives an input signal, it automatically adjusts the picture's position and sharpness (phase/pitch), and ensures that is cut and NO INPUT SIGNAL appears on the screen (within the following monitor frequency ranges): Horizontal frequency:28 - 92 kHz Vertical frequency...
... Automatic picture quality adjustment function (analog RGB signal only) When the monitor receives an input signal, it automatically matches the signal to OFF (page 16), the monitor does not enter the power saving mode. The factory preset mode When the monitor receives an input signal, it automatically adjusts the picture's position and sharpness (phase/pitch), and ensures that is cut and NO INPUT SIGNAL appears on the screen (within the following monitor frequency ranges): Horizontal frequency:28 - 92 kHz Vertical frequency...
Operating Instructions (primary manual)
Page 18
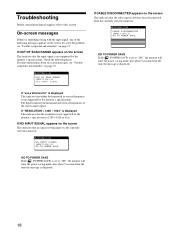
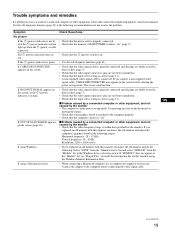
...... (POWER SAVE) is set to "ON," the monitor will enter the power saving mode after about on-screen messages, see "Trouble symptoms and remedies" on the screen This indicates that the resolution is something wrong with the input signal, one of the current input signal. If OUT OF SCAN RANGE appears on the screen. x k H z / x x x H. Check the following messages appears on the screen This indicates that either the horizontal or vertical frequency is displayed...
...... (POWER SAVE) is set to "ON," the monitor will enter the power saving mode after about on-screen messages, see "Trouble symptoms and remedies" on the screen This indicates that the resolution is something wrong with the input signal, one of the current input signal. If OUT OF SCAN RANGE appears on the screen. x k H z / x x x H. Check the following messages appears on the screen This indicates that either the horizontal or vertical frequency is displayed...
Operating Instructions (primary manual)
Page 19
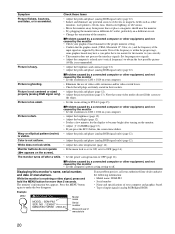
...-supplied video signal cable is properly connected and all plugs are firmly seated in . • Check that the input select setting is orange, • Check that the video input connector's pins are not bent or pushed in the Windows device selection screen. If "SDM-P82" does not appear in the power saving mode. If you replaced an old monitor with this monitor, reconnect the old monitor and adjust the computer's graphics board in the following ranges: Horizontal frequency: 28...
...-supplied video signal cable is properly connected and all plugs are firmly seated in . • Check that the input select setting is orange, • Check that the video input connector's pins are not bent or pushed in the Windows device selection screen. If "SDM-P82" does not appear in the power saving mode. If you replaced an old monitor with this monitor, reconnect the old monitor and adjust the computer's graphics board in the following ranges: Horizontal frequency: 28...
Operating Instructions (primary manual)
Page 20
... monitor is receiving a video signal, press and hold the MENU button for progressive signals. • Adjust the computer's refresh rate (vertical frequency) to obtain the best possible picture (60 Hz is dark. • Adjust the brightness (page 12). • Adjust the backlight (page 12). • It takes a few minutes for the display to become bright after a while. • Set the power saving function to FULL2 (page 15). Picture is recommended). • Adjust the brightness and contrast...
... monitor is receiving a video signal, press and hold the MENU button for progressive signals. • Adjust the computer's refresh rate (vertical frequency) to obtain the best possible picture (60 Hz is dark. • Adjust the brightness (page 12). • Adjust the backlight (page 12). • It takes a few minutes for the display to become bright after a while. • Set the power saving function to FULL2 (page 15). Picture is recommended). • Adjust the brightness and contrast...

Operating Instructions (primary manual)
Page 21
... monitor failure. The computer's power saving mode is awaked and the 1 (power) indicator lights up in power saving mode. Specifications LCD panel Panel type: a-Si TFT Active Matrix Picture size: 18.1 inch Input signal format RGB operating frequency* Horizontal: 28 - 92 kHz Vertical: 56 - 85 Hz Resolution Horizontal: Max.1280 dots Vertical: Max.1024 lines Input signal levels Analog RGB video signal 0.7 Vp-p, 75 Ω, positive SYNC signal TTL level, 2.2 kΩ, positive or negative (Separate horizontal and vertical, or composite sync) 0.3 Vp-p, 75Ω, negative (Sync...
... monitor failure. The computer's power saving mode is awaked and the 1 (power) indicator lights up in power saving mode. Specifications LCD panel Panel type: a-Si TFT Active Matrix Picture size: 18.1 inch Input signal format RGB operating frequency* Horizontal: 28 - 92 kHz Vertical: 56 - 85 Hz Resolution Horizontal: Max.1280 dots Vertical: Max.1024 lines Input signal levels Analog RGB video signal 0.7 Vp-p, 75 Ω, positive SYNC signal TTL level, 2.2 kΩ, positive or negative (Separate horizontal and vertical, or composite sync) 0.3 Vp-p, 75Ω, negative (Sync...
Read Me First for Setup Instructions
Page 1
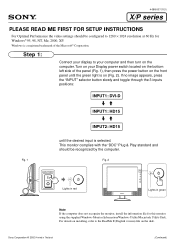
...; 2002 Printed in green Note If the computer does not recognize the monitor, install the information file for Windows® 95, 98, NT, Me, 2000, XP. 4-088-537-31(1) X/P series PLEASE READ ME FIRST FOR SETUP INSTRUCTIONS For Optimal Performance the video settings should be configured to 1280 × 1024 resolution at 60 Hz for this monitor using the supplied Windows Monitor Information/Windows Utility/Macintosh Utility...
...; 2002 Printed in green Note If the computer does not recognize the monitor, install the information file for Windows® 95, 98, NT, Me, 2000, XP. 4-088-537-31(1) X/P series PLEASE READ ME FIRST FOR SETUP INSTRUCTIONS For Optimal Performance the video settings should be configured to 1280 × 1024 resolution at 60 Hz for this monitor using the supplied Windows Monitor Information/Windows Utility/Macintosh Utility...
Read Me First for Setup Instructions
Page 2
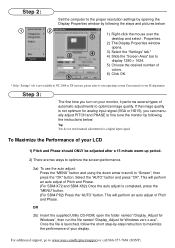
... optimize the screen performance. 2a) To use the auto adjust: Press the "MENU" button and using the down arrow to scroll to www.sony.com/displays/support or call 866-357-7669 (SONY) OR 2b) Insert the supplied Utility CD-ROM, open the folder named "/Display_Adjust for Windows", then run the file named "Display_Adjust for analog input signal (VGA or HD15), you turn on your monitor, it performs several types of colors...
... optimize the screen performance. 2a) To use the auto adjust: Press the "MENU" button and using the down arrow to scroll to www.sony.com/displays/support or call 866-357-7669 (SONY) OR 2b) Insert the supplied Utility CD-ROM, open the folder named "/Display_Adjust for Windows", then run the file named "Display_Adjust for analog input signal (VGA or HD15), you turn on your monitor, it performs several types of colors...
Comparison Chart: Flat Panel LCD
Page 1
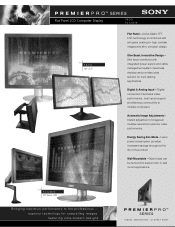
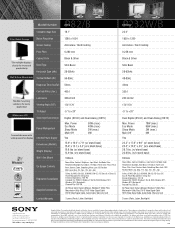
Wall Mountable - Stand base can be removed to the professional - Flat Panel LCD Computer Display P82/B 18" LCD P82/B P232W/B Flat Panel - Active Matrix TFT LCD technology is combined with integrated power supply and cable management system maximizes desktop and provides ideal solution for multi-tasking applications Digital & Analog Input - Slim Bezel, Innovative Design - Digital connection maximizes video performance, dual inputs support simultaneous connectivity to multiple computers Automatic Image Adjustments Instant adjustment of the product. Energy Saving Eco Mode - C L E...
Wall Mountable - Stand base can be removed to the professional - Flat Panel LCD Computer Display P82/B 18" LCD P82/B P232W/B Flat Panel - Active Matrix TFT LCD technology is combined with integrated power supply and cable management system maximizes desktop and provides ideal solution for multi-tasking applications Digital & Analog Input - Slim Bezel, Innovative Design - Digital connection maximizes video performance, dual inputs support simultaneous connectivity to multiple computers Automatic Image Adjustments Instant adjustment of the product. Energy Saving Eco Mode - C L E...
Comparison Chart: Flat Panel LCD
Page 2
.... x 17.6" .x.1.5..0. ". (w/ stand base) .(w. ./o. .st.a.n.d. Power, Menu, Contrast, Brightness, Input Select, Eco Mode, Color Power, Menu, Contrast, Brightness, Input Select, Eco Mode, Color On Screen Controls Temperature,Backlight, Auto Adjust, H/V Adjust, Power Save, Phase, Pitch, Reset, Gamma, Zoom, Smoothing, Menu Lock, OSD Position Temperature, Backlight, Auto Adjust, H/V Adjust, Power Save, Phase, Pitch, Reset, Gamma, Zoom, Smoothing, Menu Lock, OSD M.ul.ti.La.n.g..(E.n.g.., F.re..,.Sp.a.., .ITa.l.., G.e.r.,.Ja.p P.os.iti.on hardware options. Flexible mounting solutions for...
.... x 17.6" .x.1.5..0. ". (w/ stand base) .(w. ./o. .st.a.n.d. Power, Menu, Contrast, Brightness, Input Select, Eco Mode, Color Power, Menu, Contrast, Brightness, Input Select, Eco Mode, Color On Screen Controls Temperature,Backlight, Auto Adjust, H/V Adjust, Power Save, Phase, Pitch, Reset, Gamma, Zoom, Smoothing, Menu Lock, OSD Position Temperature, Backlight, Auto Adjust, H/V Adjust, Power Save, Phase, Pitch, Reset, Gamma, Zoom, Smoothing, Menu Lock, OSD M.ul.ti.La.n.g..(E.n.g.., F.re..,.Sp.a.., .ITa.l.., G.e.r.,.Ja.p P.os.iti.on hardware options. Flexible mounting solutions for...


