Operating Instructions
Page 2
... can radiate radio frequency energy and, if not installed and used in accordance with Part 15 of the following specifications: SPECIFICATIONS Plug Type Nema-Plug 5-15p Cord Type SVT or SJT, minimum 3 × 18 AWG Length Maximum 15 feet Rating Minimum 7 A, ...turning the equipment off and on a circuit different from that this product, you call : Sony Customer Information Center 1-800-222-SONY (7669) or write to USA/Canada, install only a UL LISTED/CSA LABELLED power supply cord meeting the following measures: - If this equipment. Owner's Record The model and serial numbers...
... can radiate radio frequency energy and, if not installed and used in accordance with Part 15 of the following specifications: SPECIFICATIONS Plug Type Nema-Plug 5-15p Cord Type SVT or SJT, minimum 3 × 18 AWG Length Maximum 15 feet Rating Minimum 7 A, ...turning the equipment off and on a circuit different from that this product, you call : Sony Customer Information Center 1-800-222-SONY (7669) or write to USA/Canada, install only a UL LISTED/CSA LABELLED power supply cord meeting the following measures: - If this equipment. Owner's Record The model and serial numbers...
Operating Instructions
Page 3
... 4 Identifying parts and controls 5 Setup 7 Setup 1: Connect a computer equipped with a DVI output connector (digital RGB 7 Setup 2: Connect a computer equipped with an HD15 output connector (analog RGB 7 Setup 3: Connect the power cord 8 Setup 4: Bundle the cords and cables 9 Setup 5: Turn on the monitor and computer 9 Setup 6: Adjust the tilt 10 Selecting the input signal (INPUT button 11 Customizing Your Monitor 12 Navigating the menu 12 PICTURE ADJUSTMENT menu 13 Adjusting the Backlight 13 GB Adjusting the Contrast 13 Adjusting the Brightness 13 Adjusting the Color 13...
... 4 Identifying parts and controls 5 Setup 7 Setup 1: Connect a computer equipped with a DVI output connector (digital RGB 7 Setup 2: Connect a computer equipped with an HD15 output connector (analog RGB 7 Setup 3: Connect the power cord 8 Setup 4: Bundle the cords and cables 9 Setup 5: Turn on the monitor and computer 9 Setup 6: Adjust the tilt 10 Selecting the input signal (INPUT button 11 Customizing Your Monitor 12 Navigating the menu 12 PICTURE ADJUSTMENT menu 13 Adjusting the Backlight 13 GB Adjusting the Contrast 13 Adjusting the Brightness 13 Adjusting the Color 13...
Operating Instructions
Page 4
... is not a malfunction. If you use the appropriate cord, this monitor with general household waste. • The fluorescent tube used in a cold place, a residual image may appear for a long time, a residual image may appear on the LCD screen, and irregular colored stripes or brightness may scratch the LCD screen's coating. • Clean the cabinet, panel, and controls with a soft cloth lightly moistened with a soft cloth. The...
... is not a malfunction. If you use the appropriate cord, this monitor with general household waste. • The fluorescent tube used in a cold place, a residual image may appear for a long time, a residual image may appear on the LCD screen, and irregular colored stripes or brightness may scratch the LCD screen's coating. • Clean the cabinet, panel, and controls with a soft cloth lightly moistened with a soft cloth. The...

Operating Instructions
Page 5
... M/m buttons (3). F AUTO button (page 15) Press this cover when you connect cables or cords. It makes further automatic adjustment of the LCD display A 1 (Power) switch and 1 (power) indicator (pages 9, 18, 22) This switch turns the monitor on when the 1 (power) indicator lights up in parentheses for the current input signal. I Back cover (page 7) Remove this button when the displayed picture seems poorly adjusted. If the 1 (power) indicator does not light up . E INPUT button and INPUT1/INPUT2 indicators (page 11) This button switches the video input signal...
... M/m buttons (3). F AUTO button (page 15) Press this cover when you connect cables or cords. It makes further automatic adjustment of the LCD display A 1 (Power) switch and 1 (power) indicator (pages 9, 18, 22) This switch turns the monitor on when the 1 (power) indicator lights up in parentheses for the current input signal. I Back cover (page 7) Remove this button when the displayed picture seems poorly adjusted. If the 1 (power) indicator does not light up . E INPUT button and INPUT1/INPUT2 indicators (page 11) This button switches the video input signal...
Operating Instructions
Page 7
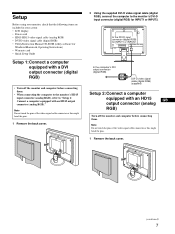
...LCD display • Power cord • HD15-HD15 video signal cable (analog RGB) • DVI-D video signal cable (digital RGB) • Utility/Instruction Manual CD-ROM (utility software for Windows/Macintosh, Operating Instructions) • Warranty card • Quick Setup Guide Setup 1: Connect a computer equipped with a DVI output connector (digital RGB) • Turn off the monitor and computer before connecting them . to the DVI-D input connector (digital RGB) for INPUT1 or INPUT2 to the computer's DVI output connector (digital RGB) DVI-D video signal cable (digital RGB) (supplied...
...LCD display • Power cord • HD15-HD15 video signal cable (analog RGB) • DVI-D video signal cable (digital RGB) • Utility/Instruction Manual CD-ROM (utility software for Windows/Macintosh, Operating Instructions) • Warranty card • Quick Setup Guide Setup 1: Connect a computer equipped with a DVI output connector (digital RGB) • Turn off the monitor and computer before connecting them . to the DVI-D input connector (digital RGB) for INPUT1 or INPUT2 to the computer's DVI output connector (digital RGB) DVI-D video signal cable (digital RGB) (supplied...

Operating Instructions
Page 8
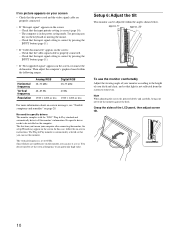
... adapter to a power outlet. 2 Using the supplied HD15-HD15 video signal cable (analog RGB), connect the computer to the monitor's HD15 input connector (analog RGB) for INPUT1 or INPUT2 to the computer's output connector* HD15-HD15 video signal cable (analog RGB) (supplied) Macintosh * When connecting a Macintosh computer, use an adapter (not supplied), if necessary. x Connecting to an IBM PC/AT or compatible computer Setup 3: Connect the power cord 1 Connect the supplied power cord to the monitor's AC IN connector. 2 Connect it to the computer before connecting the video signal cable...
... adapter to a power outlet. 2 Using the supplied HD15-HD15 video signal cable (analog RGB), connect the computer to the monitor's HD15 input connector (analog RGB) for INPUT1 or INPUT2 to the computer's output connector* HD15-HD15 video signal cable (analog RGB) (supplied) Macintosh * When connecting a Macintosh computer, use an adapter (not supplied), if necessary. x Connecting to an IBM PC/AT or compatible computer Setup 3: Connect the power cord 1 Connect the supplied power cord to the monitor's AC IN connector. 2 Connect it to the computer before connecting the video signal cable...
Operating Instructions
Page 10
.... Horizontal frequency Vertical frequency Resolution Analog RGB 28-92 kHz Digital RGB 28-75 kHz 48-85 Hz 60 Hz 1920 × 1200 or less 1920 × 1200 or less For more information about on-screen messages, see "Trouble symptoms and remedies" on the computer. The first time you can use this case, follow the on-screen instructions. The Plug & Play monitor is in the power saving mode. Check that...
.... Horizontal frequency Vertical frequency Resolution Analog RGB 28-92 kHz Digital RGB 28-75 kHz 48-85 Hz 60 Hz 1920 × 1200 or less 1920 × 1200 or less For more information about on-screen messages, see "Trouble symptoms and remedies" on the computer. The first time you can use this case, follow the on-screen instructions. The Plug & Play monitor is in the power saving mode. Check that...

Operating Instructions
Page 13
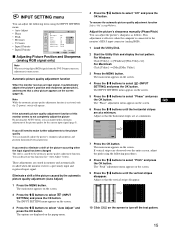
... the default color temperature settings GB 1 Press the MENU button. Backlight : 100 1 Press the MENU button. PICTURE ADJUSTMENT menu You can adjust the following items using the PICTURE ADJUSTMENT menu. • Backlight • Contrast • Brightness • Color • Gamma • Smoothing PICTURE ADJUSTMENT Backlight : Contrast : Brightness : Color : Gamma : Smoothing : 100 50 50 9300K Gamma2 Standard 1: HD15 Select 1920 × 1200/60 Hz Set OK Exit MENU x Adjusting the Backlight If the screen is too bright, adjust the backlight to make the screen easier to adjust...
... the default color temperature settings GB 1 Press the MENU button. Backlight : 100 1 Press the MENU button. PICTURE ADJUSTMENT menu You can adjust the following items using the PICTURE ADJUSTMENT menu. • Backlight • Contrast • Brightness • Color • Gamma • Smoothing PICTURE ADJUSTMENT Backlight : Contrast : Brightness : Color : Gamma : Smoothing : 100 50 50 9300K Gamma2 Standard 1: HD15 Select 1920 × 1200/60 Hz Set OK Exit MENU x Adjusting the Backlight If the screen is too bright, adjust the backlight to make the screen easier to adjust...
Operating Instructions
Page 15
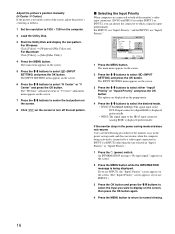
... Exit MENU x Adjusting Picture Position and Sharpness (analog RGB signal only) Note When receiving digital RGB signals from the DVI-D input connector, adjustment is connected to select "Phase" and press the OK button. To resume the automatic picture quality adjustment function Select "On" in memory and automatically recalled when the monitor receives a previously input and registered input signal. For Windows Click [Utility] t [Windows]/[Win Utility.exe]. Adjust so that a clear picture appears on the screen. 2 Press the M/m buttons...
... Exit MENU x Adjusting Picture Position and Sharpness (analog RGB signal only) Note When receiving digital RGB signals from the DVI-D input connector, adjustment is connected to select "Phase" and press the OK button. To resume the automatic picture quality adjustment function Select "On" in memory and automatically recalled when the monitor receives a previously input and registered input signal. For Windows Click [Utility] t [Windows]/[Win Utility.exe]. Adjust so that a clear picture appears on the screen. 2 Press the M/m buttons...
Operating Instructions
Page 16
...; DVI-D (The default setting): The signal input to the DVI-D input connector (digital RGB) is displayed preferentially. • HD15: The signal input to the HD15 input connector (analog RGB) is displayed preferentially. For Windows Click [Utility] t [Windows]/[Win Utility.exe]. If you use "Input2 Priority." For Macintosh Click [Utility] t [Mac]/[Mac Utility]. 4 Press the MENU button. x Selecting the Input Priority When computers are displayed on the screen. 2 Press the MENU button while the INFORMATION message is being activated is connected to a video input connector...
...; DVI-D (The default setting): The signal input to the DVI-D input connector (digital RGB) is displayed preferentially. • HD15: The signal input to the HD15 input connector (analog RGB) is displayed preferentially. For Windows Click [Utility] t [Windows]/[Win Utility.exe]. If you use "Input2 Priority." For Macintosh Click [Utility] t [Mac]/[Mac Utility]. 4 Press the MENU button. x Selecting the Input Priority When computers are displayed on the screen. 2 Press the MENU button while the INFORMATION message is being activated is connected to a video input connector...

Operating Instructions
Page 17
... change the menu position if it is not reset by a black frame. Note that the "Language" setting is blocking an image on the screen. 3 Press the M/m buttons to select "Menu Position" and press the OK button. The picture is displayed on the popup menu. 2 Press the M/m buttons to select the desired mode and press the OK button. • OK: To reset all of the picture, depending on the signal. • Real: The input signal...
... change the menu position if it is not reset by a black frame. Note that the "Language" setting is blocking an image on the screen. 3 Press the M/m buttons to select "Menu Position" and press the OK button. The picture is displayed on the popup menu. 2 Press the M/m buttons to select the desired mode and press the OK button. • OK: To reset all of the picture, depending on the signal. • Real: The input signal...

Operating Instructions
Page 18
... one of the factory preset modes, the monitor may not completely adjust the picture position, phase, and pitch. This adjustment data is a power saving mode defined by VESA, ENERGY STAR, and NUTEK. If you can set . The menu automatically disappears after about 5 seconds. If the input signal matches the factory preset mode, the picture appears on the screen and normal backlight level is DPMS (Display Power Management Signaling) compliant, the monitor will function in...
... one of the factory preset modes, the monitor may not completely adjust the picture position, phase, and pitch. This adjustment data is a power saving mode defined by VESA, ENERGY STAR, and NUTEK. If you can set . The menu automatically disappears after about 5 seconds. If the input signal matches the factory preset mode, the picture appears on the screen and normal backlight level is DPMS (Display Power Management Signaling) compliant, the monitor will function in...
Operating Instructions
Page 19
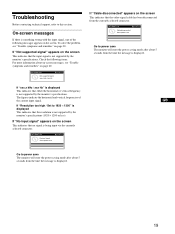
... input signal. INFORMATION No input signal Go to power save 1: HD15 If "Cable disconnected" appears on the screen. Check the following messages appears on the screen This indicates that either the horizontal or vertical frequency is being input via the currently selected connector. INFORMATION Cable disconnected Go to power save 1: HD15 Go to power save The monitor will enter the power saving mode after about 5 seconds from the time the message is displayed. If "Not supported signal...
... input signal. INFORMATION No input signal Go to power save 1: HD15 If "Cable disconnected" appears on the screen. Check the following messages appears on the screen This indicates that either the horizontal or vertical frequency is being input via the currently selected connector. INFORMATION Cable disconnected Go to power save 1: HD15 Go to power save The monitor will enter the power saving mode after about 5 seconds from the time the message is displayed. If "Not supported signal...
Operating Instructions
Page 20
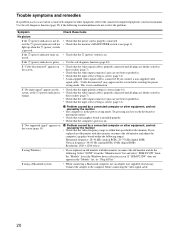
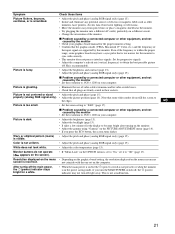
... replaced an old monitor with this monitor, reconnect the old monitor and adjust the computer's graphics board within that the video frequency range is on (page 9). Connect the adapter to the connected computer/equipment's instruction manual. This is on the keyboard or moving the mouse. • Check that your graphics board is installed properly. • Check that the input select setting is correct (page 11). • A non-supplied video signal cable is in . • Check...
... replaced an old monitor with this monitor, reconnect the old monitor and adjust the computer's graphics board within that the video frequency range is on (page 9). Connect the adapter to the connected computer/equipment's instruction manual. This is on the keyboard or moving the mouse. • Check that your graphics board is installed properly. • Check that the input select setting is correct (page 11). • A non-supplied video signal cable is in . • Check...
Operating Instructions
Page 21
... the use of video cable extensions and/or video switch boxes. • Check that is too narrow for progressive signals. • Adjust the computer's refresh rate (vertical frequency) to the edges. Note that the graphics mode (VESA, Macintosh 19'' Color, etc.) and the frequency of the input signal are firmly seated in the power saving mode, if you press the ECO button, the screen turns darker. Picture is too small. • Set the zoom setting to sync with...
... the use of video cable extensions and/or video switch boxes. • Check that is too narrow for progressive signals. • Adjust the computer's refresh rate (vertical frequency) to the edges. Note that the graphics mode (VESA, Macintosh 19'' Color, etc.) and the frequency of the input signal are firmly seated in the power saving mode, if you press the ECO button, the screen turns darker. Picture is too small. • Set the zoom setting to sync with...
Operating Instructions
Page 22
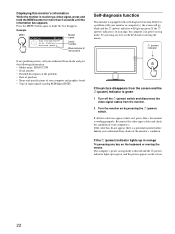
... 1 (power) switch. If all four color bars appear (white, red, green, blue), the monitor is a potential monitor failure. Inform your computer(s). The computer's power saving mode is shut off the 1 (power) switch and disconnect the video signal cables from the monitor. 2 Turn the monitor on the keyboard or moving the mouse. No. : 1234567 Manufactured : 2002-40 Model name Serial number Week and year of input signals (analog RGB/digital RGB) If the picture disappears from the screen and the 1 (power) indicator is green 1 Turn...
... 1 (power) switch. If all four color bars appear (white, red, green, blue), the monitor is a potential monitor failure. Inform your computer(s). The computer's power saving mode is shut off the 1 (power) switch and disconnect the video signal cables from the monitor. 2 Turn the monitor on the keyboard or moving the mouse. No. : 1234567 Manufactured : 2002-40 Model name Serial number Week and year of input signals (analog RGB/digital RGB) If the picture disappears from the screen and the 1 (power) indicator is green 1 Turn...
Quick Setup Guide
Page 2
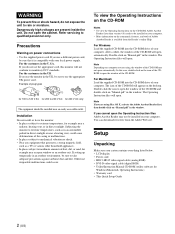
...'s online Help. Setup Unpacking Make sure your carton contains everything listed below. • LCD display • Power cord • HD15-HD15 video signal cable (analog RGB) • DVI-D video signal cable (digital RGB) • Utility/Instruction Manual CD-ROM (utility software for example near a radiator, heating vent, or in direct sunlight or near an easily accessible outlet. Double-click on your computer. The Operating Instruction files will appear on power connections • Use the supplied power cord. The...
...'s online Help. Setup Unpacking Make sure your carton contains everything listed below. • LCD display • Power cord • HD15-HD15 video signal cable (analog RGB) • DVI-D video signal cable (digital RGB) • Utility/Instruction Manual CD-ROM (utility software for example near a radiator, heating vent, or in direct sunlight or near an easily accessible outlet. Double-click on your computer. The Operating Instruction files will appear on power connections • Use the supplied power cord. The...

Quick Setup Guide
Page 3
... monitor. Connect the adapter to a computer. The 1 (power) indicator lights up in red. 2 Press the 1 (power) switch on the computer. The 1 (power) indicator lights up in green. 3 Turn on the computer. 2 MAIN POWER 1 US to the DVI-D input connector (digital RGB) for INPUT1 or INPUT2 to the HD15 input connector (analog RGB) for INPUT1 or INPUT2 HD15-HD15 2 video signal cable (analog RGB) (supplied) DVI-D video signal cable (digital RGB) (supplied) 3 to AC IN to power outlet 4 power cord (supplied) Note For details on securing the cords, refer to a video output connector...
... monitor. Connect the adapter to a computer. The 1 (power) indicator lights up in red. 2 Press the 1 (power) switch on the computer. The 1 (power) indicator lights up in green. 3 Turn on the computer. 2 MAIN POWER 1 US to the DVI-D input connector (digital RGB) for INPUT1 or INPUT2 to the HD15 input connector (analog RGB) for INPUT1 or INPUT2 HD15-HD15 2 video signal cable (analog RGB) (supplied) DVI-D video signal cable (digital RGB) (supplied) 3 to AC IN to power outlet 4 power cord (supplied) Note For details on securing the cords, refer to a video output connector...
Quick Setup Guide
Page 4
... installed properly. • Check that the input select setting is on the screen, check the following ranges: Horizontal frequency: 28-92 kHz (analog RGB), 28-75 kHz (digital RGB) Vertical frequency: 48-85 Hz (analog RGB), 60 Hz (digital RGB) Resolution: 1920 × 1200 or less • If you connect a non-supplied video signal cable, "Cable disconnected" may appear on the supplied CD-ROM). • A non-supplied video signal cable is properly connected and all plugs are not bent or pushed in the power saving mode. x Problem...
... installed properly. • Check that the input select setting is on the screen, check the following ranges: Horizontal frequency: 28-92 kHz (analog RGB), 28-75 kHz (digital RGB) Vertical frequency: 48-85 Hz (analog RGB), 60 Hz (digital RGB) Resolution: 1920 × 1200 or less • If you connect a non-supplied video signal cable, "Cable disconnected" may appear on the supplied CD-ROM). • A non-supplied video signal cable is properly connected and all plugs are not bent or pushed in the power saving mode. x Problem...
Quick Setup Guide
Page 5
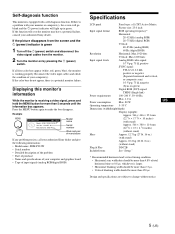
... LCD panel Panel type: a-Si TFT Active Matrix Picture size: 23.0 inch Input signal format RGB operating frequency* Horizontal: 28-92 kHz (analog RGB) 28-75 kHz (digital RGB) Vertical: 48-85 Hz (analog RGB) 60 Hz (digital RGB) Resolution Horizontal: Max.1920 dots Vertical: Max.1200 lines Input signal levels Analog RGB video signal: 0.7 Vp-p, 75 Ω, positive SYNC signal: TTL level, 2.2 kΩ, positive or negative (Separate horizontal and vertical, or composite sync) 0.3 Vp-p, 75 Ω, negative (Sync on by pressing the 1 (power) switch. Displaying this monitor...
... LCD panel Panel type: a-Si TFT Active Matrix Picture size: 23.0 inch Input signal format RGB operating frequency* Horizontal: 28-92 kHz (analog RGB) 28-75 kHz (digital RGB) Vertical: 48-85 Hz (analog RGB) 60 Hz (digital RGB) Resolution Horizontal: Max.1920 dots Vertical: Max.1200 lines Input signal levels Analog RGB video signal: 0.7 Vp-p, 75 Ω, positive SYNC signal: TTL level, 2.2 kΩ, positive or negative (Separate horizontal and vertical, or composite sync) 0.3 Vp-p, 75 Ω, negative (Sync on by pressing the 1 (power) switch. Displaying this monitor...


