Operating Instructions (primary manual)
Page 2
... white model) This monitor complies with Part 15 of the FCC Rules. Model No. Do not open the cabinet. This equipment generates, uses, and can be determined by turning the equipment off and on a circuit different from that may not cause harmful interference, and (2) this device must accept any changes or modifications not expressly approved in accordance with the instructions...
... white model) This monitor complies with Part 15 of the FCC Rules. Model No. Do not open the cabinet. This equipment generates, uses, and can be determined by turning the equipment off and on a circuit different from that may not cause harmful interference, and (2) this device must accept any changes or modifications not expressly approved in accordance with the instructions...
Operating Instructions (primary manual)
Page 3
... • Macintosh is a trademark licensed to your computer 7 Step 2: Check the digital/analog select switch 8 Step 3: Connect the audio cord 8 Step 4: Connect the power cord 8 Step 5: Secure the cords and close the back cover 8 Step 6: Turn on the monitor and computer 9 Using the stereo speakers 9 Adjusting the tilt and height 10 Customizing Your Monitor 11 Navigating the menu 11 Adjusting the contrast (CONTRAST 12 Adjusting the black level of their respective companies. • Furthermore, "ä" and...
... • Macintosh is a trademark licensed to your computer 7 Step 2: Check the digital/analog select switch 8 Step 3: Connect the audio cord 8 Step 4: Connect the power cord 8 Step 5: Secure the cords and close the back cover 8 Step 6: Turn on the monitor and computer 9 Using the stereo speakers 9 Adjusting the tilt and height 10 Customizing Your Monitor 11 Navigating the menu 11 Adjusting the contrast (CONTRAST 12 Adjusting the black level of their respective companies. • Furthermore, "ä" and...
Operating Instructions (primary manual)
Page 4
... prolonged contact is compatible with your Sony dealer when replacing the fluorescent tube. If the screen becomes dark, unstable, or does not turn on power connections • Use the supplied power cord. For the customers in a scratched picture tube. • Note that it can damage the LCD screen. This magnetic field may appear on or scratch the LCD screen. If you place the monitor by a window. • Do...
... prolonged contact is compatible with your Sony dealer when replacing the fluorescent tube. If the screen becomes dark, unstable, or does not turn on power connections • Use the supplied power cord. For the customers in a scratched picture tube. • Note that it can damage the LCD screen. This magnetic field may appear on or scratch the LCD screen. If you place the monitor by a window. • Do...
Operating Instructions (primary manual)
Page 5
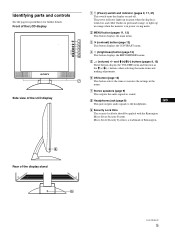
...switch turns the display on , and either flashes in green and orange, or lights up in power saving mode. 2 MENU button (pages 11, 12) This button displays the main menu. 3 6 (contrast) button (page 12) This button displays the CONTRAST menu. 4 8 (brightness) button (page 12) This button displays the BRITGHTNESS menu. 5 2 (volume) +/- and M(+)/m(-) buttons (pages 9, 12) These buttons display the VOLUME menu and function as sound. 8 Headphones jack (page 9) This jack outputs audio signals to the headphones. Identifying parts and controls See the pages in the menu. 7 Stereo speakers...
...switch turns the display on , and either flashes in green and orange, or lights up in power saving mode. 2 MENU button (pages 11, 12) This button displays the main menu. 3 6 (contrast) button (page 12) This button displays the CONTRAST menu. 4 8 (brightness) button (page 12) This button displays the BRITGHTNESS menu. 5 2 (volume) +/- and M(+)/m(-) buttons (pages 9, 12) These buttons display the VOLUME menu and function as sound. 8 Headphones jack (page 9) This jack outputs audio signals to the headphones. Identifying parts and controls See the pages in the menu. 7 Stereo speakers...
Operating Instructions (primary manual)
Page 6
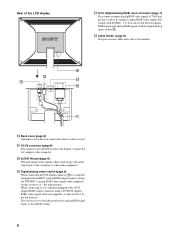
... connector (page 8) This connector provides DC power to D - You can switch between digital RGB signals and analog RGB signals with DVI Rev. 1.0. Rear of the computer or other audio equipment. qs AUDIO IN jack (page 8) This jack inputs audio signals when connecting to the audio output jack of the LCD display OPEN qf DVI-I input connector qf to a computer equipped with a DVI (digital RGB) output connector using the DVI-HD15 (analog RGB) video signal cable (supplied), set this switch to the monitor. 0 Back cover (page 8) Open this cover when you connect/disconnect cables or cords...
... connector (page 8) This connector provides DC power to D - You can switch between digital RGB signals and analog RGB signals with DVI Rev. 1.0. Rear of the computer or other audio equipment. qs AUDIO IN jack (page 8) This jack inputs audio signals when connecting to the audio output jack of the LCD display OPEN qf DVI-I input connector qf to a computer equipped with a DVI (digital RGB) output connector using the DVI-HD15 (analog RGB) video signal cable (supplied), set this switch to the monitor. 0 Back cover (page 8) Open this cover when you connect/disconnect cables or cords...
Operating Instructions (primary manual)
Page 7
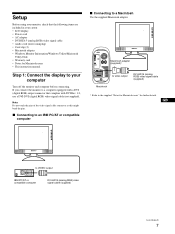
... users • This instruction manual Step 1: Connect the display to your carton: • LCD display • Power cord • AC adapter • DVI-HD15 (analog RGB) video signal cable • Audio cord (stereo miniplug) • Cord clip (2) • Macintosh adapter • Windows Monitor Information/Windows Utility/Macintosh Utility Disk • Warranty card • Notes for further details. Macintosh adapter (supplied)* to video output DVI-HD15 (analog RGB) video signal cable (supplied) Macintosh * Refer to a computer equipped with DVI Rev. 1.0, use a DVI-DVI (digital...
... users • This instruction manual Step 1: Connect the display to your carton: • LCD display • Power cord • AC adapter • DVI-HD15 (analog RGB) video signal cable • Audio cord (stereo miniplug) • Cord clip (2) • Macintosh adapter • Windows Monitor Information/Windows Utility/Macintosh Utility Disk • Warranty card • Notes for further details. Macintosh adapter (supplied)* to video output DVI-HD15 (analog RGB) video signal cable (supplied) Macintosh * Refer to a computer equipped with DVI Rev. 1.0, use a DVI-DVI (digital...
Operating Instructions (primary manual)
Page 8
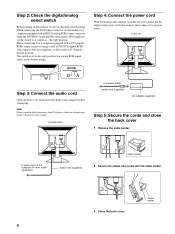
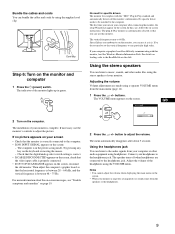
...for analog RGB signal input) as the default setting Step 4: Connect the power cord With the monitor and computer switched off, first connect the AC adapter and power cord to the monitor, then connect it to a computer equipped with a DVI (digital RGB) output connector using the DVI-HD15 (analog RGB) video signal cable (supplied), set the switch to DC IN OPEN DA Step 3: Connect the audio cord Open the back cover and turn off the display and computer before connecting. When connecting the DVI-I input connector on the monitor, be sure to a power outlet power cord (supplied) AC adapter...
...for analog RGB signal input) as the default setting Step 4: Connect the power cord With the monitor and computer switched off, first connect the AC adapter and power cord to the monitor, then connect it to a computer equipped with a DVI (digital RGB) output connector using the DVI-HD15 (analog RGB) video signal cable (supplied), set the switch to DC IN OPEN DA Step 3: Connect the audio cord Open the back cover and turn off the display and computer before connecting. When connecting the DVI-I input connector on the monitor, be sure to a power outlet power cord (supplied) AC adapter...
Operating Instructions (primary manual)
Page 9
... monitor's information. Adjusting the volume Volume adjustments are made using a separate VOLUME menu from your screen • Check that you can use the monitor's controls to the computer. If no sound comes from the speakers or the headphones. 9 Check that the digital/analog select switch setting is between 48 - 75 Hz. Then adjust the computer's graphic board so that the video input cable is properly connected. • If OUT OF SCAN RANGE appears on the screen, check that the horizontal frequency...
... monitor's information. Adjusting the volume Volume adjustments are made using a separate VOLUME menu from your screen • Check that you can use the monitor's controls to the computer. If no sound comes from the speakers or the headphones. 9 Check that the digital/analog select switch setting is between 48 - 75 Hz. Then adjust the computer's graphic board so that the video input cable is properly connected. • If OUT OF SCAN RANGE appears on the screen, check that the horizontal frequency...
Operating Instructions (primary manual)
Page 11
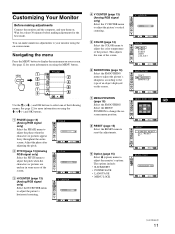
... object displayed on using the M(+)/m(-) and OK buttons. 1 PHASE (page 13) (Analog RGB signal only) Select the PHASE menu to adjust the monitor's options. PHAS E 30 EX I T P I TCH 1344 EX I T H CENTER 50 EX I T (continued) 11 MENU , PHASE 4 V CENTER (page 13) (Analog RGB signal only) Select the V CENTER menu to adjust the picture's vertical centering. 5 COLOR (page 14) Select the COLOR menu to your screen. The options include: • BACKLIGHT • POWER SAVE • LANGUAGE • MENU LOCK...
... object displayed on using the M(+)/m(-) and OK buttons. 1 PHASE (page 13) (Analog RGB signal only) Select the PHASE menu to adjust the monitor's options. PHAS E 30 EX I T P I TCH 1344 EX I T H CENTER 50 EX I T (continued) 11 MENU , PHASE 4 V CENTER (page 13) (Analog RGB signal only) Select the V CENTER menu to adjust the picture's vertical centering. 5 COLOR (page 14) Select the COLOR menu to your screen. The options include: • BACKLIGHT • POWER SAVE • LANGUAGE • MENU LOCK...

Operating Instructions (primary manual)
Page 12
... buttons are displayed in the CONTRAST and BRIGHTNESS menu. 2 Press the M(+)/m(-) buttons to make the adjustment, then press the OK button. BR I GHTNESS 50 48 . 4 kHz / 60Hz Horizontal frequency of the current input signal Vertical frequency of the current input signal are pressed, the menu closes automatically after about 5 seconds. When you want to select the menu item. , OK 3 Adjust the menu. Note You can reset the adjustments using the RESET menu. The BRIGHTNESS menu appears on the screen...
... buttons are displayed in the CONTRAST and BRIGHTNESS menu. 2 Press the M(+)/m(-) buttons to make the adjustment, then press the OK button. BR I GHTNESS 50 48 . 4 kHz / 60Hz Horizontal frequency of the current input signal Vertical frequency of the current input signal are pressed, the menu closes automatically after about 5 seconds. When you want to select the menu item. , OK 3 Adjust the menu. Note You can reset the adjustments using the RESET menu. The BRIGHTNESS menu appears on the screen...
Operating Instructions (primary manual)
Page 13
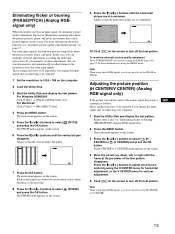
... the OK button. Note When using digital RGB signals, you do not need to set the PHASE or PITCH. Eliminating flicker or blurring (PHASE/PITCH) (Analog RGB signal only) When the monitor receives an input signal, the automatic picture quality adjustment function of "Eliminating flicker or blurring (PHASE/PITCH) (Analog RGB signal only)." 2 Press the MENU button. GB 1 Start the Utility Disk and display the test pattern. These settings may not completely adjust the picture position, phase, and...
... the OK button. Note When using digital RGB signals, you do not need to set the PHASE or PITCH. Eliminating flicker or blurring (PHASE/PITCH) (Analog RGB signal only) When the monitor receives an input signal, the automatic picture quality adjustment function of "Eliminating flicker or blurring (PHASE/PITCH) (Analog RGB signal only)." 2 Press the MENU button. GB 1 Start the Utility Disk and display the test pattern. These settings may not completely adjust the picture position, phase, and...
Operating Instructions (primary manual)
Page 14
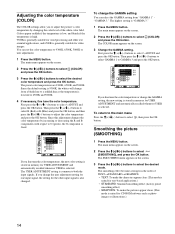
... suited for text-based applications.) • STANDARD: Standard smoothing effect (factory preset smoothing effect) • GRAPHICS: To make the pictures appear clean. (This mode is suited for video images. The smoothing effect becomes stronger in memory for USER ADJUSTMENT and automatically recalled whenever USER is 9300K, the whites will change the user adjustment setting for one input signal, the setting for USER ADJUSTMENT and automatically recalled whenever USER is selected. Colors appear reddish...
... suited for text-based applications.) • STANDARD: Standard smoothing effect (factory preset smoothing effect) • GRAPHICS: To make the pictures appear clean. (This mode is suited for video images. The smoothing effect becomes stronger in memory for USER ADJUSTMENT and automatically recalled whenever USER is 9300K, the whites will change the user adjustment setting for one input signal, the setting for USER ADJUSTMENT and automatically recalled whenever USER is selected. Colors appear reddish...
Operating Instructions (primary manual)
Page 15
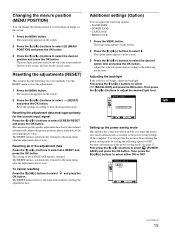
... the computer. Then press the M(+)/m(-) buttons to the following instructions. POWER S A V E ON OFF EX I T Setting up the power saving mode This monitor has a function which enables it is too bright, adjust the backlight. The main menu appears on the screen. 2 Press the M(+)/m(-) buttons to select POSITION) and press the OK button. (MENU 3 Press the M(+)/m(-) buttons to the power saving settings of the power saving mode, see page 17. Adjust the selected option item according to...
... the computer. Then press the M(+)/m(-) buttons to the following instructions. POWER S A V E ON OFF EX I T Setting up the power saving mode This monitor has a function which enables it is too bright, adjust the backlight. The main menu appears on the screen. 2 Press the M(+)/m(-) buttons to select POSITION) and press the OK button. (MENU 3 Press the M(+)/m(-) buttons to the power saving settings of the power saving mode, see page 17. Adjust the selected option item according to...
Operating Instructions (primary manual)
Page 17
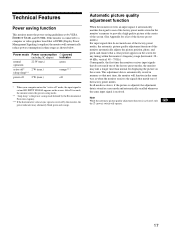
... monitor's frequency range (horizontal: 28 - 64 kHz, vertical: 48 - 75 Hz). GB 17 Technical Features Power saving function This monitor meets the power-saving guidelines set by the Environmental Protection Agency. *** If the horizontal or vertical sync signal is automatically stored in the same way as a user mode and automatically recalled whenever the same input signal is cut and NO INPUT SIGNAL appears on the screen. In all modes as above, if the picture...
... monitor's frequency range (horizontal: 28 - 64 kHz, vertical: 48 - 75 Hz). GB 17 Technical Features Power saving function This monitor meets the power-saving guidelines set by the Environmental Protection Agency. *** If the horizontal or vertical sync signal is automatically stored in the same way as a user mode and automatically recalled whenever the same input signal is cut and NO INPUT SIGNAL appears on the screen. In all modes as above, if the picture...
Operating Instructions (primary manual)
Page 18
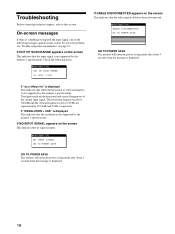
... monitor's specifications. On-screen messages If there is input. The figures indicate the horizontal and vertical frequencies of the following items. I NFORMA T I GNA L GO TO POWER SAVE GO TO POWER SAVE The monitor will enter the power saving mode after about 5 seconds from the message is displayed. 18 I NFORMA T I ON NO I NPUT S I ON OUT OF SCAN RANGE x x . If "xx.x kHz/xx Hz" is displayed This indicates that the video signal cable...
... monitor's specifications. On-screen messages If there is input. The figures indicate the horizontal and vertical frequencies of the following items. I NFORMA T I GNA L GO TO POWER SAVE GO TO POWER SAVE The monitor will enter the power saving mode after about 5 seconds from the message is displayed. 18 I NFORMA T I ON NO I NPUT S I ON OUT OF SCAN RANGE x x . If "xx.x kHz/xx Hz" is displayed This indicates that the video signal cable...
Operating Instructions (primary manual)
Page 19
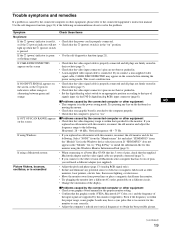
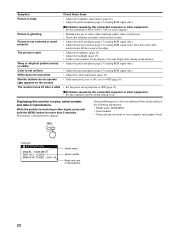
..., you replaced an old monitor with this monitor, reconnect the old monitor and adjust the frequency range to the connected equipment's instruction manual. Trouble symptoms and remedies If a problem is caused by the connected computer or other equipment • Check your graphic board is attached to the type of signals input via the DVI-I (digital/analog RGB) input connector (page 8). If using the Windows Monitor Information Disk (page 9). If NO INPUT SIGNAL appears on the screen, or the 1 (power) indicator...
..., you replaced an old monitor with this monitor, reconnect the old monitor and adjust the frequency range to the connected equipment's instruction manual. Trouble symptoms and remedies If a problem is caused by the connected computer or other equipment • Check your graphic board is attached to the type of signals input via the DVI-I (digital/analog RGB) input connector (page 8). If using the Windows Monitor Information Disk (page 9). If NO INPUT SIGNAL appears on the screen, or the 1 (power) indicator...
Operating Instructions (primary manual)
Page 20
.... If any problem persists, call your authorized Sony dealer and give the following information: • Model name: SDM-M51D • Serial number • Name and specifications of your computer. • Eliminate the use of video cable extensions and/or video switch boxes. • Check that some video modes do not operate ( appears on the screen) • Adjust the pitch and phase (page 13) (analog RGB signal only). • Adjust the color temperature (page...
.... If any problem persists, call your authorized Sony dealer and give the following information: • Model name: SDM-M51D • Serial number • Name and specifications of your computer. • Eliminate the use of video cable extensions and/or video switch boxes. • Check that some video modes do not operate ( appears on the screen) • Adjust the pitch and phase (page 13) (analog RGB signal only). • Adjust the color temperature (page...
Operating Instructions (primary manual)
Page 21
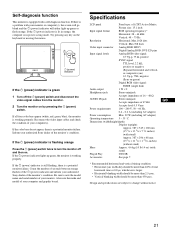
Specifications LCD panel Panel type: a-Si TFT Active Matrix Picture size: 15.1 inch Input signal format RGB operating frequency* Horizontal: 28 - 64 kHz Vertical: 48 - 75 Hz Resolution Horizontal: Max.1024 dots Vertical: Max.768 lines Video input connector Analog RGB: HD15 Digital/Analog RGB: DVI-I 29 pins Input signal levels Analog RGB video signal: 0.7 Vp-p, 75 Ω, positive SYNC signal TTL level, 2.2 kΩ, positive or negative (Separate horizontal and vertical, or composite sync) 0.3 Vp-p, 75Ω, negative (Sync on by pressing the 1 (power) switch...
Specifications LCD panel Panel type: a-Si TFT Active Matrix Picture size: 15.1 inch Input signal format RGB operating frequency* Horizontal: 28 - 64 kHz Vertical: 48 - 75 Hz Resolution Horizontal: Max.1024 dots Vertical: Max.768 lines Video input connector Analog RGB: HD15 Digital/Analog RGB: DVI-I 29 pins Input signal levels Analog RGB video signal: 0.7 Vp-p, 75 Ω, positive SYNC signal TTL level, 2.2 kΩ, positive or negative (Separate horizontal and vertical, or composite sync) 0.3 Vp-p, 75Ω, negative (Sync on by pressing the 1 (power) switch...
Marketing Specifications
Page 1
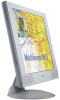
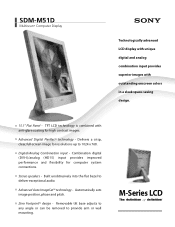
...combined with outstanding onscreen colors in a sleek space-saving design. 15.1" Flat Panel - Advanced Digital FlexRes™ technology - Stereo speakers - Automatically sets image position, phase and pitch. Removable tilt base adjusts to any angle or can be removed to provide arm or wall mounting. M-Series LCD Digital/Analog Combination input - Zero Footprint™ design - SDM-M51D Multiscan® Computer Display Technologically advanced LCD display with unique digital and analog combination input provides superior images with anti-glare coating for high contrast images.
...combined with outstanding onscreen colors in a sleek space-saving design. 15.1" Flat Panel - Advanced Digital FlexRes™ technology - Stereo speakers - Automatically sets image position, phase and pitch. Removable tilt base adjusts to any angle or can be removed to provide arm or wall mounting. M-Series LCD Digital/Analog Combination input - Zero Footprint™ design - SDM-M51D Multiscan® Computer Display Technologically advanced LCD display with unique digital and analog combination input provides superior images with anti-glare coating for high contrast images.
Marketing Specifications
Page 2
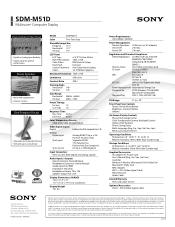
.../displays Printed in part without notice. Sony hereby disclaims any combination of the hardware and software in this product meets the International Energy Star Program for optimal performance Stereo Speakers • Multi-media applications • Internet Content Zero Footprint Design • Adjustable and removable tilt base • Sleek and space saving design Model SDM-M51D Color Two-Tone Gray Viewable Image Size Diagonal 15.1" Horizontal 12.1" Vertical 9.1" LCD Panel LCD Type Native Resolution Color Filters Pixel...
.../displays Printed in part without notice. Sony hereby disclaims any combination of the hardware and software in this product meets the International Energy Star Program for optimal performance Stereo Speakers • Multi-media applications • Internet Content Zero Footprint Design • Adjustable and removable tilt base • Sleek and space saving design Model SDM-M51D Color Two-Tone Gray Viewable Image Size Diagonal 15.1" Horizontal 12.1" Vertical 9.1" LCD Panel LCD Type Native Resolution Color Filters Pixel...


