
Operating Instructions
Page 3
... 7 Step 3: Connect the power cord 8 Step 4: Secure the cords and replace the back cover 8 Step 5: Turn on the monitor and computer 9 Adjusting the tilt 9 Selecting the input signal (INPUT button 9 Customizing Your Monitor 10 Navigating the menu 10 PICTURE menu 10 SCREEN menu (analog RGB signal only 12 MENU POSITION menu 13... Automatic picture quality adjustment function (analog RGB signal only 16 Troubleshooting 17 On-screen messages 17 Trouble symptoms and remedies 18 Specifications 20 http://www.sony.net/ 3
... 7 Step 3: Connect the power cord 8 Step 4: Secure the cords and replace the back cover 8 Step 5: Turn on the monitor and computer 9 Adjusting the tilt 9 Selecting the input signal (INPUT button 9 Customizing Your Monitor 10 Navigating the menu 10 PICTURE menu 10 SCREEN menu (analog RGB signal only 12 MENU POSITION menu 13... Automatic picture quality adjustment function (analog RGB signal only 16 Troubleshooting 17 On-screen messages 17 Trouble symptoms and remedies 18 Specifications 20 http://www.sony.net/ 3

Operating Instructions
Page 4
...cabinet, panel, and controls with a soft cloth lightly moistened with a mild detergent solution. Installation on a wall or a mounting arm If you place the monitor by a window. • Do not push on a flat surface. Take care when you intend to install the display on a wall or a mounting arm...parked in direct sunlight. Transportation • Disconnect all cables from such surface, it is made with both hands when transporting. Subjecting the monitor to extreme temperatures, such as the temperature rises to inordinate amounts of this type of plug types for 100 to 120 V AC ...
...cabinet, panel, and controls with a soft cloth lightly moistened with a mild detergent solution. Installation on a wall or a mounting arm If you place the monitor by a window. • Do not push on a flat surface. Take care when you intend to install the display on a wall or a mounting arm...parked in direct sunlight. Transportation • Disconnect all cables from such surface, it is made with both hands when transporting. Subjecting the monitor to extreme temperatures, such as the temperature rises to inordinate amounts of this type of plug types for 100 to 120 V AC ...

Operating Instructions
Page 5
...lower right part of the front of the display 1 1 (Power) switch and indicator (pages 9, 15) To turn the display on or off . Front of the monitor. Press upward to the monitor. 7 Light sensor (page 16) This sensor measures the brightness of the screen. Micro Saver Security System is in orange when the... monitor is a trademark of Kensington. 5 Identifying parts and controls See the pages in the menu. 5 button (page 16) This button is used to cover the ...
...lower right part of the front of the display 1 1 (Power) switch and indicator (pages 9, 15) To turn the display on or off . Front of the monitor. Press upward to the monitor. 7 Light sensor (page 16) This sensor measures the brightness of the screen. Micro Saver Security System is in orange when the... monitor is a trademark of Kensington. 5 Identifying parts and controls See the pages in the menu. 5 button (page 16) This button is used to cover the ...

Operating Instructions
Page 7
...computer's DVI output connector (digital RGB) to the DVI-D input connector (digital RGB) DVI-D video signal cable (digital RGB) (supplied) to the monitor's HD15 input connector (analog RGB). Otherwise, the display may topple over. Notes • Do not touch the pins of the video signal cable connector...video signal cable (analog RGB) (supplied) 7 Connect the Macintosh adapter to the following items are included in your computer Turn off the monitor and computer before connecting the cable. x Connecting to an IBM PC/AT or compatible computer to the HD15 input connector (analog RGB) to...
...computer's DVI output connector (digital RGB) to the DVI-D input connector (digital RGB) DVI-D video signal cable (digital RGB) (supplied) to the monitor's HD15 input connector (analog RGB). Otherwise, the display may topple over. Notes • Do not touch the pins of the video signal cable connector...video signal cable (analog RGB) (supplied) 7 Connect the Macintosh adapter to the following items are included in your computer Turn off the monitor and computer before connecting the cable. x Connecting to an IBM PC/AT or compatible computer to the HD15 input connector (analog RGB) to...
Operating Instructions
Page 8
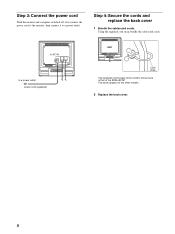
Step 4: Secure the cords and replace the back cover 1 Bundle the cables and cords. Using the supplied cord strap, bundle the cables and cords. The same applies for the other models. 2 Replace the back cover. 8 to AC IN to a power outlet. Step 3: Connect the power cord With the monitor and computer switched off, first connect the power cord to the monitor, then connect it to a power outlet power cord (supplied) Cord strap The illustration of the back of the monitor shown here is that of the SDM-HS75P.
Step 4: Secure the cords and replace the back cover 1 Bundle the cables and cords. Using the supplied cord strap, bundle the cables and cords. The same applies for the other models. 2 Replace the back cover. 8 to AC IN to a power outlet. Step 3: Connect the power cord With the monitor and computer switched off, first connect the power cord to the monitor, then connect it to a power outlet power cord (supplied) Cord strap The illustration of the back of the monitor shown here is that of the SDM-HS75P.
Operating Instructions
Page 9
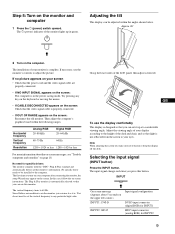
...× 1024 or less 1280 × 1024 or less For more information about 5 seconds on the screen. Grasp the lower sides of the monitor lights up at a comfortable viewing angle. Adjust the viewing angle of your display according to the height of your screen • Check that the... power cord and the video signal cable are unobtrusive on your monitor is automatically selected so that light is properly connected. • If OUT OF RANGE appears on -screen instructions. Try pressing any particular high...
...× 1024 or less 1280 × 1024 or less For more information about 5 seconds on the screen. Grasp the lower sides of the monitor lights up at a comfortable viewing angle. Adjust the viewing angle of your display according to the height of your screen • Check that the... power cord and the video signal cable are unobtrusive on your monitor is automatically selected so that light is properly connected. • If OUT OF RANGE appears on -screen instructions. Try pressing any particular high...

Operating Instructions
Page 10
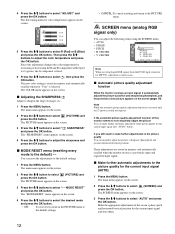
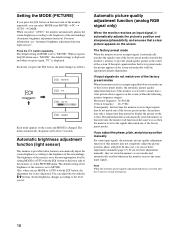
... MOVIE: Clear picture with strong contrast. • PC: Soft tone picture. • AUTO: Automatically adjusts the screen brightness according to your monitor using the on . If no buttons are pressed, the menu closes automatically after about 45 seconds. The MODE menu appears on the screen. ...numerous adjustments to the brightness of the surroundings (automatic brightness adjustment function). Wait for at least 30 minutes before making adjustments Connect the monitor and the computer, and turn them on -screen menu. MENU 2 Select the menu you cannot adjust the backlight. Press the ...
... MOVIE: Clear picture with strong contrast. • PC: Soft tone picture. • AUTO: Automatically adjusts the screen brightness according to your monitor using the on . If no buttons are pressed, the menu closes automatically after about 45 seconds. The MODE menu appears on the screen. ...numerous adjustments to the brightness of the surroundings (automatic brightness adjustment function). Wait for at least 30 minutes before making adjustments Connect the monitor and the computer, and turn them on -screen menu. MENU 2 Select the menu you cannot adjust the backlight. Press the ...
Operating Instructions
Page 12
... button. The new color setting is stored in memory and automatically recalled when the monitor receives a previously input and registered input signal. x Automatic picture quality adjustment function When the monitor receives an input signal, it automatically adjusts the picture's position and sharpness (phase/...to adjust the sharpness and press the OK button. Note While the automatic picture quality adjustment function is unnecessary. Since this monitor seems to not completely adjust the picture You can make further adjustments to the picture quality You can reset the adjustments to...
... button. The new color setting is stored in memory and automatically recalled when the monitor receives a previously input and registered input signal. x Automatic picture quality adjustment function When the monitor receives an input signal, it automatically adjusts the picture's position and sharpness (phase/...to adjust the sharpness and press the OK button. Note While the automatic picture quality adjustment function is unnecessary. Since this monitor seems to not completely adjust the picture You can make further adjustments to the picture quality You can reset the adjustments to...
Operating Instructions
Page 13
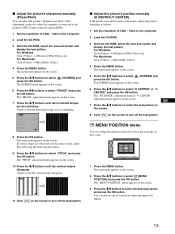
... menu appears on the screen to turn off the test pattern. x Adjust the picture's position manually (H CENTER /V CENTER) If the picture is connected to the monitor's HD15 input connector (analog RGB). 1 Set the resolution to 1280 × 1024 on the screen. You can change the menu position if it is blocking...
... menu appears on the screen to turn off the test pattern. x Adjust the picture's position manually (H CENTER /V CENTER) If the picture is connected to the monitor's HD15 input connector (analog RGB). 1 Set the resolution to 1280 × 1024 on the screen. You can change the menu position if it is blocking...

Operating Instructions
Page 14
... terminal has no input signal, or when you select AUTO ON in the INPUT SENSING menu, the monitor automatically detects an input signal to an input terminal, and changes the input automatically before the monitor goes into the power saving mode automatically. • AUTO OFF: The input is not changed , ... on the left upper of buttons to prevent accidental adjustments or resetting. When there is not reset by the INPUT button on the monitor and the terminal has no input signal, the monitor goes into the power saving mode. The RESET menu appears on -screen message appears (page 17) and the...
... terminal has no input signal, or when you select AUTO ON in the INPUT SENSING menu, the monitor automatically detects an input signal to an input terminal, and changes the input automatically before the monitor goes into the power saving mode automatically. • AUTO OFF: The input is not changed , ... on the left upper of buttons to prevent accidental adjustments or resetting. When there is not reset by the INPUT button on the monitor and the terminal has no input signal, the monitor goes into the power saving mode. The RESET menu appears on -screen message appears (page 17) and the...
Operating Instructions
Page 15
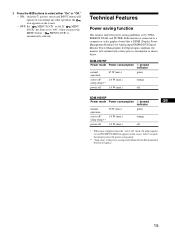
...button will automatically reduce power consumption as shown below. After 5 seconds, the monitor enters the power saving mode. ** "deep sleep" is the power saving mode defined by VESA, ENERGY STAR, and NUTEK. SDM-HS75P Power mode Power consumption 1 (power) indicator normal operation 45 W (max....) green active off* 1.0 W (max.) (deep sleep)** orange power off 1.0 W (max.) off SDM-HS95P Power mode Power consumption 1 (power) GB indicator ...
...button will automatically reduce power consumption as shown below. After 5 seconds, the monitor enters the power saving mode. ** "deep sleep" is the power saving mode defined by VESA, ENERGY STAR, and NUTEK. SDM-HS75P Power mode Power consumption 1 (power) indicator normal operation 45 W (max....) green active off* 1.0 W (max.) (deep sleep)** orange power off 1.0 W (max.) off SDM-HS95P Power mode Power consumption 1 (power) GB indicator ...
Operating Instructions
Page 16
...by setting MODE to the brightness of the surroundings (Automatic brightness adjustment function). Automatic brightness adjustment function (light sensor) This monitor is provided with the appropriate default adjustments. If the input signal matches the factory preset mode, the picture appears on the...t GAME. The default setting of the brightness of the screen is also displayed. In this case, you select "AUTO," the monitor automatically adjusts the screen brightness according to AUTO with the button on the screen automatically with a feature to automatically adjust the screen ...
...by setting MODE to the brightness of the surroundings (Automatic brightness adjustment function). Automatic brightness adjustment function (light sensor) This monitor is provided with the appropriate default adjustments. If the input signal matches the factory preset mode, the picture appears on the...t GAME. The default setting of the brightness of the screen is also displayed. In this case, you select "AUTO," the monitor automatically adjusts the screen brightness according to AUTO with the button on the screen automatically with a feature to automatically adjust the screen ...
Operating Instructions
Page 17
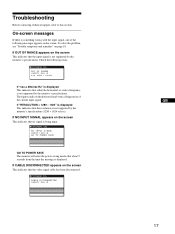
... that either the horizontal or vertical frequency is not supported by the monitor's specifications. I NFORMA T I ON CAB L E D I SCONNECT ED I NPUT 1 : DV I -D GO TO POWER SAVE GO TO POWER SAVE The monitor will enter the power saving mode after about 5 seconds from the ... I GNA L I NPUT 1 : DV I -D GB 17 If CABLE DISCONNECTED appears on the screen. On-screen messages If there is not supported by the monitor's specifications (1280 × 1024 or less). If "RESOLUTION > 1280 × 1024" is being input. Troubleshooting Before contacting technical support, refer to this section....
... that either the horizontal or vertical frequency is not supported by the monitor's specifications. I NFORMA T I ON CAB L E D I SCONNECT ED I NPUT 1 : DV I -D GO TO POWER SAVE GO TO POWER SAVE The monitor will enter the power saving mode after about 5 seconds from the ... I GNA L I NPUT 1 : DV I -D GB 17 If CABLE DISCONNECTED appears on the screen. On-screen messages If there is not supported by the monitor's specifications (1280 × 1024 or less). If "RESOLUTION > 1280 × 1024" is being input. Troubleshooting Before contacting technical support, refer to this section....

Operating Instructions
Page 18
... Windows and replaced an old monitor with this monitor, • If you replaced an old monitor with this monitor, reconnect the old monitor and adjust the computer's graphics board within the proper range, some graphics boards may appear on . • Restart the computer. Select "SONY" from the "Manufacturers" list and select "SDM-HS75P" or "SDM-HS95P" from the "Models...
... Windows and replaced an old monitor with this monitor, • If you replaced an old monitor with this monitor, reconnect the old monitor and adjust the computer's graphics board within the proper range, some graphics boards may appear on . • Restart the computer. Select "SONY" from the "Manufacturers" list and select "SDM-HS75P" or "SDM-HS95P" from the "Models...
Operating Instructions
Page 19
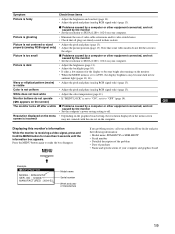
... of video cable extensions and/or video switch boxes. • Check that some video modes do not operate ( appears on the screen) The monitor turns off after turning on your computer. • Adjust the brightness (page 11). • Adjust the backlight (page 10). • It... on the computer. NO : 1234567 MANUFACTURED : 2004-52 Model name Serial number Week and year of your authorized Sony dealer and give the following information: • Model name: SDM-HS75P or SDM-HS95P • Serial number • Detailed description of the problem • Date of purchase • Name and...
... of video cable extensions and/or video switch boxes. • Check that some video modes do not operate ( appears on the screen) The monitor turns off after turning on your computer. • Adjust the brightness (page 11). • Adjust the backlight (page 10). • It... on the computer. NO : 1234567 MANUFACTURED : 2004-52 Model name Serial number Week and year of your authorized Sony dealer and give the following information: • Model name: SDM-HS75P or SDM-HS95P • Serial number • Detailed description of the problem • Date of purchase • Name and...

Quick Setup Guide
Page 2
...be sure to use a different power cord, be installed near an easily accessible outlet. 2 (US) Installation Do not install or leave the monitor: • In places subject to mandatory FCC standards. Precautions Warning on a flat surface. This is made with your local power supply. ...8226; In places subject to extreme temperatures, such as in an automobile parked in the United States This product contains mercury. Subjecting the monitor to mechanical vibration or shock. • Near any equipment that the LCD screen is not malfunction. (Effective dots: more than 99...
...be sure to use a different power cord, be installed near an easily accessible outlet. 2 (US) Installation Do not install or leave the monitor: • In places subject to mandatory FCC standards. Precautions Warning on a flat surface. This is made with your local power supply. ...8226; In places subject to extreme temperatures, such as in an automobile parked in the United States This product contains mercury. Subjecting the monitor to mechanical vibration or shock. • Near any equipment that the LCD screen is not malfunction. (Effective dots: more than 99...

Quick Setup Guide
Page 3
...computer. Load the supplied CDROM into the CD-ROM drive of the CDROM will open the window, then double-click on the "MONITOR" icon. Connect the adapter to the computer before connecting them . If you are included in British English.) To exit from the.../ Macintosh, Operating Instructions, etc.) • Warranty card • This Quick Setup Guide US Connecting your monitor Connect your computer. After a while, the introductory page of your monitor to a computer. If necessary, use an adapter (not supplied). If the introductory page does not appear automatically...
...computer. Load the supplied CDROM into the CD-ROM drive of the CDROM will open the window, then double-click on the "MONITOR" icon. Connect the adapter to the computer before connecting them . If you are included in British English.) To exit from the.../ Macintosh, Operating Instructions, etc.) • Warranty card • This Quick Setup Guide US Connecting your monitor Connect your computer. After a while, the introductory page of your monitor to a computer. If necessary, use an adapter (not supplied). If the introductory page does not appear automatically...

Quick Setup Guide
Page 4
... DVI-D input to the Operating Instructions on the front right of the monitor. 4 Connect the supplied power cord to the monitor's AC IN connector. 5 Connect the power cord to a power outlet. 2 back cover Turning on the monitor and computer Turn on your monitor first, then a computer. 1 Press upward the 1 (power) switch on the CD...
... DVI-D input to the Operating Instructions on the front right of the monitor. 4 Connect the supplied power cord to the monitor's AC IN connector. 5 Connect the power cord to a power outlet. 2 back cover Turning on the monitor and computer Turn on your monitor first, then a computer. 1 Press upward the 1 (power) switch on the CD...

Quick Setup Guide
Page 5
... pressing any key on the screen, check the following table for possible solutions. If you are not bent or pushed in . x Problems caused by the monitor • The computer is properly connected.
... pressing any key on the screen, check the following table for possible solutions. If you are not bent or pushed in . x Problems caused by the monitor • The computer is properly connected.

Quick Setup Guide
Page 6
Select "SONY" from the "Manufacturers" list and select "SDM-HS75P" or "SDM-HS95P" from the "Models" list in the "Models" list, try "Plug & Play." Press the MENU button again to make the box disappear. If the model name of this monitor, reconnect the old monitor and do the following information: 6 (US) Displaying this monitor's information While the monitor is...
Select "SONY" from the "Manufacturers" list and select "SDM-HS75P" or "SDM-HS95P" from the "Models" list in the "Models" list, try "Plug & Play." Press the MENU button again to make the box disappear. If the model name of this monitor, reconnect the old monitor and do the following information: 6 (US) Displaying this monitor's information While the monitor is...


