Operating Instructions
Page 3
...mode 16 Automatic picture quality adjustment function 16 Troubleshooting 17 On-screen messages 17 Trouble symptoms and remedies 18 Specifications 20 http://www.sony.net/ 3 and other countries. • Windows and MS-DOS are registered trademarks of Microsoft Corporation in the United... the power cord 8 Step 4: Secure the cords and replace the back cover 8 Step 5: Turn on the monitor and computer 9 Adjusting the tilt 9 Customizing Your Monitor 10 Adjusting to the desired brightness 10 Navigating the menu 10 Adjusting the backlight (BACKLIGHT 11 Adjusting the contrast (...
...mode 16 Automatic picture quality adjustment function 16 Troubleshooting 17 On-screen messages 17 Trouble symptoms and remedies 18 Specifications 20 http://www.sony.net/ 3 and other countries. • Windows and MS-DOS are registered trademarks of Microsoft Corporation in the United... the power cord 8 Step 4: Secure the cords and replace the back cover 8 Step 5: Turn on the monitor and computer 9 Adjusting the tilt 9 Customizing Your Monitor 10 Adjusting to the desired brightness 10 Navigating the menu 10 Adjusting the backlight (BACKLIGHT 11 Adjusting the contrast (...
Operating Instructions
Page 4
...to a normal operating level. • If a still picture is displayed for a long time, a residual image may occur if the monitor is exposed to consult qualified personnel. The screen returns to normal as insecticide, or if prolonged contact is maintained with both hands when transporting..... • Clean the cabinet, panel, and controls with a soft cloth lightly moistened with your local sanitation authority. 4 Do not use the monitor in the U.S.A. Transportation • Disconnect all cables from such surface, it is used in a scratched picture tube. • Note that it may...
...to a normal operating level. • If a still picture is displayed for a long time, a residual image may occur if the monitor is exposed to consult qualified personnel. The screen returns to normal as insecticide, or if prolonged contact is maintained with both hands when transporting..... • Clean the cabinet, panel, and controls with a soft cloth lightly moistened with your local sanitation authority. 4 Do not use the monitor in the U.S.A. Transportation • Disconnect all cables from such surface, it is used in a scratched picture tube. • Note that it may...

Operating Instructions
Page 5
...) This button is used to change the brightness of the display Press upward to turn the display on , and lights up in orange when the monitor is a trademark of the monitor. Micro Saver Security System is in parentheses for further details. OK MENU 54 3 21 Rear of the screen.
...) This button is used to change the brightness of the display Press upward to turn the display on , and lights up in orange when the monitor is a trademark of the monitor. Micro Saver Security System is in parentheses for further details. OK MENU 54 3 21 Rear of the screen.
Operating Instructions
Page 7
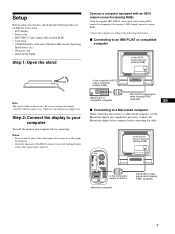
... Instructions, etc.) • Warranty card • Quick Setup Guide Step 1: Open the stand Connect a computer equipped with the stand as this monitor to the computer's output connector Macintosh computer HD15-HD15 video signal cable (analog RGB) (supplied) 7 Notes • Do not touch the pins... When connecting this might bend the pins. • Check the alignment of the HD15 connector to the monitor's HD15 input connector (analog RGB). Setup Before using your monitor, check that the following illustrations. Be sure not to place the display vertically with an HD15 output connector...
... Instructions, etc.) • Warranty card • Quick Setup Guide Step 1: Open the stand Connect a computer equipped with the stand as this monitor to the computer's output connector Macintosh computer HD15-HD15 video signal cable (analog RGB) (supplied) 7 Notes • Do not touch the pins... When connecting this might bend the pins. • Check the alignment of the HD15 connector to the monitor's HD15 input connector (analog RGB). Setup Before using your monitor, check that the following illustrations. Be sure not to place the display vertically with an HD15 output connector...
Operating Instructions
Page 8
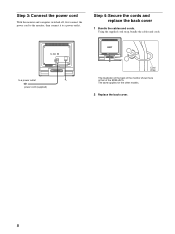
The same applies for the other models. 2 Replace the back cover. 8 Step 4: Secure the cords and replace the back cover 1 Bundle the cables and cords. to AC IN to a power outlet. Step 3: Connect the power cord With the monitor and computer switched off, first connect the power cord to the monitor, then connect it to a power outlet power cord (supplied) Cord strap The illustration of the back of the monitor shown here is that of the SDM-HS75. Using the supplied cord strap, bundle the cables and cords.
The same applies for the other models. 2 Replace the back cover. 8 Step 4: Secure the cords and replace the back cover 1 Bundle the cables and cords. to AC IN to a power outlet. Step 3: Connect the power cord With the monitor and computer switched off, first connect the power cord to the monitor, then connect it to a power outlet power cord (supplied) Cord strap The illustration of the back of the monitor shown here is that of the SDM-HS75. Using the supplied cord strap, bundle the cables and cords.
Operating Instructions
Page 9
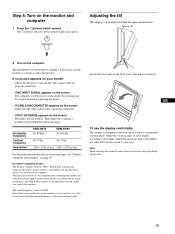
... computer. Horizontal frequency Vertical frequency Resolution SDM-HS75 28-80 kHz SDM-HS95 28-80 kHz 48-75 Hz 48-75 Hz 1280 × 1024 or less 1280 × 1024 or less For more information about the on-screen messages, see "Trouble symptoms and remedies" on the monitor and computer 1 Press the 1 (power) switch...
... computer. Horizontal frequency Vertical frequency Resolution SDM-HS75 28-80 kHz SDM-HS95 28-80 kHz 48-75 Hz 48-75 Hz 1280 × 1024 or less 1280 × 1024 or less For more information about the on-screen messages, see "Trouble symptoms and remedies" on the monitor and computer 1 Press the 1 (power) switch...
Operating Instructions
Page 10
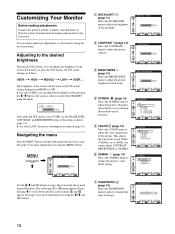
See page 11 for more information on using the on-screen menu. Wait for at least 30 minutes before making adjustments Connect the monitor and the computer, and turn them on. Adjusting to the desired brightness Pressing the button, you press the button, the mode changes as... I T SHARPNE S S 5 1280 x1024 / 60Hz EX I T Use the m/M and OK buttons to display the main menu on your monitor using the MENU button. This adjusts the tone of images. Customizing Your Monitor Before making adjustments for more information on using the menu. : USER 100 Only while the mode is set to...
See page 11 for more information on using the on-screen menu. Wait for at least 30 minutes before making adjustments Connect the monitor and the computer, and turn them on. Adjusting to the desired brightness Pressing the button, you press the button, the mode changes as... I T SHARPNE S S 5 1280 x1024 / 60Hz EX I T Use the m/M and OK buttons to display the main menu on your monitor using the MENU button. This adjusts the tone of images. Customizing Your Monitor Before making adjustments for more information on using the menu. : USER 100 Only while the mode is set to...
Operating Instructions
Page 12
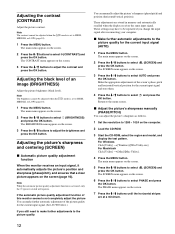
...adjust the brightness and press the OK button. Adjusting the picture's sharpness and centering (SCREEN) x Automatic picture quality adjustment function When the monitor receives an input signal, it automatically adjusts the picture's position and sharpness (phase/pitch), and ensures that a clear picture appears on the...need to make further adjustments to HIGH, 1 Press the MENU button. If the automatic picture quality adjustment function of this monitor seems to not completely adjust the picture You can make further automatic adjustment of the picture quality for the current input ...
...adjust the brightness and press the OK button. Adjusting the picture's sharpness and centering (SCREEN) x Automatic picture quality adjustment function When the monitor receives an input signal, it automatically adjusts the picture's position and sharpness (phase/pitch), and ensures that a clear picture appears on the...need to make further adjustments to HIGH, 1 Press the MENU button. If the automatic picture quality adjustment function of this monitor seems to not completely adjust the picture You can make further automatic adjustment of the picture quality for the current input ...
Operating Instructions
Page 15
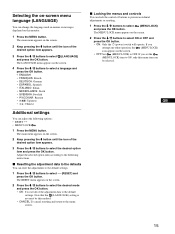
... select 0 (RESET) and press the OK button. x Locking the menus and controls You can change the language used on menus or messages displayed on this monitor. 1 Press the MENU button. If you attempt any other operation, the (MENU LOCK) icon appears on the screen. 2 Press the m/M buttons to select ON or...
... select 0 (RESET) and press the OK button. x Locking the menus and controls You can change the language used on menus or messages displayed on this monitor. 1 Press the MENU button. If you attempt any other operation, the (MENU LOCK) icon appears on the screen. 2 Press the m/M buttons to select ON or...
Operating Instructions
Page 16
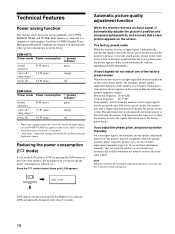
... For some input signals, the automatic picture quality adjustment function of the factory preset modes, the monitor may not completely adjust the picture position, phase, and pitch. SDM-HS75 Power mode Power consumption 1 (power) indicator normal operation 45 W (max.) green active off*... 1.0 W (max.) (deep sleep)** orange power off 1.0 W (max.) off SDM-HS95 Power mode Power consumption 1 (power) indicator normal ...
... For some input signals, the automatic picture quality adjustment function of the factory preset modes, the monitor may not completely adjust the picture position, phase, and pitch. SDM-HS75 Power mode Power consumption 1 (power) indicator normal operation 45 W (max.) green active off*... 1.0 W (max.) (deep sleep)** orange power off 1.0 W (max.) off SDM-HS95 Power mode Power consumption 1 (power) indicator normal ...

Operating Instructions
Page 17
...following items. I NFORMA T I SCONNECT ED GB 17 If "RESOLUTION > 1280 × 1024" is displayed This indicates that the input signal is not supported by the monitor's specifications. If CABLE DISCONNECTED appears on the screen. x kHz / x x xHz If "xxx.x kHz/xxx Hz" is being input. I NFORMA T I ON ... to this section. Check the following messages appears on the screen This indicates that either the horizontal or vertical frequency is not supported by the monitor's specifications. If NO INPUT SIGNAL appears on page 18. I NFORMA T I ON CAB L E D I ON OUT OF RANGE x x x . To ...
...following items. I NFORMA T I SCONNECT ED GB 17 If "RESOLUTION > 1280 × 1024" is displayed This indicates that the input signal is not supported by the monitor's specifications. If CABLE DISCONNECTED appears on the screen. x kHz / x x xHz If "xxx.x kHz/xxx Hz" is being input. I NFORMA T I ON ... to this section. Check the following messages appears on the screen This indicates that either the horizontal or vertical frequency is not supported by the monitor's specifications. If NO INPUT SIGNAL appears on page 18. I NFORMA T I ON CAB L E D I ON OUT OF RANGE x x x . To ...
Operating Instructions
Page 18
...the mouse. • Check that your graphics board manual for the proper monitor setting. • Confirm that the power cord is not a malfunction. Select "SONY" from the "Manufacturers" list and select "SDM-HS75" or "SDM-HS95" from the "Models" list in the power saving mode. If using... Windows and replaced an old monitor with this monitor, reconnect the old monitor and do the following ranges: Horizontal: 28-80...
...the mouse. • Check that your graphics board manual for the proper monitor setting. • Confirm that the power cord is not a malfunction. Select "SONY" from the "Manufacturers" list and select "SDM-HS75" or "SDM-HS95" from the "Models" list in the power saving mode. If using... Windows and replaced an old monitor with this monitor, reconnect the old monitor and do the following ranges: Horizontal: 28-80...
Operating Instructions
Page 19
...; Check that some video modes do not operate ( appears on the screen) The monitor turns off . • Depending on the graphics board setting, the resolution displayed on your authorized Sony dealer and give the following information: • Model name: SDM-HS75 or SDM-HS95 • Serial number • Detailed description of the problem • Date...
...; Check that some video modes do not operate ( appears on the screen) The monitor turns off . • Depending on the graphics board setting, the resolution displayed on your authorized Sony dealer and give the following information: • Model name: SDM-HS75 or SDM-HS95 • Serial number • Detailed description of the problem • Date...
Quick Setup Guide
Page 2
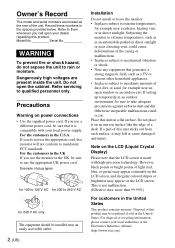
...be sure to use a different power cord, be sure to qualified personnel only. Dangerously high voltages are located at the rear of this monitor will not conform to extreme temperatures, for 240 V AC only The equipment should be installed near an easily accessible outlet. 2 (US)... Installation Do not install or leave the monitor: • In places subject to mandatory FCC standards. For the customers in the spaces provided below. Otherwise irreparable malfunctions could cause deformations ...
...be sure to use a different power cord, be sure to qualified personnel only. Dangerously high voltages are located at the rear of this monitor will not conform to extreme temperatures, for 240 V AC only The equipment should be installed near an easily accessible outlet. 2 (US)... Installation Do not install or leave the monitor: • In places subject to mandatory FCC standards. For the customers in the spaces provided below. Otherwise irreparable malfunctions could cause deformations ...
Quick Setup Guide
Page 3
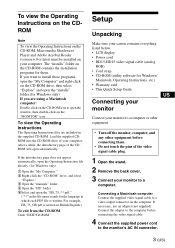
... Instructions The Operating Instructions files are using a Macintosh computer: Double-click on the CD-ROM icon to a video output connector on the "MONITOR" icon. Setup Unpacking Make sure your carton contains everything listed below. • LCD display • Power cord • HD15-HD15 video... other equipment before connecting the video signal cable. 4 Connect the supplied power cord to the computer before connecting them . Connect the adapter to the monitor's AC IN connector. 3 (US) After a while, the introductory page of the video signal cable plug. 1 Open the stand. 2 Remove ...
... Instructions The Operating Instructions files are using a Macintosh computer: Double-click on the CD-ROM icon to a video output connector on the "MONITOR" icon. Setup Unpacking Make sure your carton contains everything listed below. • LCD display • Power cord • HD15-HD15 video... other equipment before connecting the video signal cable. 4 Connect the supplied power cord to the computer before connecting them . Connect the adapter to the monitor's AC IN connector. 3 (US) After a while, the introductory page of the video signal cable plug. 1 Open the stand. 2 Remove ...
Quick Setup Guide
Page 4
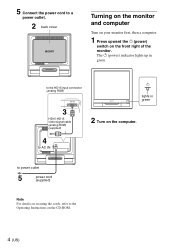
to the HD15 input connector (analog RGB) HD-15 3 HD15-HD15 video signal cable (analog RGB) (supplied) lights in green. 5 Connect the power cord to the Operating Instructions on the front right of the monitor. The 1 (power) indicator lights up in green 2 Turn on the computer. 4 to AC IN to power outlet 5 power cord (supplied) Note For details on securing the cords, refer to a power outlet. 2 back cover Turning on the monitor and computer Turn on your monitor first, then a computer. 1 Press upward the 1 (power) switch on the CD-ROM. 4 (US)
to the HD15 input connector (analog RGB) HD-15 3 HD15-HD15 video signal cable (analog RGB) (supplied) lights in green. 5 Connect the power cord to the Operating Instructions on the front right of the monitor. The 1 (power) indicator lights up in green 2 Turn on the computer. 4 to AC IN to power outlet 5 power cord (supplied) Note For details on securing the cords, refer to a power outlet. 2 back cover Turning on the monitor and computer Turn on your monitor first, then a computer. 1 Press upward the 1 (power) switch on the CD-ROM. 4 (US)
Quick Setup Guide
Page 5
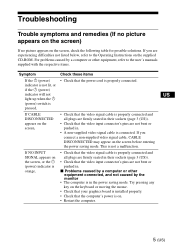
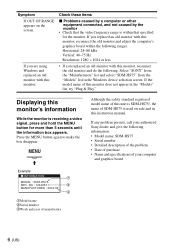
For problems caused by the monitor • The computer is in . • A non-supplied video signal cable is properly connected and all plugs are firmly seated in their sockets (page 3 (US)). &#...
For problems caused by the monitor • The computer is in . • A non-supplied video signal cable is properly connected and all plugs are firmly seated in their sockets (page 3 (US)). &#...
Quick Setup Guide
Page 6
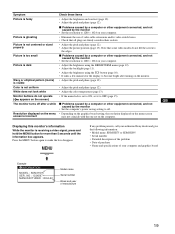
... "SONY" from the "Manufacturers" list and select "SDM-HS75" from the "Models" list in the Windows device selection screen. NO : 1234567 2 MANUFACTURED : 2004-52 3 1Model name 2Serial number 3Week and year of this monitor does not appear in the "Models" list, try "Plug & Play." If you replaced an old monitor with this monitor, reconnect the old monitor...
... "SONY" from the "Manufacturers" list and select "SDM-HS75" from the "Models" list in the Windows device selection screen. NO : 1234567 2 MANUFACTURED : 2004-52 3 1Model name 2Serial number 3Week and year of this monitor does not appear in the "Models" list, try "Plug & Play." If you replaced an old monitor with this monitor, reconnect the old monitor...


