Operating Instructions
Page 2
... for help. Connect the equipment into an outlet on , the user is encouraged to try to correct the interference by turning the equipment off and on a circuit different from that to which can radiate radio frequency energy and, if not installed and used in the spaces provided below. Do not open the cabinet. Record these numbers in accordance with part...
... for help. Connect the equipment into an outlet on , the user is encouraged to try to correct the interference by turning the equipment off and on a circuit different from that to which can radiate radio frequency energy and, if not installed and used in the spaces provided below. Do not open the cabinet. Record these numbers in accordance with part...
Operating Instructions
Page 3
... on-screen menu language (LANGUAGE 15 Additional settings 15 Technical Features 16 Power saving function 16 Reducing the power consumption ( mode 16 Automatic picture quality adjustment function 16 Troubleshooting 17 On-screen messages 17 Trouble symptoms and remedies 18 Specifications 20 http://www.sony.net/ 3 Precautions 4 Identifying parts and controls 5 Setup 7 Step 1: Open the stand 7 Step 2: Connect the display to your computer 7 Step 3: Connect the power cord 8 Step 4: Secure the cords and replace the back cover 8 Step 5: Turn on the monitor...
... on-screen menu language (LANGUAGE 15 Additional settings 15 Technical Features 16 Power saving function 16 Reducing the power consumption ( mode 16 Automatic picture quality adjustment function 16 Troubleshooting 17 On-screen messages 17 Trouble symptoms and remedies 18 Specifications 20 http://www.sony.net/ 3 Precautions 4 Identifying parts and controls 5 Setup 7 Step 1: Open the stand 7 Step 2: Connect the display to your computer 7 Step 3: Connect the power cord 8 Step 4: Secure the cords and replace the back cover 8 Step 5: Turn on the monitor...
Operating Instructions
Page 4
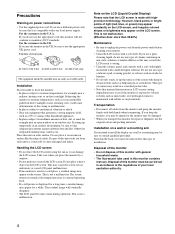
... image may appear for example near an easily accessible outlet. If you place the monitor by a window. • Do not push on power connections • Use the supplied power cord. Installation Do not install or leave the monitor: • In places subject to mandatory FCC standards. Place this monitor must be injured or the monitor may scratch the LCD screen's coating. • Clean the cabinet, panel, and controls with...
... image may appear for example near an easily accessible outlet. If you place the monitor by a window. • Do not push on power connections • Use the supplied power cord. Installation Do not install or leave the monitor: • In places subject to mandatory FCC standards. Place this monitor must be injured or the monitor may scratch the LCD screen's coating. • Clean the cabinet, panel, and controls with...

Operating Instructions
Page 5
Identifying parts and controls See the pages in power saving mode. OK MENU 54 3 21 Rear of the display Press upward to change the brightness of the monitor. The power indicator lights up in orange when the monitor is in parentheses for further details. The 1 (power) switch and the control buttons are on or off . 2 MENU button (pages 10, 11) This button displays or closes the main menu. 3 m/M buttons (page 11) These buttons function as...
Identifying parts and controls See the pages in power saving mode. OK MENU 54 3 21 Rear of the display Press upward to change the brightness of the monitor. The power indicator lights up in orange when the monitor is in parentheses for further details. The 1 (power) switch and the control buttons are on or off . 2 MENU button (pages 10, 11) This button displays or closes the main menu. 3 m/M buttons (page 11) These buttons function as...
Operating Instructions
Page 7
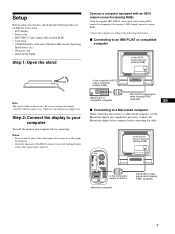
.... Connect the Macintosh adapter to a Macintosh computer, use the Macintosh adapter (not supplied) if necessary. to the HD15 input connector (analog RGB) to the HD15 input connector (analog RGB) Note The stand is . Step 2: Connect the display to your carton: • LCD display • Power cord • HD15-HD15 video signal cable (analog RGB) • Cord strap • CD-ROM (utility software for Windows/Macintosh, Operating Instructions, etc.) • Warranty card • Quick Setup Guide Step 1: Open the stand Connect a computer equipped with the stand as this monitor...
.... Connect the Macintosh adapter to a Macintosh computer, use the Macintosh adapter (not supplied) if necessary. to the HD15 input connector (analog RGB) to the HD15 input connector (analog RGB) Note The stand is . Step 2: Connect the display to your carton: • LCD display • Power cord • HD15-HD15 video signal cable (analog RGB) • Cord strap • CD-ROM (utility software for Windows/Macintosh, Operating Instructions, etc.) • Warranty card • Quick Setup Guide Step 1: Open the stand Connect a computer equipped with the stand as this monitor...
Operating Instructions
Page 9
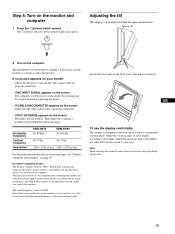
... page 18. Adjusting the tilt This display can use the display comfortably This display is designed so that the power cord and the video signal cable are unobtrusive on the screen: Reconnect the old monitor. If necessary, use it as it up in the power saving mode. If no picture appears on your computer after connecting the monitor, the setup Wizard may appear on the computer. Horizontal frequency Vertical frequency Resolution SDM-HS75 28-80 kHz SDM-HS95 28...
... page 18. Adjusting the tilt This display can use the display comfortably This display is designed so that the power cord and the video signal cable are unobtrusive on the screen: Reconnect the old monitor. If necessary, use it as it up in the power saving mode. If no picture appears on your computer after connecting the monitor, the setup Wizard may appear on the computer. Horizontal frequency Vertical frequency Resolution SDM-HS75 28-80 kHz SDM-HS95 28...
Operating Instructions
Page 10
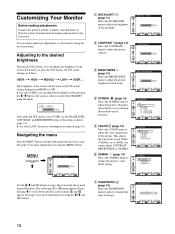
... minutes before making adjustments Connect the monitor and the computer, and turn them on using the m/M and OK buttons. 1 BACKLIGHT (page 11) Select the BACKLIGHT menu to adjust the brightness of the backlight. 2 CONTRAST 6 (page 12) Select the CONTRAST menu to adjust the picture contrast. 3 BRIGHTNESS 8 (page 12) Select the BRIGHTNESS menu to adjust the picture brightness (black level). 4 SCREEN (page 12) Select the SCREEN menu to adjust the picture's sharpness (phase/pitch) or its centering (horizontal/vertical position). 5 COLOR (page 13) Select the COLOR menu to...
... minutes before making adjustments Connect the monitor and the computer, and turn them on using the m/M and OK buttons. 1 BACKLIGHT (page 11) Select the BACKLIGHT menu to adjust the brightness of the backlight. 2 CONTRAST 6 (page 12) Select the CONTRAST menu to adjust the picture contrast. 3 BRIGHTNESS 8 (page 12) Select the BRIGHTNESS menu to adjust the picture brightness (black level). 4 SCREEN (page 12) Select the SCREEN menu to adjust the picture's sharpness (phase/pitch) or its centering (horizontal/vertical position). 5 COLOR (page 13) Select the COLOR menu to...
Operating Instructions
Page 11
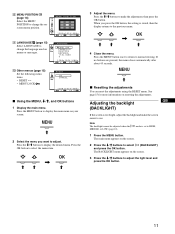
... select the menu item. The BACKLIGHT menu appears on the screen. 3 Press the m/M buttons to display the desired menu. Press the m/M buttons to adjust the light level and press the OK button. 11 Press the m/M buttons to make the screen easier to adjust. OK , 4 Close the menu. Press the MENU button to change the language used on menus or messages. 0 Other menus (page 15) Set the following menu items. • RESET 0 • MENU LOCK MENU POS I T I ON...
... select the menu item. The BACKLIGHT menu appears on the screen. 3 Press the m/M buttons to display the desired menu. Press the m/M buttons to adjust the light level and press the OK button. 11 Press the m/M buttons to make the screen easier to adjust. OK , 4 Close the menu. Press the MENU button to change the language used on menus or messages. 0 Other menus (page 15) Set the following menu items. • RESET 0 • MENU LOCK MENU POS I T I ON...
Operating Instructions
Page 12
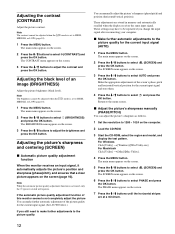
... make further automatic adjustment of an image (BRIGHTNESS) Adjust the picture brightness (black level). Adjusting the contrast (CONTRAST) Adjust the picture contrast. Adjusting the picture's sharpness and centering (SCREEN) x Automatic picture quality adjustment function When the monitor receives an input signal, it automatically adjusts the picture's position and sharpness (phase/pitch), and ensures that a clear picture appears on the screen. 5 Press the m/M buttons to HIGH, 1 Press the MENU button. These settings may have to be repeated if you still need to the menu screen. mode...
... make further automatic adjustment of an image (BRIGHTNESS) Adjust the picture brightness (black level). Adjusting the contrast (CONTRAST) Adjust the picture contrast. Adjusting the picture's sharpness and centering (SCREEN) x Automatic picture quality adjustment function When the monitor receives an input signal, it automatically adjusts the picture's position and sharpness (phase/pitch), and ensures that a clear picture appears on the screen. 5 Press the m/M buttons to HIGH, 1 Press the MENU button. These settings may have to be repeated if you still need to the menu screen. mode...
Operating Instructions
Page 13
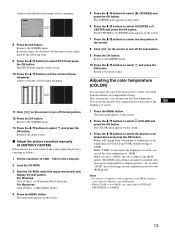
... mode of the brightness of the picture's white color field from 9300K (default setting) to select OK button. Notes • If a connected computer or other equipment is not in the screen. 8 Click [END] on the screen. 10 Press the m/M buttons until the vertical stripes disappear. and press the x Adjust the picture's position manually (H CENTER/V CENTER) If the picture is not sRGB-compliant, color cannot be set the color temperature to select (SCREEN...
... mode of the brightness of the picture's white color field from 9300K (default setting) to select OK button. Notes • If a connected computer or other equipment is not in the screen. 8 Click [END] on the screen. 10 Press the m/M buttons until the vertical stripes disappear. and press the x Adjust the picture's position manually (H CENTER/V CENTER) If the picture is not sRGB-compliant, color cannot be set the color temperature to select (SCREEN...
Operating Instructions
Page 15
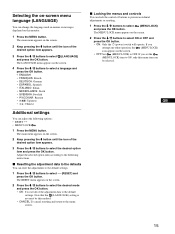
... the default settings. 1 Press the m/M buttons to select 0 (RESET) and press the OK button. The main menu appears on the screen. 2 Keep pressing the m button until the icon of buttons to prevent accidental adjustments or resetting. 1 Press the m/M buttons to select (MENU LOCK) and press the OK button. x Resetting the adjustment data to the defaults You can adjust the following instructions. x Locking the menus and controls You can change the language used on menus or messages displayed...
... the default settings. 1 Press the m/M buttons to select 0 (RESET) and press the OK button. The main menu appears on the screen. 2 Keep pressing the m button until the icon of buttons to prevent accidental adjustments or resetting. 1 Press the m/M buttons to select (MENU LOCK) and press the OK button. x Resetting the adjustment data to the defaults You can adjust the following instructions. x Locking the menus and controls You can change the language used on menus or messages displayed...
Operating Instructions
Page 16
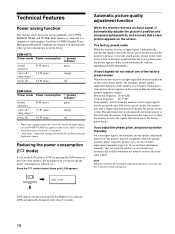
... following monitor frequency ranges): Horizontal frequency: 28-80 kHz Vertical frequency: 48-75 Hz Consequently, the first time the monitor receives input signals that a clear picture appears on the screen. If the monitor is activated, only the 1 (power) switch will automatically reduce power consumption as shown below. After 5 seconds, the monitor enters the power saving mode. ** "deep sleep" is reduced. If the input signal matches the factory preset mode, the picture appears on the screen and the backlight...
... following monitor frequency ranges): Horizontal frequency: 28-80 kHz Vertical frequency: 48-75 Hz Consequently, the first time the monitor receives input signals that a clear picture appears on the screen. If the monitor is activated, only the 1 (power) switch will automatically reduce power consumption as shown below. After 5 seconds, the monitor enters the power saving mode. ** "deep sleep" is reduced. If the input signal matches the factory preset mode, the picture appears on the screen and the backlight...

Operating Instructions
Page 17
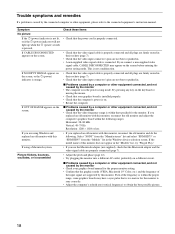
... no signal is not supported by the monitor's specifications (1280 × 1024 or less). Troubleshooting Before contacting technical support, refer to this section. If OUT OF RANGE appears on the screen This indicates that the input signal is something wrong with the input signal, one of the current input signal. If CABLE DISCONNECTED appears on the screen This indicates that either the horizontal or vertical frequency is being input. Check the...
... no signal is not supported by the monitor's specifications (1280 × 1024 or less). Troubleshooting Before contacting technical support, refer to this section. If OUT OF RANGE appears on the screen This indicates that the input signal is something wrong with the input signal, one of the current input signal. If CABLE DISCONNECTED appears on the screen This indicates that either the horizontal or vertical frequency is being input. Check the...
Operating Instructions
Page 18
... graphics board manual for the proper monitor setting. • Confirm that the Macintosh adapter and the video signal cable are not bent or pushed in their sockets (page 7). • Check that the power cord is connected. If the model name of the input signal are not bent or pushed in the Windows device selection screen. x Problems caused by this monitor, • If you use the Macintosh adapter (not supplied), check that the graphics mode (VESA...
... graphics board manual for the proper monitor setting. • Confirm that the Macintosh adapter and the video signal cable are not bent or pushed in their sockets (page 7). • Check that the power cord is connected. If the model name of the input signal are not bent or pushed in the Windows device selection screen. x Problems caused by this monitor, • If you use the Macintosh adapter (not supplied), check that the graphics mode (VESA...
Operating Instructions
Page 19
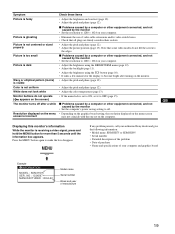
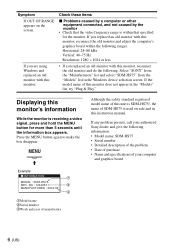
... monitor's information While the monitor is fuzzy • Adjust the brightness and contrast (page 12). • Adjust the pitch and phase (page 12). NO : 1234567 MANUFACTURED : 2004-52 Model name Serial number Week and year of video cable extensions and/or video switch boxes. • Check that some video modes do not operate ( appears on the screen) The monitor turns off . • Depending on the graphics board setting, the resolution displayed on the menu screen...
... monitor's information While the monitor is fuzzy • Adjust the brightness and contrast (page 12). • Adjust the pitch and phase (page 12). NO : 1234567 MANUFACTURED : 2004-52 Model name Serial number Week and year of video cable extensions and/or video switch boxes. • Check that some video modes do not operate ( appears on the screen) The monitor turns off . • Depending on the graphics board setting, the resolution displayed on the menu screen...
Quick Setup Guide
Page 2
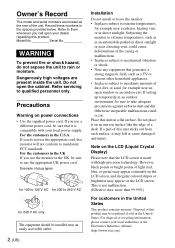
....eiae.org). Owner's Record The model and serial numbers are present inside the unit. Model No. Dangerously high voltages are located at the rear of a desk. For the customers in direct sunlight or near a heating vent, could occur. However, black points or bright points of light (red, blue, or green) may appear constantly on the LCD screen, and irregular colored stripes or brightness may appear...
....eiae.org). Owner's Record The model and serial numbers are present inside the unit. Model No. Dangerously high voltages are located at the rear of a desk. For the customers in direct sunlight or near a heating vent, could occur. However, black points or bright points of light (red, blue, or green) may appear constantly on the LCD screen, and irregular colored stripes or brightness may appear...
Quick Setup Guide
Page 3
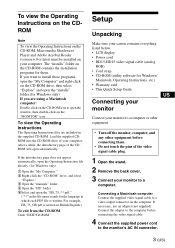
.... • LCD display • Power cord • HD15-HD15 video signal cable (analog RGB) • Cord strap • CD-ROM (utility software for Windows/ Macintosh, Operating Instructions, etc.) • Warranty card • This Quick Setup Guide US Connecting your monitor Connect your monitor to a computer. If you are included in the file name stands for Windows only) If you want to a video output connector on the CD-ROM contains the installation programs for Windows only) 1 Open the "My...
.... • LCD display • Power cord • HD15-HD15 video signal cable (analog RGB) • Cord strap • CD-ROM (utility software for Windows/ Macintosh, Operating Instructions, etc.) • Warranty card • This Quick Setup Guide US Connecting your monitor Connect your monitor to a computer. If you are included in the file name stands for Windows only) If you want to a video output connector on the CD-ROM contains the installation programs for Windows only) 1 Open the "My...
Quick Setup Guide
Page 5
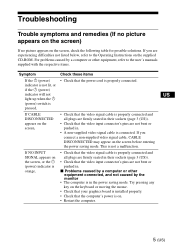
...; Check that the video input connector's pins are not bent or pushed in the power saving mode. x Problems caused by the monitor • The computer is properly connected. Try pressing any key on the supplied CD-ROM. If you connect a non-supplied video signal cable, CABLE DISCONNECTED may appear on the screen, check the following table for possible solutions. Troubleshooting Trouble symptoms and remedies (If no picture appears on the screen) If no picture...
...; Check that the video input connector's pins are not bent or pushed in the power saving mode. x Problems caused by the monitor • The computer is properly connected. Try pressing any key on the supplied CD-ROM. If you connect a non-supplied video signal cable, CABLE DISCONNECTED may appear on the screen, check the following table for possible solutions. Troubleshooting Trouble symptoms and remedies (If no picture appears on the screen) If no picture...
Quick Setup Guide
Page 6
... model name of this instruction manual. Select "SONY" from the "Manufacturers" list and select "SDM-HS75" from the "Models" list in the "Models" list, try "Plug & Play." If you replaced an old monitor with this monitor, reconnect the old monitor and adjust the computer's graphics board within the following information: • Model name: SDM-HS75 • Serial number • Detailed description of the problem • Date of purchase • Name and specifications...
... model name of this instruction manual. Select "SONY" from the "Manufacturers" list and select "SDM-HS75" from the "Models" list in the "Models" list, try "Plug & Play." If you replaced an old monitor with this monitor, reconnect the old monitor and adjust the computer's graphics board within the following information: • Model name: SDM-HS75 • Serial number • Detailed description of the problem • Date of purchase • Name and specifications...
Marketing Specifications
Page 2
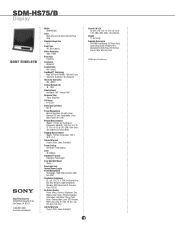
... lbs (5 Kg) Supplied Accessories CD-ROM User Manual, AC Power Cord, Quick Setup Guide, Windows® & Macintosh® Utility Files, HD15 Video Signal Cable, Warranty Card ©2004 Sony Electronics Inc. SDM-HS75/B Display Sony Electronics Inc. 16765 West Bernardo Drive San Diego, CA 92127 1-866-357-7669 www.sony.com/display Model SDM-HS75/B Color Black Chassis with Silver Control Panel Strip Viewable Image Size 17.0" Panel Type TFT Active Matrix Native Resolution 1280 x 1024 Pixel Pitch 0.264mm Luminance 250cd/m2 Contrast Ratio 500...
... lbs (5 Kg) Supplied Accessories CD-ROM User Manual, AC Power Cord, Quick Setup Guide, Windows® & Macintosh® Utility Files, HD15 Video Signal Cable, Warranty Card ©2004 Sony Electronics Inc. SDM-HS75/B Display Sony Electronics Inc. 16765 West Bernardo Drive San Diego, CA 92127 1-866-357-7669 www.sony.com/display Model SDM-HS75/B Color Black Chassis with Silver Control Panel Strip Viewable Image Size 17.0" Panel Type TFT Active Matrix Native Resolution 1280 x 1024 Pixel Pitch 0.264mm Luminance 250cd/m2 Contrast Ratio 500...


