Operating Instructions
Page 3
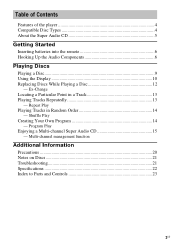
... and Controls 23 3US Table of Contents Features of the player 4 Compatible Disc Types 4 About the Super Audio CD 5 Getting Started Inserting batteries into the remote 6 Hooking Up the Audio Components 6 Playing Discs Playing a Disc 9 Using the Display 10 Replacing Discs While Playing a Disc 12 -
... and Controls 23 3US Table of Contents Features of the player 4 Compatible Disc Types 4 About the Super Audio CD 5 Getting Started Inserting batteries into the remote 6 Hooking Up the Audio Components 6 Playing Discs Playing a Disc 9 Using the Display 10 Replacing Discs While Playing a Disc 12 -
Operating Instructions
Page 4
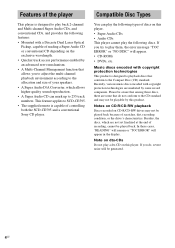
... the exclusive wavelength. • Quicker track access performance enabled by this product. Compatible Disc Types You can mark up to SCD-CE595. • The supplied remote is capable of controlling both the SCD-CE595 and a conventional Sony CD player. Besides, the discs, which allows higher-quality sound reproduction. • A Super Audio CD can play the following...
... the exclusive wavelength. • Quicker track access performance enabled by this product. Compatible Disc Types You can mark up to SCD-CE595. • The supplied remote is capable of controlling both the SCD-CE595 and a conventional Sony CD player. Besides, the discs, which allows higher-quality sound reproduction. • A Super Audio CD can play the following...
Operating Instructions
Page 6
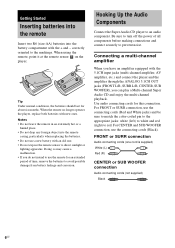
...use a new battery with the + and - FRONT or SURR connection Audio connecting cords (one . • Do not expose the remote sensor to prevent noise. When the remote no longer operates the player, replace both batteries with the 5.1CH input jacks (multi-channel amplifier, AV amplifier, etc.) and connect the... and enjoy the multi-channel playback. Tip Under normal conditions, the batteries should last for this connection. Notes • Do not leave the remote in an extremely hot or a humid place. • Do not drop any foreign object into the battery compartment with an old one cord ...
...use a new battery with the + and - FRONT or SURR connection Audio connecting cords (one . • Do not expose the remote sensor to prevent noise. When the remote no longer operates the player, replace both batteries with the 5.1CH input jacks (multi-channel amplifier, AV amplifier, etc.) and connect the... and enjoy the multi-channel playback. Tip Under normal conditions, the batteries should last for this connection. Notes • Do not leave the remote in an extremely hot or a humid place. • Do not drop any foreign object into the battery compartment with an old one cord ...

Operating Instructions
Page 8
... MENU on the player. 2 Turn l AMS L (or press ./> on the remote repeatedly) to select "CD1/2 SEL". 3 Press l AMS L (or ENTER on the remote). Connecting a digital component When you connect an MD deck or another Sony CD player in until it clicks into place. Optical digital cable (not supplied) To... CD optical digital input connector on the remote) to bend or twist the optical cable. The ...
... MENU on the player. 2 Turn l AMS L (or press ./> on the remote repeatedly) to select "CD1/2 SEL". 3 Press l AMS L (or ENTER on the remote). Connecting a digital component When you connect an MD deck or another Sony CD player in until it clicks into place. Optical digital cable (not supplied) To... CD optical digital input connector on the remote) to bend or twist the optical cable. The ...
Operating Instructions
Page 9
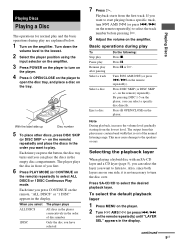
... from the lowest level. continued 9US Basic operations during play are on one side, it is out of the normal listening range. on the remote repeatedly). Also, since both layers are explained below. 1 Turn on the amplifier. By pressing DISC 1-5 on the player, you want to ...Select the player position using the input selector on the amplifier. 3 Press POWER on the player to turn l AMS L (or press ./> on the remote repeatedly) to select ALL DISCS or 1DISC Continuous Play mode. Each time you have selected Note During playback, increase the volume level gradually starting from...
... from the lowest level. continued 9US Basic operations during play are on one side, it is out of the normal listening range. on the remote repeatedly). Also, since both layers are explained below. 1 Turn on the amplifier. By pressing DISC 1-5 on the player, you want to ...Select the player position using the input selector on the amplifier. 3 Press POWER on the player to turn l AMS L (or press ./> on the remote repeatedly) to select ALL DISCS or 1DISC Continuous Play mode. Each time you have selected Note During playback, increase the volume level gradually starting from...
Operating Instructions
Page 10
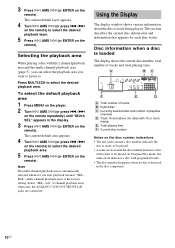
...describes the current disc information and information that appears for discs with 16 or more tracks) E: Total playing time F: Current disc number Notes on the remote repeatedly) until "M/2ch SEL" appears in the disc component. 10US A BC F E D A: Total number of tracks B: Hybrid disc C: Currently ...The disc number disappears when no disc is automatically selected whenever you want to listen to be played. 3 Press l AMS L (or ENTER on the remote). Press MULTI/2CH to be played. • A semi-circle around a disc number indicates the disc is ready to . Mch" (multi-channel ...
...describes the current disc information and information that appears for discs with 16 or more tracks) E: Total playing time F: Current disc number Notes on the remote repeatedly) until "M/2ch SEL" appears in the disc component. 10US A BC F E D A: Total number of tracks B: Hybrid disc C: Currently ...The disc number disappears when no disc is automatically selected whenever you want to listen to be played. 3 Press l AMS L (or ENTER on the remote). Press MULTI/2CH to be played. • A semi-circle around a disc number indicates the disc is ready to . Mch" (multi-channel ...
Operating Instructions
Page 12
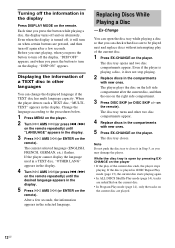
... turn off and on alternately. After a few seconds. Replacing Discs While Playing a Disc - The disc tray opens and two disc compartments appear. on the remote). The disc tray closes. Ex-Change You can open by pressing EXCHANGE on the player • If the play of the current disc ends, the...off, it in Step 5, as you press the button to the procedures below. 1 Press MENU on the player. 2 Turn l AMS L (or press ./> on the remote repeatedly) until the desired language appears in the display. Even if the player is open the disc tray while playing a disc so that you press...
... turn off and on alternately. After a few seconds. Replacing Discs While Playing a Disc - The disc tray opens and two disc compartments appear. on the remote). The disc tray closes. Ex-Change You can open by pressing EXCHANGE on the player • If the play of the current disc ends, the...off, it in Step 5, as you press the button to the procedures below. 1 Press MENU on the player. 2 Turn l AMS L (or press ./> on the remote repeatedly) until the desired language appears in the display. Even if the player is open the disc tray while playing a disc so that you press...

Operating Instructions
Page 13
... the tracks on the current disc in Continuous Play sequential order. (page 9) 1DISC Shuffle All the tracks on the remote repeatedly) in the display. To cancel Repeat Play Press REPEAT on the remote repeatedly until "REP" or "REP1" appears in stop mode to repeat all the tracks in the display, the disc...; If you turn off the player or disconnect the power cord, Repeat Play is ALL DISCS All the tracks on all the tracks on the remote repeatedly until both "REP" and "REP1" disappear. Press REPEAT on the disc(s). Program Play (page 14) All the tracks in the program in sequential order...
... the tracks on the current disc in Continuous Play sequential order. (page 9) 1DISC Shuffle All the tracks on the remote repeatedly) in the display. To cancel Repeat Play Press REPEAT on the remote repeatedly until "REP" or "REP1" appears in stop mode to repeat all the tracks in the display, the disc...; If you turn off the player or disconnect the power cord, Repeat Play is ALL DISCS All the tracks on all the tracks on the remote repeatedly until both "REP" and "REP1" disappear. Press REPEAT on the disc(s). Program Play (page 14) All the tracks in the program in sequential order...
Operating Instructions
Page 14
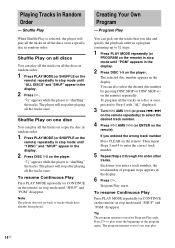
... Play You can play all the tracks on all the tracks once. To resume Continuous Play Press PLAY MODE repeatedly (or CONTINUE on the remote. If you like and specify the playback order in a program containing up to 32 steps. 1 Press PLAY MODE repeatedly (or PROGRAM on the...stop mode until "ALL DISCS" and "SHUF" appear in random order. Press H to select the desired track number. 4 Press l AMS L (or ENTER on the remote) repeatedly. The selected disc number appears in Random Order - Shuffle Play on one disc You can also select the desired disc number by pressing DISC...
... Play You can play all the tracks on all the tracks once. To resume Continuous Play Press PLAY MODE repeatedly (or CONTINUE on the remote. If you like and specify the playback order in a program containing up to 32 steps. 1 Press PLAY MODE repeatedly (or PROGRAM on the...stop mode until "ALL DISCS" and "SHUF" appear in random order. Press H to select the desired track number. 4 Press l AMS L (or ENTER on the remote) repeatedly. The selected disc number appears in Random Order - Shuffle Play on one disc You can also select the desired disc number by pressing DISC...
Operating Instructions
Page 15
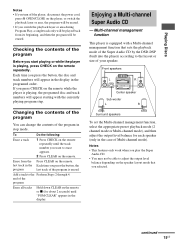
...player is erased. Multi-channel management function This player is equipped with the currently playing program step. Each time you press CHECK on the remote while the player is playing, the programed disc and track numbers will appear starting with a Multi-channel management function that sets the playback... mode of the Super Audio CD by the DSD-DSP (built into the player) according to adjust the output level balance depending on the remote or x (for about 2 seconds) until the track number you play the Super Audio CD. • You may not be erased. Front speakers L...
...player is erased. Multi-channel management function This player is equipped with the currently playing program step. Each time you press CHECK on the remote while the player is playing, the programed disc and track numbers will appear starting with a Multi-channel management function that sets the playback... mode of the Super Audio CD by the DSD-DSP (built into the player) according to adjust the output level balance depending on the remote or x (for about 2 seconds) until the track number you play the Super Audio CD. • You may not be erased. Front speakers L...
Operating Instructions
Page 16
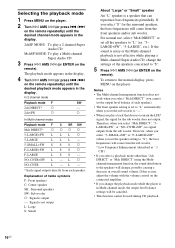
..."S" for the sub woofer does not output. Selecting the playback mode 1 Press MENU on the player. 2 Turn l AMS L (or press ./> on the remote repeatedly) until the desired playback mode appears in the display. 2chSP MODE: To play a 2 channel Super Audio CD. Therefore, when you change the settings of... "Mch DIRECT", "5- LARGE+SW", "5-LARGE", etc.). The playback mode appears in the display. 4 Turn l AMS L (or press ./> on the remote repeatedly) until the desired channel mode appears in the display. LARGE+SW", or "NO-CNTR+SW", no signal outputs from the sub woofer. * Low ...
..."S" for the sub woofer does not output. Selecting the playback mode 1 Press MENU on the player. 2 Turn l AMS L (or press ./> on the remote repeatedly) until the desired playback mode appears in the display. 2chSP MODE: To play a 2 channel Super Audio CD. Therefore, when you change the settings of... "Mch DIRECT", "5- LARGE+SW", "5-LARGE", etc.). The playback mode appears in the display. 4 Turn l AMS L (or press ./> on the remote repeatedly) until the desired channel mode appears in the display. LARGE+SW", or "NO-CNTR+SW", no signal outputs from the sub woofer. * Low ...

Operating Instructions
Page 17
... to Step 4. Since fine adjustments can also adjust it while listening to the test tone during stop mode, the test tone is output from the remote You can be made, it may not work depending on the front panel of the player You can adjust the output level balance of each... display returns to Step 6. Note The output level balance can adjust the output level of each speaker from the listening position by using the supplied remote. 1 Press LEVEL ADJ during playback or stop mode, the test tone is output from "SURR BAL", "CNTR BAL", or "SW BAL". To adjust the output...
... to Step 4. Since fine adjustments can also adjust it while listening to the test tone during stop mode, the test tone is output from the remote You can be made, it may not work depending on the front panel of the player You can adjust the output level balance of each... display returns to Step 6. Note The output level balance can adjust the output level of each speaker from the listening position by using the supplied remote. 1 Press LEVEL ADJ during playback or stop mode, the test tone is output from "SURR BAL", "CNTR BAL", or "SW BAL". To adjust the output...
Operating Instructions
Page 19
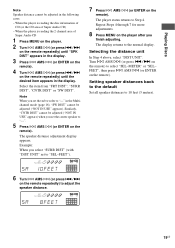
... "--" in the Multichannel mode (page 16), "SW DIST" cannot be adjusted in the display. 3 Press l AMS L (or ENTER on the remote). 4 Turn l AMS L (or press ./> on the remote). FEET", then press l AMS L (or ENTER on the player after you select "SURR DIST" (with "DIST UNIT" set to Step 4. Select... disc information of CD (or the CD area of Super Audio CD 1 Press MENU on the player. 2 Turn l AMS L (or press ./> on the remote repeatedly) until "SPK DIST" appears in the following cases. - Selecting the distance unit In Step 4 above, select "DIST UNIT". Setting speaker distances back to...
... "--" in the Multichannel mode (page 16), "SW DIST" cannot be adjusted in the display. 3 Press l AMS L (or ENTER on the remote). 4 Turn l AMS L (or press ./> on the remote). FEET", then press l AMS L (or ENTER on the player after you select "SURR DIST" (with "DIST UNIT" set to Step 4. Select... disc information of CD (or the CD area of Super Audio CD 1 Press MENU on the player. 2 Turn l AMS L (or press ./> on the remote repeatedly) until "SPK DIST" appears in the following cases. - Selecting the distance unit In Step 4 above, select "DIST UNIT". Setting speaker distances back to...
Operating Instructions
Page 21
... the player, use a disc with a cleaning cloth. There is connected securely. • Make sure you select "5- The remote does not function. • Remove any problem persist, consult your nearest Sony dealer. If you play . • There is no disc inside the player. • Place the disc on the disc... connector. • The audio signals of the Super Audio CD cannot be output from the SUB WOOFER jack. • Select a playback mode in the remote are weak, replace with a dry cloth. • Do not use solvents such as on the disc. • Use only round-shaped discs. Reload...
... the player, use a disc with a cleaning cloth. There is connected securely. • Make sure you select "5- The remote does not function. • Remove any problem persist, consult your nearest Sony dealer. If you play . • There is no disc inside the player. • Place the disc on the disc... connector. • The audio signals of the Super Audio CD cannot be output from the SUB WOOFER jack. • Select a playback mode in the remote are weak, replace with a dry cloth. • Do not use solvents such as on the disc. • Use only round-shaped discs. Reload...
Operating Instructions
Page 22
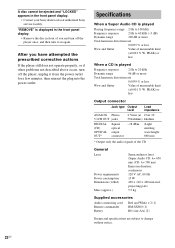
...CD is displayed in the front panel display. • Remove the disc in the front panel display. • Contact your Sony dealer or local authorized Sony service facility. A disc cannot be ejected and "LOCKED" appears in front of the CD General Laser Power requirements Power consumption ...and turn off the player once, and then turn off the player, unplug it on again. projecting parts 5.5 kg Supplied accessories Audio connecting cord Remote commander Battery Red and White × 2 (1) RM-SX800 (1) R6 (size-AA) (2) Design and specifications are subject to change without notice...
...CD is displayed in the front panel display. • Remove the disc in the front panel display. • Contact your Sony dealer or local authorized Sony service facility. A disc cannot be ejected and "LOCKED" appears in front of the CD General Laser Power requirements Power consumption ...and turn off the player once, and then turn off the player, unplug it on again. projecting parts 5.5 kg Supplied accessories Audio connecting cord Remote commander Battery Red and White × 2 (1) RM-SX800 (1) R6 (size-AA) (2) Design and specifications are subject to change without notice...

Operating Instructions
Page 23
... parentheses. continued 23US Index to Parts and Controls Further details are provided on the pages indicated in this manual describe the controls on the player. C Remote sensor (6) D Display window (10) E H button (9, 13, 14) F X button (9) G x button (9, 15) H m/M buttons (13) I l AMS L dial (AMS: Automatic Music Sensor) (8, 9, 10, 12, ...the player. K DISC SKIP button (9, 12, 14) Press to select the disc directly. You can also use the controls on the remote if they have the same or similar names as those on the player, or when the Multi-channel Super Audio CD is loaded. ...
... parentheses. continued 23US Index to Parts and Controls Further details are provided on the pages indicated in this manual describe the controls on the player. C Remote sensor (6) D Display window (10) E H button (9, 13, 14) F X button (9) G x button (9, 15) H m/M buttons (13) I l AMS L dial (AMS: Automatic Music Sensor) (8, 9, 10, 12, ...the player. K DISC SKIP button (9, 12, 14) Press to select the disc directly. You can also use the controls on the remote if they have the same or similar names as those on the player, or when the Multi-channel Super Audio CD is loaded. ...
Operating Instructions
Page 24
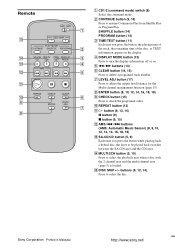
Remote qg qf qd qs qa q; 9 8 A CD1/2 (command mode) switch (8) Select the command mode. N MULTI/2CH button (5, 10) Press to be played back switches between the ... button (5, 9) Each time you press the button, the playing time of 2 the track, the remaining time of the disc, or TEXT information appears in Malaysia Sony Corporation Printed in the display. 3 D DISPLAY MODE button (12) Press to turn the display information off or on. 4 E m/M buttons (13) 5 F CLEAR button (14, 15) Press...
Remote qg qf qd qs qa q; 9 8 A CD1/2 (command mode) switch (8) Select the command mode. N MULTI/2CH button (5, 10) Press to be played back switches between the ... button (5, 9) Each time you press the button, the playing time of 2 the track, the remaining time of the disc, or TEXT information appears in Malaysia Sony Corporation Printed in the display. 3 D DISPLAY MODE button (12) Press to turn the display information off or on. 4 E m/M buttons (13) 5 F CLEAR button (14, 15) Press...


