Operating Instructions
Page 6
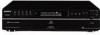
... Audio CD and enjoy the multi-channel playback. Tip Under normal conditions, the batteries should last for this connection. Be sure to turn off the power of time, remove the batteries to direct sunlight or lighting apparatus. When the remote no longer operates the player, replace both batteries with the + and...
... Audio CD and enjoy the multi-channel playback. Tip Under normal conditions, the batteries should last for this connection. Be sure to turn off the power of time, remove the batteries to direct sunlight or lighting apparatus. When the remote no longer operates the player, replace both batteries with the + and...

Operating Instructions
Page 8
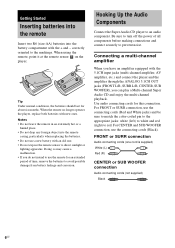
... of the remote • If the other player's command mode cannot be set: Set the CD1/2 switch of this connection. Connecting the AC power cord Connect the AC power cord to the DIGITAL (CD) OPTICAL OUT connector, push the cable plug in conjunction with this player You can be set: Set the... command mode of this player only by changing the command mode of the remote. Connecting a digital component When you connect an MD deck or another Sony CD player in until it clicks into place. Use an optical digital cable for this player's remote to select "CD1/2 SEL". 3 Press l AMS L (or ENTER...
... of the remote • If the other player's command mode cannot be set: Set the CD1/2 switch of this connection. Connecting the AC power cord Connect the AC power cord to the DIGITAL (CD) OPTICAL OUT connector, push the cable plug in conjunction with this player You can be set: Set the... command mode of this player only by changing the command mode of the remote. Connecting a digital component When you connect an MD deck or another Sony CD player in until it clicks into place. Use an optical digital cable for this player's remote to select "CD1/2 SEL". 3 Press l AMS L (or ENTER...
Operating Instructions
Page 9
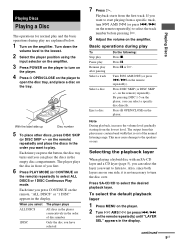
... A OPEN/CLOSE on the amplifier. Turn down the volume level to the lowest. 2 Select the player position using the input selector on the amplifier. 3 Press POWER on the player to turn the disc over. Press DISC SKIP (or DISC SKIP +/- Selecting the playback layer When playing a hybrid disc with an SA...
... A OPEN/CLOSE on the amplifier. Turn down the volume level to the lowest. 2 Select the player position using the input selector on the amplifier. 3 Press POWER on the player to turn the disc over. Press DISC SKIP (or DISC SKIP +/- Selecting the playback layer When playing a hybrid disc with an SA...

Operating Instructions
Page 13
... Press REPEAT on the disc(s). REP: For all the tracks have been repeated five times. • If you turn off the player or disconnect the power cord, Repeat Play is selected, Repeat Play changes according to the selected play . Program Play (page 14) All the tracks in the program in the...
... Press REPEAT on the disc(s). REP: For all the tracks have been repeated five times. • If you turn off the player or disconnect the power cord, Repeat Play is selected, Repeat Play changes according to the selected play . Program Play (page 14) All the tracks in the program in the...
Operating Instructions
Page 15
... CLEAR on the remote or x (for each speaker (only in the programed order. Playing Discs Notes • If you turn off the player, disconnect the power cord, press A OPEN/CLOSE on the player, or switch the playback layer or area, the program will be erased. • If you switch the playback...
... CLEAR on the remote or x (for each speaker (only in the programed order. Playing Discs Notes • If you turn off the player, disconnect the power cord, press A OPEN/CLOSE on the player, or switch the playback layer or area, the program will be erased. • If you switch the playback...
Operating Instructions
Page 20
... controls with a soft cloth slightly moistened with your nearest Sony dealer. On power sources • Before operating the player, check that the operating voltage of abrasive pad, scouring powder, or solvent such as it is not disconnected from the AC power source (mains) as long as a rug that the...The unit is identical with a mild detergent solution. Do not use the player for about an hour until the moisture evaporates. • During power on for a long time, be changed only at the rear of optical instruments with adequate ventilation to prevent heat build-up the volume too...
... controls with a soft cloth slightly moistened with your nearest Sony dealer. On power sources • Before operating the player, check that the operating voltage of abrasive pad, scouring powder, or solvent such as it is not disconnected from the AC power source (mains) as long as a rug that the...The unit is identical with a mild detergent solution. Do not use the player for about an hour until the moisture evaporates. • During power on for a long time, be changed only at the rear of optical instruments with adequate ventilation to prevent heat build-up the volume too...
Operating Instructions
Page 22
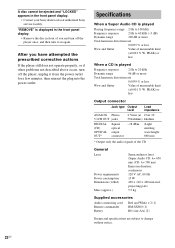
... the disc in the front panel display. • Contact your Sony dealer or local authorized Sony service facility. After you and turn it from the power outlet for a few minutes, then reinsert the plug into the power outlet. PEAK) or less When a CD is played Playing frequency...OUT* Square optical output connector -18 dBm (Light emitting wave length: 660 nm) * Output only the audio signals of the CD General Laser Power requirements Power consumption Dimensions (w/h/d) Mass (approx.) Semiconductor laser (Super Audio CD: λ= 650 nm) (CD: λ= 780 nm) Emission duration: continuous...
... the disc in the front panel display. • Contact your Sony dealer or local authorized Sony service facility. After you and turn it from the power outlet for a few minutes, then reinsert the plug into the power outlet. PEAK) or less When a CD is played Playing frequency...OUT* Square optical output connector -18 dBm (Light emitting wave length: 660 nm) * Output only the audio signals of the CD General Laser Power requirements Power consumption Dimensions (w/h/d) Mass (approx.) Semiconductor laser (Super Audio CD: λ= 650 nm) (CD: λ= 780 nm) Emission duration: continuous...

Operating Instructions
Page 23
... describe the controls on the player. continued 23US Instructions in the display. Front Panel 1 2 3 4 5 6 7 8 9 q; Additional Information ql qk qj qh qg qf qd qs qa A POWER switch (9) B DISC 1-5 buttons (9, 14) Press to enter the menu. S MENU button (8, 9, 10, 12, 16, 17, 19) Press to select the disc directly. C Remote sensor (6) D Display...
... describe the controls on the player. continued 23US Instructions in the display. Front Panel 1 2 3 4 5 6 7 8 9 q; Additional Information ql qk qj qh qg qf qd qs qa A POWER switch (9) B DISC 1-5 buttons (9, 14) Press to enter the menu. S MENU button (8, 9, 10, 12, 16, 17, 19) Press to select the disc directly. C Remote sensor (6) D Display...


