Operating Instructions
Page 3
... Specifications 25 Index to Parts and Controls 26 3US Program Play Enjoying a Multi-channel Super Audio CD 16 - Table of Contents Features of the player 4 Compatible Disc Types 4 About the Super Audio CD 5 Getting Started Inserting batteries into the remote 6 Hooking Up the Audio Components 6 Playing Discs Playing a Disc 9 Using the Display 11 Replacing Discs While Playing a Disc...
... Specifications 25 Index to Parts and Controls 26 3US Program Play Enjoying a Multi-channel Super Audio CD 16 - Table of Contents Features of the player 4 Compatible Disc Types 4 About the Super Audio CD 5 Getting Started Inserting batteries into the remote 6 Hooking Up the Audio Components 6 Playing Discs Playing a Disc 9 Using the Display 11 Replacing Discs While Playing a Disc...

Operating Instructions
Page 4
... Laser Optical Pickup, capable of reading a Super Audio CD or conventional CD depending on this player. • Super Audio CDs • Audio CDs This player cannot play the following features: • Mounted with copyright protection technologies This product is capable of controlling both the SCD-C2000ES and a conventional Sony CD player. Notes on CD-R/CD-RW playback Discs recorded on this player. If you to adjust the multi-channel...
... Laser Optical Pickup, capable of reading a Super Audio CD or conventional CD depending on this player. • Super Audio CDs • Audio CDs This player cannot play the following features: • Mounted with copyright protection technologies This product is capable of controlling both the SCD-C2000ES and a conventional Sony CD player. Notes on CD-R/CD-RW playback Discs recorded on this player. If you to adjust the multi-channel...
Operating Instructions
Page 5
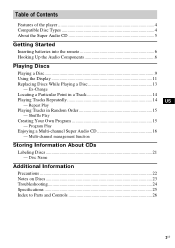
... play the CD layer on a conventional CD player. 2) Since both areas, press MULTI/2CH to select the area you want to listen to (see page 10). CD layer3) SA-CD layer3) 5US SA-CD layer: A high-density signal layer for Super Audio CD CD layer1): A layer that of a conventional CD, and with an SA-CD layer and a CD layer) An SA-CD layer consists...
... play the CD layer on a conventional CD player. 2) Since both areas, press MULTI/2CH to select the area you want to listen to (see page 10). CD layer3) SA-CD layer3) 5US SA-CD layer: A high-density signal layer for Super Audio CD CD layer1): A layer that of a conventional CD, and with an SA-CD layer and a CD layer) An SA-CD layer consists...
Operating Instructions
Page 6
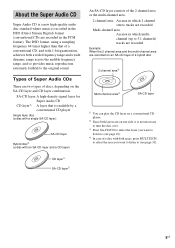
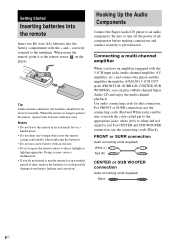
Doing so may cause a malfunction. • If you can play a Multi-channel Super Audio CD and enjoy the multi-channel playback. Use audio connecting cords for an extended period of all components before making connections and connect securely to prevent noise. Getting ... the player, replace both batteries with the + and - Tip Under normal conditions, the batteries should last for about six months. Be sure to turn off the power of time, remove the batteries to red. correctly oriented to an audio component. Hooking Up the Audio Components Connect the Super Audio CD player to ...
Doing so may cause a malfunction. • If you can play a Multi-channel Super Audio CD and enjoy the multi-channel playback. Use audio connecting cords for an extended period of all components before making connections and connect securely to prevent noise. Getting ... the player, replace both batteries with the + and - Tip Under normal conditions, the batteries should last for about six months. Be sure to turn off the power of time, remove the batteries to red. correctly oriented to an audio component. Hooking Up the Audio Components Connect the Super Audio CD player to ...
Operating Instructions
Page 7
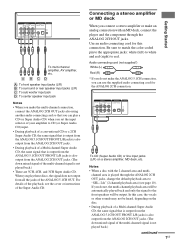
... supplied*) White (L) Red (R) * If you can use the supplied audio connecting cord for this case, the vocals or other sounds may not be output. Notes • When a disc with an MD deck, connect the player and the component through the ANALOG 2CH OUT jacks, change the default playback...sure to match the color-coded pin to the appropriate jacks: white (left) to white and red (right) to CD (or Super Audio CD) input. • During playback of a conventional CD or a 2CH Super Audio CD, the same signal that is output from the ANALOG 5.1CH OUT FRONT L/R jacks is also output from the ANALOG...
... supplied*) White (L) Red (R) * If you can use the supplied audio connecting cord for this case, the vocals or other sounds may not be output. Notes • When a disc with an MD deck, connect the player and the component through the ANALOG 2CH OUT jacks, change the default playback...sure to match the color-coded pin to the appropriate jacks: white (left) to white and red (right) to CD (or Super Audio CD) input. • During playback of a conventional CD or a 2CH Super Audio CD, the same signal that is output from the ANALOG 5.1CH OUT FRONT L/R jacks is also output from the ANALOG...
Operating Instructions
Page 8
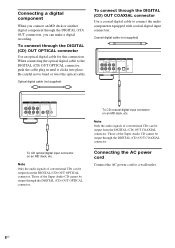
... in until it clicks into place. To connect through the DIGITAL (CD) OUT OPTICAL connector Use an optical digital cable for this connection. Those of the Super Audio CD cannot be output through the DIGITAL (CD) OUT OPTICAL connector. When connecting the optical digital cable to a ...wall outlet. 8US Be careful not to connect the audio components equipped with coaxial digital input connectors. Coaxial ...
... in until it clicks into place. To connect through the DIGITAL (CD) OUT OPTICAL connector Use an optical digital cable for this connection. Those of the Super Audio CD cannot be output through the DIGITAL (CD) OUT OPTICAL connector. When connecting the optical digital cable to a ...wall outlet. 8US Be careful not to connect the audio components equipped with coaxial digital input connectors. Coaxial ...

Operating Instructions
Page 9
Turn down the volume level to the lowest. 2 Select the player position using another Sony CD player in conjunction with this player You can set the supplied remote to be set: Set the CD1/2 switch of this player's remote to CD2. Each time you press the button, the disc tray turns and you first.... in the order of the remote • If the other player's command mode can place the discs in the display. The current command mode appears. 4 Turn l AMS L (or press ./> on the remote) to select "CD - 1" or "CD - 2", then press l AMS L (or ENTER on the amplifier. Playing Discs Playing a ...
Turn down the volume level to the lowest. 2 Select the player position using another Sony CD player in conjunction with this player You can set the supplied remote to be set: Set the CD1/2 switch of this player's remote to CD2. Each time you press the button, the disc tray turns and you first.... in the order of the remote • If the other player's command mode can place the discs in the display. The current command mode appears. 4 Turn l AMS L (or press ./> on the remote) to select "CD - 1" or "CD - 2", then press l AMS L (or ENTER on the amplifier. Playing Discs Playing a ...
Operating Instructions
Page 10
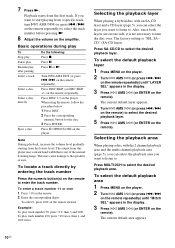
... and a CD layer (page 5), you can select the playback area you want to listen to select the desired playback layer. 5 Press l AMS L (or ENTER on the remote) repeatedly. To select the default playback area 1 Press MENU on the player. 2 Turn l AMS L (or press ./> on the remote repeatedly) until "LAYER SEL" appears in...
... and a CD layer (page 5), you can select the playback area you want to listen to select the desired playback layer. 5 Press l AMS L (or ENTER on the remote) repeatedly. To select the default playback area 1 Press MENU on the player. 2 Turn l AMS L (or press ./> on the remote repeatedly) until "LAYER SEL" appears in...
Operating Instructions
Page 12
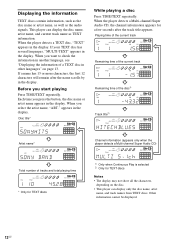
...information, such as the disc name or artist name, as well as TEXT information. appears in the display. When the player detects a Multi-channel Super Audio CD, the channel information appears for TEXT discs Notes • The display may not show all the characters, depending on page ...Remaining time of the current track Remaining time of the disc1) Track title2) Artist name* Channel information (appears only when the player detects a Multi-channel Super Audio CD) Total number of a TEXT disc in the display. If your TEXT disc has several languages, "MULTI-TEXT" appears in other...
...information, such as the disc name or artist name, as well as TEXT information. appears in the display. When the player detects a Multi-channel Super Audio CD, the channel information appears for TEXT discs Notes • The display may not show all the characters, depending on page ...Remaining time of the current track Remaining time of the disc1) Track title2) Artist name* Channel information (appears only when the player detects a Multi-channel Super Audio CD) Total number of a TEXT disc in the display. If your TEXT disc has several languages, "MULTI-TEXT" appears in other...
Operating Instructions
Page 16
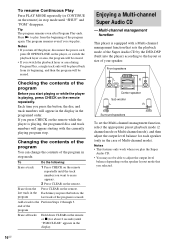
... you start playing or while the player is erased. Tip The program remains even after Program Play ends. Multi-channel management function This player is playing, the programed disc and track numbers will appear in the display in the case of the Super Audio CD by the DSD-DSP (built into... the player) according to erase appears. 2 Press CLEAR on the remote. To Erase a track Do the following: 1 Press CHECK on the remote repeatedly ...
... you start playing or while the player is erased. Tip The program remains even after Program Play ends. Multi-channel management function This player is playing, the programed disc and track numbers will appear in the display in the case of the Super Audio CD by the DSD-DSP (built into... the player) according to erase appears. 2 Press CLEAR on the remote. To Erase a track Do the following: 1 Press CHECK on the remote repeatedly ...

Operating Instructions
Page 17
... woofer. LARGE+SW", "5-LARGE", etc.). If the sound is noisy or the Multi-channel playback is not effective while playing a Multi-channel Super Audio CD, change the settings of table symbols F: Front speakers C: Center speaker SR: Surround speakers SW: Sub woofer a: Signal is output --: Signal ...speakers will change the playback mode while the player is a speaker that does not contain the LFE* signal, the signal for the surround speakers, the bass frequencies will come from the sub woofer. Therefore, when you play a 2 channel Super Audio CD. The playback mode appears in the display. ...
... woofer. LARGE+SW", "5-LARGE", etc.). If the sound is noisy or the Multi-channel playback is not effective while playing a Multi-channel Super Audio CD, change the settings of table symbols F: Front speakers C: Center speaker SR: Surround speakers SW: Sub woofer a: Signal is output --: Signal ...speakers will change the playback mode while the player is a speaker that does not contain the LFE* signal, the signal for the surround speakers, the bass frequencies will come from the sub woofer. Therefore, when you play a 2 channel Super Audio CD. The playback mode appears in the display. ...

Operating Instructions
Page 19
...set the speaker distance on this function, we recommend that you select "SURR BAL" during stop mode, the test tone is "SEL-FEET". The player status returns to the normal display. Adjusting the speaker distance You can be made, it may not be adjusted in 1 foot (0.1 meter) steps...amplifier has this player and the amplifier, both of the setting may work and you set the distance to get the proper result. The test tone issues from the front speakers and surround speakers. 6 Press ./> repeatedly to observe the movement of measure for the Multi-channel Super Audio CD. In stop...
...set the speaker distance on this function, we recommend that you select "SURR BAL" during stop mode, the test tone is "SEL-FEET". The player status returns to the normal display. Adjusting the speaker distance You can be made, it may not be adjusted in 1 foot (0.1 meter) steps...amplifier has this player and the amplifier, both of the setting may work and you set the distance to get the proper result. The test tone issues from the front speakers and surround speakers. 6 Press ./> repeatedly to observe the movement of measure for the Multi-channel Super Audio CD. In stop...

Operating Instructions
Page 20
...the Multichannel mode (page 17), "SW DIST" cannot be adjusted ("NOT IN USE" appears). When the player is reading the disc information of CD (or the CD area of Super Audio CD 1 Press MENU on the player. 2 Turn l AMS L (or press ./> on the remote repeatedly) until the desired item appears in ...speaker to "SEL-FEET"). 7 Press l AMS L (or ENTER on the remote) to the normal display. When the player is reading the 2 channel area of Super Audio CD) - The player status returns to adjust the speaker distance. 20US Note Speaker distance cannot be adjusted in the display. FEET", then press l...
...the Multichannel mode (page 17), "SW DIST" cannot be adjusted ("NOT IN USE" appears). When the player is reading the disc information of CD (or the CD area of Super Audio CD 1 Press MENU on the player. 2 Turn l AMS L (or press ./> on the remote repeatedly) until the desired item appears in ...speaker to "SEL-FEET"). 7 Press l AMS L (or ENTER on the remote) to the normal display. When the player is reading the 2 channel area of Super Audio CD) - The player status returns to adjust the speaker distance. 20US Note Speaker distance cannot be adjusted in the display. FEET", then press l...
Operating Instructions
Page 21
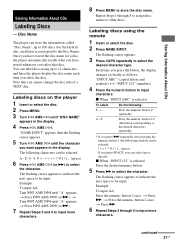
...through 5 to select the desired character type. Press the numeric button 2-9 (the button corresponding to be input. Storing Information About CDs Storing Information About CDs Labeling Discs - The following characters can be selected space) If you press SPACE, you press the button, the display changes cyclically...repeatedly. * If you select the disc. Labeling discs using up to 100 discs (for a disc, the player automatically recalls what you have the player display the disc name each layer is correspond to be input. Z Do the following symbols can select space ...
...through 5 to select the desired character type. Press the numeric button 2-9 (the button corresponding to be input. Storing Information About CDs Storing Information About CDs Labeling Discs - The following characters can be selected space) If you press SPACE, you press the button, the display changes cyclically...repeatedly. * If you select the disc. Labeling discs using up to 100 discs (for a disc, the player automatically recalls what you have the player display the disc name each layer is correspond to be input. Z Do the following symbols can select space ...

Operating Instructions
Page 22
... played. In this product will increase eye hazard. • Should any solid object or liquid fall into the Super Audio CD player. On adjusting the volume Do not turn up in the player. • Do not place the player on other discs. Erase all the characters. 3 Press ENTER on the remote repeatedly to the wall outlet...
... played. In this product will increase eye hazard. • Should any solid object or liquid fall into the Super Audio CD player. On adjusting the volume Do not turn up in the player. • Do not place the player on other discs. Erase all the characters. 3 Press ENTER on the remote repeatedly to the wall outlet...

Operating Instructions
Page 24
...; Contact your nearest Sony dealer. SMALL+SW" or "F-LARGE+SW" for a few minutes, then reinsert the plug into the power outlet. 24US Troubleshooting If you experience any of the Super Audio CD cannot be ejected and "LOCKED" appears in front of the remote and the player. • Point ...the remote at an angle. A disc cannot be output from the DIGITAL (CD) OUT connectors. "REMOVE" is output from the ...
...; Contact your nearest Sony dealer. SMALL+SW" or "F-LARGE+SW" for a few minutes, then reinsert the plug into the power outlet. 24US Troubleshooting If you experience any of the Super Audio CD cannot be ejected and "LOCKED" appears in front of the remote and the player. • Point ...the remote at an angle. A disc cannot be output from the DIGITAL (CD) OUT connectors. "REMOVE" is output from the ...
Operating Instructions
Page 25
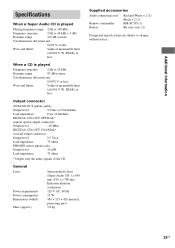
... range 97 dB or more Total harmonic distortion rate 0.003 % or less Wow and flutter Value of the CD General Laser Power requirements Power consumption Dimensions (w/h/d) Mass (approx.) Semiconductor laser (Super Audio CD: λ= 650 nm) (CD: λ= 780 nm) Emission duration: continuous 120 V AC, 60 Hz 15 W 430 × 115 × 420 mm incl...
... range 97 dB or more Total harmonic distortion rate 0.003 % or less Wow and flutter Value of the CD General Laser Power requirements Power consumption Dimensions (w/h/d) Mass (approx.) Semiconductor laser (Super Audio CD: λ= 650 nm) (CD: λ= 780 nm) Emission duration: continuous 120 V AC, 60 Hz 15 W 430 × 115 × 420 mm incl...

Operating Instructions
Page 26
... Q TIME/TEXT button (12) Each time you press the button, the playing time of the track, the remaining time of a Multi-channel Super Audio CD, the same signal that is output from the ANALOG 5.1CH OUT FRONT L/R jacks is loaded and select the multi-channel playback area by pressing ... O Disc tray (9) P MULTI CHANNEL DECODING indicator Turns on the pages indicated in parentheses. T SA-CD/CD button (5, 10) Each time you turn on the player, or when the Multi-channel Super Audio CD is output from the menu and return to Parts and Controls Further details are provided on when you press...
... Q TIME/TEXT button (12) Each time you press the button, the playing time of the track, the remaining time of a Multi-channel Super Audio CD, the same signal that is output from the ANALOG 5.1CH OUT FRONT L/R jacks is loaded and select the multi-channel playback area by pressing ... O Disc tray (9) P MULTI CHANNEL DECODING indicator Turns on the pages indicated in parentheses. T SA-CD/CD button (5, 10) Each time you turn on the player, or when the Multi-channel Super Audio CD is output from the menu and return to Parts and Controls Further details are provided on when you press...
Operating Instructions
Page 27
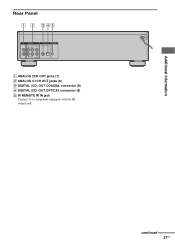
Additional Information Rear Panel 2CH OUT ANALOG 5.1CH OUT FRONT SURR CENTER L L R R SUB WOOFER DIGITAL(CD) OUT COAXIAL OPTICAL IR REMOTE IR IN A ANALOG 2CH OUT jacks (7) B ANALOG 5.1CH OUT jacks (6) C DIGITAL (CD) OUT COAXIAL connector (8) D DIGITAL (CD) OUT OPTICAL connector (8) E IR REMOTE IR IN jack Connect to a component equipped with the IR output jack. continued 27US
Additional Information Rear Panel 2CH OUT ANALOG 5.1CH OUT FRONT SURR CENTER L L R R SUB WOOFER DIGITAL(CD) OUT COAXIAL OPTICAL IR REMOTE IR IN A ANALOG 2CH OUT jacks (7) B ANALOG 5.1CH OUT jacks (6) C DIGITAL (CD) OUT COAXIAL connector (8) D DIGITAL (CD) OUT OPTICAL connector (8) E IR REMOTE IR IN jack Connect to a component equipped with the IR output jack. continued 27US
Operating Instructions
Page 28
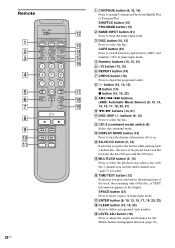
..., 15) F REPEAT button (14) G CHECK button (16) Press to adjust the output level balance for the Multi-channel management function (page 16). N SA-CD/CD button (5, 10) Each time you press the button, the playing time of the track, the remaining time of the disc, or TEXT information appears in... switches between capital letters (ABC) and numbers (123) in name input mode. Remote CD1 CD2 PLAY MODE CONTINUE SHUFFLE PROGRAM NAME DISPLAY INPUT MODE SA-CD/CD DISC TIME/TEXT CAPS SPACE MULTI/2CH 1 GHI 4 PQRS 7 ABC 2 JKL 5 TUV 8 DEF 3 MNO 6 WXYZ 9 >10 ENTER 10/0 REPEAT CHECK CLEAR LEVEL ADJ...
..., 15) F REPEAT button (14) G CHECK button (16) Press to adjust the output level balance for the Multi-channel management function (page 16). N SA-CD/CD button (5, 10) Each time you press the button, the playing time of the track, the remaining time of the disc, or TEXT information appears in... switches between capital letters (ABC) and numbers (123) in name input mode. Remote CD1 CD2 PLAY MODE CONTINUE SHUFFLE PROGRAM NAME DISPLAY INPUT MODE SA-CD/CD DISC TIME/TEXT CAPS SPACE MULTI/2CH 1 GHI 4 PQRS 7 ABC 2 JKL 5 TUV 8 DEF 3 MNO 6 WXYZ 9 >10 ENTER 10/0 REPEAT CHECK CLEAR LEVEL ADJ...


