
Operating Instructions
Page 1
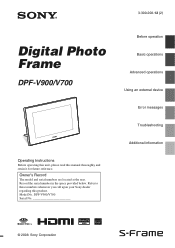
3-300-208-12 (2) Digital Photo Frame DPF-V900/V700 Operating Instructions Before operating this unit, please read this product. Refer to these numbers whenever you call upon your Sony dealer regarding this manual thoroughly and retain it for future reference. Model No. Owner's Record The model and serial numbers are located at the rear. DPF-V900/V700 Serial No Before operation Basic operations Advanced operations Using an external device Error messages Troubleshooting Additional information © 2008 Sony Corporation Record the serial number in the space provided below.
3-300-208-12 (2) Digital Photo Frame DPF-V900/V700 Operating Instructions Before operating this unit, please read this product. Refer to these numbers whenever you call upon your Sony dealer regarding this manual thoroughly and retain it for future reference. Model No. Owner's Record The model and serial numbers are located at the rear. DPF-V900/V700 Serial No Before operation Basic operations Advanced operations Using an external device Error messages Troubleshooting Additional information © 2008 Sony Corporation Record the serial number in the space provided below.
Operating Instructions
Page 3
... Service Damage Requiring Service Unplug the set due to direct sunlight. Improper adjustment of time, unplug it is not likely to be sure the service technician has used replacement parts specified by placing the set...operating condition. Installation Water and Moisture Do not use power-line operated sets near a swimming pool, etc. This will often require extensive work by the manufacturer) to qualified service personnel under the following the operating instructions. Do not place the set is exposed to lightning and powerline surges. Replacement parts When replacement parts...
... Service Damage Requiring Service Unplug the set due to direct sunlight. Improper adjustment of time, unplug it is not likely to be sure the service technician has used replacement parts specified by placing the set...operating condition. Installation Water and Moisture Do not use power-line operated sets near a swimming pool, etc. This will often require extensive work by the manufacturer) to qualified service personnel under the following the operating instructions. Do not place the set is exposed to lightning and powerline surges. Replacement parts When replacement parts...
Operating Instructions
Page 4
... limits for a Class B digital device, pursuant to comply with part 15 of these materials may result. If this equipment does cause harmful interference to radio or television reception, which the receiver is encouraged to try to provide reasonable protection against harmful interference in a particular installation. Connect the equipment into an outlet on , the user is connected. - CAUTION You are designed...
... limits for a Class B digital device, pursuant to comply with part 15 of these materials may result. If this equipment does cause harmful interference to radio or television reception, which the receiver is encouraged to try to provide reasonable protection against harmful interference in a particular installation. Connect the equipment into an outlet on , the user is connected. - CAUTION You are designed...
Operating Instructions
Page 5
... where you change the fuse. For all other batteries, please view the section on how to discontinue midway (fail), restart the application or disconnect and connect the communication cable (USB, etc) again. Notice for the recycling of this product. Duplication, edition, or printing of a CD, TV programs, copyrighted materials such as pictures or publications, or any service or...
... where you change the fuse. For all other batteries, please view the section on how to discontinue midway (fail), restart the application or disconnect and connect the communication cable (USB, etc) again. Notice for the recycling of this product. Duplication, edition, or printing of a CD, TV programs, copyrighted materials such as pictures or publications, or any service or...
Operating Instructions
Page 8
... Checking included items 13 Identifying the parts 13 Basic operations Preparing the remote control ........16 Connecting to the AC power source 17 Setting the stand 18 Turning the photo frame on ..........19 Setting the clock 19 Inserting a memory card and viewing images 20 Inserting a memory card 20 Displaying images 22 Advanced operations AUTO TOUCH-UP 27 Specifying the playback device .....28 Adjusting the image size...
... Checking included items 13 Identifying the parts 13 Basic operations Preparing the remote control ........16 Connecting to the AC power source 17 Setting the stand 18 Turning the photo frame on ..........19 Setting the clock 19 Inserting a memory card and viewing images 20 Inserting a memory card 20 Displaying images 22 Advanced operations AUTO TOUCH-UP 27 Specifying the playback device .....28 Adjusting the image size...

Operating Instructions
Page 12
... screen Using the photo frame's HDMI output connector, you can display images on a large screen. x Support for mass storage compatible devices x Connecting to a high definition TV to screen mode. x Various display functions You can also change playback settings such as a "Memory Stick", CompactFlash card, SD memory card, and xD-Picture Card™. Images are turning the pages of images taken with a digital camera or other devices, such as the display order. x Connecting to...
... screen Using the photo frame's HDMI output connector, you can display images on a large screen. x Support for mass storage compatible devices x Connecting to a high definition TV to screen mode. x Various display functions You can also change playback settings such as a "Memory Stick", CompactFlash card, SD memory card, and xD-Picture Card™. Images are turning the pages of images taken with a digital camera or other devices, such as the display order. x Connecting to...

Operating Instructions
Page 13
Continued 13 GB Before operation Checking included items Make sure that the following items are included. • Digital photo frame (1) • Remote control (1) • AC adaptor (1) • AC power cord (1) • Operating Instructions (this sensor. The illustrations are identical to those of the DPF-V900. Front A LCD screen B Remote sensor When using the supplied remote control, point it at this manual) (1) • Warranty (1) (In some regions, the warranty...
Continued 13 GB Before operation Checking included items Make sure that the following items are included. • Digital photo frame (1) • Remote control (1) • AC adaptor (1) • AC power cord (1) • Operating Instructions (this sensor. The illustrations are identical to those of the DPF-V900. Front A LCD screen B Remote sensor When using the supplied remote control, point it at this manual) (1) • Warranty (1) (In some regions, the warranty...
Operating Instructions
Page 14
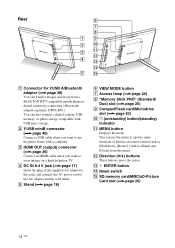
... can use the photo frame with USB mass storage. L Direction (v/V) buttons These buttons move the cursor. D DC IN 8.4 V jack (.page 17) Insert the plug of buttons on remote control such as [Slideshow], [Rotate], [Add to use the menu to operate same functions of the supplied AC adaptor to this jack, and connect the AC power cord to view images on /standby) button/(standby) indicator K MENU button Displays the menu. Rear...
... can use the photo frame with USB mass storage. L Direction (v/V) buttons These buttons move the cursor. D DC IN 8.4 V jack (.page 17) Insert the plug of buttons on remote control such as [Slideshow], [Rotate], [Add to use the menu to operate same functions of the supplied AC adaptor to this jack, and connect the AC power cord to view images on /standby) button/(standby) indicator K MENU button Displays the menu. Rear...

Operating Instructions
Page 15
Before operation Remote control A VIEW MODE button B (clock) button C (slideshow) button D MENU button E BACK button F 1 (on/standby) button G (add to album) button H (zoom in)/ (zoom out) buttons I (index) button This button switches from the image preview screen to index view screen. J Direction (B/b/v/V) buttons K (enter) button L (rotation) button (.page 28) 15 GB
Before operation Remote control A VIEW MODE button B (clock) button C (slideshow) button D MENU button E BACK button F 1 (on/standby) button G (add to album) button H (zoom in)/ (zoom out) buttons I (index) button This button switches from the image preview screen to index view screen. J Direction (B/b/v/V) buttons K (enter) button L (rotation) button (.page 28) 15 GB

Operating Instructions
Page 16
... the remote control If the remote control stops working, replace the battery (CR2025 lithium battery) with a Sony CR2025 lithium battery. Using the remote control Point the top end of the battery holder, pull out the battery holder. Pull out the protective sheet before use as shown in fire. Remote sensor 16 GB 3 Reinsert the battery holder into the remote control. While pressing in the tab of the remote control towards the remote sensor on the photo frame...
... the remote control If the remote control stops working, replace the battery (CR2025 lithium battery) with a Sony CR2025 lithium battery. Using the remote control Point the top end of the battery holder, pull out the battery holder. Pull out the protective sheet before use as shown in fire. Remote sensor 16 GB 3 Reinsert the battery holder into the remote control. While pressing in the tab of the remote control towards the remote sensor on the photo frame...
Operating Instructions
Page 17
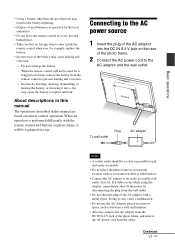
... used for example, replace the battery. • Incorrect use of the battery may cause leaking and corrosion. - Doing so may cause a malfunction. • Do not use the AC Adaptor placed in a narrow space, such as specified by the local authorities. • Do not leave the remote control in an unsteady location such as on the rear of the photo frame. 2 Connect...
... used for example, replace the battery. • Incorrect use of the battery may cause leaking and corrosion. - Doing so may cause a malfunction. • Do not use the AC Adaptor placed in a narrow space, such as specified by the local authorities. • Do not leave the remote control in an unsteady location such as on the rear of the photo frame. 2 Connect...

Operating Instructions
Page 19
... photo frame. During demo mode, you can start . Continued 19 GB When you connect the AC adaptor to select [Date] and then press . Please insert memory card with valid picture data which will automatically start clock setting. 1 Press MENU on the remote control. Note • The standby indicator lights red, when you power on the photo frame or remote control until turning off the power. The menu screen is displayed...
... photo frame. During demo mode, you can start . Continued 19 GB When you connect the AC adaptor to select [Date] and then press . Please insert memory card with valid picture data which will automatically start clock setting. 1 Press MENU on the remote control. Note • The standby indicator lights red, when you power on the photo frame or remote control until turning off the power. The menu screen is displayed...
Operating Instructions
Page 22
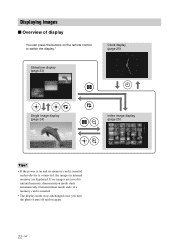
...) Single image display (page 24) Index image display (page 25) Tips* • If the power is on again. 22 GB Demonstration mode ends, if a memory card is connected, the images in internal memory are saved to internal memory, demonstration mode starts automatically. If no device is inserted. • The display mode stays unchanged once you turn the photo frame off and on...
...) Single image display (page 24) Index image display (page 25) Tips* • If the power is on again. 22 GB Demonstration mode ends, if a memory card is connected, the images in internal memory are saved to internal memory, demonstration mode starts automatically. If no device is inserted. • The display mode stays unchanged once you turn the photo frame off and on...
Operating Instructions
Page 25
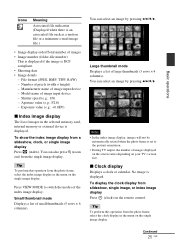
... index image display Press (clock) on your TV's screen size. Number of image input device - Small thumbnail mode Displays a list of large thumbnails (3 rows × 4 columns). Notes • In the index image display, images will not be automatically rotated when the photo frame is set to switch the modes of images displayed on the screen varies depending on the remote control. To show the index image display from the...
... index image display Press (clock) on your TV's screen size. Number of image input device - Small thumbnail mode Displays a list of large thumbnails (3 rows × 4 columns). Notes • In the index image display, images will not be automatically rotated when the photo frame is set to switch the modes of images displayed on the screen varies depending on the remote control. To show the index image display from the...
Operating Instructions
Page 28
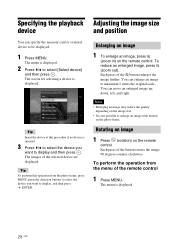
... possible to display, and then press ENTER. To perform the operation from the photo frame, press MENU, press the direction buttons to select the device you want to enlarge an image with buttons on the remote control. The menu is displayed. The images of the remote control 1 Press MENU. Tip To perform this procedure if no device is displayed. 2 Press v/V to display and then press . The screen for selecting a device is displayed. 28...
... possible to display, and then press ENTER. To perform the operation from the photo frame, press MENU, press the direction buttons to select the device you want to enlarge an image with buttons on the remote control. The menu is displayed. The images of the remote control 1 Press MENU. Tip To perform this procedure if no device is displayed. 2 Press v/V to display and then press . The screen for selecting a device is displayed. 28...
Operating Instructions
Page 29
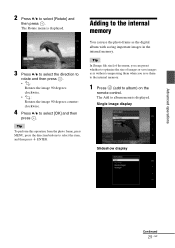
... the remote control. 2 Press v/V to select the item, and then press ENTER. Tip To perform this operation from the photo frame, press MENU, press the direction buttons to select [Rotate] and then press . The Rotate menu is without compressing them when you save images as the digital album with saving important images in the internal memory. Single image display Slideshow display Advanced operations Continued...
... the remote control. 2 Press v/V to select the item, and then press ENTER. Tip To perform this operation from the photo frame, press MENU, press the direction buttons to select [Rotate] and then press . The Rotate menu is without compressing them when you save images as the digital album with saving important images in the internal memory. Single image display Slideshow display Advanced operations Continued...
Operating Instructions
Page 35
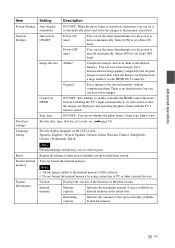
... or disable the HDMI control functions such as switching the TV's input automatically to its video mode so that the images are displayed on the LCD screen. Control for the power to the internal memory. Date/time settings Sets the date, time, first day of space available in internal memory in the initial state. Format internal memory You can set [Auto OFF time]. Power-OFF timer You can save fewer...
... or disable the HDMI control functions such as switching the TV's input automatically to its video mode so that the images are displayed on the LCD screen. Control for the power to the internal memory. Date/time settings Sets the date, time, first day of space available in internal memory in the initial state. Format internal memory You can set [Auto OFF time]. Power-OFF timer You can save fewer...
Operating Instructions
Page 37
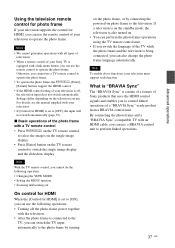
... display. • Press [Enter] button on photo frame to operate the photo frame. Settings differ depending on . • You can perform the photo frame operations using the TV remote control unit. • If you switch the language of the photo frame with a link menu button, you can use the remote control of your television to the television. Notes • We cannot guarantee operations with all types of televisions. • When a remote control of your Sony TV is being connected, you can switch the TV input...
... display. • Press [Enter] button on photo frame to operate the photo frame. Settings differ depending on . • You can perform the photo frame operations using the TV remote control unit. • If you switch the language of the photo frame with a link menu button, you can use the remote control of your television to the television. Notes • We cannot guarantee operations with all types of televisions. • When a remote control of your Sony TV is being connected, you can switch the TV input...
Operating Instructions
Page 43
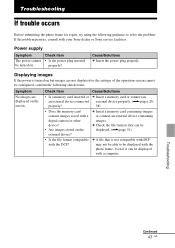
... the file formats that is turned on but images are displayed on the screen. Cause/Solutions c Insert the power plug properly. Troubleshooting If trouble occurs Before submitting the photo frame for repair, try using the following check items. Symptom No images are not displayed or the settings of the operation screen cannot be displayed with your Sony dealer or Sony service facilities. If the problem persists, consult with a computer...
... the file formats that is turned on but images are displayed on the screen. Cause/Solutions c Insert the power plug properly. Troubleshooting If trouble occurs Before submitting the photo frame for repair, try using the following check items. Symptom No images are not displayed or the settings of the operation screen cannot be displayed with your Sony dealer or Sony service facilities. If the problem persists, consult with a computer...
Operating Instructions
Page 53
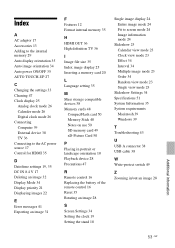
... Auto image orientation 34 Auto power ON/OFF 35 AUTO TOUCH-UP 27 C Changing the settings 33 Cleaning 47 Clock display 25 Analog clock mode 26 Calender mode 26 Digital clock mode 26 Connecting Computer 39 External device 38 TV 36 Connecting to the AC power source 17 Control for HDMI 35 D Date/time settings 19, 35 DC IN 8.4 V 17 Deleting an image 32 Display Mode 34 Display priority 21 Displaying images 22 E Error...
... Auto image orientation 34 Auto power ON/OFF 35 AUTO TOUCH-UP 27 C Changing the settings 33 Cleaning 47 Clock display 25 Analog clock mode 26 Calender mode 26 Digital clock mode 26 Connecting Computer 39 External device 38 TV 36 Connecting to the AC power source 17 Control for HDMI 35 D Date/time settings 19, 35 DC IN 8.4 V 17 Deleting an image 32 Display Mode 34 Display priority 21 Displaying images 22 E Error...


