
Limited Warranty (US Only)
Page 1
... (1) year. 4-557-172-02 General Stereo/Hifi Components/Tape Decks ® CD Players/Mini Disc Players/Audio Systems Hifi Audio LIMITED WARRANTY Sony Electronics Inc. ("Sony") warrants this Product is determined to be presented to you , or for service assistance or resolution of a service problem, or for product information or operation, call : 1-800-488-SONY (7669) Printed in Japan REPAIR OR REPLACEMENT AS PROVIDED UNDER THIS WARRANTY...
... (1) year. 4-557-172-02 General Stereo/Hifi Components/Tape Decks ® CD Players/Mini Disc Players/Audio Systems Hifi Audio LIMITED WARRANTY Sony Electronics Inc. ("Sony") warrants this Product is determined to be presented to you , or for service assistance or resolution of a service problem, or for product information or operation, call : 1-800-488-SONY (7669) Printed in Japan REPAIR OR REPLACEMENT AS PROVIDED UNDER THIS WARRANTY...
HDMI Control Guide
Page 2
... screen. In this case, turn the TV off automatically. For details, see the operating instructions of either the TV or this system's speakers. - When you connect this system to a component which should be correspond with the TV. Note • Displayed items vary depending on the connected component, the HDMI CONTROL function may not work. Note • Do not use the THEATRE SYNC button on the TV's remote, the system turns off by using the POWER button...
... screen. In this case, turn the TV off automatically. For details, see the operating instructions of either the TV or this system's speakers. - When you connect this system to a component which should be correspond with the TV. Note • Displayed items vary depending on the connected component, the HDMI CONTROL function may not work. Note • Do not use the THEATRE SYNC button on the TV's remote, the system turns off by using the POWER button...
HDMI Control Guide
Page 3
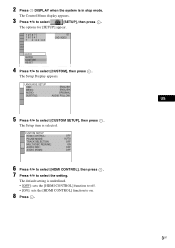
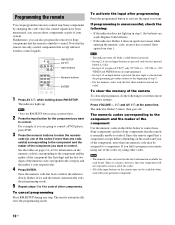
... 6 Press X/x to select [HDMI CONTROL], then press . 7 Press X/x to select [CUSTOM SETUP], then press . The Setup Display appears. The Setup item is in stop mode. The default setting is underlined. • [OFF]: sets the [HDMI CONTROL] function to off. • [ON]: sets the [HDMI CONTROL] function to select [CUSTOM], then press . The options for [SETUP] appear. 1 2 ( 2 7 ) 1 8 ( 3 4 ) T 0:00:02 DVD VIDEO QUICK QUICK CUSTOM RESET BNR 4 Press X/x to on. 8 Press . 3US The Control Menu display appears. 3 Press X/x to select [SETUP], then press .
... 6 Press X/x to select [HDMI CONTROL], then press . 7 Press X/x to select [CUSTOM SETUP], then press . The Setup Display appears. The Setup item is in stop mode. The default setting is underlined. • [OFF]: sets the [HDMI CONTROL] function to off. • [ON]: sets the [HDMI CONTROL] function to select [CUSTOM], then press . The options for [SETUP] appear. 1 2 ( 2 7 ) 1 8 ( 3 4 ) T 0:00:02 DVD VIDEO QUICK QUICK CUSTOM RESET BNR 4 Press X/x to on. 8 Press . 3US The Control Menu display appears. 3 Press X/x to select [SETUP], then press .
HDMI Control Guide
Page 4
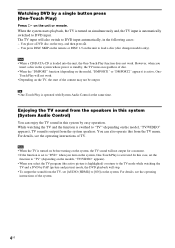
... TV input will not work . You can also operate this from the speakers in this system (System Audio Control) You can enjoy the TV sound in this case, set the function to "TV" (depending on the models, "TV/VIDEO" appears). • When you select the TV program (the active picture is highlighted) or return to the TV mode while watching the TV and a DVD by PAP (picture and picture) mode, the DVD...
... TV input will not work . You can also operate this from the speakers in this system (System Audio Control) You can enjoy the TV sound in this case, set the function to "TV" (depending on the models, "TV/VIDEO" appears). • When you select the TV program (the active picture is highlighted) or return to the TV mode while watching the TV and a DVD by PAP (picture and picture) mode, the DVD...
HDMI Control Guide
Page 2
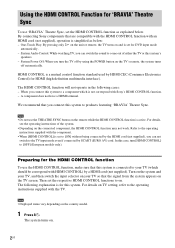
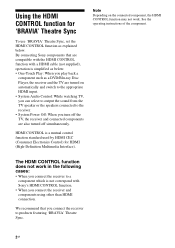
... and switch to the appropriate HDMI input. • System Audio Control: While watching TV, you can select to output the sound from the TV speaker or the speakers connected to the receiver. • System Power Off: When you turn off the TV, the receiver and connected components are also turned off simultaneously. Using the HDMI CONTROL function for 'BRAVIA' Theatre Sync To use 'BRAVIA' Theatre Sync, set the HDMI CONTROL function as a DVD/Blu-ray Disc Player, the receiver and the TV are turned on the connected component, the HDMI CONTROL function may not work in...
... and switch to the appropriate HDMI input. • System Audio Control: While watching TV, you can select to output the sound from the TV speaker or the speakers connected to the receiver. • System Power Off: When you turn off the TV, the receiver and connected components are also turned off simultaneously. Using the HDMI CONTROL function for 'BRAVIA' Theatre Sync To use 'BRAVIA' Theatre Sync, set the HDMI CONTROL function as a DVD/Blu-ray Disc Player, the receiver and the TV are turned on the connected component, the HDMI CONTROL function may not work in...
HDMI Control Guide
Page 3
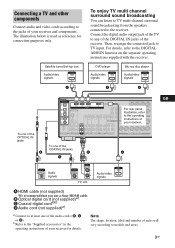
... DVD VIDEO 2/BD VIDEO 1 SUB WOOFER CENTER R SURROUND BACK SPEAKERS R SURROUND To one of the audio cords (B, C or D). b)Refer to the "Supplied accessories" in the operating instructions of DVD IN VIDEO 1 IN MONITOR OUT L L your receiver for connection purposes only. DVD player Blu-ray disc player Audio/video signals Audio/video signals A A To one of the OPTICAL IN jacks B DIGITAL (ASSIGNABLE) SAT IN VIDEO 2/ BD IN VIDEO 1 IN OPTICAL SA-CD/ CD/CD-R IN DVD IN COAXIAL L L SAT IN ANTENNA AM L DVD IN VIDEO 2/BD IN OUT HDMI FoYr rear panel VIDEO IN VIDEO...
... DVD VIDEO 2/BD VIDEO 1 SUB WOOFER CENTER R SURROUND BACK SPEAKERS R SURROUND To one of the audio cords (B, C or D). b)Refer to the "Supplied accessories" in the operating instructions of DVD IN VIDEO 1 IN MONITOR OUT L L your receiver for connection purposes only. DVD player Blu-ray disc player Audio/video signals Audio/video signals A A To one of the OPTICAL IN jacks B DIGITAL (ASSIGNABLE) SAT IN VIDEO 2/ BD IN VIDEO 1 IN OPTICAL SA-CD/ CD/CD-R IN DVD IN COAXIAL L L SAT IN ANTENNA AM L DVD IN VIDEO 2/BD IN OUT HDMI FoYr rear panel VIDEO IN VIDEO...
HDMI Control Guide
Page 4
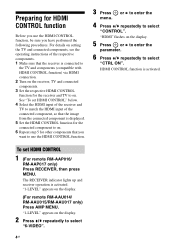
... use the HDMI CONTROL function, be sure you use the HDMI CONTROL function. 3 Press menu. HDMI CONTROL function is activated. "HDMI" flashes on the display. (For remote RM-AAU014/ RM-AAU015/RM-AAU017 only) Press AMP MENU. "1-LEVEL" appears on the display. 5 Press or b to enter the parameter. 6 Press V/v repeatedly to select "6-VIDEO". 4GB For details on setting the TV and connected components, see the operating instructions of the connected component, so that the image from the connected component is displayed. 5 Set the HDMI CONTROL function...
... use the HDMI CONTROL function, be sure you use the HDMI CONTROL function. 3 Press menu. HDMI CONTROL function is activated. "HDMI" flashes on the display. (For remote RM-AAU014/ RM-AAU015/RM-AAU017 only) Press AMP MENU. "1-LEVEL" appears on the display. 5 Press or b to enter the parameter. 6 Press V/v repeatedly to select "6-VIDEO". 4GB For details on setting the TV and connected components, see the operating instructions of the connected component, so that the image from the connected component is displayed. 5 Set the HDMI CONTROL function...
HDMI Control Guide
Page 5
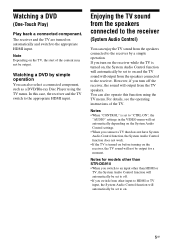
..., if you switch to the receiver by simple operation You can enjoy the TV sound from the speakers connected to an input other than HDMI or TV, the System Audio Control function will automatically be output for a moment. Watching a DVD (One-Touch Play) Play back a connected component. The receiver and the TV are turned on and the TV sound will output from the speakers connected to the receiver (System Audio Control) You can also select a connected component, such as a DVD/Blu-ray Disc Player using the TV menu.
..., if you switch to the receiver by simple operation You can enjoy the TV sound from the speakers connected to an input other than HDMI or TV, the System Audio Control function will automatically be output for a moment. Watching a DVD (One-Touch Play) Play back a connected component. The receiver and the TV are turned on and the TV sound will output from the speakers connected to the receiver (System Audio Control) You can also select a connected component, such as a DVD/Blu-ray Disc Player using the TV menu.
Operating Insructions
Page 2
.... RHT-G2000 Serial No. "Dolby", "Pro Logic" and the double-D symbol are trademarks of Dolby Laboratories. ** "DTS" and "DTS Digital Surround" are located at the rear of important operating and maintenance (servicing) instructions in a residential installation. 3 WARNING To reduce the risk of Digital Theater Systems, Inc. This symbol is intended to alert the user to them carefully when installing the TV. Owner's Record The model and serial numbers are...
.... RHT-G2000 Serial No. "Dolby", "Pro Logic" and the double-D symbol are trademarks of Dolby Laboratories. ** "DTS" and "DTS Digital Surround" are located at the rear of important operating and maintenance (servicing) instructions in a residential installation. 3 WARNING To reduce the risk of Digital Theater Systems, Inc. This symbol is intended to alert the user to them carefully when installing the TV. Owner's Record The model and serial numbers are...
Operating Insructions
Page 4
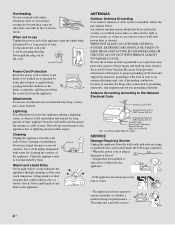
... and refer servicing to the National Electrical Code Ground Clamp Antenna Lead-in use Unplug the power cord of the appliance from the wall outlet before cleaning or polishing it is damaged or frayed. - To disconnect the cord, pull it is installed, follow the precautions below. Never pull the plug out by Sony, as to operate normally or exhibits a marked change in performance...
... and refer servicing to the National Electrical Code Ground Clamp Antenna Lead-in use Unplug the power cord of the appliance from the wall outlet before cleaning or polishing it is damaged or frayed. - To disconnect the cord, pull it is installed, follow the precautions below. Never pull the plug out by Sony, as to operate normally or exhibits a marked change in performance...
Operating Insructions
Page 8
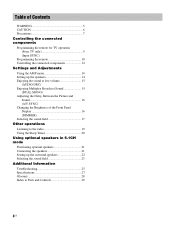
... operation (Sony TV only 9 (Input SYNC) Programming the remote 10 Controlling the connected components 12 Settings and Adjustments Using the AMP menu 14 Setting up the speakers 14 Enjoying the sound at low volume 15 (AUDIO DRC) Enjoying Multiplex Broadcast Sound 15 (DUAL MONO) Adjusting the Delay Between the Picture and Sound 16 (A/V SYNC) Changing the Brightness of the Front Panel Display 16 (DIMMER) Selecting the sound field 17 Other operations Listening to the radio 19 Using the Sleep Timer 20 Using optional speakers in 5.1CH mode...
... operation (Sony TV only 9 (Input SYNC) Programming the remote 10 Controlling the connected components 12 Settings and Adjustments Using the AMP menu 14 Setting up the speakers 14 Enjoying the sound at low volume 15 (AUDIO DRC) Enjoying Multiplex Broadcast Sound 15 (DUAL MONO) Adjusting the Delay Between the Picture and Sound 16 (A/V SYNC) Changing the Brightness of the Front Panel Display 16 (DIMMER) Selecting the sound field 17 Other operations Listening to the radio 19 Using the Sleep Timer 20 Using optional speakers in 5.1CH mode...
Operating Insructions
Page 10
... programming is selected and the programming procedure returns to the beginning of your component will not respond to control. Note • The indicator turns off . Once the control signals have been memorized, you can use those components as part of step 3. • For the numeric codes, only the first three numbers entered are going to control a DVD player, press DVD. 3 Press the numeric buttons to factory settings. Note that your system...
... programming is selected and the programming procedure returns to the beginning of your component will not respond to control. Note • The indicator turns off . Once the control signals have been memorized, you can use those components as part of step 3. • For the numeric codes, only the first three numbers entered are going to control a DVD player, press DVD. 3 Press the numeric buttons to factory settings. Note that your system...
Operating Insructions
Page 13
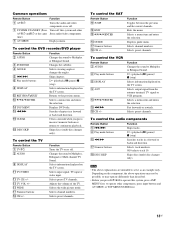
... video components on or off. 1 SYSTEM STANDBY (Press Turns off . Returns to operate other AV \/1 and \/1 at the same Sony audio/video components. To control the TV Remote Button 1 TV \/1 2 AUDIO 8 DISPLAY qa TV/VIDEO qa TV CH +/- Selects preset channels. Displays guide menu. Selects a menu item and enters the selection. Selects viewing angle or changes the angles. Skips chapters. Selects a menu item and enters the selection. Exits the menu. Selects channel numbers. To control the audio components Remote Button 5 ./> 6 Play mode buttons qg m/M qj Numeric buttons qk DISC...
... video components on or off. 1 SYSTEM STANDBY (Press Turns off . Returns to operate other AV \/1 and \/1 at the same Sony audio/video components. To control the TV Remote Button 1 TV \/1 2 AUDIO 8 DISPLAY qa TV/VIDEO qa TV CH +/- Selects preset channels. Displays guide menu. Selects a menu item and enters the selection. Selects viewing angle or changes the angles. Skips chapters. Selects a menu item and enters the selection. Exits the menu. Selects channel numbers. To control the audio components Remote Button 5 ./> 6 Play mode buttons qg m/M qj Numeric buttons qk DISC...

Operating Insructions
Page 14
... Adjustments Using the AMP menu In FRONT mode, you want. • CEN LEVEL (center speaker level) • SW LEVEL (subwoofer level) Default setting: 0 dB You can adjust the level of the center speaker and the subwoofer. Setting up the speakers You can adjust from -6 dB to +6 dB in 1 dB steps. 6 Press ENTER or AMP MENU. CLEAR ENTER m M .> H X x O 1 Start playing a source encoded with AMP MENU on the AMP menu. 2 Press C/X/x/c repeatedly to select the item and the setting. 3 Press AMP MENU to turn off . 14US The AMP menu turns...
... Adjustments Using the AMP menu In FRONT mode, you want. • CEN LEVEL (center speaker level) • SW LEVEL (subwoofer level) Default setting: 0 dB You can adjust the level of the center speaker and the subwoofer. Setting up the speakers You can adjust from -6 dB to +6 dB in 1 dB steps. 6 Press ENTER or AMP MENU. CLEAR ENTER m M .> H X x O 1 Start playing a source encoded with AMP MENU on the AMP menu. 2 Press C/X/x/c repeatedly to select the item and the setting. 3 Press AMP MENU to turn off . 14US The AMP menu turns...

Operating Insructions
Page 23
... take advantage of surround sound simply by selecting one of movie theaters into your listening position, adjust the speaker level by pressing x/X. 8 Repeat steps 5 to 7 to adjust the other speaker levels. 9 When you want appears. The speakers emit the test tone in 5.1CH mode Sound field AUTO FORMAT DIRECT AUTO Dolby Pro Logic Dolby Pro Logic II MOVIE Dolby Pro Logic II MUSIC 2CH STEREO NEWS MULTI ST. To set the speaker level by using the test tone 1 Press AMP MENU. 2 Press x/X repeatedly...
... take advantage of surround sound simply by selecting one of movie theaters into your listening position, adjust the speaker level by pressing x/X. 8 Repeat steps 5 to 7 to adjust the other speaker levels. 9 When you want appears. The speakers emit the test tone in 5.1CH mode Sound field AUTO FORMAT DIRECT AUTO Dolby Pro Logic Dolby Pro Logic II MOVIE Dolby Pro Logic II MUSIC 2CH STEREO NEWS MULTI ST. To set the speaker level by using the test tone 1 Press AMP MENU. 2 Press x/X repeatedly...

Operating Insructions
Page 25
... difficulties while using the system, use this system, check that audio setting (settings for that component. • Check that the cords are not short-circuited. • Is anything blocking the ventilation holes of the system? There is no sound from the surround speakers when connected in Dolby Digital or DTS format. • When connecting the DVD player, etc, to the digital input jacks of this troubleshooting guide to help remedy the problem before requesting repairs. Dolby Digital or DTS multi channel sound is...
... difficulties while using the system, use this system, check that audio setting (settings for that component. • Check that the cords are not short-circuited. • Is anything blocking the ventilation holes of the system? There is no sound from the surround speakers when connected in Dolby Digital or DTS format. • When connecting the DVD player, etc, to the digital input jacks of this troubleshooting guide to help remedy the problem before requesting repairs. Dolby Digital or DTS multi channel sound is...

Operating Insructions
Page 26
... not inputting PCM 96 kHz audio signals; In this case, return the setting to the operating instructions supplied with your DVD player. "COLD RESET" appears and the system is poor. • Use a 75-ohm coaxial cable (not supplied) to connect the receiver to an outdoor FM antenna as follows: Use buttons on the unit for the operation. 1 Press ?/1 to turn on the power. 2 Press INPUT SELECTOR, VOLUME -, ?/1 at the remote sensor on the system. • Remove...
... not inputting PCM 96 kHz audio signals; In this case, return the setting to the operating instructions supplied with your DVD player. "COLD RESET" appears and the system is poor. • Use a 75-ohm coaxial cable (not supplied) to connect the receiver to an outdoor FM antenna as follows: Use buttons on the unit for the operation. 1 Press ?/1 to turn on the power. 2 Press INPUT SELECTOR, VOLUME -, ?/1 at the remote sensor on the system. • Remove...

Operating Insructions
Page 28
... S-Force PRO Front Surround. This technology conforms to change without the need for superior channel separation. Compared with the subwoofer channel designed as optional passive speakers. All six channels in digitally. projecting parts Mass (approx.) 79 kg (174 lb 3 oz) Supplied accessories AM loop antenna (1) FM wire antenna (1) Input Box (4) System cable (4) Optical cable (1) Video cord (blue/green/red) (1) Video cord (yellow) (1) Remote commander (remote) (1) Size AA (R6) batteries (2) Operating Instructions (1) Quick Setup Guide (card) (1) Optional passive...
... S-Force PRO Front Surround. This technology conforms to change without the need for superior channel separation. Compared with the subwoofer channel designed as optional passive speakers. All six channels in digitally. projecting parts Mass (approx.) 79 kg (174 lb 3 oz) Supplied accessories AM loop antenna (1) FM wire antenna (1) Input Box (4) System cable (4) Optical cable (1) Video cord (blue/green/red) (1) Video cord (yellow) (1) Remote commander (remote) (1) Size AA (R6) batteries (2) Operating Instructions (1) Quick Setup Guide (card) (1) Optional passive...
Marketing Specifications
Page 1
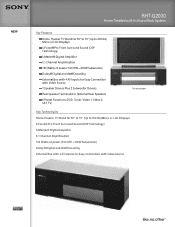
NEW RHT-G2000 Home Theater built-in Sound Rack System Key Features Home Theater TV Stand for 50" to 70" (Up to 200 lbs) Micro or LCD Displays S-Force® Pro Front Surround Sound (DSP Technology) S-Master® Digital Amplifier 5.1 Channel Amplification 700 Watts of power (5x100W + 200W Subwoofer) Dolby® Digital and dts® Decoding External Box with 4 AV Inputs for Easy Connection with Video Source 7 Speaker Drivers Plus 2 Subwoofer Drivers Rear Speaker Terminals for Optional Rear Speakers 6 Preset Functions (DVD, Tuner, Video 1, Video 2, SAT, TV) TV not included Key ...
NEW RHT-G2000 Home Theater built-in Sound Rack System Key Features Home Theater TV Stand for 50" to 70" (Up to 200 lbs) Micro or LCD Displays S-Force® Pro Front Surround Sound (DSP Technology) S-Master® Digital Amplifier 5.1 Channel Amplification 700 Watts of power (5x100W + 200W Subwoofer) Dolby® Digital and dts® Decoding External Box with 4 AV Inputs for Easy Connection with Video Source 7 Speaker Drivers Plus 2 Subwoofer Drivers Rear Speaker Terminals for Optional Rear Speakers 6 Preset Functions (DVD, Tuner, Video 1, Video 2, SAT, TV) TV not included Key ...
Marketing Specifications
Page 2
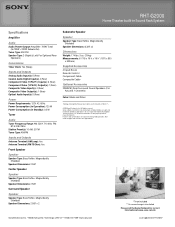
... respective owners. RHT-G2000 Home Theater built-in Sound Rack System Specifications Amplifier Audio Audio Power Output: Amplifier: 700W Total (5x100W + 200W Subwoofer) Tuner Type: AM, FM Speaker Type: 2 (Right & Left, For Optional Rear Speakers) Convenience Timer Clock: Yes (Sleep) Inputs and Outputs Analog Audio Input(s): 5 (Rear) Coaxial Audio Digital Input(s): 4 (Rear) Component Video (Y/Pb/Pr ) Input(s): 3 (Rear) Component Video (Y/Pb/Pr) Output(s): 1 (Rear) Composite Video Input(s): 4 (Rear) Composite Video Output(s): 1 (Rear) Optical Audio Input(s): 5 (Rear) Power Power Requirements...
... respective owners. RHT-G2000 Home Theater built-in Sound Rack System Specifications Amplifier Audio Audio Power Output: Amplifier: 700W Total (5x100W + 200W Subwoofer) Tuner Type: AM, FM Speaker Type: 2 (Right & Left, For Optional Rear Speakers) Convenience Timer Clock: Yes (Sleep) Inputs and Outputs Analog Audio Input(s): 5 (Rear) Coaxial Audio Digital Input(s): 4 (Rear) Component Video (Y/Pb/Pr ) Input(s): 3 (Rear) Component Video (Y/Pb/Pr) Output(s): 1 (Rear) Composite Video Input(s): 4 (Rear) Composite Video Output(s): 1 (Rear) Optical Audio Input(s): 5 (Rear) Power Power Requirements...


