
Operating Instructions
Page 4
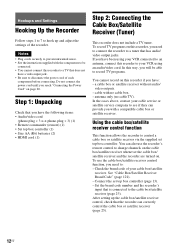
... played back on this manual describe the controls on the remote. You can be used in this manual may not match the graphics displayed on your TV screen. • The explanations regarding discs in this recorder. • Icons, such as DVD or , listed at the top of each explanation indicate... what kind of media can also use the controls on the recorder if they have the same or similar names as those on the remote. • The on page 30. ...
... played back on this manual describe the controls on the remote. You can be used in this manual may not match the graphics displayed on your TV screen. • The explanations regarding discs in this recorder. • Icons, such as DVD or , listed at the top of each explanation indicate... what kind of media can also use the controls on the recorder if they have the same or similar names as those on the remote. • The on page 30. ...
Operating Instructions
Page 5
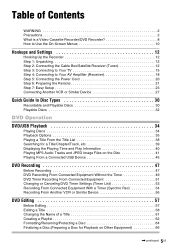
... Amplifier (Receiver 18 Step 5: Connecting the Power Cord 20 Step 6: Preparing the Remote 21 Step 7: Easy Setup 23 Connecting Another VCR or Similar Device 27 Quick Guide to Disc Types 30 Recordable and Playable Discs 30 Playable Discs 32 DVD Operation DVD/USB Playback 34 Playing Discs 34 Playback Options 35 Playing a Title From the...
... Amplifier (Receiver 18 Step 5: Connecting the Power Cord 20 Step 6: Preparing the Remote 21 Step 7: Easy Setup 23 Connecting Another VCR or Similar Device 27 Quick Guide to Disc Types 30 Recordable and Playable Discs 30 Playable Discs 32 DVD Operation DVD/USB Playback 34 Playing Discs 34 Playback Options 35 Playing a Title From the...
Operating Instructions
Page 12
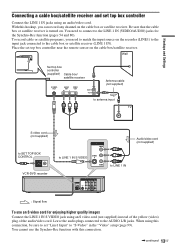
... up the cable box/satellite receiver control, check that is connected to hook up and adjust the settings of your VCR using your VCR connected to an antenna, connect this recorder if you need to your cable box/satellite receiver. Do not connect the power cord until you with a compatible...1 to 7 to the cable box/satellite receiver (page 23). a cable box or satellite receiver without audio/ video outputs. - To use the recorder's remote control to see if they can correctly control the cable box or satellite receiver (page 25). 12US antenna only (no cable box. - In the ...
... up the cable box/satellite receiver control, check that is connected to hook up and adjust the settings of your VCR using your VCR connected to an antenna, connect this recorder if you need to your cable box/satellite receiver. Do not connect the power cord until you with a compatible...1 to 7 to the cable box/satellite receiver (page 23). a cable box or satellite receiver without audio/ video outputs. - To use the recorder's remote control to see if they can correctly control the cable box or satellite receiver (page 25). 12US antenna only (no cable box. - In the ...
Operating Instructions
Page 13
... ANT IN TO TV Antenna cable (not supplied) to antenna input TV S video cord (not supplied) to SET TOP BOX CONTROL SET TOP BOX CONTROL VCR-DVD recorder LINE 1 IN VIDEO S VIDEO to LINE 1 IN S VIDEO AUDIO to the cable box or satellite receiver (LINE 1 IN). With this hookup, you need to connect... box/satellite receiver and set top box controller Connect the LINE 1 IN jacks using this connection, be sure to set top box controller near the remote sensor on . Be sure that the cable box or satellite receiver is turned on the cable box/satellite receiver. When using an audio/video cord...
... ANT IN TO TV Antenna cable (not supplied) to antenna input TV S video cord (not supplied) to SET TOP BOX CONTROL SET TOP BOX CONTROL VCR-DVD recorder LINE 1 IN VIDEO S VIDEO to LINE 1 IN S VIDEO AUDIO to the cable box or satellite receiver (LINE 1 IN). With this hookup, you need to connect... box/satellite receiver and set top box controller Connect the LINE 1 IN jacks using this connection, be sure to set top box controller near the remote sensor on . Be sure that the cable box or satellite receiver is turned on the cable box/satellite receiver. When using an audio/video cord...
Operating Instructions
Page 16
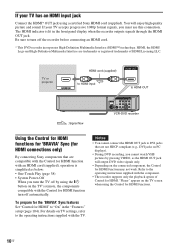
... VIDEO L Y S VIDEO L PB R R PR AUDIO AUDIO COAXIAL DIGITAL AUDIO OUT VCR-DVD recorder Using the Control for HDMI functions for 'BRAVIA' Sync (for HDMI connections only) By connecting Sony components that are trademarks or registered trademarks of Control for HDMI function turn off by pressing ..."Player" appears on TV settings, refer to DVI jacks that are compatible with the Control for HDMI function with the Control for HDMI. HDMI, the HDMI Logo and High-Definition Multimedia Interface are not HDCP compliant (e.g., DVI jacks on PC displays). • During DVD recording,...
... VIDEO L Y S VIDEO L PB R R PR AUDIO AUDIO COAXIAL DIGITAL AUDIO OUT VCR-DVD recorder Using the Control for HDMI functions for 'BRAVIA' Sync (for HDMI connections only) By connecting Sony components that are trademarks or registered trademarks of Control for HDMI function turn off by pressing ..."Player" appears on TV settings, refer to DVI jacks that are compatible with the Control for HDMI function with the Control for HDMI. HDMI, the HDMI Logo and High-Definition Multimedia Interface are not HDCP compliant (e.g., DVI jacks on PC displays). • During DVD recording,...
Operating Instructions
Page 21
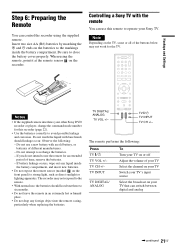
... TV Select the channel on your TV Switch your TV's input source Select the broadcast on your other Sony DVD recorder or player, change the command mode number for this remote to avoid possible leakage and corrosion. Controlling a Sony TV with an old battery, or batteries of time, remove the batteries. - TV CH +/- Note Depending on...
... TV Select the channel on your TV Switch your TV's input source Select the broadcast on your other Sony DVD recorder or player, change the command mode number for this remote to avoid possible leakage and corrosion. Controlling a Sony TV with an old battery, or batteries of time, remove the batteries. - TV CH +/- Note Depending on...
Operating Instructions
Page 22
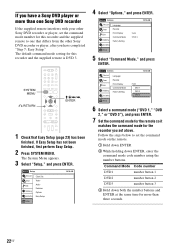
If you have a Sony DVD player or more than one Sony DVD recorder If the supplied remote interferes with your other Sony DVD recorder or player, set the command mode number for this recorder and the supplied remote is DVD 3. SYSTEM MENU 123 456 789 0 O RETURN M/m/ The default command mode setting for this recorder and the supplied remote to one that differs from the other Sony DVD recorder or player, after you have completed "Step 7: Easy Setup."
If you have a Sony DVD player or more than one Sony DVD recorder If the supplied remote interferes with your other Sony DVD recorder or player, set the command mode number for this recorder and the supplied remote is DVD 3. SYSTEM MENU 123 456 789 0 O RETURN M/m/ The default command mode setting for this recorder and the supplied remote to one that differs from the other Sony DVD recorder or player, after you have completed "Step 7: Easy Setup."
Operating Instructions
Page 23
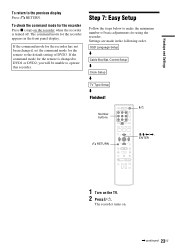
... below to make the minimum number of basic adjustments for the recorder Press x (stop) on the recorder when the recorder is changed , set the command mode for the remote to the default setting of DVD3. If the command mode for the recorder appears in the following order. Settings are made in the front... panel display. The command mode for the remote is turned off. If the command mode for the recorder has not been changed to DVD1 or DVD2, you will be unable to the previous display Press O RETURN. OSD Language Setup m Cable...
... below to make the minimum number of basic adjustments for the recorder Press x (stop) on the recorder when the recorder is changed , set the command mode for the remote to the default setting of DVD3. If the command mode for the recorder appears in the following order. Settings are made in the front... panel display. The command mode for the remote is turned off. If the command mode for the recorder has not been changed to DVD1 or DVD2, you will be unable to the previous display Press O RETURN. OSD Language Setup m Cable...
Operating Instructions
Page 25
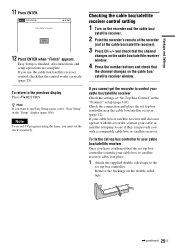
... and place the set the clock accurately. Remove the backings on the cable box/ satellite receiver window. If you cannot get the recorder to control your cable or satellite company to the previous display Press O RETURN. Easy Setup is finished. 10:10 AM Finish 12... a compatible cable box or satellite receiver. Checking the cable box/satellite receiver control setting 1 Turn on the recorder and the cable box/ satellite receiver. 2 Point the recorder's remote at the recorder (not at "Set Top Box Control" in the "Features" setup (page 103). All connections and setup operations...
... and place the set the clock accurately. Remove the backings on the cable box/ satellite receiver window. If you cannot get the recorder to control your cable or satellite company to the previous display Press O RETURN. Easy Setup is finished. 10:10 AM Finish 12... a compatible cable box or satellite receiver. Checking the cable box/satellite receiver control setting 1 Turn on the recorder and the cable box/ satellite receiver. 2 Point the recorder's remote at the recorder (not at "Set Top Box Control" in the "Features" setup (page 103). All connections and setup operations...
Operating Instructions
Page 26
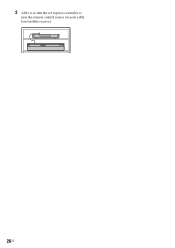
2 Affix it so that the set top box controller is near the remote control sensor on your cable box/satellite receiver. 26US
2 Affix it so that the set top box controller is near the remote control sensor on your cable box/satellite receiver. 26US
Operating Instructions
Page 36
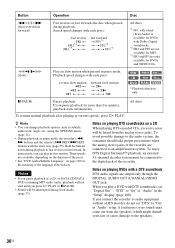
... such as subtitle, audio track, angle, etc., using the OPTIONS menu (page 11). • During playback or pause mode, the recorder's m/ M buttons and the remote's .PREV/>NEXT buttons work the same way (page 35). Notes on playing DTS soundtracks on a CD When playing DTS-encoded CDs, excessive...fast reverse FR1 T FR2*2 T T FR3*3 T T T fast forward t FF1*1 t t FF2*2 t t t FF3*3 All discs *1 FF1 with sound (Scan Audio) is available for DVDs with DTS soundtracks, set "DTS" to the digital jack of the language abbreviation. To avoid possible damage to the audio system, the consumer should take...
... such as subtitle, audio track, angle, etc., using the OPTIONS menu (page 11). • During playback or pause mode, the recorder's m/ M buttons and the remote's .PREV/>NEXT buttons work the same way (page 35). Notes on playing DTS soundtracks on a CD When playing DTS-encoded CDs, excessive...fast reverse FR1 T FR2*2 T T FR3*3 T T T fast forward t FF1*1 t t FF2*2 t t t FF3*3 All discs *1 FF1 with sound (Scan Audio) is available for DVDs with DTS soundtracks, set "DTS" to the digital jack of the language abbreviation. To avoid possible damage to the audio system, the consumer should take...
Operating Instructions
Page 49
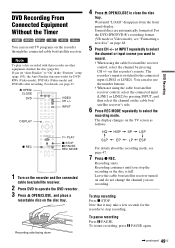
... X PAUSE REC MODE 1 Turn on the recorder and the connected cable box/satellite receiver. 2 Press DVD to the connected input (LINE1 or LINE2). For the DVD-RW/DVD-R's recording format (VR mode or Video mode), see ...DVD recorder. 3 Press Z OPEN/CLOSE, and place a recordable disc on the disc tray. Recording starts. To pause recording Press X PAUSE. If you stop recording Press x STOP. Recording continues until "LOAD" disappears from the front panel display. Unused discs are recording. Note To play a disc recorded with this recorder on this recorder's remote. DVD Recording...
... X PAUSE REC MODE 1 Turn on the recorder and the connected cable box/satellite receiver. 2 Press DVD to the connected input (LINE1 or LINE2). For the DVD-RW/DVD-R's recording format (VR mode or Video mode), see ...DVD recorder. 3 Press Z OPEN/CLOSE, and place a recordable disc on the disc tray. Recording starts. To pause recording Press X PAUSE. If you stop recording Press x STOP. Recording continues until "LOAD" disappears from the front panel display. Unused discs are recording. Note To play a disc recorded with this recorder on this recorder's remote. DVD Recording...
Operating Instructions
Page 75
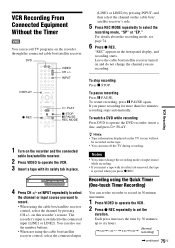
.... 4 Press CH +/- To watch a DVD while recording Press DVD to set the recorder to record in the front panel display, and recording starts. "REC" appears in 30-minute increments. 1 Press VIDEO to operate the VCR. 2 Press z REC repeatedly to operate the DVD recorder, insert a disc, and press H PLAY. DVD 123 456 789 0 VIDEO CH +/- The recorder's input is ejected when you...
.... 4 Press CH +/- To watch a DVD while recording Press DVD to set the recorder to record in the front panel display, and recording starts. "REC" appears in 30-minute increments. 1 Press VIDEO to operate the VCR. 2 Press z REC repeatedly to operate the DVD recorder, insert a disc, and press H PLAY. DVD 123 456 789 0 VIDEO CH +/- The recorder's input is ejected when you...
Operating Instructions
Page 106
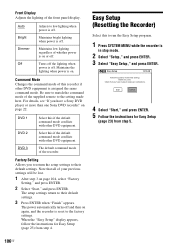
...Changes the command mode of the supplied remote to their default settings. 3 Press ENTER when "Finish" appears. Be sure to match the command mode of this if the default command mode conflicts with other DVD equipment. Note that you to return the... step 3 on page 22. Maintains the lighting when power is on . DVD 1 DVD 2 DVD 3 Select this recorder if other DVD equipment. Select this to the factory settings. Factory Setting Allows you have a Sony DVD player or more than one Sony DVD recorder" on page 104, select "Factory Setting," and press ENTER. 2 Select ...
...Changes the command mode of the supplied remote to their default settings. 3 Press ENTER when "Finish" appears. Be sure to match the command mode of this if the default command mode conflicts with other DVD equipment. Note that you to return the... step 3 on page 22. Maintains the lighting when power is on . DVD 1 DVD 2 DVD 3 Select this recorder if other DVD equipment. Select this to the factory settings. Factory Setting Allows you have a Sony DVD player or more than one Sony DVD recorder" on page 104, select "Factory Setting," and press ENTER. 2 Select ...
Operating Instructions
Page 111
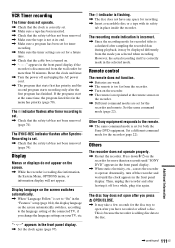
...on appears in the front panel display if the recorder is disconnected from the wall outlet for more than ten seconds until "SONY DVD" appears in the "Features" setup (page 104), the display language on the screen automatically switches, according to the remote. , The same command mode is reading disc... correctly made in the selected mode. Reset the clock and timer. , Turn the power off the recorder and wait until the clock appears in the front panel display. VCR Timer recording The timer does not operate. , Check that the clock is correctly set. , Make sure a tape has been inserted....
...on appears in the front panel display if the recorder is disconnected from the wall outlet for more than ten seconds until "SONY DVD" appears in the "Features" setup (page 104), the display language on the screen automatically switches, according to the remote. , The same command mode is reading disc... correctly made in the selected mode. Reset the clock and timer. , Turn the power off the recorder and wait until the clock appears in the front panel display. VCR Timer recording The timer does not operate. , Check that the clock is correctly set. , Make sure a tape has been inserted....

Operating Instructions
Page 114
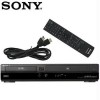
... projecting parts and controls (w/h/d) Approx. 430 × 82 × 329 mm (Approx. 17 × 3 1/4 × 13 inches) Mass Approx. 4.6 kg (Approx. 10.1 lbs) Supplied accessories Remote commander (remote) (1) Size AA (R6) batteries (2) Audio/video cord (1) Set top box controller (1) HDMI cord (1) Design and specifications are subject to change without notice. 114US
... projecting parts and controls (w/h/d) Approx. 430 × 82 × 329 mm (Approx. 17 × 3 1/4 × 13 inches) Mass Approx. 4.6 kg (Approx. 10.1 lbs) Supplied accessories Remote commander (remote) (1) Size AA (R6) batteries (2) Audio/video cord (1) Set top box controller (1) HDMI cord (1) Design and specifications are subject to change without notice. 114US
Operating Instructions
Page 116
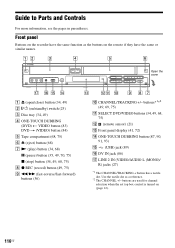
...record) button (49, 75) I m/M (fast-reverse/fast-forward) buttons (36) J CHANNEL/TRACKING +/- Guide to Parts and Controls For more information, see the pages in parentheses. Open the cover A Z (open/close) button (34, 49) B "/1 (on (page 12). 116US buttons*1*2 (49, 69, 75) K SELECT DVD/VIDEO buttons (34, 49, 68, 75) L (remote...(MONO)/ R) jacks (27) *1 The CHANNEL/TRACKING + button has a tactile dot. Front panel Buttons on the remote if they have the same or similar names. Use the tactile dot as the buttons on the recorder have the same function as a reference. *2 The CHANNEL +/-
...record) button (49, 75) I m/M (fast-reverse/fast-forward) buttons (36) J CHANNEL/TRACKING +/- Guide to Parts and Controls For more information, see the pages in parentheses. Open the cover A Z (open/close) button (34, 49) B "/1 (on (page 12). 116US buttons*1*2 (49, 69, 75) K SELECT DVD/VIDEO buttons (34, 49, 68, 75) L (remote...(MONO)/ R) jacks (27) *1 The CHANNEL/TRACKING + button has a tactile dot. Front panel Buttons on the remote if they have the same or similar names. Use the tactile dot as the buttons on the recorder have the same function as a reference. *2 The CHANNEL +/-
Operating Instructions
Page 117
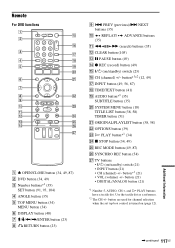
...) • CH (channel) +/- Additional Information ,continued 117US Use the tactile dot as a reference. *2 The CH +/- Remote For DVD functions 123 456 789 0 A Z OPEN/CLOSE button (34, 49, 87) B DVD button (34, 49) C Number buttons*1 (35) SET button (91, 93, 104) D ANGLE button (35) ...E TOP MENU button (34) MENU button (34) F DISPLAY button (40) G M/m/ NEXT buttons (35) J REPLAY/ (35) ADVANCE buttons K m / M (search) buttons (35) L CLEAR button (105) M X PAUSE button (49) N z REC (record) ...
...) • CH (channel) +/- Additional Information ,continued 117US Use the tactile dot as a reference. *2 The CH +/- Remote For DVD functions 123 456 789 0 A Z OPEN/CLOSE button (34, 49, 87) B DVD button (34, 49) C Number buttons*1 (35) SET button (91, 93, 104) D ANGLE button (35) ...E TOP MENU button (34) MENU button (34) F DISPLAY button (40) G M/m/ NEXT buttons (35) J REPLAY/ (35) ADVANCE buttons K m / M (search) buttons (35) L CLEAR button (105) M X PAUSE button (49) N z REC (record) ...
Operating Instructions
Page 126
...) 18 to your TV 15 "Connections" 103 Control for HDMI 16, 104 Controlling a Sony TV with the remote 21 Copy protection 48 Copy-Free 48 Copy-Never 48 Copy-Once 48 Counter 68 CPRM ...DV/D8 Dubbing" 88 "DV/D8 Simple Dubbing" 88 "DVD Auto Chapter" 102 "DVD Backup" 91 DVD Editing 57 DVD VIDEO 32 DVD+R 30 DVD+R DL 30 DVD+RW 30 DVD-R 30 DVD-RAM 32 DVD-RW 30 E Easy Setup 106 "Edit" 53, 79... F "Factory Setting" 106 Fast forward 36, 70 Fast reverse 36, 70 Feature settings 102 Finalizing 66 "Format DVD-RW" 103 Formatting 48, 64 "Front Display" 106 Front panel 116 Front panel display 119 H Handling discs 112...
...) 18 to your TV 15 "Connections" 103 Control for HDMI 16, 104 Controlling a Sony TV with the remote 21 Copy protection 48 Copy-Free 48 Copy-Never 48 Copy-Once 48 Counter 68 CPRM ...DV/D8 Dubbing" 88 "DV/D8 Simple Dubbing" 88 "DVD Auto Chapter" 102 "DVD Backup" 91 DVD Editing 57 DVD VIDEO 32 DVD+R 30 DVD+R DL 30 DVD+RW 30 DVD-R 30 DVD-RAM 32 DVD-RW 30 E Easy Setup 106 "Edit" 53, 79... F "Factory Setting" 106 Fast forward 36, 70 Fast reverse 36, 70 Feature settings 102 Finalizing 66 "Format DVD-RW" 103 Formatting 48, 64 "Front Display" 106 Front panel 116 Front panel display 119 H Handling discs 112...
Operating Instructions
Page 127
...119 REC 49, 75 REC MODE 49 Recording 47, 74 recordable discs 30 recording format 30 recording mode 47 tape speed 74 Recording mode 47, 74 Recording time 47, 50 Region code 33 Remaining time 40, 76 Remote 21, 117 REPLAY 35, 70 Resetting... 68, 75 Sub-menu 11 SUBTITLE 35 "Subtitle" 104 "Surround" 101 SYNCHRO REC 55, 81 "Synchro Recording" 55, 80, 103 System Menu 10 T "Tape Length" 103 Tape speed 74 TIME/TEXT 41, 72 TIMER ...TV Type" 98 U "Unfinalize" 67 Unrecordable pictures 48 "USB Dubbing" 91 V "VCR Function" 103 "Video (HDMI)" 98 VIDEO CD 32 Video mode 30 Video settings 98 VR mode 30 Z Zoom 43...
...119 REC 49, 75 REC MODE 49 Recording 47, 74 recordable discs 30 recording format 30 recording mode 47 tape speed 74 Recording mode 47, 74 Recording time 47, 50 Region code 33 Remaining time 40, 76 Remote 21, 117 REPLAY 35, 70 Resetting... 68, 75 Sub-menu 11 SUBTITLE 35 "Subtitle" 104 "Surround" 101 SYNCHRO REC 55, 81 "Synchro Recording" 55, 80, 103 System Menu 10 T "Tape Length" 103 Tape speed 74 TIME/TEXT 41, 72 TIMER ...TV Type" 98 U "Unfinalize" 67 Unrecordable pictures 48 "USB Dubbing" 91 V "VCR Function" 103 "Video (HDMI)" 98 VIDEO CD 32 Video mode 30 Video settings 98 VR mode 30 Z Zoom 43...


