Operating Instructions
Page 6
... 6: Preparing the Remote 21 Step 7: Easy Setup 23 Connecting Another VCR or Similar Device 27 Quick Guide to Disc Types 30 Recordable and Playable Discs 30 Playable Discs 33 DVD Operation DVD Playback 35 Playing Discs 35 Playback Options 36 Playing a Title From...44 DVD Recording 46 Before Recording 46 DVD Recording From Connected Equipment Without the Timer 47 DVD Timer Recording From Connected Equipment 49 Recording From Connected Equipment With a Timer (Synchro Rec 51 Changing or Canceling DVD Timer Settings (Timer List 53 Recording From Another VCR or Similar Device 54 DVD ...
... 6: Preparing the Remote 21 Step 7: Easy Setup 23 Connecting Another VCR or Similar Device 27 Quick Guide to Disc Types 30 Recordable and Playable Discs 30 Playable Discs 33 DVD Operation DVD Playback 35 Playing Discs 35 Playback Options 36 Playing a Title From...44 DVD Recording 46 Before Recording 46 DVD Recording From Connected Equipment Without the Timer 47 DVD Timer Recording From Connected Equipment 49 Recording From Connected Equipment With a Timer (Synchro Rec 51 Changing or Canceling DVD Timer Settings (Timer List 53 Recording From Another VCR or Similar Device 54 DVD ...
Operating Instructions
Page 7
... Selecting the Sound During Playback 74 VCR Recording 75 Before Recording 75 VCR Recording From Connected Equipment Without the Timer 76 VCR Timer Recording From Connected Equipment 78 Recording From Connected Equipment With a Timer (Synchro Rec 80 Changing or Canceling VCR Timer Settings (Timer List 81 Recording From Another VCR or Similar Device 83 Dubbing (TAPE y DVD 84 Dubbing From a VHS Tape...
... Selecting the Sound During Playback 74 VCR Recording 75 Before Recording 75 VCR Recording From Connected Equipment Without the Timer 76 VCR Timer Recording From Connected Equipment 78 Recording From Connected Equipment With a Timer (Synchro Rec 80 Changing or Canceling VCR Timer Settings (Timer List 81 Recording From Another VCR or Similar Device 83 Dubbing (TAPE y DVD 84 Dubbing From a VHS Tape...
Operating Instructions
Page 8
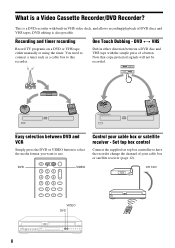
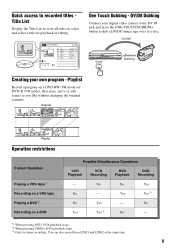
Recording and timer recording Record TV programs on a DVD or VHS tape, either direction between DVD and VCR Simply press the DVD or VIDEO button to select the media format you want to use. Note that copy-protected signals will not be recorded. DVD 123 456 789 0 VIDEO CH 103! 103 VIDEO DVD 8 You need to connect a tuner such as a cable...
Recording and timer recording Record TV programs on a DVD or VHS tape, either direction between DVD and VCR Simply press the DVD or VIDEO button to select the media format you want to use. Note that copy-protected signals will not be recorded. DVD 123 456 789 0 VIDEO CH 103! 103 VIDEO DVD 8 You need to connect a tuner such as a cable...
Operating Instructions
Page 9
...-TOUCH DUBBING button to dub a DV/D8 format tape over to view all titles on a DVD Possible Simultaneous Operations VCR Playback VCR Recording DVD Playback DVD Recording - You can also record from LINE1 and LINE2 at the same time. 9 Quick access to recorded titles Title List Display the Title List to a disc. DV/D8 Dubbing Connect your own program...
...-TOUCH DUBBING button to dub a DV/D8 format tape over to view all titles on a DVD Possible Simultaneous Operations VCR Playback VCR Recording DVD Playback DVD Recording - You can also record from LINE1 and LINE2 at the same time. 9 Quick access to recorded titles Title List Display the Title List to a disc. DV/D8 Dubbing Connect your own program...
Operating Instructions
Page 13
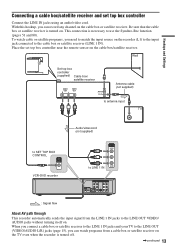
... ANT IN TO TV Antenna cable (not supplied) to antenna input TV Audio/video cord (not supplied) to SET TOP BOX CONTROL SETTOP BOX CONTROL VCR-DVD recorder LINE 1 IN VIDEO to LINE 1 IN AUDIO AUDIO OUT COMPONENT VIDEO OUT S VIDEO OUT LINE 1 IN LINE OUT VIDEO VIDEO L Y R PB ...SETTOP HDMI OUT BOX CONTROL PR OPTICAL COAXIAL DIGITAL AUDIO OUT L R AUDIO AUDIO : Signal flow About AV path through This recorder automatically sends the input signal from a cable box or satellite receiver on . To watch programs from the LINE 1 IN jacks to the cable box or...
... ANT IN TO TV Antenna cable (not supplied) to antenna input TV Audio/video cord (not supplied) to SET TOP BOX CONTROL SETTOP BOX CONTROL VCR-DVD recorder LINE 1 IN VIDEO to LINE 1 IN AUDIO AUDIO OUT COMPONENT VIDEO OUT S VIDEO OUT LINE 1 IN LINE OUT VIDEO VIDEO L Y R PB ...SETTOP HDMI OUT BOX CONTROL PR OPTICAL COAXIAL DIGITAL AUDIO OUT L R AUDIO AUDIO : Signal flow About AV path through This recorder automatically sends the input signal from a cable box or satellite receiver on . To watch programs from the LINE 1 IN jacks to the cable box or...
Operating Instructions
Page 15
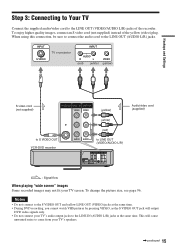
... supplied) S VIDEO OUT LINE 1 IN LINE OUT VIDEO VIDEO (yellow) to S VIDEO OUT VCR-DVD recorder L R AUDIO AUDIO (white) (red) to the LINE IN (AUDIO L/R) jacks at the same time. • During DVD recording, you cannot watch VHS pictures by pressing VIDEO, as the S VIDEO OUT jack will cause unwanted... noise to come from your TV screen. To enjoy higher quality images, connect an S video cord (not supplied) instead of the recorder.
... supplied) S VIDEO OUT LINE 1 IN LINE OUT VIDEO VIDEO (yellow) to S VIDEO OUT VCR-DVD recorder L R AUDIO AUDIO (white) (red) to the LINE IN (AUDIO L/R) jacks at the same time. • During DVD recording, you cannot watch VHS pictures by pressing VIDEO, as the S VIDEO OUT jack will cause unwanted... noise to come from your TV screen. To enjoy higher quality images, connect an S video cord (not supplied) instead of the recorder.
Operating Instructions
Page 16
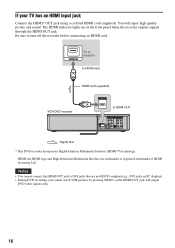
...HDMI cord (supplied). HDMI IN TV or projector to HDMI input HDMI cord (supplied) VCR-DVD recorder HDMI OUT to turn off the recorder before connecting an HDMI cord. You will output DVD video signals only. 16 Be sure to HDMI OUT AUDIO OUT COMPONENT VIDEO OUT S ...VIDEO VIDEO L Y R PB SETTOP HDMI OUT BOX CONTROL PR OPTICAL COAXIAL DIGITAL AUDIO OUT L R AUDIO AUDIO : Signal flow * This DVD recorder incorporates High-Definition Multimedia Interface (HDMI™) technology. HDMI, the HDMI logo and High-Definition Multimedia Interface are not HDCP compliant (e.g., DVI ...
...HDMI cord (supplied). HDMI IN TV or projector to HDMI input HDMI cord (supplied) VCR-DVD recorder HDMI OUT to turn off the recorder before connecting an HDMI cord. You will output DVD video signals only. 16 Be sure to HDMI OUT AUDIO OUT COMPONENT VIDEO OUT S ...VIDEO VIDEO L Y R PB SETTOP HDMI OUT BOX CONTROL PR OPTICAL COAXIAL DIGITAL AUDIO OUT L R AUDIO AUDIO : Signal flow * This DVD recorder incorporates High-Definition Multimedia Interface (HDMI™) technology. HDMI, the HDMI logo and High-Definition Multimedia Interface are not HDCP compliant (e.g., DVI ...

Operating Instructions
Page 17
...OUT LINE 1 IN LINE OUT VIDEO VIDEO L Y R PB SETTOP HDMI OUT BOX CONTROL PR OPTICAL COAXIAL DIGITAL AUDIO OUT L R AUDIO AUDIO VCR-DVD recorder : Signal flow Note During DVD recording, you must use this connection, be sure to connect the audio cord to "On" in the "Setup" display (page 97). You will ...output DVD video signals only. 17 If your TV has component video input jacks Connect the COMPONENT VIDEO OUT jacks using ...
...OUT LINE 1 IN LINE OUT VIDEO VIDEO L Y R PB SETTOP HDMI OUT BOX CONTROL PR OPTICAL COAXIAL DIGITAL AUDIO OUT L R AUDIO AUDIO VCR-DVD recorder : Signal flow Note During DVD recording, you must use this connection, be sure to connect the audio cord to "On" in the "Setup" display (page 97). You will ...output DVD video signals only. 17 If your TV has component video input jacks Connect the COMPONENT VIDEO OUT jacks using ...
Operating Instructions
Page 18
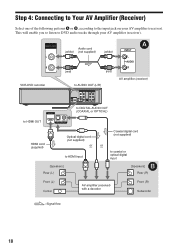
AUDIO OUT L R VCR-DVD recorder HDMI OUT Audio cord (white) (not supplied) (white) (red) (red) to AUDIO OUT (L/R) AUDIO OUT COMPONENT VIDEO OUT S VIDEO OUT LINE 1 IN LINE OUT VIDEO ... COAXIAL DIGITAL AUDIO OUT HDMI cord (supplied) Optical digital cord (not supplied) or to HDMI input [Speakers] Rear (L) Coaxial digital cord (not supplied) or to DVD audio tracks through your AV amplifier (receiver). This will enable you to listen to coaxial or optical digital input B [Speakers] Rear (R) Front (L) Center AV amplifier...
AUDIO OUT L R VCR-DVD recorder HDMI OUT Audio cord (white) (not supplied) (white) (red) (red) to AUDIO OUT (L/R) AUDIO OUT COMPONENT VIDEO OUT S VIDEO OUT LINE 1 IN LINE OUT VIDEO ... COAXIAL DIGITAL AUDIO OUT HDMI cord (supplied) Optical digital cord (not supplied) or to HDMI input [Speakers] Rear (L) Coaxial digital cord (not supplied) or to DVD audio tracks through your AV amplifier (receiver). This will enable you to listen to coaxial or optical digital input B [Speakers] Rear (R) Front (L) Center AV amplifier...
Operating Instructions
Page 27
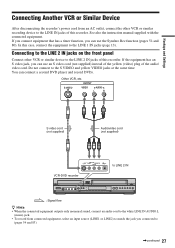
... equipment. OUTPUT S VIDEO VIDEO AUDIO L R S video cord (not supplied) Audio/video cord (not supplied) S VIDEO LINE 2 IN VIDEO L AUDIO R (MONO) DV IN to LINE 2 IN VCR-DVD recorder : Signal flow z Hints • When the connected equipment outputs only monaural sound, connect an audio cord to the white LINE IN AUDIO L (mono) jack. •...
... equipment. OUTPUT S VIDEO VIDEO AUDIO L R S video cord (not supplied) Audio/video cord (not supplied) S VIDEO LINE 2 IN VIDEO L AUDIO R (MONO) DV IN to LINE 2 IN VCR-DVD recorder : Signal flow z Hints • When the connected equipment outputs only monaural sound, connect an audio cord to the white LINE IN AUDIO L (mono) jack. •...

Operating Instructions
Page 28
... to the VCR-DVD recorder and your TV screen. To watch video tapes, watch the tapes through a second line input on your TV in the order shown below. Notes • Do not connect more than one type of this recorder. VCR-DVD recorder VCR TV Be sure to connect your VCR to the input... jack of video cord between the recorder and your TV. Line input 1 VCR VCR-DVD recorder TV Line input 2 28 Noise (feedback) may result. • If you ...
... to the VCR-DVD recorder and your TV screen. To watch video tapes, watch the tapes through a second line input on your TV in the order shown below. Notes • Do not connect more than one type of this recorder. VCR-DVD recorder VCR TV Be sure to connect your VCR to the input... jack of video cord between the recorder and your TV. Line input 1 VCR VCR-DVD recorder TV Line input 2 28 Noise (feedback) may result. • If you ...
Operating Instructions
Page 46
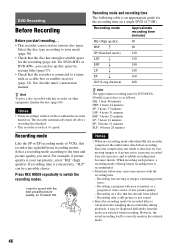
...r 180 LP r 240 EP r 360 SLP (Long duration) 480 z Hint The approximate recording time for DVD+R DL (Double Layer) discs is an approximate guide for recorded titles is connected to a tuner such as follows: HQ: 1 hour 48 minutes HSP: ...recording (page 44). z Hint To play a disc recorded with poor reception, or a program or video source of VCRs, this recorder on various disc types. Notes • Timer recordings will start recording... • This recorder can record on other than HQ, the recorder compresses the audio/video data before recording. Recording mode and recording...
...r 180 LP r 240 EP r 360 SLP (Long duration) 480 z Hint The approximate recording time for DVD+R DL (Double Layer) discs is an approximate guide for recorded titles is connected to a tuner such as follows: HQ: 1 hour 48 minutes HSP: ...recording (page 44). z Hint To play a disc recorded with poor reception, or a program or video source of VCRs, this recorder on various disc types. Notes • Timer recordings will start recording... • This recorder can record on other than HQ, the recorder compresses the audio/video data before recording. Recording mode and recording...

Operating Instructions
Page 48
...hours*. 0:30 1:00 7:30 8:00 (Normal recording) "c" and "OTR" light up, and the remaining recording time appears in 30-minute increments. 1 Press DVD to operate the DVD recorder. 2 Press z REC repeatedly to set the recorder to select the recording mode. Recording continues until the counter appears in the front panel...SP LSP SLP EP LP ESP For details about the recording mode, see page 46. 7 Press z REC. Note that it may be erased. • You cannot change the input source during recording. The recorder returns to operate the VCR, insert a tape, then press H PLAY. The ...
...hours*. 0:30 1:00 7:30 8:00 (Normal recording) "c" and "OTR" light up, and the remaining recording time appears in 30-minute increments. 1 Press DVD to operate the DVD recorder. 2 Press z REC repeatedly to set the recorder to select the recording mode. Recording continues until the counter appears in the front panel...SP LSP SLP EP LP ESP For details about the recording mode, see page 46. 7 Press z REC. Note that it may be erased. • You cannot change the input source during recording. The recorder returns to operate the VCR, insert a tape, then press H PLAY. The ...
Operating Instructions
Page 49
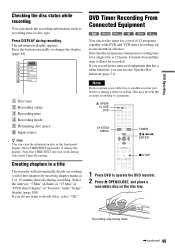
... You can view the information also in the "Setup" display (page 100). DVD Recording Checking the disc status while recording You can use the Synchro Rec function (page 51). This may prevent the accurate recording of 12 programs together with DVD and VCR timer recording, up to divide titles, select "Off." The information display appears. Creating chapters...
... You can view the information also in the "Setup" display (page 100). DVD Recording Checking the disc status while recording You can use the Synchro Rec function (page 51). This may prevent the accurate recording of 12 programs together with DVD and VCR timer recording, up to divide titles, select "Off." The information display appears. Creating chapters...
Operating Instructions
Page 54
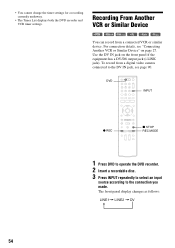
... 789 0 INPUT z REC x STOP REC MODE 1 Press DVD to operate the DVD recorder. 2 Insert a recordable disc. 3 Press INPUT repeatedly to select an input source according to the DV IN jack, see "Connecting Another VCR or Similar Device" on the front panel if the equipment has a DV/D8 output jack (i.LINK jack). Use the DV IN...
... 789 0 INPUT z REC x STOP REC MODE 1 Press DVD to operate the DVD recorder. 2 Insert a recordable disc. 3 Press INPUT repeatedly to select an input source according to the DV IN jack, see "Connecting Another VCR or Similar Device" on the front panel if the equipment has a DV/D8 output jack (i.LINK jack). Use the DV IN...

Operating Instructions
Page 69
...display resets to find later. Playback starts automatically if you want to "0:00:00." Notes • During playback, the VCR automatically detects the recording system (S-VHS/VHS) and the recording mode (SP or EP) from the tape. To eject the tape Press Z OPEN/CLOSE. When the tape reaches the... rewinding until it reaches the end. CLEAR H PLAY x STOP 1 Press VIDEO to the VCR while playing a disc, DVD playback stops. • The VCR does not record in EP (3x) mode is not guaranteed. • The VCR is not guaranteed. • The counter resets to "0:00:00" after ten hours, and...
...display resets to find later. Playback starts automatically if you want to "0:00:00." Notes • During playback, the VCR automatically detects the recording system (S-VHS/VHS) and the recording mode (SP or EP) from the tape. To eject the tape Press Z OPEN/CLOSE. When the tape reaches the... rewinding until it reaches the end. CLEAR H PLAY x STOP 1 Press VIDEO to the VCR while playing a disc, DVD playback stops. • The VCR does not record in EP (3x) mode is not guaranteed. • The VCR is not guaranteed. • The counter resets to "0:00:00" after ten hours, and...
Operating Instructions
Page 72
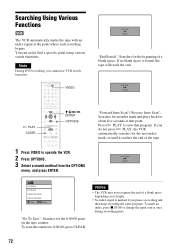
Note During DVD recording, you cannot use VCR search functions. 123 456 789 0 H PLAY CLEAR VIDEO M/m/ You can easily find a specific point using various search functions. Searching Using Various Functions The VCR automatically marks the tape with an index signal at the point where each recording begins.
Note During DVD recording, you cannot use VCR search functions. 123 456 789 0 H PLAY CLEAR VIDEO M/m/ You can easily find a specific point using various search functions. Searching Using Various Functions The VCR automatically marks the tape with an index signal at the point where each recording begins.
Operating Instructions
Page 76
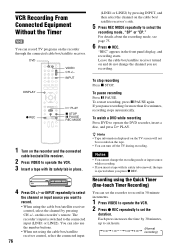
... the channel by 30 minutes, up to operate the DVD recorder, insert a disc, and press H PLAY. VCR Recording From Connected Equipment Without the Timer You can turn off the TV during recording. INPUT DISPLAY z REC H PLAY x STOP X PAUSE REC MODE 1 Turn on this recorder's remote. The recorder's input is ejected when you want to select the channel...
... the channel by 30 minutes, up to operate the DVD recorder, insert a disc, and press H PLAY. VCR Recording From Connected Equipment Without the Timer You can turn off the TV during recording. INPUT DISPLAY z REC H PLAY x STOP X PAUSE REC MODE 1 Turn on this recorder's remote. The recorder's input is ejected when you want to select the channel...

Operating Instructions
Page 79
...2 will be cut off To change or cancel timer recording See "Changing or Canceling VCR Timer Settings (Timer List)" on and do not change or cancel a timer recording, select "Edit" from the Timer List (page 81). 6 Press SYSTEM MENU to both the DVD disc and the VHS tape. • You can also... turn off when a timer recording finishes, even if the recording started with ...
...2 will be cut off To change or cancel timer recording See "Changing or Canceling VCR Timer Settings (Timer List)" on and do not change or cancel a timer recording, select "Edit" from the Timer List (page 81). 6 Press SYSTEM MENU to both the DVD disc and the VHS tape. • You can also... turn off when a timer recording finishes, even if the recording started with ...

Operating Instructions
Page 108
...VCR Recording The channel cannot be changed (page 101). To record on the TV or monitor. Do not use a commercially available liquid type cleaning cassette, as it to video input. Consult your nearest Sony dealer (a standard service fee will be replaced. VCR Playback The playback picture does not appear on a DVD... with enough space for the recorder to input disc data before recording can stop. Timer recording is inserted. The ...
...VCR Recording The channel cannot be changed (page 101). To record on the TV or monitor. Do not use a commercially available liquid type cleaning cassette, as it to video input. Consult your nearest Sony dealer (a standard service fee will be replaced. VCR Playback The playback picture does not appear on a DVD... with enough space for the recorder to input disc data before recording can stop. Timer recording is inserted. The ...


