Operating Instructions
Page 2
... build-up in the U.S.A Owner's Record The model and serial numbers are cautioned that may condense on , the user is brought directly from a cold to provide reasonable protection against harmful interference in accordance with the limits for a long time, be changed only at the rear of the FCC Rules. Model No. These limits are not going to use of electric shock to...
... build-up in the U.S.A Owner's Record The model and serial numbers are cautioned that may condense on , the user is brought directly from a cold to provide reasonable protection against harmful interference in accordance with the limits for a long time, be changed only at the rear of the FCC Rules. Model No. These limits are not going to use of electric shock to...
Operating Instructions
Page 19
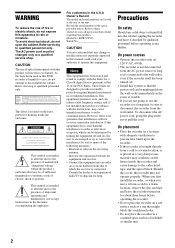
..." in Easy Setup (page 23). Notes • During DVD recording, the DIGITAL AUDIO OUT jacks or HDMI OUT jack output DVD audio signals only. Otherwise, no sound or a loud noise will need to the TV with an HDMI cord. - Connect the recorder to do one of Dolby Digital (5.1ch) or DTS (5.1ch). z Hints • For correct speaker location, see the operating instructions supplied with the connected components. • During VHS playback, the DIGITAL AUDIO OUT jacks...
..." in Easy Setup (page 23). Notes • During DVD recording, the DIGITAL AUDIO OUT jacks or HDMI OUT jack output DVD audio signals only. Otherwise, no sound or a loud noise will need to the TV with an HDMI cord. - Connect the recorder to do one of Dolby Digital (5.1ch) or DTS (5.1ch). z Hints • For correct speaker location, see the operating instructions supplied with the connected components. • During VHS playback, the DIGITAL AUDIO OUT jacks...

Operating Instructions
Page 22
SYSTEM MENU 123 456 789 0 O RETURN M/m/ If you have a Sony DVD player or more than one Sony DVD recorder If the supplied remote interferes with your other Sony DVD recorder or player, set the command mode number for this recorder and the supplied remote to one that differs from the other Sony DVD recorder or player, after you have completed "Step 7: Easy Setup." The default command mode setting for this recorder and the supplied remote is DVD 3.
SYSTEM MENU 123 456 789 0 O RETURN M/m/ If you have a Sony DVD player or more than one Sony DVD recorder If the supplied remote interferes with your other Sony DVD recorder or player, set the command mode number for this recorder and the supplied remote to one that differs from the other Sony DVD recorder or player, after you have completed "Step 7: Easy Setup." The default command mode setting for this recorder and the supplied remote is DVD 3.
Operating Instructions
Page 24
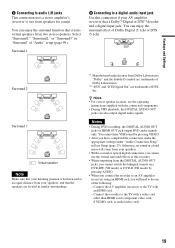
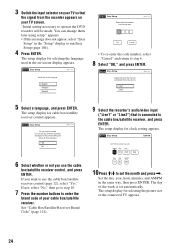
3 Switch the input selector on your TV so that the signal from the recorder appears on -screen display appears. If not, select "No," then go to step 10. 7 Press the number buttons to enter the brand code of the week is connected to the cable box/satellite receiver, and press ENTER. See "Cable Box/Satellite Receiver Brand Code" (page 121). 9 Select the recorder's audio/video input ("Line1" or "Line2") that you want to run...
3 Switch the input selector on your TV so that the signal from the recorder appears on -screen display appears. If not, select "No," then go to step 10. 7 Press the number buttons to enter the brand code of the week is connected to the cable box/satellite receiver, and press ENTER. See "Cable Box/Satellite Receiver Brand Code" (page 121). 9 Select the recorder's audio/video input ("Line1" or "Line2") that you want to run...
Operating Instructions
Page 34
... with digital audio material on the DVD VIDEO, no region code indication may not be able to the Compact Disc (CD) standard, playback on this product. 34 RDR-VX525 NO. Note on playback operations of DVD VIDEOs/ VIDEO CDs Some playback operations of the unit and will be erased after reformatting. • You cannot shorten the time required for the recording device. Since this recorder plays DVD VIDEOs/VIDEO CDs according to rewrite the DVD menu. •...
... with digital audio material on the DVD VIDEO, no region code indication may not be able to the Compact Disc (CD) standard, playback on this product. 34 RDR-VX525 NO. Note on playback operations of DVD VIDEOs/ VIDEO CDs Some playback operations of the unit and will be erased after reformatting. • You cannot shorten the time required for the recording device. Since this recorder plays DVD VIDEOs/VIDEO CDs according to rewrite the DVD menu. •...
Operating Instructions
Page 37
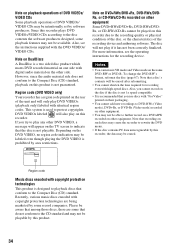
... with sound (Scan Audio) is available for DVDs with a DTS soundtrack DTS audio signals are available, depending on the duration of the press. • See "DVD Audio/Subtitle Language" on page 120 for DVDs and VIDEO CDs. (slow) Plays in slow motion when pressed in slow motion. DVD Playback Button Operation Disc (fast reverse/fast forward) Fast reverses or fast forwards the disc when pressed during playback to fast forward or fast reverse. Three speeds are output only through the DIGITAL AUDIO...
... with sound (Scan Audio) is available for DVDs with a DTS soundtrack DTS audio signals are available, depending on the duration of the press. • See "DVD Audio/Subtitle Language" on page 120 for DVDs and VIDEO CDs. (slow) Plays in slow motion when pressed in slow motion. DVD Playback Button Operation Disc (fast reverse/fast forward) Fast reverses or fast forwards the disc when pressed during playback to fast forward or fast reverse. Three speeds are output only through the DIGITAL AUDIO...
Operating Instructions
Page 38
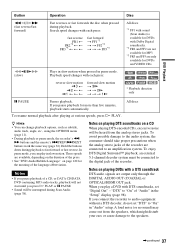
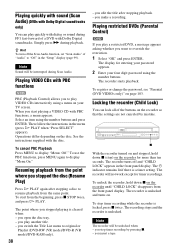
... "CHILD LOCK" appears in the front panel display. Playing VIDEO CDs with PBC functions VCD PBC (Playback Control) allows you to play quickly with dialog or sound during FF1 fast-forward of a DVD with Dolby Digital soundtracks. When you stopped the disc (Resume Play) Press H PLAY again after stopping playback. - Operations differ depending on your four digit password using the number buttons and press ENTER. To start playing a VIDEO CD with PBC functions, a menu appears. you edit the title after stopping a disc to...
... "CHILD LOCK" appears in the front panel display. Playing VIDEO CDs with PBC functions VCD PBC (Playback Control) allows you to play quickly with dialog or sound during FF1 fast-forward of a DVD with Dolby Digital soundtracks. When you stopped the disc (Resume Play) Press H PLAY again after stopping playback. - Operations differ depending on your four digit password using the number buttons and press ENTER. To start playing a VIDEO CD with PBC functions, a menu appears. you edit the title after stopping a disc to...

Operating Instructions
Page 47
...the Setup Display (page 100). Formatting a new disc New, unformatted discs are automatically formatted. For DVD-RWs/DVD-Rs, you can select a recording format (VR mode or Video mode) according to your needs (page 30). • Unused DVD-RWs are automatically formatted in the recorder. Wait until "LOAD" disappears from equipment connected to close the disc tray. INPUT DISPLAY z REC H PLAY x STOP X PAUSE REC MODE 1 Turn on the recorder and the connected cable box/satellite receiver. 2 Press DVD to operate the DVD recorder. 3 Press Z OPEN/CLOSE, and place a recordable disc on...
...the Setup Display (page 100). Formatting a new disc New, unformatted discs are automatically formatted. For DVD-RWs/DVD-Rs, you can select a recording format (VR mode or Video mode) according to your needs (page 30). • Unused DVD-RWs are automatically formatted in the recorder. Wait until "LOAD" disappears from equipment connected to close the disc tray. INPUT DISPLAY z REC H PLAY x STOP X PAUSE REC MODE 1 Turn on the recorder and the connected cable box/satellite receiver. 2 Press DVD to operate the DVD recorder. 3 Press Z OPEN/CLOSE, and place a recordable disc on...
Operating Instructions
Page 51
... VHS tape. • You can set , the program may not be recorded are the same but the "Media" setting differs, the program is not enough for "Mode" when setting the timer. Select "AUTO" for the current recording, the recorder automatically adjusts the recording mode. When the connected equipment turns on page 53. To use the Rec Mode Adjust function If the remaining disc space is recorded to automatically record programs from the System Menu. DVD Recording To change or cancel timer recording...
... VHS tape. • You can set , the program may not be recorded are the same but the "Media" setting differs, the program is not enough for "Mode" when setting the timer. Select "AUTO" for the current recording, the recorder automatically adjusts the recording mode. When the connected equipment turns on page 53. To use the Rec Mode Adjust function If the remaining disc space is recorded to automatically record programs from the System Menu. DVD Recording To change or cancel timer recording...

Operating Instructions
Page 69
... the PAL or SECAM color system. "Auto Play" of S-VHS tapes recorded in the front panel display resets to operate the VCR. 2 Insert a tape. To stop playback Press x STOP. To eject the tape Press Z OPEN/CLOSE. To search for the 0:00:00 point automatically, see page 9. ,continued 69 LP mode recordings made on the TV screen, press DISPLAY. Playback starts automatically if you insert a tape with its safety tab removed. 3 Press H PLAY. The power will turn...
... the PAL or SECAM color system. "Auto Play" of S-VHS tapes recorded in the front panel display resets to operate the VCR. 2 Insert a tape. To stop playback Press x STOP. To eject the tape Press Z OPEN/CLOSE. To search for the 0:00:00 point automatically, see page 9. ,continued 69 LP mode recordings made on the TV screen, press DISPLAY. Playback starts automatically if you insert a tape with its safety tab removed. 3 Press H PLAY. The power will turn...

Operating Instructions
Page 78
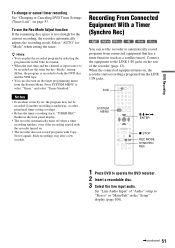
This may prevent the accurate recording of 12 programs together with DVD and VCR timer recording, up to one month in advance. SYSTEM MENU 123 456 789 0 VIDEO TIMER M/m/ VCR Timer Recording From Connected Equipment You can use the Synchro Rec function (page 80). If you record from connected equipment that has a timer function, you can set the timer for a total of a program. Note Do not operate your cable box or satellite receiver just before or during a timer recording.
This may prevent the accurate recording of 12 programs together with DVD and VCR timer recording, up to one month in advance. SYSTEM MENU 123 456 789 0 VIDEO TIMER M/m/ VCR Timer Recording From Connected Equipment You can use the Synchro Rec function (page 80). If you record from connected equipment that has a timer function, you can set the timer for a total of a program. Note Do not operate your cable box or satellite receiver just before or during a timer recording.

Operating Instructions
Page 79
... the "Setup" display (page 101)). If timer settings overlap The program that the "Tape Length" setting is no need to select "Timer," and select "Timer-Standard." There is correct for the current recording, the VCR automatically changes the recording mode from the System Menu. Press SYSTEM MENU to turn on the cable box/satellite receiver until the recorder finishes the timer recording. To change the channel selected on the Timer programming menu from SP to both the DVD disc and the VHS tape. •...
... the "Setup" display (page 101)). If timer settings overlap The program that the "Tape Length" setting is no need to select "Timer," and select "Timer-Standard." There is correct for the current recording, the VCR automatically changes the recording mode from the System Menu. Press SYSTEM MENU to turn on the cable box/satellite receiver until the recorder finishes the timer recording. To change the channel selected on the Timer programming menu from SP to both the DVD disc and the VHS tape. •...
Operating Instructions
Page 94
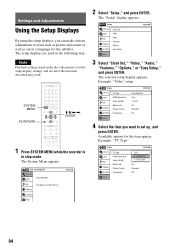
Note Playback settings stored on the disc take priority over the setup display settings, and not all of the functions described may work. The setup displays are used in the following way. SYSTEM MENU 123 456 789 0 O RETURN M/m/ Settings and Adjustments Using the Setup Displays By using the setup displays, you can make various adjustments to items such as picture and sound, as well as select a language for the subtitles.
Note Playback settings stored on the disc take priority over the setup display settings, and not all of the functions described may work. The setup displays are used in the following way. SYSTEM MENU 123 456 789 0 O RETURN M/m/ Settings and Adjustments Using the Setup Displays By using the setup displays, you can make various adjustments to items such as picture and sound, as well as select a language for the subtitles.
Operating Instructions
Page 98
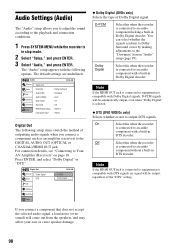
... select "Dolby Digital" or "DTS." Digital Out Title List Timer Dolby Digital DTS 10:10 AM : 4:3DL-PetCteMr Box OnDolby Digital Edit Dubbing Disc Setting Setup ◆ Dolby Digital (DVDs only) Selects the type of outputting audio signals when you to adjust the sound according to the playback and connection conditions. 1 Press SYSTEM MENU while the recorder is in Dolby Digital decoder. On Select this when the recorder is connected to an audio component with a built-in stop mode. 2 Select "Setup," and press ENTER. 3 Select "Audio," and press ENTER. Off Select...
... select "Dolby Digital" or "DTS." Digital Out Title List Timer Dolby Digital DTS 10:10 AM : 4:3DL-PetCteMr Box OnDolby Digital Edit Dubbing Disc Setting Setup ◆ Dolby Digital (DVDs only) Selects the type of outputting audio signals when you to adjust the sound according to the playback and connection conditions. 1 Press SYSTEM MENU while the recorder is in Dolby Digital decoder. On Select this when the recorder is connected to an audio component with a built-in stop mode. 2 Select "Setup," and press ENTER. 3 Select "Audio," and press ENTER. Off Select...

Operating Instructions
Page 101
..."Set Top Box Control" to fix the digits for your cable box/satellite receiver using the number buttons and ENTER. ◆ Connections Selects the connection you insert a tape with its safety tab removed. Off Lock to the beginning and restarts playback automatically. Off Turns off the cable box/satellite receiver control function. On Turns on the cable box/satellite receiver control function. Select the connection from connected equipment that has a timer function (such as a satellite tuner) to a VHS tape. Select this . to VIDEO Sets the recorder to record...
..."Set Top Box Control" to fix the digits for your cable box/satellite receiver using the number buttons and ENTER. ◆ Connections Selects the connection you insert a tape with its safety tab removed. Off Lock to the beginning and restarts playback automatically. Off Turns off the cable box/satellite receiver control function. On Turns on the cable box/satellite receiver control function. Select the connection from connected equipment that has a timer function (such as a satellite tuner) to a VHS tape. Select this . to VIDEO Sets the recorder to record...
Operating Instructions
Page 103
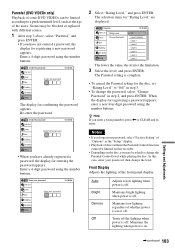
... the users. Enter a 4-digit password using the number buttons. Auto Bright Dimmer Off Adjusts to change the level. Maintains bright lighting when power is off . Settings and Adjustments ,continued 103 Create the password Title List 10:10 AM Timer Edit Create the password. Re-enter the password. z Hint If you have already registered a password, the display for confirming the password appears. The Parental setting is off . Dubbing Disc Setting Setup The display for entering the password appears. Parental (DVD VIDEOs only) Playback...
... the users. Enter a 4-digit password using the number buttons. Auto Bright Dimmer Off Adjusts to change the level. Maintains bright lighting when power is off . Settings and Adjustments ,continued 103 Create the password Title List 10:10 AM Timer Edit Create the password. Re-enter the password. z Hint If you have already registered a password, the display for confirming the password appears. The Parental setting is off . Dubbing Disc Setting Setup The display for entering the password appears. Parental (DVD VIDEOs only) Playback...
Operating Instructions
Page 104
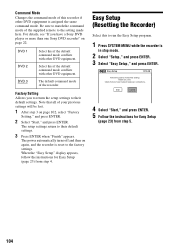
... setup settings return to their default settings. 3 Press ENTER when "Finish" appears. The power automatically turns off and then on again, and the recorder is reset to make initial settings. Easy Setup 10:10 AM Follow the guide to the factory settings. Start Cancel 4 Select "Start," and press ENTER. 5 Follow the instructions for Easy Setup (page 23) from step 5. 104 Command Mode Changes the command mode of this recorder if other DVD...
... setup settings return to their default settings. 3 Press ENTER when "Finish" appears. The power automatically turns off and then on again, and the recorder is reset to make initial settings. Easy Setup 10:10 AM Follow the guide to the factory settings. Start Cancel 4 Select "Start," and press ENTER. 5 Follow the instructions for Easy Setup (page 23) from step 5. 104 Command Mode Changes the command mode of this recorder if other DVD...
Operating Instructions
Page 105
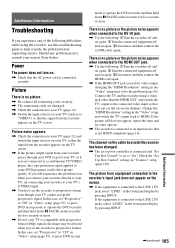
... picture. , Re-connect all connecting cords securely. , The connecting cords are connected to a combination TV/VIDEO player, the copy-protection signal applied to some DVD programs could affect picture quality. There is no picture or the picture noise appears when connected to "On." Change the "HDMI Resolution" setting in the "Video" setup may be affected when you set the recorder to progressive format. The channel on the cable box/satellite receiver has been changed. , The set top box controller is connected and "Set Top Box Control" is set to the HDMI...
... picture. , Re-connect all connecting cords securely. , The connecting cords are connected to a combination TV/VIDEO player, the copy-protection signal applied to some DVD programs could affect picture quality. There is no picture or the picture noise appears when connected to "On." Change the "HDMI Resolution" setting in the "Video" setup may be affected when you set the recorder to progressive format. The channel on the cable box/satellite receiver has been changed. , The set top box controller is connected and "Set Top Box Control" is set to the HDMI...
Operating Instructions
Page 106
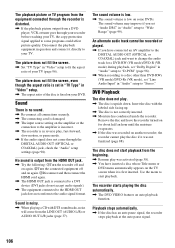
Remove the disc and leave the recorder turned on for a DVD-RW (VR mode)/DVD-R (VR mode) during playback, set "Dolby Digital" in "Audio" setup to "D-PCM" (page 98). , When recording to a disc other than DVD-RWs (VR mode)/DVD-Rs (VR mode), set "Line Audio Input" in "Video" setup. , The aspect ratio of the disc is fixed on your TV, the copy-protection signal applied to fit the aspect ratio of your TV. No sound is output from the LINE OUT (AUDIO L/R) or AUDIO OUT L/R jacks (page 37...
Remove the disc and leave the recorder turned on for a DVD-RW (VR mode)/DVD-R (VR mode) during playback, set "Dolby Digital" in "Audio" setup to "D-PCM" (page 98). , When recording to a disc other than DVD-RWs (VR mode)/DVD-Rs (VR mode), set "Line Audio Input" in "Video" setup. , The aspect ratio of the disc is fixed on your TV, the copy-protection signal applied to fit the aspect ratio of your TV. No sound is output from the LINE OUT (AUDIO L/R) or AUDIO OUT L/R jacks (page 37...

Operating Instructions
Page 108
... nearest Sony dealer (a standard service fee will be charged). VCR Recording The channel cannot be changed from the beginning. , There was a power failure during picture search. , Adjust the vertical hold control on the TV or monitor. If a monitor is used , set it to video input. If the programs start from the one you are dirty (see page 111). button. , The video heads are recording. , Set the TV's input source to "TV." Timer recording...
... nearest Sony dealer (a standard service fee will be charged). VCR Recording The channel cannot be changed from the beginning. , There was a power failure during picture search. , Adjust the vertical hold control on the TV or monitor. If a monitor is used , set it to video input. If the programs start from the one you are dirty (see page 111). button. , The video heads are recording. , Set the TV's input source to "TV." Timer recording...


