
CLIE Handbook
Page 37
The check boxes are , in the following cases: • Pressing an application button to start an application or category. • Switching the screen from [Options]. 5 Tap / (check boxes) next to [Remember Last Category] ...
The check boxes are , in the following cases: • Pressing an application button to start an application or category. • Switching the screen from [Options]. 5 Tap / (check boxes) next to [Remember Last Category] ...

CLIE Handbook
Page 41
Note The Find option is automatically CLIÉ™ handheld basic operations 41 Tip If you want to tapping placed in the list of search results. The application associated with the data automatically starts and opens the data. searching for "sony" also finds "Sony". To resume the search, tap [Find More]. Finding records 4 Tap the data you select text in an application prior to view in the Find dialog box. (Find), the text is not case sensitive; To stop searching Tap [Stop] and [Exit].
Note The Find option is automatically CLIÉ™ handheld basic operations 41 Tip If you want to tapping placed in the list of search results. The application associated with the data automatically starts and opens the data. searching for "sony" also finds "Sony". To resume the search, tap [Find More]. Finding records 4 Tap the data you select text in an application prior to view in the Find dialog box. (Find), the text is not case sensitive; To stop searching Tap [Stop] and [Exit].
CLIE Handbook
Page 48
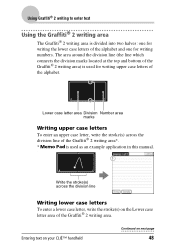
..., write the stroke(s) on next page 48 Entering text on your CLIÉ™ handheld Continued on the Lower case letter area of the Graffiti® 2 writing area. Using Graffiti® 2 writing to enter text Using the Graffiti® 2 writing area The Graffiti® 2 writing ... the division marks located at the top and bottom of the Graffiti® 2 writing area) is divided into two halves: one for writing the lower case letters of the alphabet and one for writing upper...
..., write the stroke(s) on next page 48 Entering text on your CLIÉ™ handheld Continued on the Lower case letter area of the Graffiti® 2 writing area. Using Graffiti® 2 writing to enter text Using the Graffiti® 2 writing area The Graffiti® 2 writing ... the division marks located at the top and bottom of the Graffiti® 2 writing area) is divided into two halves: one for writing the lower case letters of the alphabet and one for writing upper...

CLIE Handbook
Page 51
The Punctuation Shift indicator is displayed on the screen to enter Symbol mode or exit Symbol mode, on either the Lower case letter area or the Number area. 2 Write the symbol stroke(s). • Tips • Write the stroke(s) as soon as you can write on next page ... you are in the Graffiti® 2 input area when Symbol mode is activated. Entering text on your CLIÉ™ handheld Continued on the Lower case letter area or the Number area of the Graffiti® 2 writing area. Using Graffiti® 2 writing to enter a symbol. 1 Write the stroke anywhere within the...
The Punctuation Shift indicator is displayed on the screen to enter Symbol mode or exit Symbol mode, on either the Lower case letter area or the Number area. 2 Write the symbol stroke(s). • Tips • Write the stroke(s) as soon as you can write on next page ... you are in the Graffiti® 2 input area when Symbol mode is activated. Entering text on your CLIÉ™ handheld Continued on the Lower case letter area or the Number area of the Graffiti® 2 writing area. Using Graffiti® 2 writing to enter a symbol. 1 Write the stroke anywhere within the...

CLIE Handbook
Page 52
... need to Graffiti 2 Help on your CLIÉ™ handheld Continued on the symbol. This shows which symbols need to be written on the Lower case letter area of the Graffiti® 2 writing area, depending on next page 52 This will enter the symbol, and exit Symbol mode. • Tip Some...
... need to Graffiti 2 Help on your CLIÉ™ handheld Continued on the symbol. This shows which symbols need to be written on the Lower case letter area of the Graffiti® 2 writing area, depending on next page 52 This will enter the symbol, and exit Symbol mode. • Tip Some...

CLIE Handbook
Page 53
... area) You can write the following stroke(s) directly in the Lower case letter area without switching to Symbol mode. . (Period) , (Comma) ' (Apostrophe) ? (Question mark) ! (Exclamation mark) & @ '' Space Carriage return Tab Symbol (Number area) You can write the ...
... area) You can write the following stroke(s) directly in the Lower case letter area without switching to Symbol mode. . (Period) , (Comma) ' (Apostrophe) ? (Question mark) ! (Exclamation mark) & @ '' Space Carriage return Tab Symbol (Number area) You can write the ...

CLIE Handbook
Page 55
y ã õ ñ å Entering text on your CLIÉ handheld. b For details, refer to enter text § ¿ • ° ¢ ß ¥ £ Ø ¡ ç Writing accented letters To enter an accented letter, first write the lower case letter or upper case letter, then write the accent stroke on your CLIÉ™ handheld 55 Using Graffiti® 2 writing to the following and Graffiti 2 Help on the Number area of the Graffiti® 2 writing area.
y ã õ ñ å Entering text on your CLIÉ handheld. b For details, refer to enter text § ¿ • ° ¢ ß ¥ £ Ø ¡ ç Writing accented letters To enter an accented letter, first write the lower case letter or upper case letter, then write the accent stroke on your CLIÉ™ handheld 55 Using Graffiti® 2 writing to the following and Graffiti 2 Help on the Number area of the Graffiti® 2 writing area.

CLIE Handbook
Page 57
... stroke shape for the letter you want to the sides of the Graffiti® 2 writing area. Use the same shape to create both the upper case and lower case version of a letter. 4 Position the stylus on the Lower case letter area of the Graffiti® 2 writing area.
... stroke shape for the letter you want to the sides of the Graffiti® 2 writing area. Use the same shape to create both the upper case and lower case version of a letter. 4 Position the stylus on the Lower case letter area of the Graffiti® 2 writing area.

CLIE Handbook
Page 61
Tip You can also display the Decuma Latin screen by tapping "1" on page 63. For details, refer to enter text (for PEG-TJ37 only) 2 Tap the time line on the Date Book screen. 3 Tap "a" on next page 61 Using Decuma Input to "The areas for writing letters and numbers are different" on the Graffiti 2 input area. In this case, the Decuma Latin screen for Numbers and Special characters is displayed. Entering text on your CLIÉ™ handheld Continued on the Graffiti 2 input area. The Decuma Latin screen is displayed.
Tip You can also display the Decuma Latin screen by tapping "1" on page 63. For details, refer to enter text (for PEG-TJ37 only) 2 Tap the time line on the Date Book screen. 3 Tap "a" on next page 61 Using Decuma Input to "The areas for writing letters and numbers are different" on the Graffiti 2 input area. In this case, the Decuma Latin screen for Numbers and Special characters is displayed. Entering text on your CLIÉ™ handheld Continued on the Graffiti 2 input area. The Decuma Latin screen is displayed.

CLIE Handbook
Page 75
The Users dialog box is changed at the bottom right of the Windows task tray (Notification area). In this case, bring the configuration window to change and click [Rename]. 3 Enter a new user name and click [OK]. Tip Changing the user name of your computer, and ...
The Users dialog box is changed at the bottom right of the Windows task tray (Notification area). In this case, bring the configuration window to change and click [Rename]. 3 Enter a new user name and click [OK]. Tip Changing the user name of your computer, and ...
CLIE Handbook
Page 84
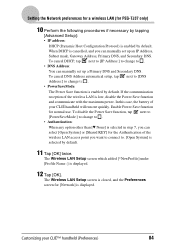
...]. Customizing your CLIÉ handheld will run out quickly. In this case, the battery of the wireless LAN is low, disable the Power Save function and communicate with the maximum power. Setting the Network preferences for a wireless LAN (for PEG-TJ37 only) 10 Perform the following procedures if necessary by tapping [Advanced Setup...
...]. Customizing your CLIÉ handheld will run out quickly. In this case, the battery of the wireless LAN is low, disable the Power Save function and communicate with the maximum power. Setting the Network preferences for a wireless LAN (for PEG-TJ37 only) 10 Perform the following procedures if necessary by tapping [Advanced Setup...
CLIE Handbook
Page 85
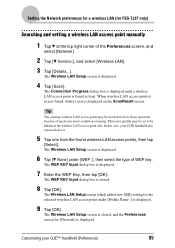
... wireless LAN access point side. The WEP KEY Input dialog box is closed , and the Preferences screen for [Network] is displayed. 9 Tap [OK]. In this case, your CLIÉ™ handheld (Preferences) 85 The Wireless LAN Setup screen is displayed. 6 Tap [V None] under [Profile Name :] is displayed. The Wireless LAN Setup... your CLIÉ handheld also can not detect it (they) is (are ) displayed on the ScanResult screen. Setting the Network preferences for a wireless LAN (for PEG-TJ37 only) Searching and setting a wireless LAN access point manually 1 Tap V at least.
... wireless LAN access point side. The WEP KEY Input dialog box is closed , and the Preferences screen for [Network] is displayed. 9 Tap [OK]. In this case, your CLIÉ™ handheld (Preferences) 85 The Wireless LAN Setup screen is displayed. 6 Tap [V None] under [Profile Name :] is displayed. The Wireless LAN Setup... your CLIÉ handheld also can not detect it (they) is (are ) displayed on the ScanResult screen. Setting the Network preferences for a wireless LAN (for PEG-TJ37 only) Searching and setting a wireless LAN access point manually 1 Tap V at least.

CLIE Handbook
Page 86
The Wireless LAN Setup screen is closed and the Preferences screen for a wireless LAN access point, "*" is displayed. In this case, the most suitable wireless LAN access point is displayed. 4 Tap [-Auto Connect-] under [Profile Name:]. 5 Tap [OK]. The Wireless LAN Setup screen is selected.... corner of the Preferences screen, and select [Network]. 2 Tap [V Service:], and select [Wireless LAN]. 3 Tap [Details...]. Setting the Network preferences for a wireless LAN (for PEG-TJ37 only) Connecting your CLIÉ handheld to [Auto Connect:] at the setting of wireless LAN access point.
The Wireless LAN Setup screen is closed and the Preferences screen for a wireless LAN access point, "*" is displayed. In this case, the most suitable wireless LAN access point is displayed. 4 Tap [-Auto Connect-] under [Profile Name:]. 5 Tap [OK]. The Wireless LAN Setup screen is selected.... corner of the Preferences screen, and select [Network]. 2 Tap [V Service:], and select [Wireless LAN]. 3 Tap [Details...]. Setting the Network preferences for a wireless LAN (for PEG-TJ37 only) Connecting your CLIÉ handheld to [Auto Connect:] at the setting of wireless LAN access point.

CLIE Handbook
Page 136
... or Windows® Explorer, otherwise the files/data may be disabled. corrosive substances - extremely high temperature such as inside a hot car, outdoors in its original case to ensure protection of important files/data. • Make a backup of your fingers or a metal object. • Do not drop, bend, or expose "Memory Stick...
... or Windows® Explorer, otherwise the files/data may be disabled. corrosive substances - extremely high temperature such as inside a hot car, outdoors in its original case to ensure protection of important files/data. • Make a backup of your fingers or a metal object. • Do not drop, bend, or expose "Memory Stick...

CLIE Handbook
Page 140
... Stick™" media 3 Select (Card) by rotating the Jog Dial™ navigator, or by tap (Card). Note Depending on your CLIÉ handheld. In this case, use CLIE Files to "Memory Stick" media, then the (Card Name) is displayed in the [/Palm/Launcher] directory on "Memory Stick" media. If you start...
... Stick™" media 3 Select (Card) by rotating the Jog Dial™ navigator, or by tap (Card). Note Depending on your CLIÉ handheld. In this case, use CLIE Files to "Memory Stick" media, then the (Card Name) is displayed in the [/Palm/Launcher] directory on "Memory Stick" media. If you start...

CLIE Handbook
Page 144
...É handheld, be sure to formatting so that you remove the "Memory Stick" media during formatting, the "Memory Stick" media will be erased. In this case, insert "Memory Stick" media again and restart formatting. Notes • If "Memory Stick" media is formatting? Make sure you check the files/data prior to...
...É handheld, be sure to formatting so that you remove the "Memory Stick" media during formatting, the "Memory Stick" media will be erased. In this case, insert "Memory Stick" media again and restart formatting. Notes • If "Memory Stick" media is formatting? Make sure you check the files/data prior to...
CLIE Handbook
Page 146
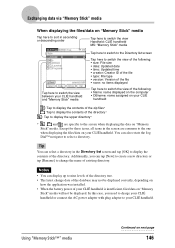
... of the directory* : Tap to display the upper directory* * , and are common to the screen when displaying the data on next page 146 In this case, you can select a directory in the screen are specific to the one when displaying the files/data on how the application was installed. • When...
... of the directory* : Tap to display the upper directory* * , and are common to the screen when displaying the data on next page 146 In this case, you can select a directory in the screen are specific to the one when displaying the files/data on how the application was installed. • When...

CLIE Handbook
Page 147
...that arise from your moving or deleting files/data using CLIE Files, some CLIÉ handheld applications may not operate properly or some cases when you may not be copied to operate the CLIE Launcher. • NetworkDB: Network settings. Using "Memory Stick™" media Continued... handheld after the backup will be overwritten with applications or files/data, that any added or edited information in your CLIÉ handheld. Sony is deleted, you move or delete the following files: • Saved Preferences: The final operation status or settings for various applications. •...
...that arise from your moving or deleting files/data using CLIE Files, some CLIÉ handheld applications may not operate properly or some cases when you may not be copied to operate the CLIE Launcher. • NetworkDB: Network settings. Using "Memory Stick™" media Continued... handheld after the backup will be overwritten with applications or files/data, that any added or edited information in your CLIÉ handheld. Sony is deleted, you move or delete the following files: • Saved Preferences: The final operation status or settings for various applications. •...

CLIE Handbook
Page 148
... to your CLIÉ handheld. • If your CLIÉ handheld receives IR communication while copying data, the copying will not be interrupted. In this case, retry copying or moving, and if the confirm overwrite message is insufficient, data on "Memory Stick" media will be displayed. In this... case, you need to charge your CLIÉ handheld or connect the AC power adapter with plug adapter to receive IR communication while copying data. • ...
... to your CLIÉ handheld. • If your CLIÉ handheld receives IR communication while copying data, the copying will not be interrupted. In this case, retry copying or moving, and if the confirm overwrite message is insufficient, data on "Memory Stick" media will be displayed. In this... case, you need to charge your CLIÉ handheld or connect the AC power adapter with plug adapter to receive IR communication while copying data. • ...

CLIE Handbook
Page 156
... want to extract to change to . Note Some data cannot be extracted. : Files that could not be saved on your CLIÉ handheld. In these cases, an error message is displayed. 7 Tap a directory in Step 7. : Files that were extracted normally. : Files that were skipped during extraction. 9 Tap [Close]. The data is...
... want to extract to change to . Note Some data cannot be extracted. : Files that could not be saved on your CLIÉ handheld. In these cases, an error message is displayed. 7 Tap a directory in Step 7. : Files that were extracted normally. : Files that were skipped during extraction. 9 Tap [Close]. The data is...