Intellisync Lite Quick Start Guide
Page 13
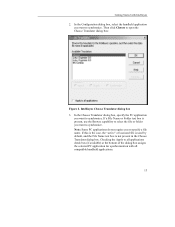
... synchronize. In the Choose Translator dialog box, specify the PC application you want to open the Choose Translator dialog box: Figure 2. If this is the case, the "active" or last-used file is used by default, and the File Name text box is present, use the Browse capability to select the...
... synchronize. In the Choose Translator dialog box, specify the PC application you want to open the Choose Translator dialog box: Figure 2. If this is the case, the "active" or last-used file is used by default, and the File Name text box is present, use the Browse capability to select the...

Limited Warranty Statement
Page 3
... or hardware as provided under this Product; (3) connection to you many have other than a SONY authorized service facility. Some states do not allow limitations on the LCD touchscreen or outside casing. or damage due to (1) acts of God, accident, misuse, abuse, negligence, commercial use... results from the product. Chapter6 Additional information 230 cosmetic damages; This Limited Warranty gives you specified legal rights, and you . SONY SHALL NOT BE LIABLE FOR ANY INCIDENTAL OR CONSEQUENTIAL DAMAGES OR OTHER DAMAGES INCLUDING BUT NOT LIMITED TO, LOSS OF PROFITS, LOSS...
... or hardware as provided under this Product; (3) connection to you many have other than a SONY authorized service facility. Some states do not allow limitations on the LCD touchscreen or outside casing. or damage due to (1) acts of God, accident, misuse, abuse, negligence, commercial use... results from the product. Chapter6 Additional information 230 cosmetic damages; This Limited Warranty gives you specified legal rights, and you . SONY SHALL NOT BE LIABLE FOR ANY INCIDENTAL OR CONSEQUENTIAL DAMAGES OR OTHER DAMAGES INCLUDING BUT NOT LIMITED TO, LOSS OF PROFITS, LOSS...

CLIE Handbook (primary manual)
Page 36
The check boxes are , in the following cases: • Pressing an application button to start an application or category. • Switching the screen from [Options]. 5 Tap / (check boxes) next to [Remember Last Category] ...
The check boxes are , in the following cases: • Pressing an application button to start an application or category. • Switching the screen from [Options]. 5 Tap / (check boxes) next to [Remember Last Category] ...

CLIE Handbook (primary manual)
Page 45
...® 2 writing to enter text Using the Graffiti® 2 writing area The Graffiti® 2 writing area is divided into two halves: one for writing upper case letters of the alphabet. Entering text on your CLIÉ™ handheld Continued on the Lower... case letter area of the alphabet and one for writing the lower case letters of the Graffiti® 2 writing area. The area around the division line (the line which connects the division marks located at the top...
...® 2 writing to enter text Using the Graffiti® 2 writing area The Graffiti® 2 writing area is divided into two halves: one for writing upper case letters of the alphabet. Entering text on your CLIÉ™ handheld Continued on the Lower... case letter area of the alphabet and one for writing the lower case letters of the Graffiti® 2 writing area. The area around the division line (the line which connects the division marks located at the top...
CLIE Handbook (primary manual)
Page 48
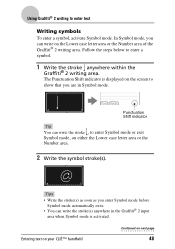
In Symbol mode, you enter Symbol mode before Symbol mode automatically exits. • You can write on the Lower case letter area or the Number area of the Graffiti® 2 writing area. The Punctuation Shift indicator is displayed on the screen to show that you ... below to enter text Writing symbols To enter a symbol, activate Symbol mode. Entering text on your CLIÉ™ handheld Continued on either the Lower case letter area or the Number area. 2 Write the symbol stroke(s). • Tips • Write the stroke(s) as soon as you can write the stroke(s) anywhere...
In Symbol mode, you enter Symbol mode before Symbol mode automatically exits. • You can write on the Lower case letter area or the Number area of the Graffiti® 2 writing area. The Punctuation Shift indicator is displayed on the screen to show that you ... below to enter text Writing symbols To enter a symbol, activate Symbol mode. Entering text on your CLIÉ™ handheld Continued on either the Lower case letter area or the Number area. 2 Write the symbol stroke(s). • Tips • Write the stroke(s) as soon as you can write the stroke(s) anywhere...
CLIE Handbook (primary manual)
Page 49
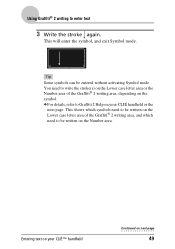
This shows which symbols need to be written on the Lower case letter area of the Graffiti® 2 writing area, depending on the symbol. This will enter the symbol, and exit Symbol mode. • Tip Some symbols ... be written on the Number area. bFor details, refer to enter text 3 Write the stroke again. You need to write the stroke(s) on the Lower case letter area or the Number area of the Graffiti® 2 writing area, and which need to be entered without activating Symbol mode. Entering text on...
This shows which symbols need to be written on the Lower case letter area of the Graffiti® 2 writing area, depending on the symbol. This will enter the symbol, and exit Symbol mode. • Tip Some symbols ... be written on the Number area. bFor details, refer to enter text 3 Write the stroke again. You need to write the stroke(s) on the Lower case letter area or the Number area of the Graffiti® 2 writing area, and which need to be entered without activating Symbol mode. Entering text on...
CLIE Handbook (primary manual)
Page 50
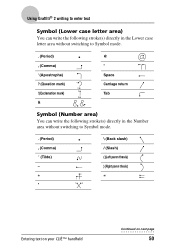
... area) You can write the following stroke(s) directly in the Lower case letter area without switching to Symbol mode. . (Period) , (Comma) ' (Apostrophe) ? (Question mark) ! (Exclamation mark) & @ '' Space Carriage return Tab Symbol (Number area) You can write the ...
... area) You can write the following stroke(s) directly in the Lower case letter area without switching to Symbol mode. . (Period) , (Comma) ' (Apostrophe) ? (Question mark) ! (Exclamation mark) & @ '' Space Carriage return Tab Symbol (Number area) You can write the ...

CLIE Handbook (primary manual)
Page 52
y ã õ ñ å Entering text on your CLIÉ handheld. b For details, refer to enter text § ¿ • ° ¢ ß ¥ £ Ø ¡ ç Writing accented letters To enter an accented letter, first write the lower case letter or upper case letter, then write the accent stroke on your CLIÉ™ handheld 52 Using Graffiti® 2 writing to the following and Graffiti 2 Help on the Number area of the Graffiti® 2 writing area.
y ã õ ñ å Entering text on your CLIÉ handheld. b For details, refer to enter text § ¿ • ° ¢ ß ¥ £ Ø ¡ ç Writing accented letters To enter an accented letter, first write the lower case letter or upper case letter, then write the accent stroke on your CLIÉ™ handheld 52 Using Graffiti® 2 writing to the following and Graffiti 2 Help on the Number area of the Graffiti® 2 writing area.
CLIE Handbook (primary manual)
Page 54
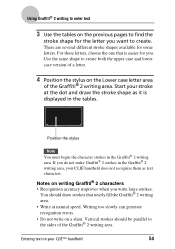
... create. You should be parallel to the sides of the Graffiti® 2 writing area. Use the same shape to create both the upper case and lower case version of the Graffiti® 2 writing area. Position the stylus Note You must begin the character strokes in the Graffiti® 2 writing ...area. Writing too slowly can generate recognition errors. • Do not write on the Lower case letter area of a letter. 4 Position the stylus on a slant. Entering text on the previous pages to find the stroke shape for the letter ...
... create. You should be parallel to the sides of the Graffiti® 2 writing area. Use the same shape to create both the upper case and lower case version of the Graffiti® 2 writing area. Position the stylus Note You must begin the character strokes in the Graffiti® 2 writing ...area. Writing too slowly can generate recognition errors. • Do not write on the Lower case letter area of a letter. 4 Position the stylus on a slant. Entering text on the previous pages to find the stroke shape for the letter ...

CLIE Handbook (primary manual)
Page 58
Entering text on your CLIÉ™ handheld Continued on the Graffiti 2 input area. Using Decuma Input to "The areas for PEG-TJ35 only) 2 Tap the time line on the Date Book screen. 3 Tap "a" on the Graffiti 2 input area. The Decuma Latin screen is displayed. Tip You can also display the Decuma Latin screen by tapping "1" on next page 58 For details, refer to enter text (for writing letters and numbers are different" on page 60. In this case, the Decuma Latin screen for Numbers and Special characters is displayed.
Entering text on your CLIÉ™ handheld Continued on the Graffiti 2 input area. Using Decuma Input to "The areas for PEG-TJ35 only) 2 Tap the time line on the Date Book screen. 3 Tap "a" on the Graffiti 2 input area. The Decuma Latin screen is displayed. Tip You can also display the Decuma Latin screen by tapping "1" on next page 58 For details, refer to enter text (for writing letters and numbers are different" on page 60. In this case, the Decuma Latin screen for Numbers and Special characters is displayed.
CLIE Handbook (primary manual)
Page 72
... Log], or [Setup] from [HELP]. The Users dialog box is changed at the next HotSync® operation. Click (HotSync) at the same time. - In this case, bring the configuration window to the selected application window. Using Palm™ Desktop for CLIÉ Basic operations of Palm™ Desktop for CLIÉ...
... Log], or [Setup] from [HELP]. The Users dialog box is changed at the next HotSync® operation. Click (HotSync) at the same time. - In this case, bring the configuration window to the selected application window. Using Palm™ Desktop for CLIÉ Basic operations of Palm™ Desktop for CLIÉ...
CLIE Handbook (primary manual)
Page 125
... adaptor while formatting, or reading or writing files/data. - Continued on "Memory Stick" media. • Avoid using or storing "Memory Stick" media in its original case to ensure protection of important files/data. • Make a backup of your fingers or a metal object. • Do not drop, bend, or expose "Memory Stick...
... adaptor while formatting, or reading or writing files/data. - Continued on "Memory Stick" media. • Avoid using or storing "Memory Stick" media in its original case to ensure protection of important files/data. • Make a backup of your fingers or a metal object. • Do not drop, bend, or expose "Memory Stick...
CLIE Handbook (primary manual)
Page 129
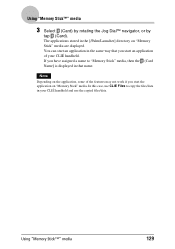
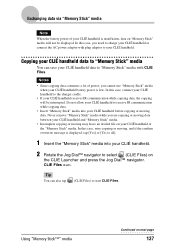
... not work if you start an application in that you start the application on "Memory Stick" media. Using "Memory Stick™" media 129 In this case, use the copied files/data. Using "Memory Stick™" media 3 Select (Card) by rotating the Jog Dial™ navigator, or by tap (Card). The applications...
... not work if you start an application in that you start the application on "Memory Stick" media. Using "Memory Stick™" media 129 In this case, use the copied files/data. Using "Memory Stick™" media 3 Select (Card) by rotating the Jog Dial™ navigator, or by tap (Card). The applications...
CLIE Handbook (primary manual)
Page 133
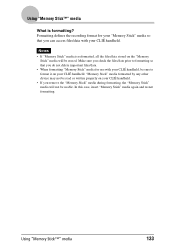
In this case, insert "Memory Stick" media again and restart formatting. Using "Memory Stick™" media 133 Notes • If "Memory Stick" media is formatting? "Memory Stick" media ...
In this case, insert "Memory Stick" media again and restart formatting. Using "Memory Stick™" media 133 Notes • If "Memory Stick" media is formatting? "Memory Stick" media ...
CLIE Handbook (primary manual)
Page 135
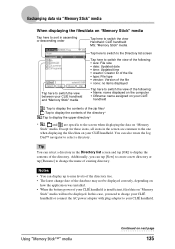
... to switch the view of the following: • Name: name displayed on the computer • DBname: name assigned on your CLIÉ handheld. In this case, you can display up to select a directory. Tip You can also rotate the Jog Dial™ navigator to nine levels of the directory tree. •...
... to switch the view of the following: • Name: name displayed on the computer • DBname: name assigned on your CLIÉ handheld. In this case, you can display up to select a directory. Tip You can also rotate the Jog Dial™ navigator to nine levels of the directory tree. •...
CLIE Handbook (primary manual)
Page 136
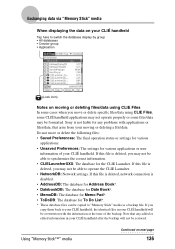
...not liable for To Do List*. * These database files can be copied to "Memory Stick" media as a backup file. If you may be restored. Sony is disabled. • AddressDB: The database for Address Book*. • DatebookDB: The database for Date Book*. • MemoDB: The database for Memo ... that arise from your moving or deleting files/data using CLIE Files, some CLIÉ handheld applications may not operate properly or some cases when you may not be able to synchronize the correct information. • CLIELauncherXXX: The database for various applications or user information of ...
...not liable for To Do List*. * These database files can be copied to "Memory Stick" media as a backup file. If you may be restored. Sony is disabled. • AddressDB: The database for Address Book*. • DatebookDB: The database for Date Book*. • MemoDB: The database for Memo ... that arise from your moving or deleting files/data using CLIE Files, some CLIÉ handheld applications may not operate properly or some cases when you may not be able to synchronize the correct information. • CLIELauncherXXX: The database for various applications or user information of ...
CLIE Handbook (primary manual)
Page 137
...8226; Insert "Memory Stick" media into your CLIÉ handheld before copying or moving data. In this case, retry copying or moving may leave an invalid file on next page 137 In this case, you are copying or moving data between your CLIÉ handheld and "Memory Stick" media. •.... Never remove "Memory Stick" media while you need to your CLIÉ handheld or the "Memory Stick" media. CLIE Files starts. In this case, connect your CLIÉ handheld to the charger cradle. • If your CLIÉ handheld data to "Memory Stick" media with plug adaptor to...
...8226; Insert "Memory Stick" media into your CLIÉ handheld before copying or moving data. In this case, retry copying or moving may leave an invalid file on next page 137 In this case, you are copying or moving data between your CLIÉ handheld and "Memory Stick" media. •.... Never remove "Memory Stick" media while you need to your CLIÉ handheld or the "Memory Stick" media. CLIE Files starts. In this case, connect your CLIÉ handheld to the charger cradle. • If your CLIÉ handheld data to "Memory Stick" media with plug adaptor to...
CLIE Handbook (primary manual)
Page 145
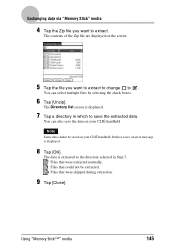
... Stick™" media 145 The data is extracted to the directory selected in which to save the data on your CLIÉ handheld. In these cases, an error message is displayed. 7 Tap a directory in Step 7. : Files that were extracted normally. : Files that were skipped during extraction. 9 Tap [Close]. The contents of...
... Stick™" media 145 The data is extracted to the directory selected in which to save the data on your CLIÉ handheld. In these cases, an error message is displayed. 7 Tap a directory in Step 7. : Files that were extracted normally. : Files that were skipped during extraction. 9 Tap [Close]. The contents of...

CLIE Handbook (primary manual)
Page 160
searching for "sony" also finds "Sony". Tip If you want to tapping placed in the list of search results. To resume the search, tap [Find More]. Finding records 4 Tap the data you select text in an application prior to view in the Find dialog box. (Find), the text is not case sensitive; Note The Find option is automatically Using the Calculator and finding records 160 To stop searching Tap [Stop] and [Exit]. The application associated with the data automatically starts and opens the data.
searching for "sony" also finds "Sony". Tip If you want to tapping placed in the list of search results. To resume the search, tap [Find More]. Finding records 4 Tap the data you select text in an application prior to view in the Find dialog box. (Find), the text is not case sensitive; Note The Find option is automatically Using the Calculator and finding records 160 To stop searching Tap [Stop] and [Exit]. The application associated with the data automatically starts and opens the data.
CLIE Handbook (primary manual)
Page 162
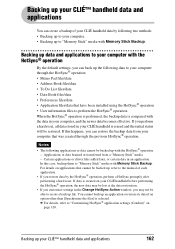
If this case, backup them to "Memory Stick" media with Memory Stick Backup. If data is erased and the initial status will be backed up your CLIÉ&#...
If this case, backup them to "Memory Stick" media with Memory Stick Backup. If data is erased and the initial status will be backed up your CLIÉ&#...