
Intellisync Lite Quick Start Guide
Page 16
...application. 11. HotSync Progress dialog box Note: If you synchronize, Intellisync uses a history file to determine the changes that must be made in the cradle and the cradle connected to achieve synchronization. When the operation is complete, your handheld in each set of data you click Cancel on the... cradle. Figure 5. Note: For each of the data. "First run " synchronization is created by the first synchronization of your systems to the appropriate COM ...
...application. 11. HotSync Progress dialog box Note: If you synchronize, Intellisync uses a history file to determine the changes that must be made in the cradle and the cradle connected to achieve synchronization. When the operation is complete, your handheld in each set of data you click Cancel on the... cradle. Figure 5. Note: For each of the data. "First run " synchronization is created by the first synchronization of your systems to the appropriate COM ...
Intellisync User Guide
Page 5
... disk space • 16 MB RAM • VGA monitor or better, 640 x 480 resolution • CD-ROM drive • One available serial port (requires serial cradle) • HotSync 3.0 installed Page 5
... disk space • 16 MB RAM • VGA monitor or better, 640 x 480 resolution • CD-ROM drive • One available serial port (requires serial cradle) • HotSync 3.0 installed Page 5
Intellisync User Guide
Page 6
...; HotSync 3.0 installed All systems Internet access with Internet Explorer 4.x or Netscape 3.x and higher (suggested). In addition, you will need a Palm OS® handheld and a docking cradle. Page 6
...; HotSync 3.0 installed All systems Internet access with Internet Explorer 4.x or Netscape 3.x and higher (suggested). In addition, you will need a Palm OS® handheld and a docking cradle. Page 6

Intellisync User Guide
Page 8
... a Palm OS handheld application with Palm Desktop after Intellisync is activated by pressing the HotSync button on the handheld cradle, the HotSync Manager initiates the synchronization configured in the Intellisync Configuration dialog. Installing Palm Desktop installs HotSync manager in the... Startup group on the handheld cradle. The HotSync Manager automatically runs the most recently configured Intellisync operation. • You can synchronize any time by ...
... a Palm OS handheld application with Palm Desktop after Intellisync is activated by pressing the HotSync button on the handheld cradle, the HotSync Manager initiates the synchronization configured in the Intellisync Configuration dialog. Installing Palm Desktop installs HotSync manager in the... Startup group on the handheld cradle. The HotSync Manager automatically runs the most recently configured Intellisync operation. • You can synchronize any time by ...

Intellisync User Guide
Page 9
... HotSync® Manager" in the Choose Translator dialog. Once you press the HotSync button on your Palm OS® handheld with data on the handheld cradle, synchronization starts immediately. How does Intellisync know what to change specifications. Note: For simplicity, this tutorial. Page 9 This tutorial is basically a one -way data transfers...
... HotSync® Manager" in the Choose Translator dialog. Once you press the HotSync button on your Palm OS® handheld with data on the handheld cradle, synchronization starts immediately. How does Intellisync know what to change specifications. Note: For simplicity, this tutorial. Page 9 This tutorial is basically a one -way data transfers...

Intellisync User Guide
Page 12
... has been completed. By default, this check box is checked, indicating that pressing the Cancel button on the handheld cradle. To review or alter settings affecting synchronization, select the Advanced button to the handheld application name. With your handheld in the handheld... cradle and the cradle connected to the Configuration dialog. 8. Note that the data is not synchronized.) 6. When settings are configured as you clear this ...
... has been completed. By default, this check box is checked, indicating that pressing the Cancel button on the handheld cradle. To review or alter settings affecting synchronization, select the Advanced button to the handheld application name. With your handheld in the handheld... cradle and the cradle connected to the Configuration dialog. 8. Note that the data is not synchronized.) 6. When settings are configured as you clear this ...

Intellisync User Guide
Page 14
...handheld and PC applications because fields in Chapter 3 for the PC application(s) you select the handheld Date Book application and Lotus Organizer, handheld Date Book records are using. Intellisync Lite Re-Running the Operation Now that are compatible with the handheld application. ...addressed there. For this to occur, your handheld must be properly fitted into the handheld cradle, and the cradle serial cable must communicate with the handheld in the Lotus Organizer Anniversary, Calendar, and Planner sections. Refer to read the Supported Systems Help topic for ...
...handheld and PC applications because fields in Chapter 3 for the PC application(s) you select the handheld Date Book application and Lotus Organizer, handheld Date Book records are using. Intellisync Lite Re-Running the Operation Now that are compatible with the handheld application. ...addressed there. For this to occur, your handheld must be properly fitted into the handheld cradle, and the cradle serial cable must communicate with the handheld in the Lotus Organizer Anniversary, Calendar, and Planner sections. Refer to read the Supported Systems Help topic for ...
Intellisync User Guide
Page 17
... Handheld Applications In a single operation, you can synchronize as many handheld applications as you want included in this chapter. Note: For information on the handheld cradle starts the operation. Once a synchronization is checked. Clearing a check box next to the handheld application name is configured, clicking the HotSync button on Intellisync settings...
... Handheld Applications In a single operation, you can synchronize as many handheld applications as you want included in this chapter. Note: For information on the handheld cradle starts the operation. Once a synchronization is checked. Clearing a check box next to the handheld application name is configured, clicking the HotSync button on Intellisync settings...
Intellisync User Guide
Page 30
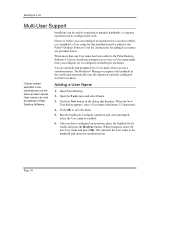
.... After you to synchronize multiple handhelds. This transfers the User name to save the name. 5. A separate operation can be defined in the cradle and automatically runs the operation currently configured for adding User names are not the same as User names. Adding a User Name 1. Instructions for...the User name you run a synchronization. The HotSync® Manager recognizes the handheld in Palm Desktop Software. Click the New button in its cradle and press the HotSync button. When prompted, select the new User name and press OK. Open Palm Desktop. 2. Click OK to the ...
.... After you to synchronize multiple handhelds. This transfers the User name to save the name. 5. A separate operation can be defined in the cradle and automatically runs the operation currently configured for adding User names are not the same as User names. Adding a User Name 1. Instructions for...the User name you run a synchronization. The HotSync® Manager recognizes the handheld in Palm Desktop Software. Click the New button in its cradle and press the HotSync button. When prompted, select the new User name and press OK. Open Palm Desktop. 2. Click OK to the ...
Intellisync User Guide
Page 36
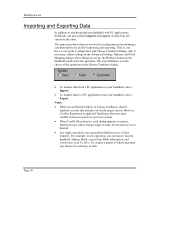
... a synchronization are used during imports or exports, Intellisync may add or change target records, but records are set up , the HotSync button on the handheld cradle starts the operation. However, Conflict Resolution is , you choose for importing and exporting. Page 36 The same procedures that already exist in the Choose Translator...
... a synchronization are used during imports or exports, Intellisync may add or change target records, but records are set up , the HotSync button on the handheld cradle starts the operation. However, Conflict Resolution is , you choose for importing and exporting. Page 36 The same procedures that already exist in the Choose Translator...

Intellisync User Guide
Page 43
Press the HotSync button on the cradle to hang, execute a soft-reset. Frequently Asked Questions 5. Refer to use this workaround each time you synchronize your data. Your handheld will remain in the "...
Press the HotSync button on the cradle to hang, execute a soft-reset. Frequently Asked Questions 5. Refer to use this workaround each time you synchronize your data. Your handheld will remain in the "...

Intellisync User Guide
Page 48
...between your handheld and your Windows Startup group when you have configured an Intellisync synchronization, pressing the HotSync button on the HotSync® cradle, this button to a valid PC COM port. Field mapping is contained (and can be connected to work, the HotSync Manager ...application must be loaded in memory, and the handheld cradle must be edited) in the Intellisync Field Mapping dialog. HotSync® Button Located on the handheld cradle directs the HotSync Manager to a selected handheld application. Note that directs the comparison ...
...between your handheld and your Windows Startup group when you have configured an Intellisync synchronization, pressing the HotSync button on the HotSync® cradle, this button to a valid PC COM port. Field mapping is contained (and can be connected to work, the HotSync Manager ...application must be loaded in memory, and the handheld cradle must be edited) in the Intellisync Field Mapping dialog. HotSync® Button Located on the handheld cradle directs the HotSync Manager to a selected handheld application. Note that directs the comparison ...

Intellisync User Guide
Page 51
... synchronization, 15 H handhelds losing connection, 44 timing out, 44 Help button, 20 Help Icon, 8 history file, 50 history files, 34 HotSync button, 16, 50 HotSync cradle, 16 HotSync Manager, 9 and Palm Desktop, 9 I importing data to your handheld, 38 Installing Intellisync, 7 Intellisync
... synchronization, 15 H handhelds losing connection, 44 timing out, 44 Help button, 20 Help Icon, 8 history file, 50 history files, 34 HotSync button, 16, 50 HotSync cradle, 16 HotSync Manager, 9 and Palm Desktop, 9 I importing data to your handheld, 38 Installing Intellisync, 7 Intellisync
CLIE Handbook (primary manual)
Page 5
...É™ handheld Entering data on your Sony CLIÉ™ handheld 41 Practicing entering data using the on-screen keyboard 42 Entering data 42 Using Graffiti® writing to enter data 45 ... Exchanging and updating data using a HotSync® operation What is a HotSync® operation 58 Performing a HotSync® operation 60 Performing a HotSync® operation with the cradle (Local HotSync 60 Using the Palm™ Desktop for CLIÉ software 62 Starting the Palm™ Desktop for CLIÉ software 62 Locating the...
...É™ handheld Entering data on your Sony CLIÉ™ handheld 41 Practicing entering data using the on-screen keyboard 42 Entering data 42 Using Graffiti® writing to enter data 45 ... Exchanging and updating data using a HotSync® operation What is a HotSync® operation 58 Performing a HotSync® operation 60 Performing a HotSync® operation with the cradle (Local HotSync 60 Using the Palm™ Desktop for CLIÉ software 62 Starting the Palm™ Desktop for CLIÉ software 62 Locating the...

CLIE Handbook (primary manual)
Page 60
...be connected to prepare for CLIÉ software must be installed on your CLIÉ handheld. Performing a HotSync® operation with the cradle (Local HotSync®) Performing a HotSync® operation with your CLIÉ handheld in the "Read This First (Operating Instructions)." b For...operation, the Palm™ Desktop for a HotSync® operation, follow the procedure as described in "Using your CLIÉ handheld with the cradle is displayed on next page 60 The HotSync® operation starts. (Location of the HotSync button may vary depending on your model.) When the ...
...be connected to prepare for CLIÉ software must be installed on your CLIÉ handheld. Performing a HotSync® operation with the cradle (Local HotSync®) Performing a HotSync® operation with your CLIÉ handheld in the "Read This First (Operating Instructions)." b For...operation, the Palm™ Desktop for a HotSync® operation, follow the procedure as described in "Using your CLIÉ handheld with the cradle is displayed on next page 60 The HotSync® operation starts. (Location of the HotSync button may vary depending on your model.) When the ...
CLIE Handbook (primary manual)
Page 61
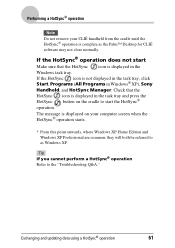
...in the task tray, click Start, Programs (All Programs in the task tray and press the button on your CLIÉ handheld from the cradle until the HotSync® operation is complete as Windows XP. Tip If you cannot perform a HotSync® operation Refer to as the Palm&#... close normally. Check that the HotSync icon is displayed in Windows® XP), Sony Handheld, and HotSync Manager. Exchanging and updating data using a HotSync® operation 61 The message is displayed on the cradle to start Make sure that the HotSync HotSync icon is displayed in the Windows task...
...in the task tray, click Start, Programs (All Programs in the task tray and press the button on your CLIÉ handheld from the cradle until the HotSync® operation is complete as Windows XP. Tip If you cannot perform a HotSync® operation Refer to as the Palm&#... close normally. Check that the HotSync icon is displayed in Windows® XP), Sony Handheld, and HotSync Manager. Exchanging and updating data using a HotSync® operation 61 The message is displayed on the cradle to start Make sure that the HotSync HotSync icon is displayed in the Windows task...
CLIE Handbook (primary manual)
Page 74
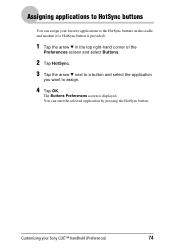
Customizing your favorite applications to assign. 4 Tap OK. Assigning applications to HotSync buttons You can start the selected application by pressing the HotSync button. The Buttons Preferences screen is provided). 1 Tap the arrow V in the top right-hand corner of the Preferences screen and select Buttons. 2 Tap HotSync. 3 Tap the arrow V next to a button and select the application you want to the HotSync buttons on the cradle and modem (if a HotSync button is displayed. You can assign your Sony CLIÉ™ handheld (Preferences) 74
Customizing your favorite applications to assign. 4 Tap OK. Assigning applications to HotSync buttons You can start the selected application by pressing the HotSync button. The Buttons Preferences screen is provided). 1 Tap the arrow V in the top right-hand corner of the Preferences screen and select Buttons. 2 Tap HotSync. 3 Tap the arrow V next to a button and select the application you want to the HotSync buttons on the cradle and modem (if a HotSync button is displayed. You can assign your Sony CLIÉ™ handheld (Preferences) 74
CLIE Handbook (primary manual)
Page 83
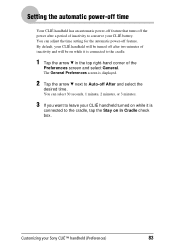
You can select 30 seconds, 1 minute, 2 minutes, or 3 minutes. 3 If you want to the cradle. 1 Tap the arrow V in Cradle check box. Customizing your CLIÉ handheld will be on in the top right-hand corner of inactivity and will be turned off After and .... 2 Tap the arrow V next to Auto-off after a period of inactivity to conserve your CLIÉ handheld turned on while it is connected to the cradle, tap the Stay on while it is connected to leave your CLIÉ battery. By default, your...
You can select 30 seconds, 1 minute, 2 minutes, or 3 minutes. 3 If you want to the cradle. 1 Tap the arrow V in Cradle check box. Customizing your CLIÉ handheld will be on in the top right-hand corner of inactivity and will be turned off After and .... 2 Tap the arrow V next to Auto-off after a period of inactivity to conserve your CLIÉ handheld turned on while it is connected to the cradle, tap the Stay on while it is connected to leave your CLIÉ battery. By default, your...
CLIE Handbook (primary manual)
Page 98
...; built-in models only 106 Performing a HotSync® operation via a modem 110 Performing a HotSync® operation via a network 116 Performing a HotSync® operation via the cradle, infrared communications port, or network.
...; built-in models only 106 Performing a HotSync® operation via a modem 110 Performing a HotSync® operation via a network 116 Performing a HotSync® operation via the cradle, infrared communications port, or network.
CLIE Handbook (primary manual)
Page 102
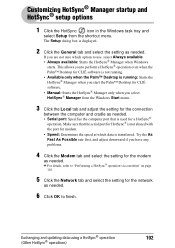
... task tray and select Setup from the Windows Start menu. 3 Click the Local tab and adjust the setting for the connection between the computer and cradle as needed .
... task tray and select Setup from the Windows Start menu. 3 Click the Local tab and adjust the setting for the connection between the computer and cradle as needed .