Quick Start Guide
Page 2
...this manual or the information contained herein at any machine-readable form without notice and may include features such as computers, displays, printers, facsimiles and copiers. SONY CANNOT WARRANT THAT THE FUNCTIONS DESCRIBED IN THIS GUIDE WILL BE UNINTERRUPTED OR ERROR-FREE. Software specifications are office ... not necessarily be reproduced, translated, or reduced to the model and serial numbers when you call your Sony VAIO® computer. Model Number: Serial Number: 2 WEB SITE INFORMATION IS OBTAINED FROM VARIOUS SOURCES AND MAY BE INACCURATE. The software described herein ...
...this manual or the information contained herein at any machine-readable form without notice and may include features such as computers, displays, printers, facsimiles and copiers. SONY CANNOT WARRANT THAT THE FUNCTIONS DESCRIBED IN THIS GUIDE WILL BE UNINTERRUPTED OR ERROR-FREE. Software specifications are office ... not necessarily be reproduced, translated, or reduced to the model and serial numbers when you call your Sony VAIO® computer. Model Number: Serial Number: 2 WEB SITE INFORMATION IS OBTAINED FROM VARIOUS SOURCES AND MAY BE INACCURATE. The software described herein ...

Quick Start Guide
Page 11
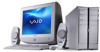
Getting Started Congratulations on your purchase of -the-art computer functionality with the latest audio, video and information technology features. 11 Your new, high-performance, multimedia computer combines state-of the Sony VAIO® computer!
Getting Started Congratulations on your purchase of -the-art computer functionality with the latest audio, video and information technology features. 11 Your new, high-performance, multimedia computer combines state-of the Sony VAIO® computer!
Quick Start Guide
Page 12
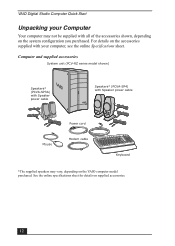
See the online specifications sheet for details on the VAIO computer model purchased. For details on the accessories supplied with all of the accessories shown, depending on the system configuration you purchased. Computer and supplied accessories System unit (PCV-RZ series model shown) Speakers* (PCVA-SP3A) with Speaker power cable Speakers* (PCVA-SP4) with Speaker...
See the online specifications sheet for details on the VAIO computer model purchased. For details on the accessories supplied with all of the accessories shown, depending on the system configuration you purchased. Computer and supplied accessories System unit (PCV-RZ series model shown) Speakers* (PCVA-SP3A) with Speaker power cable Speakers* (PCVA-SP4) with Speaker...
Quick Start Guide
Page 13
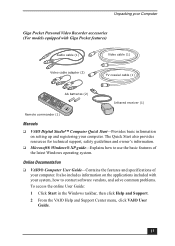
...(1) Video cable (1) Video cable adapter (2) TV coaxial cable (1) AA batteries (2) Infrared receiver (1) Remote commander (1) Manuals ❑ VAIO Digital Studio™ Computer Quick Start-Provides basic information on setting up and registering your system, how to use the basic features of your... computer. Online Documentation ❑ VAIO® Computer User Guide-Contains the features and specifications of the latest Windows operating system. The Quick Start also ...
...(1) Video cable (1) Video cable adapter (2) TV coaxial cable (1) AA batteries (2) Infrared receiver (1) Remote commander (1) Manuals ❑ VAIO Digital Studio™ Computer Quick Start-Provides basic information on setting up and registering your system, how to use the basic features of your... computer. Online Documentation ❑ VAIO® Computer User Guide-Contains the features and specifications of the latest Windows operating system. The Quick Start also ...
Quick Start Guide
Page 14
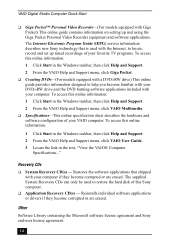
... Windows taskbar, then click Help and Support. 2 From the VAIO Help and Support menu, click VAIO User Guide. 3 Locate the link in the text, "View the VAIO® Computer Specifications..." The Internet Electronic Program Guide (iEPG) service information describes new Sony technology that shipped with your computer if they become familiar with your DVD±RW...
... Windows taskbar, then click Help and Support. 2 From the VAIO Help and Support menu, click VAIO User Guide. 3 Locate the link in the text, "View the VAIO® Computer Specifications..." The Internet Electronic Program Guide (iEPG) service information describes new Sony technology that shipped with your computer if they become familiar with your DVD±RW...
Quick Start Guide
Page 16
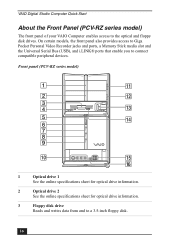
... slot and the Universal Serial Bus (USB), and i.LINK® ports that enable you to a 3.5-inch floppy disk. 16 Front panel (PCV-RZ series model) 1 Optical drive 1 See the online specifications sheet for optical drive information. 2 Optical drive 2 See the online specifications sheet... for optical drive information. 3 Floppy disk drive Reads and writes data from and to connect compatible peripheral devices. VAIO Digital Studio Computer Quick Start About the Front Panel (PCV-RZ series model) The front panel of your VAIO Computer enables access to the optical and floppy disk drives.
... slot and the Universal Serial Bus (USB), and i.LINK® ports that enable you to a 3.5-inch floppy disk. 16 Front panel (PCV-RZ series model) 1 Optical drive 1 See the online specifications sheet for optical drive information. 2 Optical drive 2 See the online specifications sheet... for optical drive information. 3 Floppy disk drive Reads and writes data from and to connect compatible peripheral devices. VAIO Digital Studio Computer Quick Start About the Front Panel (PCV-RZ series model) The front panel of your VAIO Computer enables access to the optical and floppy disk drives.
Quick Start Guide
Page 18
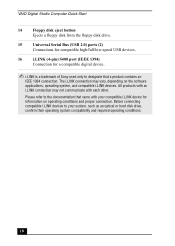
... compatible i.LINK device for a compatible digital device. ✍ i.LINK is a trademark of Sony used only to your system, such as an optical or hard disk drive, confirm their operating system compatibility and required operating conditions. 18 VAIO Digital Studio Computer Quick Start 14 Floppy disk eject button Ejects a floppy disk from the floppy...
... compatible i.LINK device for a compatible digital device. ✍ i.LINK is a trademark of Sony used only to your system, such as an optical or hard disk drive, confirm their operating system compatibility and required operating conditions. 18 VAIO Digital Studio Computer Quick Start 14 Floppy disk eject button Ejects a floppy disk from the floppy...
Quick Start Guide
Page 20
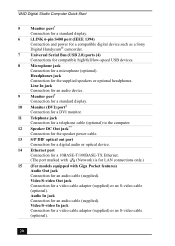
...Connection for a video cable adapter (supplied) or an S-video cable (optional). 20 Headphones jack Connection for a microphone (optional). VAIO Digital Studio Computer Quick Start 5 Monitor port* Connection for a standard display. 6 i.LINK 6-pin S400 port (IEEE 1394) Connection and power ...for a compatible digital device such as a Sony Digital Handycam® camcorder. 7 Universal Serial Bus (USB 2.0) ports (4) Connections for compatible...
...Connection for a video cable adapter (supplied) or an S-video cable (optional). 20 Headphones jack Connection for a microphone (optional). VAIO Digital Studio Computer Quick Start 5 Monitor port* Connection for a standard display. 6 i.LINK 6-pin S400 port (IEEE 1394) Connection and power ...for a compatible digital device such as a Sony Digital Handycam® camcorder. 7 Universal Serial Bus (USB 2.0) ports (4) Connections for compatible...
Quick Start Guide
Page 22
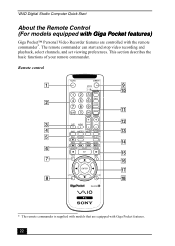
This section describes the basic functions of your remote commander. Remote control MODE III PC 1 2 3 APPLICATION MENU START CLOSE FUNCTION SIZE TV/VIDEO TITLE * The remote commander is supplied with models that are controlled with Giga Pocket features. 22 VAIO Digital Studio Computer Quick Start About the Remote Control (For models equipped with Giga Pocket features) Giga Pocket™ Personal Video Recorder features are equipped with the remote commander*. The remote commander can start and stop video recording and playback, select channels, and set viewing preferences.
This section describes the basic functions of your remote commander. Remote control MODE III PC 1 2 3 APPLICATION MENU START CLOSE FUNCTION SIZE TV/VIDEO TITLE * The remote commander is supplied with models that are controlled with Giga Pocket features. 22 VAIO Digital Studio Computer Quick Start About the Remote Control (For models equipped with Giga Pocket features) Giga Pocket™ Personal Video Recorder features are equipped with the remote commander*. The remote commander can start and stop video recording and playback, select channels, and set viewing preferences.
Quick Start Guide
Page 24
... required). (Note: This function is selected with the Menu button, press to switch from 1 to 3, to close an error message dialog box. The target computer's remote commander software determines the assigned number. (Note: The default setting is not available for other software.) 9 STANDBY button Press to place the system into... software only.) 13 VOLUME button Press to view a shortcut menu of this menu. (Note: For Giga Pocket software, the Select Video Capsules window displays. VAIO Digital Studio Computer Quick Start 7 TITLE button The function of available software applications.
... required). (Note: This function is selected with the Menu button, press to switch from 1 to 3, to close an error message dialog box. The target computer's remote commander software determines the assigned number. (Note: The default setting is not available for other software.) 9 STANDBY button Press to place the system into... software only.) 13 VOLUME button Press to view a shortcut menu of this menu. (Note: For Giga Pocket software, the Select Video Capsules window displays. VAIO Digital Studio Computer Quick Start 7 TITLE button The function of available software applications.

Quick Start Guide
Page 25
... available for Giga Pocket software only.) 15 PLAY STOP button Press to display the root menu during DVD playback. Press again to navigate. When using VAIO Media software, press to display the main menu. 17 Direction and ENTER buttons Press a direction arrow to minimize the window. See the DVD player software...
... available for Giga Pocket software only.) 15 PLAY STOP button Press to display the root menu during DVD playback. Press again to navigate. When using VAIO Media software, press to display the main menu. 17 Direction and ENTER buttons Press a direction arrow to minimize the window. See the DVD player software...
Quick Start Guide
Page 26
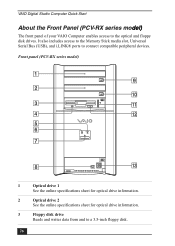
Front panel (PCV-RX series model) 1 Optical drive 1 See the online specifications sheet for optical drive information. 2 Optical drive 2 See the online specifications sheet for optical drive information. 3 ... peripheral devices. It also includes access to the Memory Stick media slot, Universal Serial Bus (USB), and i.LINK® ports to a 3.5-inch floppy disk. 26 VAIO Digital Studio Computer Quick Start About the Front Panel (PCV-RX series model) The front panel of your VAIO Computer enables access to the optical and floppy disk drives.
Front panel (PCV-RX series model) 1 Optical drive 1 See the online specifications sheet for optical drive information. 2 Optical drive 2 See the online specifications sheet for optical drive information. 3 ... peripheral devices. It also includes access to the Memory Stick media slot, Universal Serial Bus (USB), and i.LINK® ports to a 3.5-inch floppy disk. 26 VAIO Digital Studio Computer Quick Start About the Front Panel (PCV-RX series model) The front panel of your VAIO Computer enables access to the optical and floppy disk drives.
Quick Start Guide
Page 28
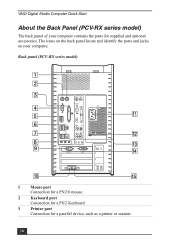
... panel locate and identify the ports and jacks on your computer contains the ports for a parallel device, such as a printer or scanner. 28 VAIO Digital Studio Computer Quick Start About the Back Panel (PCV-RX series model) The back panel of your computer. Back panel (PCV-RX series model) KEYBOARD MOUSE MONITOR PRINTER i.LINK S400 ACT...
... panel locate and identify the ports and jacks on your computer contains the ports for a parallel device, such as a printer or scanner. 28 VAIO Digital Studio Computer Quick Start About the Back Panel (PCV-RX series model) The back panel of your computer. Back panel (PCV-RX series model) KEYBOARD MOUSE MONITOR PRINTER i.LINK S400 ACT...
Quick Start Guide
Page 32
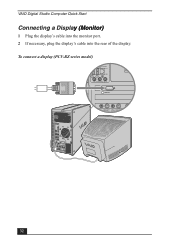
VAIO Digital Studio Computer Quick Start Connecting a Display (Monitor) 1 Plug the display's cable into the monitor port. 2 If necessary, plug the display's cable into the rear of the display. To connect a display (PCV-RZ series model) 32
VAIO Digital Studio Computer Quick Start Connecting a Display (Monitor) 1 Plug the display's cable into the monitor port. 2 If necessary, plug the display's cable into the rear of the display. To connect a display (PCV-RZ series model) 32
Quick Start Guide
Page 34
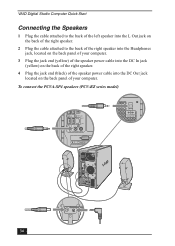
To connect the PCVA-SP4 speakers (PCV-RZ series model) USB 4 34 VAIO Digital Studio Computer Quick Start Connecting the Speakers 1 Plug the cable attached to the back of the left speaker into the L Out jack on the back of the ...right speaker. 2 Plug the cable attached to the back of the right speaker into the Headphones jack, located on the back panel of your computer. 3 Plug the jack end (yellow) of the speaker power cable into the DC In jack (yellow) on the back of the right speaker. 4 Plug the...
To connect the PCVA-SP4 speakers (PCV-RZ series model) USB 4 34 VAIO Digital Studio Computer Quick Start Connecting the Speakers 1 Plug the cable attached to the back of the left speaker into the L Out jack on the back of the ...right speaker. 2 Plug the cable attached to the back of the right speaker into the Headphones jack, located on the back panel of your computer. 3 Plug the jack end (yellow) of the speaker power cable into the DC In jack (yellow) on the back of the right speaker. 4 Plug the...
Quick Start Guide
Page 36
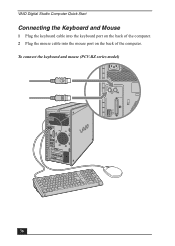
To connect the keyboard and mouse (PCV-RZ series model) KEYBOARD MOUSE PRINTER i.LINK S400 OPTICAL 36 VAIO Digital Studio Computer Quick Start Connecting the Keyboard and Mouse 1 Plug the keyboard cable into the keyboard port on the back of the computer. 2 Plug the mouse cable into the mouse port on the back of the computer.
To connect the keyboard and mouse (PCV-RZ series model) KEYBOARD MOUSE PRINTER i.LINK S400 OPTICAL 36 VAIO Digital Studio Computer Quick Start Connecting the Keyboard and Mouse 1 Plug the keyboard cable into the keyboard port on the back of the computer. 2 Plug the mouse cable into the mouse port on the back of the computer.

Quick Start Guide
Page 38
To connect the power cords (PCV-RZ series model) KEYBOARD MOUSE PRINTER 38 VAIO Digital Studio Computer Quick Start Connecting the Power Cords 1 Plug the power cord into the back of the computer. 2 Plug both the display and computer power cords into a grounded AC wall outlet or a power strip.
To connect the power cords (PCV-RZ series model) KEYBOARD MOUSE PRINTER 38 VAIO Digital Studio Computer Quick Start Connecting the Power Cords 1 Plug the power cord into the back of the computer. 2 Plug both the display and computer power cords into a grounded AC wall outlet or a power strip.

Quick Start Guide
Page 40
VAIO Digital Studio Computer Quick Start Registering your Computer Take advantage of Sony's commitment to quality customer support and receive these steps to set up Connection The first time you turn on the unit. Setting Up your Dial-...later. See the Warranty Card for more details. ✍ You are provided with your computer: ❑ Sony Customer Support - Follow the on , follow these benefits by registering your computer. ❑ Limited warranty - If you are not able to register your computer during the first session, you are prompted to troubleshoot problems you turn your...
VAIO Digital Studio Computer Quick Start Registering your Computer Take advantage of Sony's commitment to quality customer support and receive these steps to set up Connection The first time you turn on the unit. Setting Up your Dial-...later. See the Warranty Card for more details. ✍ You are provided with your computer: ❑ Sony Customer Support - Follow the on , follow these benefits by registering your computer. ❑ Limited warranty - If you are not able to register your computer during the first session, you are prompted to troubleshoot problems you turn your...

Quick Start Guide
Page 42
VAIO Digital Studio Computer Quick Start Turning Off your Computer Follow these steps when you are ready to turn off your computer for an extended period of time, you plan to turn off your computer for a short period of time. The Turn Off Computer dialog box appears. 2 Select the Turn Off option. ✍ ... saving your documents. 3 Wait for more than six seconds to force your system to repeat this procedure if your computer 1 Click Start in the Windows taskbar, then select Turn Off Computer. About the power button If your system stops responding, press and hold the Power button for your...
VAIO Digital Studio Computer Quick Start Turning Off your Computer Follow these steps when you are ready to turn off your computer for an extended period of time, you plan to turn off your computer for a short period of time. The Turn Off Computer dialog box appears. 2 Select the Turn Off option. ✍ ... saving your documents. 3 Wait for more than six seconds to force your system to repeat this procedure if your computer 1 Click Start in the Windows taskbar, then select Turn Off Computer. About the power button If your system stops responding, press and hold the Power button for your...

Quick Start Guide
Page 43
Your computer may not be equipped with all of the features or software discussed in the online VAIO® Computer User Guide. Troubleshooting This section describes how to troubleshoot some common problems. You can find more detailed information on how to troubleshoot your computer's hardware features and preinstalled software in this section, depending on the system configuration purchased. 43
Your computer may not be equipped with all of the features or software discussed in the online VAIO® Computer User Guide. Troubleshooting This section describes how to troubleshoot some common problems. You can find more detailed information on how to troubleshoot your computer's hardware features and preinstalled software in this section, depending on the system configuration purchased. 43


