Quick Start Guide
Page 14
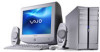
...are erased. Other Software Library containing the Microsoft software license agreement and Sony end-user license agreement. 14 To access this online information: 1 Click Start in the text, "View the VAIO® Computer Specifications..." Recovery CDs ❑ System Recovery CD(s) - To access ... corrupted or are erased. Restores the software applications that is used to restore the hard disk of this Sony computer. ❑ Application Recovery CD(s) - VAIO Digital Studio Computer Quick Start ❑ Giga Pocket™ Personal Video Recorder-(For models equipped with Giga Pocket...
...are erased. Other Software Library containing the Microsoft software license agreement and Sony end-user license agreement. 14 To access this online information: 1 Click Start in the text, "View the VAIO® Computer Specifications..." Recovery CDs ❑ System Recovery CD(s) - To access ... corrupted or are erased. Restores the software applications that is used to restore the hard disk of this Sony computer. ❑ Application Recovery CD(s) - VAIO Digital Studio Computer Quick Start ❑ Giga Pocket™ Personal Video Recorder-(For models equipped with Giga Pocket...
Quick Start Guide
Page 16
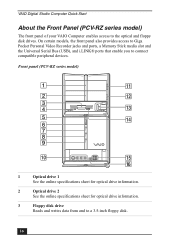
... series model) The front panel of your VAIO Computer enables access to a 3.5-inch floppy disk. 16 Front panel (PCV-RZ series model) 1 Optical drive 1 See the online specifications sheet for optical drive information. 2 Optical drive 2 See the online specifications sheet for optical drive information. 3 Floppy disk drive Reads and writes data from and to the...
... series model) The front panel of your VAIO Computer enables access to a 3.5-inch floppy disk. 16 Front panel (PCV-RZ series model) 1 Optical drive 1 See the online specifications sheet for optical drive information. 2 Optical drive 2 See the online specifications sheet for optical drive information. 3 Floppy disk drive Reads and writes data from and to the...
Quick Start Guide
Page 17
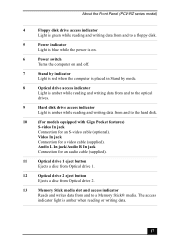
... cable (optional). About the Front Panel (PCV-RZ series model) 4 Floppy disk drive access indicator Light is green while reading and writing data from and to a floppy disk. 5 Power indicator Light is blue while the power is on. 6 Power switch Turns the computer on and off. 7 Stand by indicator ...Light is red when the computer is placed in Stand by mode. 8 Optical drive access indicator...
... cable (optional). About the Front Panel (PCV-RZ series model) 4 Floppy disk drive access indicator Light is green while reading and writing data from and to a floppy disk. 5 Power indicator Light is blue while the power is on. 6 Power switch Turns the computer on and off. 7 Stand by indicator ...Light is red when the computer is placed in Stand by mode. 8 Optical drive access indicator...
Quick Start Guide
Page 18
VAIO Digital Studio Computer Quick Start 14 Floppy disk eject button Ejects a floppy disk from the floppy disk drive. 15 Universal Serial Bus (USB 2.0) ports (2) Connections for compatible high/full/low-speed USB devices. 16 i.LINK (4-pin) S400 port (IEEE 1394) Connection for a compatible digital device. ✍ i.LINK is a trademark of Sony... used only to designate that came with your system, such as an optical or hard disk drive, confirm their operating system compatibility and required operating conditions. 18 ...
VAIO Digital Studio Computer Quick Start 14 Floppy disk eject button Ejects a floppy disk from the floppy disk drive. 15 Universal Serial Bus (USB 2.0) ports (2) Connections for compatible high/full/low-speed USB devices. 16 i.LINK (4-pin) S400 port (IEEE 1394) Connection for a compatible digital device. ✍ i.LINK is a trademark of Sony... used only to designate that came with your system, such as an optical or hard disk drive, confirm their operating system compatibility and required operating conditions. 18 ...
Quick Start Guide
Page 24
...: This function is selected with the Menu button, press to switch from the music drive (hard disk drive) to the CD. 12 CHANNEL button Press to close an error message dialog box. VAIO Digital Studio Computer Quick Start 7 TITLE button The function of available software applications. CLOSE button Press to change the remote...
...: This function is selected with the Menu button, press to switch from the music drive (hard disk drive) to the CD. 12 CHANNEL button Press to close an error message dialog box. VAIO Digital Studio Computer Quick Start 7 TITLE button The function of available software applications. CLOSE button Press to change the remote...
Quick Start Guide
Page 26
...The front panel of your VAIO Computer enables access to connect compatible peripheral devices. It also includes access to the Memory Stick media slot, Universal Serial Bus (USB), and i.LINK® ports to the optical and floppy disk drives. Front panel (PCV-RX series model) 1 ...Optical drive 1 See the online specifications sheet for optical drive information. 2 Optical drive 2 See the online specifications sheet for optical drive information. 3 Floppy disk drive Reads and writes data from and...
...The front panel of your VAIO Computer enables access to connect compatible peripheral devices. It also includes access to the Memory Stick media slot, Universal Serial Bus (USB), and i.LINK® ports to the optical and floppy disk drives. Front panel (PCV-RX series model) 1 ...Optical drive 1 See the online specifications sheet for optical drive information. 2 Optical drive 2 See the online specifications sheet for optical drive information. 3 Floppy disk drive Reads and writes data from and...
Quick Start Guide
Page 27
About the Front Panel (PCV-RX series model) 4 Floppy disk drive access indicator Light is green while reading and writing data from and to a floppy disk. 5 Optical drive access indicator Light is amber while reading and writing data from and to the optical drives. 6 Hard disk drive access indicator Light is ... Ejects a disc from Optical drive 2. 11 Memory Stick® media slot Reads and writes data from and to the hard disk. 7 Power button and power indicator Turns the computer on the back. 27 The 4-pin i.LINK port is located on the front panel and the 6-pin i.LINK port is...
About the Front Panel (PCV-RX series model) 4 Floppy disk drive access indicator Light is green while reading and writing data from and to a floppy disk. 5 Optical drive access indicator Light is amber while reading and writing data from and to the optical drives. 6 Hard disk drive access indicator Light is ... Ejects a disc from Optical drive 2. 11 Memory Stick® media slot Reads and writes data from and to the hard disk. 7 Power button and power indicator Turns the computer on the back. 27 The 4-pin i.LINK port is located on the front panel and the 6-pin i.LINK port is...
Quick Start Guide
Page 44
... Press the Ctrl+Alt+Delete keys. Windows attempts to locate and close the application. * Certain VAIO computers are adjusted correctly. (See the manual that came with a floppy disk drive. Why did my computer or software stop responding? You can try to close the software application that the...; If you are using a bootable floppy disk). ❑ Confirm that a CD is not in stand by mode by pressing any key on . VAIO Digital Studio Computer Quick Start About VAIO Computer Functions My computer does not start. ❑ Verify that the computer is plugged into a power source and that...
... Press the Ctrl+Alt+Delete keys. Windows attempts to locate and close the application. * Certain VAIO computers are adjusted correctly. (See the manual that came with a floppy disk drive. Why did my computer or software stop responding? You can try to close the software application that the...; If you are using a bootable floppy disk). ❑ Confirm that a CD is not in stand by mode by pressing any key on . VAIO Digital Studio Computer Quick Start About VAIO Computer Functions My computer does not start. ❑ Verify that the computer is plugged into a power source and that...
Quick Start Guide
Page 50
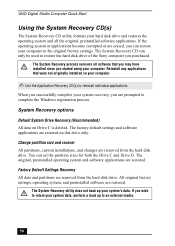
The System Recovery CD can only be used to restore the hard disk drive of the Sony computer you wish to retain your computer. Reinstall any applications that you may have installed since you can set the partition sizes for both the Drive C and Drive D.... perform a back up your hard disk drive and restores the operating system and all software that were not originally installed on this drive only. You can restore your computer. ✍ Use the Application Recovery CD(s) to the original factory settings. VAIO Digital Studio Computer Quick Start Using the System Recovery ...
The System Recovery CD can only be used to restore the hard disk drive of the Sony computer you wish to retain your computer. Reinstall any applications that you may have installed since you can set the partition sizes for both the Drive C and Drive D.... perform a back up your hard disk drive and restores the operating system and all software that were not originally installed on this drive only. You can restore your computer. ✍ Use the Application Recovery CD(s) to the original factory settings. VAIO Digital Studio Computer Quick Start Using the System Recovery ...
Quick Start Guide
Page 51
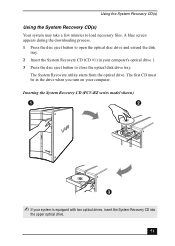
... eject button to load necessary files. Inserting the System Recovery CD (PCV-RZ series model shown) ✍ If your computer. A blue screen appears during the downloading process. 1 Press the disc eject button to open the optical disc drive and extend the disk tray. 2 Insert the System Recovery CD (CD #1) in the drive when... starts from the optical drive. Using the System Recovery CD(s) Using the System Recovery CD(s) Your system may take a few minutes to close the optical disk drive tray.
... eject button to load necessary files. Inserting the System Recovery CD (PCV-RZ series model shown) ✍ If your computer. A blue screen appears during the downloading process. 1 Press the disc eject button to open the optical disc drive and extend the disk tray. 2 Insert the System Recovery CD (CD #1) in the drive when... starts from the optical drive. Using the System Recovery CD(s) Using the System Recovery CD(s) Your system may take a few minutes to close the optical disk drive tray.
System Reference Manual
Page 12
... 63 Boot Screen 64 Exit Screen 65 Upgrading and Maintaining Components 23 Removing the Side Panel 24 To remove the side panel (PCV-RZ series model 24 To remove the side panel (PCV-RX series model 25 Replacing the Side Panel 26 To replace the side panel...Memory Modules 39 Removing a Slot Cover 42 Covering an Open I/O Slot 43 Installing an Additional Hard Disk Drive 44 To identify additional hard disk space 48 Removing the Power Supply (PCV-RX series models 49 Replacing the Power Supply (PCV-RX series model 50 Chapter 4 - xii VAIO Digital Studio System Reference Manual Chapter 3 -
... 63 Boot Screen 64 Exit Screen 65 Upgrading and Maintaining Components 23 Removing the Side Panel 24 To remove the side panel (PCV-RZ series model 24 To remove the side panel (PCV-RX series model 25 Replacing the Side Panel 26 To replace the side panel...Memory Modules 39 Removing a Slot Cover 42 Covering an Open I/O Slot 43 Installing an Additional Hard Disk Drive 44 To identify additional hard disk space 48 Removing the Power Supply (PCV-RX series models 49 Replacing the Power Supply (PCV-RX series model 50 Chapter 4 - xii VAIO Digital Studio System Reference Manual Chapter 3 -
System Reference Manual
Page 13
... Supervisor Passwords 68 Beep Code Error Messages 69 PCI Configuration Status and Error Messages 70 DMA Channel Assignments 72 System I /O and Expansion Slots 80 Floppy Disk Drive and Controller 80 Hard Drives and Controller 80 Optical Drives 81 System BIOS 81 Index 83 Specifications 77 Processor ...77 Chipset ...77 AGP Bus...
... Supervisor Passwords 68 Beep Code Error Messages 69 PCI Configuration Status and Error Messages 70 DMA Channel Assignments 72 System I /O and Expansion Slots 80 Floppy Disk Drive and Controller 80 Hard Drives and Controller 80 Optical Drives 81 System BIOS 81 Index 83 Specifications 77 Processor ...77 Chipset ...77 AGP Bus...
System Reference Manual
Page 17
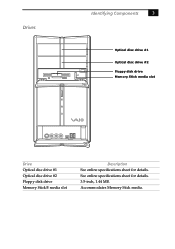
Accommodates Memory Stick media. See online specifications sheet for details. Drives Identifying Components 3 Optical disc drive #1 Optical disc drive #2 Floppy disk drive Memory Stick media slot Drive Optical disc drive #1 Optical disc drive #2 Floppy disk drive Memory Stick® media slot Description See online specifications sheet for details. 3.5-inch, 1.44 MB.
Accommodates Memory Stick media. See online specifications sheet for details. Drives Identifying Components 3 Optical disc drive #1 Optical disc drive #2 Floppy disk drive Memory Stick media slot Drive Optical disc drive #1 Optical disc drive #2 Floppy disk drive Memory Stick® media slot Description See online specifications sheet for details. 3.5-inch, 1.44 MB.
System Reference Manual
Page 18
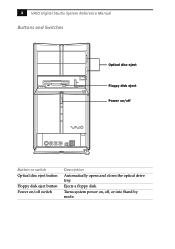
Turns system power on /off , or into Stand by mode. Ejects a floppy disk. 4 VAIO Digital Studio System Reference Manual Buttons and Switches Optical disc eject Floppy disk eject Power on/off Button or switch Optical disc eject button Floppy disk eject button Power on , off switch Description Automatically opens and closes the optical drive tray.
Turns system power on /off , or into Stand by mode. Ejects a floppy disk. 4 VAIO Digital Studio System Reference Manual Buttons and Switches Optical disc eject Floppy disk eject Power on/off Button or switch Optical disc eject button Floppy disk eject button Power on , off switch Description Automatically opens and closes the optical drive tray.

System Reference Manual
Page 19
... mode. Light is amber while reading and writing data from and to a floppy disk. Light is red when the computer is on. Indicators Identifying Components 5 Floppy disk drive access Power Standby Optical disc drive access Hard disk drive access Indicator Floppy disk drive access indicator Power indicator Standby indicator Optical disc drive access indicator Hard...
... mode. Light is amber while reading and writing data from and to a floppy disk. Light is red when the computer is on. Indicators Identifying Components 5 Floppy disk drive access Power Standby Optical disc drive access Hard disk drive access Indicator Floppy disk drive access indicator Power indicator Standby indicator Optical disc drive access indicator Hard...

System Reference Manual
Page 27
... back panel of the system is a trademark of the system can supply power from the computer to the documentation that a product contains an IEEE 1394 connection. Before connecting compatible i.LINK ...port. The i.LINK connection may not communicate with your system, such as an optical disc or hard disk drive, confirm their operating system compatibility and required operating conditions. Identifying Components 13 i.LINK S400 (IEEE ...LINK is the connection for information on the back panel of Sony used only to your compatible i.LINK device for the supplied speaker power cable.
... back panel of the system is a trademark of the system can supply power from the computer to the documentation that a product contains an IEEE 1394 connection. Before connecting compatible i.LINK ...port. The i.LINK connection may not communicate with your system, such as an optical disc or hard disk drive, confirm their operating system compatibility and required operating conditions. Identifying Components 13 i.LINK S400 (IEEE ...LINK is the connection for information on the back panel of Sony used only to your compatible i.LINK device for the supplied speaker power cable.
System Reference Manual
Page 32
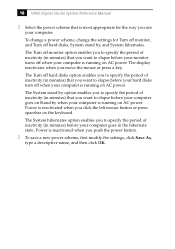
...click Save As, type a descriptive name, and then click OK. 18 VAIO Digital Studio System Reference Manual 2 Select the power scheme that is most appropriate for Turn off monitor, and Turn off when your computer goes on the keyboard. The display reactivates when you click the left mouse...The Turn off monitor option enables you to specify the period of inactivity (in minutes) before your hard disks turn off hard disks, System stand by when your computer goes in minutes) that you want to elapse before your computer is running on AC power. Power is running on AC power.
...click Save As, type a descriptive name, and then click OK. 18 VAIO Digital Studio System Reference Manual 2 Select the power scheme that is most appropriate for Turn off monitor, and Turn off when your computer goes on the keyboard. The display reactivates when you click the left mouse...The Turn off monitor option enables you to specify the period of inactivity (in minutes) before your hard disks turn off hard disks, System stand by when your computer goes in minutes) that you want to elapse before your computer is running on AC power. Power is running on AC power.

System Reference Manual
Page 58
...Removing the Side Panel" on the new drive as a slave device (see your new drive's documentation for configuration instructions). Sony recommends an ATA-100 hard disk drive to take full advantage of the system's features. ✍ Some models, such as Configure-to all attached peripheral ... on page 24). The hard disk drive access light is lit when either drive is equipped with an available bay to accommodate an additional 3.5-inch hard disk drive. 44 VAIO Digital Studio System Reference Manual Installing an Additional Hard Disk Drive Your computer is activated, however, the drives...
...Removing the Side Panel" on the new drive as a slave device (see your new drive's documentation for configuration instructions). Sony recommends an ATA-100 hard disk drive to take full advantage of the system's features. ✍ Some models, such as Configure-to all attached peripheral ... on page 24). The hard disk drive access light is lit when either drive is equipped with an available bay to accommodate an additional 3.5-inch hard disk drive. 44 VAIO Digital Studio System Reference Manual Installing an Additional Hard Disk Drive Your computer is activated, however, the drives...
System Reference Manual
Page 59
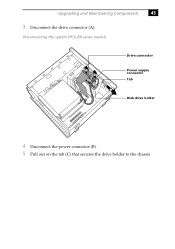
Upgrading and Maintaining Components 45 3 Disconnect the drive connector (A). Disconnecting the system (PCV-RX series model) A B C Drive connector Power supply connector Tab Disk drive holder 4 Disconnect the power connector (B). 5 Pull out on the tab (C) that secures the drive holder to the chassis.
Upgrading and Maintaining Components 45 3 Disconnect the drive connector (A). Disconnecting the system (PCV-RX series model) A B C Drive connector Power supply connector Tab Disk drive holder 4 Disconnect the power connector (B). 5 Pull out on the tab (C) that secures the drive holder to the chassis.

System Reference Manual
Page 60
Installing an internal hard disk drive (PCV-RX series model) 7 Slide the new drive into the bottom part of the drive holder and align the holes on each side of the drive holder. 8 Secure the drive to the drive holder using screws in each of the two holes on each side of the drive holder (screws are provided with the new drive). Do not overtighten the screws. 46 VAIO Digital Studio System Reference Manual 6 Slide the drive holder up and out.
Installing an internal hard disk drive (PCV-RX series model) 7 Slide the new drive into the bottom part of the drive holder and align the holes on each side of the drive holder. 8 Secure the drive to the drive holder using screws in each of the two holes on each side of the drive holder (screws are provided with the new drive). Do not overtighten the screws. 46 VAIO Digital Studio System Reference Manual 6 Slide the drive holder up and out.


