
Quick Start Guide
Page 3
... Length 1.0 mW (CD-Read) 760-810 nm (CD) 3 Safety Information and Caution Your computer's installed optical drives may vary, depending on your product or for the Sony Service Center nearest you have purchased. For questions regarding your installed optical drives. See the online specifications sheet for details on the system configuration you , visit the...
... Length 1.0 mW (CD-Read) 760-810 nm (CD) 3 Safety Information and Caution Your computer's installed optical drives may vary, depending on your product or for the Sony Service Center nearest you have purchased. For questions regarding your installed optical drives. See the online specifications sheet for details on the system configuration you , visit the...
Quick Start Guide
Page 4
❑ To prevent fire or shock hazard, do not expose your nearest Sony Service Center. As the laser beam used in this product will increase eye hazard. For DVD-RW: Danger-...telephone to beam. Avoid direct exposure to beam. to the eyes, do not open . To change the backup battery, please contact your desktop to rain or moisture. ❑ To avoid electrical shock, do not attempt to qualified personnel only. Avoid direct exposure to beam. ...❑ Do not use only No. 26 AWG or larger telecommunication line cord. 4 Refer servicing to disassemble the drive cabinet.
❑ To prevent fire or shock hazard, do not expose your nearest Sony Service Center. As the laser beam used in this product will increase eye hazard. For DVD-RW: Danger-...telephone to beam. Avoid direct exposure to beam. to the eyes, do not open . To change the backup battery, please contact your desktop to rain or moisture. ❑ To avoid electrical shock, do not attempt to qualified personnel only. Avoid direct exposure to beam. ...❑ Do not use only No. 26 AWG or larger telecommunication line cord. 4 Refer servicing to disassemble the drive cabinet.
Quick Start Guide
Page 14
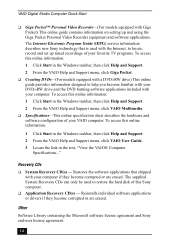
... the software applications that is used to help you become familiar with your DVD±RW drive and the DVD burning software applications included with your VAIO computer. Other Software Library containing the Microsoft software license agreement and Sony end-user license agreement. 14 Reinstalls individual software applications or drivers if they become corrupted...
... the software applications that is used to help you become familiar with your DVD±RW drive and the DVD burning software applications included with your VAIO computer. Other Software Library containing the Microsoft software license agreement and Sony end-user license agreement. 14 Reinstalls individual software applications or drivers if they become corrupted...
Quick Start Guide
Page 16
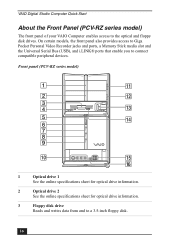
... to the optical and floppy disk drives. VAIO Digital Studio Computer Quick Start About the Front Panel (PCV-RZ series model) The front panel of your VAIO Computer enables access to connect compatible peripheral devices. Front panel (PCV-RZ series model) 1 Optical drive 1 See the online specifications sheet for optical drive information. 2 Optical drive 2 See the online specifications sheet for...
... to the optical and floppy disk drives. VAIO Digital Studio Computer Quick Start About the Front Panel (PCV-RZ series model) The front panel of your VAIO Computer enables access to connect compatible peripheral devices. Front panel (PCV-RZ series model) 1 Optical drive 1 See the online specifications sheet for optical drive information. 2 Optical drive 2 See the online specifications sheet for...
Quick Start Guide
Page 17
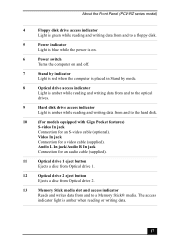
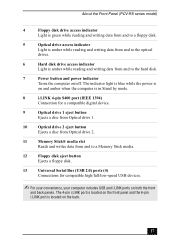
... Memory Stick® media. Audio L In jack/Audio R In jack Connection for a video cable (supplied). About the Front Panel (PCV-RZ series model) 4 Floppy disk drive access indicator Light is green while reading and writing data from and to a floppy disk. 5 Power indicator Light is blue while the... power is on. 6 Power switch Turns the computer on and off. 7 Stand by indicator Light is red when the computer is placed in Stand by mode. 8 Optical drive access indicator Light is amber while reading and writing data from and to the optical...
... Memory Stick® media. Audio L In jack/Audio R In jack Connection for a video cable (supplied). About the Front Panel (PCV-RZ series model) 4 Floppy disk drive access indicator Light is green while reading and writing data from and to a floppy disk. 5 Power indicator Light is blue while the... power is on. 6 Power switch Turns the computer on and off. 7 Stand by indicator Light is red when the computer is placed in Stand by mode. 8 Optical drive access indicator Light is amber while reading and writing data from and to the optical...
Quick Start Guide
Page 18
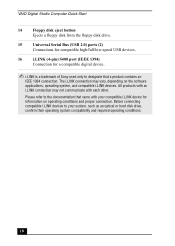
... conditions and proper connection. The i.LINK connection may not communicate with each other. VAIO Digital Studio Computer Quick Start 14 Floppy disk eject button Ejects a floppy disk from the floppy disk drive. 15 Universal Serial Bus (USB 2.0) ports (2) Connections for compatible high/full/low...(4-pin) S400 port (IEEE 1394) Connection for a compatible digital device. ✍ i.LINK is a trademark of Sony used only to designate that came with your system, such as an optical or hard disk drive, confirm their operating system compatibility and required operating conditions. 18
... conditions and proper connection. The i.LINK connection may not communicate with each other. VAIO Digital Studio Computer Quick Start 14 Floppy disk eject button Ejects a floppy disk from the floppy disk drive. 15 Universal Serial Bus (USB 2.0) ports (2) Connections for compatible high/full/low...(4-pin) S400 port (IEEE 1394) Connection for a compatible digital device. ✍ i.LINK is a trademark of Sony used only to designate that came with your system, such as an optical or hard disk drive, confirm their operating system compatibility and required operating conditions. 18
Quick Start Guide
Page 24
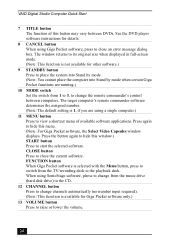
... Video Capsules window displays. Press the button again to close the current software. VAIO Digital Studio Computer Quick Start 7 TITLE button The function of available software applications. The target computer's remote commander software determines the assigned number. (Note: The default setting is ...not available for details. 8 CANCEL button When using SonicStage software, plress to change from the music drive (hard disk drive) to the CD. 12...
... Video Capsules window displays. Press the button again to close the current software. VAIO Digital Studio Computer Quick Start 7 TITLE button The function of available software applications. The target computer's remote commander software determines the assigned number. (Note: The default setting is ...not available for details. 8 CANCEL button When using SonicStage software, plress to change from the music drive (hard disk drive) to the CD. 12...
Quick Start Guide
Page 26
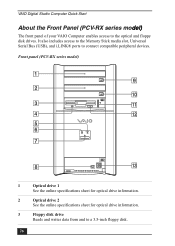
... to the optical and floppy disk drives. VAIO Digital Studio Computer Quick Start About the Front Panel (PCV-RX series model) The front panel of your VAIO Computer enables access to connect compatible peripheral devices. Front panel (PCV-RX series model) 1 Optical drive 1 See the online specifications sheet for optical drive information. 2 Optical drive 2 See the online specifications sheet for...
... to the optical and floppy disk drives. VAIO Digital Studio Computer Quick Start About the Front Panel (PCV-RX series model) The front panel of your VAIO Computer enables access to connect compatible peripheral devices. Front panel (PCV-RX series model) 1 Optical drive 1 See the online specifications sheet for optical drive information. 2 Optical drive 2 See the online specifications sheet for...
Quick Start Guide
Page 27
...power is on and amber when the computer is in Stand by mode. 8 i.LINK 4-pin S400 port (IEEE 1394) Connection for a compatible digital device. 9 Optical drive 1 eject button Ejects a disc from Optical drive 1. 10 Optical drive 2 eject button Ejects a disc from Optical drive 2. 11 Memory Stick® media...high/full/low-speed USB devices. ✍ For your convenience, your computer includes USB and i.LINK ports on both the front and back panels. About the Front Panel (PCV-RX series model) 4 Floppy disk drive access indicator Light is green while reading and writing data from and to...
...power is on and amber when the computer is in Stand by mode. 8 i.LINK 4-pin S400 port (IEEE 1394) Connection for a compatible digital device. 9 Optical drive 1 eject button Ejects a disc from Optical drive 1. 10 Optical drive 2 eject button Ejects a disc from Optical drive 2. 11 Memory Stick® media...high/full/low-speed USB devices. ✍ For your convenience, your computer includes USB and i.LINK ports on both the front and back panels. About the Front Panel (PCV-RX series model) 4 Floppy disk drive access indicator Light is green while reading and writing data from and to...
Quick Start Guide
Page 44
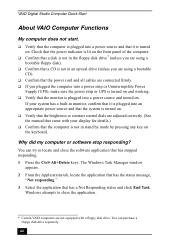
... software stop responding? You can purchase a floppy disk drive separately. 44 You can try to close the software application that has stopped responding. 1 Press the Ctrl+Alt+Delete keys. VAIO Digital Studio Computer Quick Start About VAIO Computer Functions My computer does not start. ❑ Verify that the computer is plugged into a power source and that it...
... software stop responding? You can purchase a floppy disk drive separately. 44 You can try to close the software application that has stopped responding. 1 Press the Ctrl+Alt+Delete keys. VAIO Digital Studio Computer Quick Start About VAIO Computer Functions My computer does not start. ❑ Verify that the computer is plugged into a power source and that it...

Quick Start Guide
Page 45
......" 45 This online document describes the hardware configuration of my computer's preinstalled hardware? About VAIO Computer Functions If your computer does not respond or the application does not close, try the following steps: 1 Save any open . You can I find details about the drives, cards, and memory modules that are installed on your system by viewing...
......" 45 This online document describes the hardware configuration of my computer's preinstalled hardware? About VAIO Computer Functions If your computer does not respond or the application does not close, try the following steps: 1 Save any open . You can I find details about the drives, cards, and memory modules that are installed on your system by viewing...
Quick Start Guide
Page 49
System And Application Recovery CD(s) You can restore your hard drive. 49 You may correct the problem. If you experience a problem with your computer, reinstalling an individual application or device driver may not need to recover the entire contents of your system, individual software applications, or drivers, using the Recovery CDs.
System And Application Recovery CD(s) You can restore your hard drive. 49 You may correct the problem. If you experience a problem with your computer, reinstalling an individual application or device driver may not need to recover the entire contents of your system, individual software applications, or drivers, using the Recovery CDs.
Quick Start Guide
Page 50
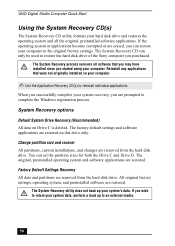
...become corrupted or are prompted to complete the Windows registration process. You can only be used to restore the hard disk drive of the Sony computer you wish to an external media. 50 The System Recovery utility does not back up to retain your system data, ...CD can set the partition sizes for both the Drive C and Drive D. System Recovery options Default System Drive Recovery (Recommended) All data on your computer. ✍ Use the Application Recovery CD(s) to the original factory settings. VAIO Digital Studio Computer Quick Start Using the System Recovery CD(s) The System...
...become corrupted or are prompted to complete the Windows registration process. You can only be used to restore the hard disk drive of the Sony computer you wish to an external media. 50 The System Recovery utility does not back up to retain your system data, ...CD can set the partition sizes for both the Drive C and Drive D. System Recovery options Default System Drive Recovery (Recommended) All data on your computer. ✍ Use the Application Recovery CD(s) to the original factory settings. VAIO Digital Studio Computer Quick Start Using the System Recovery CD(s) The System...
Quick Start Guide
Page 51
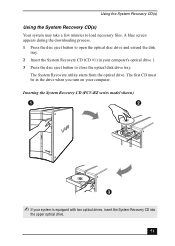
... eject button to open the optical disc drive and extend the disk tray. 2 Insert the System Recovery CD (CD #1) in the drive when you turn on your computer. Inserting the System Recovery CD (PCV-RZ series model shown) ✍ If your computer's optical drive 1. 3 Press the disc eject button to... load necessary files. The System Recovery utility starts from the optical drive. Using the System Recovery CD...
... eject button to open the optical disc drive and extend the disk tray. 2 Insert the System Recovery CD (CD #1) in the drive when you turn on your computer. Inserting the System Recovery CD (PCV-RZ series model shown) ✍ If your computer's optical drive 1. 3 Press the disc eject button to... load necessary files. The System Recovery utility starts from the optical drive. Using the System Recovery CD...
Quick Start Guide
Page 53
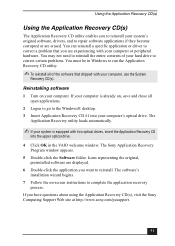
...Logon to go to the Windows® desktop. 3 Insert Application Recovery CD #1 into your computer is equipped with two optical drives, insert the Application Recovery CD into the upper optical drive. 4 Click OK in the VAIO welcome window. Icons representing the original, ...computer's optical drive. The Application Recovery utility loads automatically. ✍ If your system is already on -screen instructions to reinstall the entire contents of the software that you have questions about using the Application Recovery CD(s), visit the Sony Computing Support Web site at http://www.sony...
...Logon to go to the Windows® desktop. 3 Insert Application Recovery CD #1 into your computer is equipped with two optical drives, insert the Application Recovery CD into the upper optical drive. 4 Click OK in the VAIO welcome window. Icons representing the original, ...computer's optical drive. The Application Recovery utility loads automatically. ✍ If your system is already on -screen instructions to reinstall the entire contents of the software that you have questions about using the Application Recovery CD(s), visit the Sony Computing Support Web site at http://www.sony...
Quick Start Guide
Page 54
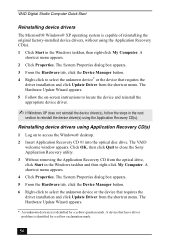
...and then right-click My Computer. The System Properties dialog box appears. 3 From the Hardware tab, click the Device Manager button. 4 Right-click to access the Windows® desktop. 2 Insert Application Recovery CD #1 into the optical disc drive. The VAIO welcome window appears. The ... installation and click Update Driver from the optical drive, click Start in the next section to close the Sony Application Recovery utility. 3 Without removing the Application Recovery CD from the shortcut menu. VAIO Digital Studio Computer Quick Start Reinstalling device drivers The Microsoft®...
...and then right-click My Computer. The System Properties dialog box appears. 3 From the Hardware tab, click the Device Manager button. 4 Right-click to access the Windows® desktop. 2 Insert Application Recovery CD #1 into the optical disc drive. The VAIO welcome window appears. The ... installation and click Update Driver from the optical drive, click Start in the next section to close the Sony Application Recovery utility. 3 Without removing the Application Recovery CD from the shortcut menu. VAIO Digital Studio Computer Quick Start Reinstalling device drivers The Microsoft®...
Quick Start Guide
Page 55
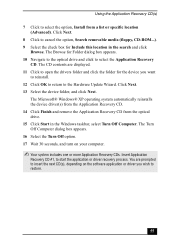
... option, Search removable media (floppy, CD-ROM...). 9 Select the check box for Folder dialog box appears. 10 Navigate to the optical drive and click to start the application or driver recovery process. The Microsoft® Windows® XP operating system automatically reinstalls the device driver...Insert Application Recovery CD #1, to select the Application Recovery CD. The CD contents are prompted to insert the next CD(s), depending on your computer. ✍ Your system includes one or more Application Recovery CDs. Click Next. 13 Select the device folder, and click Next. Using...
... option, Search removable media (floppy, CD-ROM...). 9 Select the check box for Folder dialog box appears. 10 Navigate to the optical drive and click to start the application or driver recovery process. The Microsoft® Windows® XP operating system automatically reinstalls the device driver...Insert Application Recovery CD #1, to select the Application Recovery CD. The CD contents are prompted to insert the next CD(s), depending on your computer. ✍ Your system includes one or more Application Recovery CDs. Click Next. 13 Select the device folder, and click Next. Using...
PCV-RZ Series Hard Disk Drive Replacement Instructions
Page 1
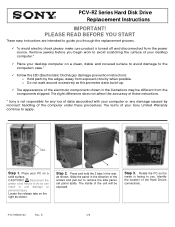
... difference does not affect the accuracy of the computer under these instructions. * Sony is facing to the computer's case.* 9 Follow the ESD (Electrostatic Discharge) damage prevention instructions: o Hold parts by incorrect handling of these procedures. Place your desktop computer on a clean, stable and covered surface to... the location of the electronic components shown in unit damage or personal injury. Tabs Step 1. PCV-RZ Series Hard Disk Drive Replacement Instructions IMPORTANT! Step 2. PLEASE READ BEFORE YOU START These easy instructions are intended to guide...
... difference does not affect the accuracy of the computer under these instructions. * Sony is facing to the computer's case.* 9 Follow the ESD (Electrostatic Discharge) damage prevention instructions: o Hold parts by incorrect handling of these procedures. Place your desktop computer on a clean, stable and covered surface to... the location of the electronic components shown in unit damage or personal injury. Tabs Step 1. PCV-RZ Series Hard Disk Drive Replacement Instructions IMPORTANT! Step 2. PLEASE READ BEFORE YOU START These easy instructions are intended to guide...
PCV-RZ Series Hard Disk Drive Replacement Instructions
Page 2
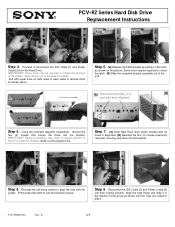
... the Tabs are in place. 2 Step 9. Step 7. [A] Slide New Hard drive inside the bracket. Reconnect the IDE Cable [1] and Power Cable [2] into the...four (4) screws previously removed, securing new drive into their original position. Slide out the original drive. Some force may be required to remove... to disconnect the IDE Cable [1] and Power Cable [2] from the Hard Drive. IMPORTANT! Pull with the guides. Step 5. [A] Release the HDD bracket... of the unit. [A] Ensure that secure the Drive into the bracket. B 2/2 IMPORTANT! Using the enclosed magnetic screwdriver, remove ...
... the Tabs are in place. 2 Step 9. Step 7. [A] Slide New Hard drive inside the bracket. Reconnect the IDE Cable [1] and Power Cable [2] into the...four (4) screws previously removed, securing new drive into their original position. Slide out the original drive. Some force may be required to remove... to disconnect the IDE Cable [1] and Power Cable [2] from the Hard Drive. IMPORTANT! Pull with the guides. Step 5. [A] Release the HDD bracket... of the unit. [A] Ensure that secure the Drive into the bracket. B 2/2 IMPORTANT! Using the enclosed magnetic screwdriver, remove ...

VAIO User Guide (primary manual)
Page 4
...Reinstalls individual software applications or drivers if they become familiar with your DVD±RW drive and the DVD burning software applications included with a DVD±RW drive) This online guide provides information designed to contact software vendors, and solve common ...Recovery CDs can only be used with your VAIO computer. Other Software Library containing the Microsoft software license agreement and Sony end-user license agreement. The Internet Electronic Program Guide (iEPG) service information describes new Sony technology that shipped with the Internet, to ...
...Reinstalls individual software applications or drivers if they become familiar with your DVD±RW drive and the DVD burning software applications included with a DVD±RW drive) This online guide provides information designed to contact software vendors, and solve common ...Recovery CDs can only be used with your VAIO computer. Other Software Library containing the Microsoft software license agreement and Sony end-user license agreement. The Internet Electronic Program Guide (iEPG) service information describes new Sony technology that shipped with the Internet, to ...


