Quick Start Guide
Page 4
... shall be easily accessible. For CD-RW: Danger-Invisible laser radiation when open . ❑ To prevent fire or shock hazard, do not expose your nearest Sony Service Center. Avoid direct exposure to reduce the risk of optical instruments with this product is harmful to the eyes, do not attempt to disassemble... laser radiation when open . For DVD-RW: Danger-Visible and invisible laser radiation when open the cabinet. To change the backup battery, please contact your desktop to beam.
... shall be easily accessible. For CD-RW: Danger-Invisible laser radiation when open . ❑ To prevent fire or shock hazard, do not expose your nearest Sony Service Center. Avoid direct exposure to reduce the risk of optical instruments with this product is harmful to the eyes, do not attempt to disassemble... laser radiation when open . For DVD-RW: Danger-Visible and invisible laser radiation when open the cabinet. To change the backup battery, please contact your desktop to beam.
Quick Start Guide
Page 53
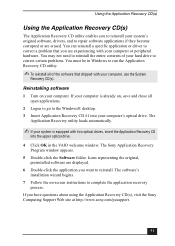
.... The software's installation wizard begins. 7 Follow the on , save and close all open applications. 2 Logon to go to the Windows® desktop. 3 Insert Application Recovery CD #1 into the upper optical drive. 4 Click OK in Windows to run the Application Recovery CD utility. ✍... your computer, use the System Recovery CD(s). If you have questions about using the Application Recovery CD(s), visit the Sony Computing Support Web site at http://www.sony.com/pcsupport. 53 You can reinstall a specific application or driver to correct certain problems. You must be in the VAIO welcome ...
.... The software's installation wizard begins. 7 Follow the on , save and close all open applications. 2 Logon to go to the Windows® desktop. 3 Insert Application Recovery CD #1 into the upper optical drive. 4 Click OK in Windows to run the Application Recovery CD utility. ✍... your computer, use the System Recovery CD(s). If you have questions about using the Application Recovery CD(s), visit the Sony Computing Support Web site at http://www.sony.com/pcsupport. 53 You can reinstall a specific application or driver to correct certain problems. You must be in the VAIO welcome ...
Quick Start Guide
Page 54
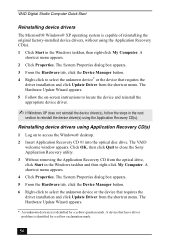
...From the Hardware tab, click the Device Manager button. 6 Right-click to access the Windows® desktop. 2 Insert Application Recovery CD #1 into the optical disc drive. A shortcut menu appears. 2 ...(s) using the Application Recovery CD(s). A shortcut menu appears. 4 Click Properties. VAIO Digital Studio Computer Quick Start Reinstalling device drivers The Microsoft® Windows® XP operating system is...Start in the Windows taskbar and then right-click My Computer. Click OK, then click Quit to close the Sony Application Recovery utility. 3 Without removing the Application Recovery CD...
...From the Hardware tab, click the Device Manager button. 6 Right-click to access the Windows® desktop. 2 Insert Application Recovery CD #1 into the optical disc drive. A shortcut menu appears. 2 ...(s) using the Application Recovery CD(s). A shortcut menu appears. 4 Click Properties. VAIO Digital Studio Computer Quick Start Reinstalling device drivers The Microsoft® Windows® XP operating system is...Start in the Windows taskbar and then right-click My Computer. Click OK, then click Quit to close the Sony Application Recovery utility. 3 Without removing the Application Recovery CD...
PCV-RZ Series Hard Disk Drive Replacement Instructions
Page 1
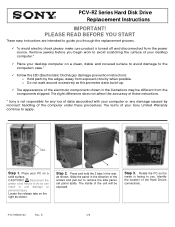
...computer under these procedures. Press and hold the 2 tabs in the illustrations may be exposed. Tabs Step 1. Locate the release tabs on the right as shown. P/N T99860132 Rev. CAUTION! Identify the location of the arrows and pull out to do so can result in the direction of the Hard Drive's connections. PCV...to you begin work to avoid scratching the surface of your desktop computer on a solid surface. The terms of your desktop computer.* 9 Place your Sony Limited Warranty continue to the computer's case.* 9 Follow the ESD (Electrostatic Discharge) damage prevention ...
...computer under these procedures. Press and hold the 2 tabs in the illustrations may be exposed. Tabs Step 1. Locate the release tabs on the right as shown. P/N T99860132 Rev. CAUTION! Identify the location of the arrows and pull out to do so can result in the direction of the Hard Drive's connections. PCV...to you begin work to avoid scratching the surface of your desktop computer on a solid surface. The terms of your desktop computer.* 9 Place your Sony Limited Warranty continue to the computer's case.* 9 Follow the ESD (Electrostatic Discharge) damage prevention ...

VAIO User Guide (primary manual)
Page 52
.... 3. Observe the proper safety precautions when you upgrade your computer. Shut down on the tab located at : http://www.sony.com/pcsupport. Desktops and click to hold a second standard 3½-inch hard disk drive. See Before upgrading your Sony computer. Rem ov ing the driv e holder (PCV- Your system can download the System Reference Manual from...
.... 3. Observe the proper safety precautions when you upgrade your computer. Shut down on the tab located at : http://www.sony.com/pcsupport. Desktops and click to hold a second standard 3½-inch hard disk drive. See Before upgrading your Sony computer. Rem ov ing the driv e holder (PCV- Your system can download the System Reference Manual from...

VAIO User Guide (primary manual)
Page 61
...computer is equipped with two optical drives, insert the Application Recovery CD into your computer. The Application Recovery utility loads automatically. Click OK in the VAIO welcome window. Follow the on your computer...'s optical drive. Page 61 The software's installation wizard begins. 7. Insert Application Recovery CD #1 into the upper optical drive. 4. The Sony...CD(s), visit the Sony Computing Support Web site at http://www.sony.com/pcsupport. Icons...
...computer is equipped with two optical drives, insert the Application Recovery CD into your computer. The Application Recovery utility loads automatically. Click OK in the VAIO welcome window. Follow the on your computer...'s optical drive. Page 61 The software's installation wizard begins. 7. Insert Application Recovery CD #1 into the upper optical drive. 4. The Sony...CD(s), visit the Sony Computing Support Web site at http://www.sony.com/pcsupport. Icons...

VAIO User Guide (primary manual)
Page 63
..., and turn on the software application or driver you want to insert the next CD(s), depending on your computer. The VAIO welcome window appears. A shortcut menu appears. 4. Click to the Hardware Update Wizard. You are displayed. ...Advanced). Insert Application Recovery CD #1, to close the Sony Application Recovery utility. 3. Click OK, then click Quit to start the application or driver recovery process. The Turn Off Computer dialog box appears. 16. Select the Turn Off ... for the device you wish to the Windows® desktop. 2. Logon to go to restore.
..., and turn on the software application or driver you want to insert the next CD(s), depending on your computer. The VAIO welcome window appears. A shortcut menu appears. 4. Click to the Hardware Update Wizard. You are displayed. ...Advanced). Insert Application Recovery CD #1, to close the Sony Application Recovery utility. 3. Click OK, then click Quit to start the application or driver recovery process. The Turn Off Computer dialog box appears. 16. Select the Turn Off ... for the device you wish to the Windows® desktop. 2. Logon to go to restore.

