

System Reference Manual
Page 2
... is governed by third parties. Sony, VAIO, the VAIO logo, VAIO Digital Studio, and i.LINK are trademarks or registered trademarks of Sony. Notice to any time without notice. All rights reserved. This product contains software owned by Sony and licensed by the terms of Intel Corporation. Model Numbers: PCV-RX462DS/ PCV-RX463DS/PCV-RX465DS/ PCV-RX470DS/PCV-RX480DS/ PCV-RX490TV Serial Number ii Intel, and...
... is governed by third parties. Sony, VAIO, the VAIO logo, VAIO Digital Studio, and i.LINK are trademarks or registered trademarks of Sony. Notice to any time without notice. All rights reserved. This product contains software owned by Sony and licensed by the terms of Intel Corporation. Model Numbers: PCV-RX462DS/ PCV-RX463DS/PCV-RX465DS/ PCV-RX470DS/PCV-RX480DS/ PCV-RX490TV Serial Number ii Intel, and...

System Reference Manual
Page 5
... qualifié. ! This device complies with the limits for a Class B digital device, pursuant to comply with Part 15 of the Rules. This equipment has been tested and found to Part 15 of FCC Rules. For questions regarding your product or for FCC-related matters... 1-800-961-7669 in accordance with Part 15 of Conformity Trade Name: SONY Model No.: PCV-RX462DS PCV-RX463DS PCV-RX465DS PCV-RX470DS PCV-RX480DS PCV-RX490TV Responsible Party: Sony Electronics Inc. This equipment generates, uses, and can be reached at http://www.sony.com/pcsupport. If this device must ...
... qualifié. ! This device complies with the limits for a Class B digital device, pursuant to comply with Part 15 of the Rules. This equipment has been tested and found to Part 15 of FCC Rules. For questions regarding your product or for FCC-related matters... 1-800-961-7669 in accordance with Part 15 of Conformity Trade Name: SONY Model No.: PCV-RX462DS PCV-RX463DS PCV-RX465DS PCV-RX470DS PCV-RX480DS PCV-RX490TV Responsible Party: Sony Electronics Inc. This equipment generates, uses, and can be reached at http://www.sony.com/pcsupport. If this device must ...
System Reference Manual
Page 6
...the operations of the equipment. All cables used to determine the quantity of the RENs should not exceed five (5.0). Only peripherals (such as computer input/ output devices, terminals, and printers) that to which the receiver is connected. ❑ Consult the dealer or an experienced radio... advance notice is not practical, the telephone company will provide advance notice in order for the calling area. FCC Part 68 This equipment complies with Part 68 of your authority to maintain uninterrupted service. vi Also, you will notify you to make changes in order ...
...the operations of the equipment. All cables used to determine the quantity of the RENs should not exceed five (5.0). Only peripherals (such as computer input/ output devices, terminals, and printers) that to which the receiver is connected. ❑ Consult the dealer or an experienced radio... advance notice is not practical, the telephone company will provide advance notice in order for the calling area. FCC Part 68 This equipment complies with Part 68 of your authority to maintain uninterrupted service. vi Also, you will notify you to make changes in order ...
System Reference Manual
Page 11
... Consumer Guidelines (Canada vii Disposal of 1991 (United States) .... Contents Notice to Users ii Owner's Record ii Safety Information and Caution iii Regulatory Information v FCC Part 68 vi Telephone Consumer Protection Act of Lithium Battery vii Industry Canada Notice ix Avis de L'industrie Canada ix Chapter 1 - Identifying Components 1 Front View...2 Drives...
... Consumer Guidelines (Canada vii Disposal of 1991 (United States) .... Contents Notice to Users ii Owner's Record ii Safety Information and Caution iii Regulatory Information v FCC Part 68 vi Telephone Consumer Protection Act of Lithium Battery vii Industry Canada Notice ix Avis de L'industrie Canada ix Chapter 1 - Identifying Components 1 Front View...2 Drives...
System Reference Manual
Page 47
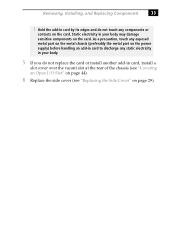
.... 5 If you do not touch any static electricity in your body may damage sensitive components on the card. As a precaution, touch any exposed metal part on the metal chassis (preferably the metal part on the power supply) before handling an add-in card to discharge any components or contacts on the card.
.... 5 If you do not touch any static electricity in your body may damage sensitive components on the card. As a precaution, touch any exposed metal part on the metal chassis (preferably the metal part on the power supply) before handling an add-in card to discharge any components or contacts on the card.
System Reference Manual
Page 49
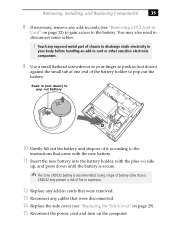
... holder to the instructions that were disconnected. 14 Replace the side cover (see "Removing a PCI Add-in Card" on the computer. Removing, Installing, and Replacing Components 35 8 If necessary, remove any add-in cards (see "Replacing the Side Cover" on...present a risk of fire or explosion. 12 Replace any add-in cards that were removed. 13 Reconnect any exposed metal part of it according to pop out the battery. Push in card or other than a CR2032 may also need to the ... handling an add-in (not down until the battery is secure. ✍ The Sony CR2032 battery is recommended.
... holder to the instructions that were disconnected. 14 Replace the side cover (see "Removing a PCI Add-in Card" on the computer. Removing, Installing, and Replacing Components 35 8 If necessary, remove any add-in cards (see "Replacing the Side Cover" on...present a risk of fire or explosion. 12 Replace any add-in cards that were removed. 13 Reconnect any exposed metal part of it according to pop out the battery. Push in card or other than a CR2032 may also need to the ... handling an add-in (not down until the battery is secure. ✍ The Sony CR2032 battery is recommended.

System Reference Manual
Page 51
...50). 6 Remove the screw that secures the AGP add-in card to the chassis. 7 Press down the computer, and unplug the power cord. 1 Choose the size of the AGP slot. The maximum memory size is ... table. Hold the memory module only by its anti-static package. Touch any exposed metal part of the memory modules. RIMM memory is expandable to discharge static electricity in size and speed... RIMM or CRIMM modules. 2 If necessary, remove the memory module you purchased it through the VAIO Direct Web site. ✍ Use only PC-800 Rambus RIMM memory modules. The BIOS automatically ...
...50). 6 Remove the screw that secures the AGP add-in card to the chassis. 7 Press down the computer, and unplug the power cord. 1 Choose the size of the AGP slot. The maximum memory size is ... table. Hold the memory module only by its anti-static package. Touch any exposed metal part of the memory modules. RIMM memory is expandable to discharge static electricity in size and speed... RIMM or CRIMM modules. 2 If necessary, remove the memory module you purchased it through the VAIO Direct Web site. ✍ Use only PC-800 Rambus RIMM memory modules. The BIOS automatically ...

System Reference Manual
Page 52
...your body. ! The Giga Pocket card is a fragile hardware component, standard in the PCV-RX490TV model. 9 Align the module over the appropriate socket, noting the location of pin 1 on the module and pin 1 on the card. 38 VAIO Digital Studio™ System Reference Manual 8 Remove the AGP add-in card. ✍ Grasp ...the card with one hand on each end, and gently pull up as you rock the card from side to discharge any exposed metal part on the metal chassis (preferably the ...
...your body. ! The Giga Pocket card is a fragile hardware component, standard in the PCV-RX490TV model. 9 Align the module over the appropriate socket, noting the location of pin 1 on the module and pin 1 on the card. 38 VAIO Digital Studio™ System Reference Manual 8 Remove the AGP add-in card. ✍ Grasp ...the card with one hand on each end, and gently pull up as you rock the card from side to discharge any exposed metal part on the metal chassis (preferably the ...
System Reference Manual
Page 55
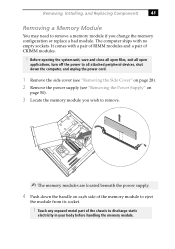
Touch any exposed metal part of the chassis to eject the module from its socket. ! The computer ships with a pair of RIMM modules and a pair of CRIMM modules. ! Before opening the system unit, save and close all open files, exit all open ...applications, turn off the power to all attached peripheral devices, shut down the computer, and unplug the power cord. 1 Remove the side cover (see "Removing the Side Cover" on page 28). 2 Remove the power supply (see "Removing the Power...
Touch any exposed metal part of the chassis to eject the module from its socket. ! The computer ships with a pair of RIMM modules and a pair of CRIMM modules. ! Before opening the system unit, save and close all open files, exit all open ...applications, turn off the power to all attached peripheral devices, shut down the computer, and unplug the power cord. 1 Remove the side cover (see "Removing the Side Cover" on page 28). 2 Remove the power supply (see "Removing the Power...
System Reference Manual
Page 61
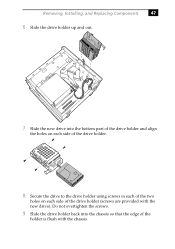
Removing, Installing, and Replacing Components 47 6 Slide the drive holder up and out. 7 Slide the new drive into the chassis so that the edge of the drive holder (screws are provided with the chassis. Do not overtighten the screws. 9 Slide the drive holder back into the bottom part of the drive holder and align the holes on each side of the drive holder. 8 Secure the drive to the drive holder using screws in each of the two holes on each side of the holder is flush with the new drive).
Removing, Installing, and Replacing Components 47 6 Slide the drive holder up and out. 7 Slide the new drive into the chassis so that the edge of the drive holder (screws are provided with the chassis. Do not overtighten the screws. 9 Slide the drive holder back into the bottom part of the drive holder and align the holes on each side of the drive holder. 8 Secure the drive to the drive holder using screws in each of the two holes on each side of the holder is flush with the new drive).

System Reference Manual
Page 132
... 18 specifications for 112 expansion slots - See Also slots F fan connectors 69 CPU-FAN 69 PWR-FAN 69 fax card - 118 VAIO Digital Studio™ System Reference Manual installing additional 3.5 drive 45 DVD-ROM drive performance of 11, 12 IDE connectors 59 IEEE1394 - See Also ...system memory memory configuration specifications 110 memory module connector 56 removing 41 specifications 110 messages error 97 status and error 98 See modem card FCC Part 68 vi floppy disk drive connector 55 specifications 113 front panel header 54 front view 2 buttons and switches 6 connectors 7, 8 drives 4...
... 18 specifications for 112 expansion slots - See Also slots F fan connectors 69 CPU-FAN 69 PWR-FAN 69 fax card - 118 VAIO Digital Studio™ System Reference Manual installing additional 3.5 drive 45 DVD-ROM drive performance of 11, 12 IDE connectors 59 IEEE1394 - See Also ...system memory memory configuration specifications 110 memory module connector 56 removing 41 specifications 110 messages error 97 status and error 98 See modem card FCC Part 68 vi floppy disk drive connector 55 specifications 113 front panel header 54 front view 2 buttons and switches 6 connectors 7, 8 drives 4...
Marketing Specifications
Page 1
... registration)* Limited Warranty One Year Parts and Labor (upon registration; 90 days without written permission is a trademark of varying software packages and add-on the Sony Desktop Computer are subject to any combination of Sony. DVD-ROM/40X max. Personal...Accessible capacity may not communicate with an i.LINK connector may vary. * Certain restrictions apply. ** Requires payment of Intel Corporation. PCV-RX463DS Sony VAIO Digital Studio™ Video Audio Integrated Operation Ppernotcieusmso4r FEATURES • Intel® Pentium® 4 processor 1.40 GHz† •...
... registration)* Limited Warranty One Year Parts and Labor (upon registration; 90 days without written permission is a trademark of varying software packages and add-on the Sony Desktop Computer are subject to any combination of Sony. DVD-ROM/40X max. Personal...Accessible capacity may not communicate with an i.LINK connector may vary. * Certain restrictions apply. ** Requires payment of Intel Corporation. PCV-RX463DS Sony VAIO Digital Studio™ Video Audio Integrated Operation Ppernotcieusmso4r FEATURES • Intel® Pentium® 4 processor 1.40 GHz† •...


