
User Guide
Page 2
...on the back of a separate user license agreement. Updates and additions to software may not necessarily be identical to this product. Sony, VAIO, the VAIO logo, VAIO Smart, VAIO Digital Studio, Media Park, DVgate, Media Bar, Handycam, Mavica, PictureGear and i.LINK are trademarks or registered trademarks of such ... institutions. Subscriptions to online service providers may not be transported or used outside the United States. Model Number: PCV-RX260DS/PCV-RX270DS/ PCV-RX280DS Serial Number 2 VAIO Digital Studio™ User Guide NOTICE © 2000 Sony Electronics Inc.
...on the back of a separate user license agreement. Updates and additions to software may not necessarily be identical to this product. Sony, VAIO, the VAIO logo, VAIO Smart, VAIO Digital Studio, Media Park, DVgate, Media Bar, Handycam, Mavica, PictureGear and i.LINK are trademarks or registered trademarks of such ... institutions. Subscriptions to online service providers may not be transported or used outside the United States. Model Number: PCV-RX260DS/PCV-RX270DS/ PCV-RX280DS Serial Number 2 VAIO Digital Studio™ User Guide NOTICE © 2000 Sony Electronics Inc.

User Guide
Page 6
... discontinuance of the RENs should be certain of the number of each transmitted page or on public coin service provided by a Sony Service Center or Sony authorized agent. This equipment cannot be advised of your fax software documentation. Connection to Party Line Service is subject to state ... à la norme NMB-003 du Canada. But if advance notice is experienced with Canadian ICES-003. For the Sony Service Center nearest you believe it is necessary. VAIO Digital Studio™ User Guide ringing in response to an incoming call 1-888-4SONYPC (1-888-476-6972). For more ...
... discontinuance of the RENs should be certain of the number of each transmitted page or on public coin service provided by a Sony Service Center or Sony authorized agent. This equipment cannot be advised of your fax software documentation. Connection to Party Line Service is subject to state ... à la norme NMB-003 du Canada. But if advance notice is experienced with Canadian ICES-003. For the Sony Service Center nearest you believe it is necessary. VAIO Digital Studio™ User Guide ringing in response to an incoming call 1-888-4SONYPC (1-888-476-6972). For more ...

User Guide
Page 9
Contents Welcome 11 Choosing an Ergonomic Location for Your Computer 11 Front Panel Overview 12 Back Panel Overview 14 VAIO® Action Setup 19 Presetting i.LINK® devices 20 Sony Digital Media Park Applications ....23 Movie Shaker 24 PictureGear 27 Using a Digital Video Camera Recorder 29 Configuring your VAIO Digital Studio™ .31 Hard Drive Partition 31 Defragmenting your Hard Disk Drive 31 i.LINK (IEEE1394) Compatibility 31 Enabling Ethernet 33 System and Application Recovery CD(s) .35 Using the System Recovery CD(s 35 9
Contents Welcome 11 Choosing an Ergonomic Location for Your Computer 11 Front Panel Overview 12 Back Panel Overview 14 VAIO® Action Setup 19 Presetting i.LINK® devices 20 Sony Digital Media Park Applications ....23 Movie Shaker 24 PictureGear 27 Using a Digital Video Camera Recorder 29 Configuring your VAIO Digital Studio™ .31 Hard Drive Partition 31 Defragmenting your Hard Disk Drive 31 i.LINK (IEEE1394) Compatibility 31 Enabling Ethernet 33 System and Application Recovery CD(s) .35 Using the System Recovery CD(s 35 9

User Guide
Page 10
VAIO Digital Studio™ User Guide Using the Application Recovery CD(s 37 Troubleshooting 39 Topics 39 Notes on Use 50 Resources 55 For Answers to Your Software Questions 56 Specifications PCV-RX260DS 59 Specifications PCV-RX270DS/RX280DS 61 Index 63 10
VAIO Digital Studio™ User Guide Using the Application Recovery CD(s 37 Troubleshooting 39 Topics 39 Notes on Use 50 Resources 55 For Answers to Your Software Questions 56 Specifications PCV-RX260DS 59 Specifications PCV-RX270DS/RX280DS 61 Index 63 10
User Guide
Page 11
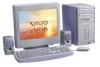
... eight inches of space on the left and back sides of you, with good back support and armrests. Use the palmrest only briefly, for your Sony VAIO Digital Studio™ computer! A footrest may strain muscles or tendons. ❑ Furniture and posture - Welcome Thank you for purchasing your new computer. Position the display...
... eight inches of space on the left and back sides of you, with good back support and armrests. Use the palmrest only briefly, for your Sony VAIO Digital Studio™ computer! A footrest may strain muscles or tendons. ❑ Furniture and posture - Welcome Thank you for purchasing your new computer. Position the display...

User Guide
Page 12
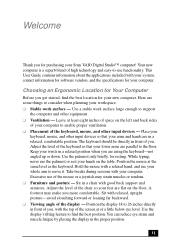
VAIO Digital Studio™ User Guide ❑ Lighting - Proper lighting adds to avoid bright spots on the display. Front panel (PCV-RX260DS/PCV-RX270DS/PCV-RX280DS) DRIVE 12 You can also purchase accessories for your display that a product contains an IEEE1394 connector. Front Panel Overview The front panel of Sony... used only to the DVD, CDRW, and diskette drives. It also includes Universal Serial Bus (USB) and i.LINK® ports to connect USB devices, compatible digital equipment, or other . Use indirect lighting to your VAIO Digital Studio Computer...
VAIO Digital Studio™ User Guide ❑ Lighting - Proper lighting adds to avoid bright spots on the display. Front panel (PCV-RX260DS/PCV-RX270DS/PCV-RX280DS) DRIVE 12 You can also purchase accessories for your display that a product contains an IEEE1394 connector. Front Panel Overview The front panel of Sony... used only to the DVD, CDRW, and diskette drives. It also includes Universal Serial Bus (USB) and i.LINK® ports to connect USB devices, compatible digital equipment, or other . Use indirect lighting to your VAIO Digital Studio Computer...

User Guide
Page 14
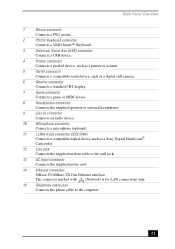
VAIO Digital Studio™ User Guide Back Panel Overview The back panel of your computer. The icons on the back panel locate and identify the connectors on your computer contains the connectors for supplied and optional accessories. Back panel (PCV-RX260DS) KEYBOARD MOUSE USB SERIAL PRINTER MONITOR HEADPHONES GAME LINE IN MIC 2 i.LINK S400 LINE TELEPHONE 14
VAIO Digital Studio™ User Guide Back Panel Overview The back panel of your computer. The icons on the back panel locate and identify the connectors on your computer contains the connectors for supplied and optional accessories. Back panel (PCV-RX260DS) KEYBOARD MOUSE USB SERIAL PRINTER MONITOR HEADPHONES GAME LINE IN MIC 2 i.LINK S400 LINE TELEPHONE 14
User Guide
Page 15
... 14 Ethernet connector 10Base-T/100Base-TX Fast Ethernet interface. Back Panel Overview 1 Mouse connector Connects a PS/2 mouse. 2 PS/2® Keyboard connector Connects a VAIO Smart™ Keyboard. 3 Universal Serial Bus (USB) connector Connects a USB device. 4 Printer connector Connects a parallel device, such as a printer or ...10 Microphone connector Connects a microphone (optional). 11 i.LINK 6-pin connector (IEEE1394) Connects a compatible digital device such as a Sony Digital Handycam® Camcorder. 12 Line jack Connects the supplied modem cable to the computer. 15
... 14 Ethernet connector 10Base-T/100Base-TX Fast Ethernet interface. Back Panel Overview 1 Mouse connector Connects a PS/2 mouse. 2 PS/2® Keyboard connector Connects a VAIO Smart™ Keyboard. 3 Universal Serial Bus (USB) connector Connects a USB device. 4 Printer connector Connects a parallel device, such as a printer or ...10 Microphone connector Connects a microphone (optional). 11 i.LINK 6-pin connector (IEEE1394) Connects a compatible digital device such as a Sony Digital Handycam® Camcorder. 12 Line jack Connects the supplied modem cable to the computer. 15
User Guide
Page 17
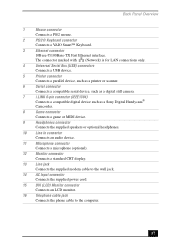
...Serial connector Connects a compatible serial device, such as a digital still camera. 7 i.LINK 6-pin connector (IEEE1394) Connects a compatible digital device such as a Sony Digital Handycam® Camcorder. 8 Game connector Connects a game or MIDI device. 9 Headphones connector Connects the supplied speakers or optional headphones. 10 Line In connector... to the computer. 17 Back Panel Overview 1 Mouse connector Connects a PS/2 mouse. 2 PS/2® Keyboard connector Connects a VAIO Smart™ Keyboard. 3 Ethernet connector 10Base-T/100Base-TX Fast Ethernet interface.
...Serial connector Connects a compatible serial device, such as a digital still camera. 7 i.LINK 6-pin connector (IEEE1394) Connects a compatible digital device such as a Sony Digital Handycam® Camcorder. 8 Game connector Connects a game or MIDI device. 9 Headphones connector Connects the supplied speakers or optional headphones. 10 Line In connector... to the computer. 17 Back Panel Overview 1 Mouse connector Connects a PS/2 mouse. 2 PS/2® Keyboard connector Connects a VAIO Smart™ Keyboard. 3 Ethernet connector 10Base-T/100Base-TX Fast Ethernet interface.

User Guide
Page 19
...and drop feature to place any application into the list box. 4 The Confirmation Application Name window appears showing you the application you want to open VAIO Action Setup. 2 Click the S Key you have selected. Outlook Express ❑ S2 - The corresponding applications appear in the list box on... settings: ❑ S1 - DVGate Motion ❑ S6 - To change the settings of the S Keys 1 From the Start menu, select Programs > VAIO Action Setup > VAIO Action Setup. ✍ You can also double-click on the right. ✍ You may now type a new name and description, if desired.
...and drop feature to place any application into the list box. 4 The Confirmation Application Name window appears showing you the application you want to open VAIO Action Setup. 2 Click the S Key you have selected. Outlook Express ❑ S2 - The corresponding applications appear in the list box on... settings: ❑ S1 - DVGate Motion ❑ S6 - To change the settings of the S Keys 1 From the Start menu, select Programs > VAIO Action Setup > VAIO Action Setup. ✍ You can also double-click on the right. ✍ You may now type a new name and description, if desired.

User Guide
Page 20
... Application Name dialog box appears. To preset your i.LINK device to perform a desired function 1 From the Start menu, select Programs > VAIO Action Setup > VAIO Action Setup. 2 Click i.LINK. 3 Click the Advanced Setting tab. 4 Click the Enable i.LINK launcher function checkbox and click Apply.... to your computer with your i.LINK-equipped devices to perform desired functions, such as automatically starting DVgate™ applications or connecting two VAIO computers. VAIO Digital Studio™ User Guide Presetting i.LINK® devices You can preset your i.LINK cable. 6 Turn on , the assigned...
... Application Name dialog box appears. To preset your i.LINK device to perform a desired function 1 From the Start menu, select Programs > VAIO Action Setup > VAIO Action Setup. 2 Click i.LINK. 3 Click the Advanced Setting tab. 4 Click the Enable i.LINK launcher function checkbox and click Apply.... to your computer with your i.LINK-equipped devices to perform desired functions, such as automatically starting DVgate™ applications or connecting two VAIO computers. VAIO Digital Studio™ User Guide Presetting i.LINK® devices You can preset your i.LINK cable. 6 Turn on , the assigned...

User Guide
Page 23
...use advanced multimedia formats. Media Bar software handles all -in any directory on your all common computer multimedia formats, and controls certain Sony devices. You can save them into a polished home video everyone will enjoy. Thumbnail views provide quick reminders of applications that you ..., crop, and color-correct your own wallpaper-the possibilities are low resolution, making it easy to use DVgate. 23 Sony Digital Media Park Applications Your VAIO computer comes with an easy-to capture individual frames from digital video clips, and then save or share via e-mail....
...use advanced multimedia formats. Media Bar software handles all -in any directory on your all common computer multimedia formats, and controls certain Sony devices. You can save them into a polished home video everyone will enjoy. Thumbnail views provide quick reminders of applications that you ..., crop, and color-correct your own wallpaper-the possibilities are low resolution, making it easy to use DVgate. 23 Sony Digital Media Park Applications Your VAIO computer comes with an easy-to capture individual frames from digital video clips, and then save or share via e-mail....

User Guide
Page 24
... add. 3 Select the file. 4 Click Open. Create a Movie using Shaker After adding clip(s) to the Clip tray, you want to create a 30-second scene. 24 VAIO Digital Studio™ User Guide Movie Shaker This application can create a short movie using the Shaker feature.
... add. 3 Select the file. 4 Click Open. Create a Movie using Shaker After adding clip(s) to the Clip tray, you want to create a 30-second scene. 24 VAIO Digital Studio™ User Guide Movie Shaker This application can create a short movie using the Shaker feature.

User Guide
Page 26
.... 26 Your clip displays with the new effect on the Effect tray monitor. 4 See help for instructions on the clip in the Working panel monitor. VAIO Digital Studio™ User Guide Editing Clips and Scenes You can edit your movie by adding effects and text, adjusting the color and contrast, and...
.... 26 Your clip displays with the new effect on the Effect tray monitor. 4 See help for instructions on the clip in the Working panel monitor. VAIO Digital Studio™ User Guide Editing Clips and Scenes You can edit your movie by adding effects and text, adjusting the color and contrast, and...

User Guide
Page 28
to save the Album. 7 Enter the Target Album name, select Thumbnails and click Okay. 8 The new album can be the same size and overlap 20%. VAIO Digital Studio™ User Guide Creating a Photo Album 1 Select the pictures you want to use to make an album. 2 From the Utilities menu, select Album ...
to save the Album. 7 Enter the Target Album name, select Thumbnails and click Okay. 8 The new album can be the same size and overlap 20%. VAIO Digital Studio™ User Guide Creating a Photo Album 1 Select the pictures you want to use to make an album. 2 From the Utilities menu, select Album ...

User Guide
Page 30
MPEG files cannot be recorded separately. ❑ Do not attempt to maximize recording capabilities, video and audio data are smaller than 4 MB. ❑ DVgate does not support hard disk compression. VAIO Digital Studio™ User Guide ❑ The last frame captured is in Timer Recording mode, as a single frame appearing in the device...
MPEG files cannot be recorded separately. ❑ Do not attempt to maximize recording capabilities, video and audio data are smaller than 4 MB. ❑ DVgate does not support hard disk compression. VAIO Digital Studio™ User Guide ❑ The last frame captured is in Timer Recording mode, as a single frame appearing in the device...

User Guide
Page 31
...to improve the performance of the DVgate software, the hard disk drive on your computer's hard disk drive(s). i.LINK (IEEE1394) Compatibility Your VAIO computer includes a 4-pin i.LINK connector on the front of the system and a 6-pin i.LINK connector on your hard disk drive, defragmentation...regularly. This prevents large video captures from consuming the available space on the back of the system. ✍ i.LINK is a trademark of Sony used only to the D partition. All products with an i.LINK connector may be necessary. To maintain optimum DVgate performance, you encounter frame ...
...to improve the performance of the DVgate software, the hard disk drive on your computer's hard disk drive(s). i.LINK (IEEE1394) Compatibility Your VAIO computer includes a 4-pin i.LINK connector on the front of the system and a 6-pin i.LINK connector on your hard disk drive, defragmentation...regularly. This prevents large video captures from consuming the available space on the back of the system. ✍ i.LINK is a trademark of Sony used only to the D partition. All products with an i.LINK connector may be necessary. To maintain optimum DVgate performance, you encounter frame ...

User Guide
Page 32
...recommended for more information on installation and use with the Sony VX1000 camcorder. Sony computer supplies, accessories, and peripherals can ❑ supply power from your local retailer or by accessing the Sony VAIO Direct Web site (http://vaio.sonystyle.com/), or by the 6-pin i.LINK connector ...cannot exceed 6 watts. VAIO Digital Studio™ User Guide A 6-pin i.LINK connector can be purchased from ...
...recommended for more information on installation and use with the Sony VX1000 camcorder. Sony computer supplies, accessories, and peripherals can ❑ supply power from your local retailer or by accessing the Sony VAIO Direct Web site (http://vaio.sonystyle.com/), or by the 6-pin i.LINK connector ...cannot exceed 6 watts. VAIO Digital Studio™ User Guide A 6-pin i.LINK connector can be purchased from ...

User Guide
Page 36
... Agreement. 5 When the System Recovery menu appears, follow the on the hard disk drive. This option is recommended for advanced users only. ! VAIO Digital Studio™ User Guide the computer will offer you the option to complete the Windows registration process when you use the System Recovery CD...(s). 1 Insert the Sony System Recovery CD in the drive when you turn on the computer. 2 Shut down your computer. 3 Wait 30 seconds and turn on your computer...
... Agreement. 5 When the System Recovery menu appears, follow the on the hard disk drive. This option is recommended for advanced users only. ! VAIO Digital Studio™ User Guide the computer will offer you the option to complete the Windows registration process when you use the System Recovery CD...(s). 1 Insert the Sony System Recovery CD in the drive when you turn on the computer. 2 Shut down your computer. 3 Wait 30 seconds and turn on your computer...

User Guide
Page 38
VAIO Digital Studio™ User Guide ✍ Your system may be prompted to insert the second CD, depending on the application you have two Application Recovery CDs, insert the first CD to restore. 38 You may include one or two Application Recovery CDs. If you wish to run the Application Recovery program.
VAIO Digital Studio™ User Guide ✍ Your system may be prompted to insert the second CD, depending on the application you have two Application Recovery CDs, insert the first CD to restore. 38 You may include one or two Application Recovery CDs. If you wish to run the Application Recovery program.


