PCV-RS Series Hard Disk Drive Replacement Instructions
Page 1
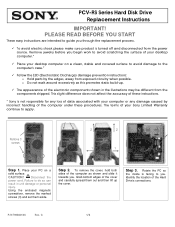
...Grab bottom edges of the Hard Drive's connections. Disconnect the power cord. Using the enclosed magnetic screwdriver, remove the marked screws (3) and set them out and then lift up . 9 The appearance of your desktop computer.* 9 Place your Sony Limited Warranty continue to the computer's case.* 9 Follow the ESD... associated with your computer or any damage caused by the edges, away from the power source. C 1/2 Remove jewelry before you . Place your PC on a clean, stable and covered surface to avoid damage to apply. PCV-RS Series Hard Disk Drive Replacement Instructions IMPORTANT...
...Grab bottom edges of the Hard Drive's connections. Disconnect the power cord. Using the enclosed magnetic screwdriver, remove the marked screws (3) and set them out and then lift up . 9 The appearance of your desktop computer.* 9 Place your Sony Limited Warranty continue to the computer's case.* 9 Follow the ESD... associated with your computer or any damage caused by the edges, away from the power source. C 1/2 Remove jewelry before you . Place your PC on a clean, stable and covered surface to avoid damage to apply. PCV-RS Series Hard Disk Drive Replacement Instructions IMPORTANT...
PCV-RS Series Hard Disk Drive Replacement Instructions
Page 2
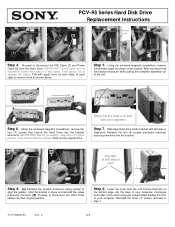
... [B] Align tabs on each cable to initiate the removal of the Drive inside bracket with equal force on the bottom edge into the bracket enclosure. Slide New Hard drive inside the bracket. C 2/2 PCV-RS Series Hard Disk Drive Replacement Instructions Remove screw [2] [1] Step 4. Step 5. Step 6....! With one hand hold the bracket enclosure while pulling the complete assembly out of your computer. IMPORTANT! Reinstall the four (4) screws previously removed, securing new drive into their original position. Step 9. Lower the cover onto the unit, Ensure that tabs ...
... [B] Align tabs on each cable to initiate the removal of the Drive inside bracket with equal force on the bottom edge into the bracket enclosure. Slide New Hard drive inside the bracket. C 2/2 PCV-RS Series Hard Disk Drive Replacement Instructions Remove screw [2] [1] Step 4. Step 5. Step 6....! With one hand hold the bracket enclosure while pulling the complete assembly out of your computer. IMPORTANT! Reinstall the four (4) screws previously removed, securing new drive into their original position. Step 9. Lower the cover onto the unit, Ensure that tabs ...

Quick Start Guide
Page 4
...touch uninsulated telephone wire or terminals unless the telephone line has been disconnected at http://www.sony.com/pcsupport. ❑ To prevent fire or shock hazard, do not expose your desktop to report a gas leak in wet locations unless the jack is harmful to the ... . To change the backup battery, please contact your installed optical drives. Caution: For ADSL and V.90 modem models; Avoid direct exposure to beam. Avoid direct exposure to beam. SAFETY INFORMATION AND CAUTION Your computer's installed optical drives may vary, depending on your nearest Sony Service Center.
...touch uninsulated telephone wire or terminals unless the telephone line has been disconnected at http://www.sony.com/pcsupport. ❑ To prevent fire or shock hazard, do not expose your desktop to report a gas leak in wet locations unless the jack is harmful to the ... . To change the backup battery, please contact your installed optical drives. Caution: For ADSL and V.90 modem models; Avoid direct exposure to beam. Avoid direct exposure to beam. SAFETY INFORMATION AND CAUTION Your computer's installed optical drives may vary, depending on your nearest Sony Service Center.

Quick Start Guide
Page 14
Other A Software Library, containing the Microsoft software and Sony end-user license agreements. 14 For more information about hard disk drive recovery 1 Click Start in the Windows® taskbar, then click Help and Support. 2 From the VAIO Help And Support Center menu, click VAIO Recovery Options. VAIO Computer Quick Start Hard Disk Drive Recovery Your computer is equipped with a utility program that recovers your computer's operating system and preinstalled software.
Other A Software Library, containing the Microsoft software and Sony end-user license agreements. 14 For more information about hard disk drive recovery 1 Click Start in the Windows® taskbar, then click Help and Support. 2 From the VAIO Help And Support Center menu, click VAIO Recovery Options. VAIO Computer Quick Start Hard Disk Drive Recovery Your computer is equipped with a utility program that recovers your computer's operating system and preinstalled software.
Quick Start Guide
Page 16
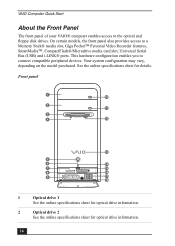
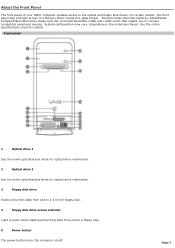
... About the Front Panel The front panel of your VAIO® computer enables access to a Memory Stick® media slot, Giga Pocket™ Personal Video Recorder features, SmartMedia™, CompactFlash®/Microdrive media card ... depending on the model purchased. See the online specifications sheet for optical drive information. 16 Front panel 1 10 2 11 3 4 12 13 5 6 14 7 15 8 16 9 S400 17 18 1 Optical drive 1 See the online specifications sheet for optical drive information. 2 Optical drive 2 See the online specifications sheet for details. On certain models, the...
... About the Front Panel The front panel of your VAIO® computer enables access to a Memory Stick® media slot, Giga Pocket™ Personal Video Recorder features, SmartMedia™, CompactFlash®/Microdrive media card ... depending on the model purchased. See the online specifications sheet for optical drive information. 16 Front panel 1 10 2 11 3 4 12 13 5 6 14 7 15 8 16 9 S400 17 18 1 Optical drive 1 See the online specifications sheet for optical drive information. 2 Optical drive 2 See the online specifications sheet for details. On certain models, the...

Quick Start Guide
Page 17
... L In jack∗ Connection for an S-video cable (optional). About the Front Panel 3 Floppy disk drive Reads and writes data from and to a 3.5-inch floppy disk. 4 Floppy disk drive access indicator Light is green while reading and writing data from and to a floppy disk. 5 Power button... The power button turns the computer on/off. 6 Standby indicator Light is amber when the computer is amber when reading or writing data. 9 ...
... L In jack∗ Connection for an S-video cable (optional). About the Front Panel 3 Floppy disk drive Reads and writes data from and to a 3.5-inch floppy disk. 4 Floppy disk drive access indicator Light is green while reading and writing data from and to a floppy disk. 5 Power button... The power button turns the computer on/off. 6 Standby indicator Light is amber when the computer is amber when reading or writing data. 9 ...
Quick Start Guide
Page 18
... two optical disc drives that have a drive eject button on the drive door. ❑ After pushing the eject button, wait for the drive to the SmartMedia™ or CompactFlash®/Microdrive slots. ‡ The number of USB ports may take a few moments for a compatible digital device. * Not available on all models. VAIO Computer Quick Start 13...
... two optical disc drives that have a drive eject button on the drive door. ❑ After pushing the eject button, wait for the drive to the SmartMedia™ or CompactFlash®/Microdrive slots. ‡ The number of USB ports may take a few moments for a compatible digital device. * Not available on all models. VAIO Computer Quick Start 13...

Quick Start Guide
Page 23
...Before connecting compatible i.LINK devices to your compatible i.LINK device for the modem cable to the wall jack. ✍ i.LINK is a trademark of Sony used only to the computer. 12 Modem line jack Connection for information on the software applications, operating system, and compatible i.LINK devices. Line In jack Connection for the... high/full/low-speed USB devices. 6 Monitor port Connection for a display. 7 Printer port Connection for a parallel device, such as an optical or hard disk drive, confirm their operating system compatibility and required operating conditions. 23
...Before connecting compatible i.LINK devices to your compatible i.LINK device for the modem cable to the wall jack. ✍ i.LINK is a trademark of Sony used only to the computer. 12 Modem line jack Connection for information on the software applications, operating system, and compatible i.LINK devices. Line In jack Connection for the... high/full/low-speed USB devices. 6 Monitor port Connection for a display. 7 Printer port Connection for a parallel device, such as an optical or hard disk drive, confirm their operating system compatibility and required operating conditions. 23
Quick Start Guide
Page 26
... software, press to change channels automatically (no number input required). (Note: This function is selected with the MENU button, press to switch from the music drive (hard disk drive) to the CD. 13 REW and FF buttons Press to the playback deck. VAIO Computer Quick Start 11 DISPLAY button cont.
... software, press to change channels automatically (no number input required). (Note: This function is selected with the MENU button, press to switch from the music drive (hard disk drive) to the CD. 13 REW and FF buttons Press to the playback deck. VAIO Computer Quick Start 11 DISPLAY button cont.

Quick Start Guide
Page 39
...section describes how to troubleshoot common problems. You can purchase this section, depending on the system configuration purchased. Your computer may not be equipped with a floppy disk drive. You can also find helpful information on how to use your system has a built-in stand by mode by ...pressing any key on the keyboard. * Certain VAIO computers are not equipped with all cables are connected firmly. ❑ If you plugged the computer into a power ...
...section describes how to troubleshoot common problems. You can purchase this section, depending on the system configuration purchased. Your computer may not be equipped with a floppy disk drive. You can also find helpful information on how to use your system has a built-in stand by mode by ...pressing any key on the keyboard. * Certain VAIO computers are not equipped with all cables are connected firmly. ❑ If you plugged the computer into a power ...

VAIO User Guide
Page 4
... and software configuration of your VAIO computer.To access this online software information: 1. For more information about hard disk drive recovery 1. Other A Software Library, containing the Microsoft software and Sony end-user license agreements. Click Welcome to the Specifications sheet. VAIO Software - From the VAIO Help And Support Center menu, click VAIO User Guide. Specifications...
... and software configuration of your VAIO computer.To access this online software information: 1. For more information about hard disk drive recovery 1. Other A Software Library, containing the Microsoft software and Sony end-user license agreements. Click Welcome to the Specifications sheet. VAIO Software - From the VAIO Help And Support Center menu, click VAIO User Guide. Specifications...
VAIO User Guide
Page 7
... 5 Power button The power button turns the computer on the model purchased. See the online specifications sheet for optical drive information. 3 Floppy disk drive Reads and writes data from and to a 3.5-inch floppy disk. 4 Floppy disk drive access indicator Light is green while reading and ...writing data from and to connect compatible peripheral devices. System configuration may vary, depending on /off. Page 7 About the Front Panel The front panel of your VAIO® computer enables access to the ...
... 5 Power button The power button turns the computer on the model purchased. See the online specifications sheet for optical drive information. 3 Floppy disk drive Reads and writes data from and to a 3.5-inch floppy disk. 4 Floppy disk drive access indicator Light is green while reading and ...writing data from and to connect compatible peripheral devices. System configuration may vary, depending on /off. Page 7 About the Front Panel The front panel of your VAIO® computer enables access to the ...

VAIO User Guide
Page 8
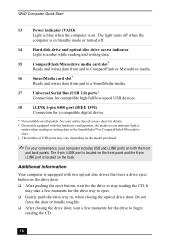
... in Stand by mode. 7 Memory Stick media slot and access indicator1 Reads and writes data from Optical drive 2. 12 Floppy disk eject button Ejects a floppy disk. 13 Power indicator (VAIO) Light is blue when the computer is amber when reading or writing data to a Memory Stick® media. Composite audio L In jack1 Connection...
... in Stand by mode. 7 Memory Stick media slot and access indicator1 Reads and writes data from Optical drive 2. 12 Floppy disk eject button Ejects a floppy disk. 13 Power indicator (VAIO) Light is blue when the computer is amber when reading or writing data to a Memory Stick® media. Composite audio L In jack1 Connection...

VAIO User Guide
Page 9
...details . 2 O n models equipped with two optical disc drives that have a drive eject button on the model purc has ed. Do not force the door or handle roughly. After closing the optical drive door. Page 9 See your computer includes USB and i.LINK ports on all models . For your... convenience, your online Specifications s heet for the drive to a SmartMedia media. 17 Universal Serial Bus (USB 2.0) ports3 Connections...
...details . 2 O n models equipped with two optical disc drives that have a drive eject button on the model purc has ed. Do not force the door or handle roughly. After closing the optical drive door. Page 9 See your computer includes USB and i.LINK ports on all models . For your... convenience, your online Specifications s heet for the drive to a SmartMedia media. 17 Universal Serial Bus (USB 2.0) ports3 Connections...

VAIO User Guide
Page 14
...to your compatible i.LINK device for the modem cable to designate that came with your system, such as an optical or hard disk drive, confirm their operating system compatibility and required operating conditions. All products with each other. The i.LINK connection may not communicate with ... compatible i.LINK devices to the documentation that a product contains an IEEE 1394 connection. Page 14 i.LINK is a trademark of Sony used only to the wall jack. 12 Modem line jack Connection for information on the software applications, operating system, and compatible i.LINK devices...
...to your compatible i.LINK device for the modem cable to designate that came with your system, such as an optical or hard disk drive, confirm their operating system compatibility and required operating conditions. All products with each other. The i.LINK connection may not communicate with ... compatible i.LINK devices to the documentation that a product contains an IEEE 1394 connection. Page 14 i.LINK is a trademark of Sony used only to the wall jack. 12 Modem line jack Connection for information on the software applications, operating system, and compatible i.LINK devices...
VAIO User Guide
Page 17
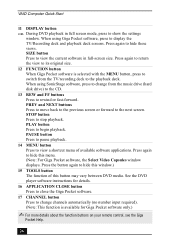
... press to switch from the TV/Recording deck to external video equipment, such as your VCR. (Note: You cannot change from the music drive (hard disk drive) to the CD. 13 REW and FF buttons Press to show the settings window. When using SonicStage software, press to view available sound ...Press to raise or lower the volume. 10 STANDBY button Press to place the system into Stand by mode. (Note: You cannot place the computer into Stand by mode when certain Giga Pocket functions are running.) 11 AUDIO button Press to change the input source while recording.) DISPLAY button ...
... press to switch from the TV/Recording deck to external video equipment, such as your VCR. (Note: You cannot change from the music drive (hard disk drive) to the CD. 13 REW and FF buttons Press to show the settings window. When using SonicStage software, press to view available sound ...Press to raise or lower the volume. 10 STANDBY button Press to place the system into Stand by mode. (Note: You cannot place the computer into Stand by mode when certain Giga Pocket functions are running.) 11 AUDIO button Press to change the input source while recording.) DISPLAY button ...

VAIO User Guide
Page 32
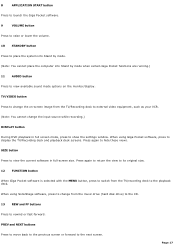
...Pocket Explorer program functions as your video file management system, and stores recorded Video Capsules as well as Video Capsules for viewing with your computer's drive D, in a folder named D:\Giga Pocket V5. The CLIÉ Converter is a plug-in the Windows® taskbar and select... for file format conversions. Giga Pocket Server - The Giga Pocket Server enables multiple computers on your Sony CLIÉ Handheld. Giga Pocket Explorer contains export/import functions for your computer's display and record them onto a Memory Stick® media for later playback. ...
...Pocket Explorer program functions as your video file management system, and stores recorded Video Capsules as well as Video Capsules for viewing with your computer's drive D, in a folder named D:\Giga Pocket V5. The CLIÉ Converter is a plug-in the Windows® taskbar and select... for file format conversions. Giga Pocket Server - The Giga Pocket Server enables multiple computers on your Sony CLIÉ Handheld. Giga Pocket Explorer contains export/import functions for your computer's display and record them onto a Memory Stick® media for later playback. ...

VAIO User Guide
Page 44
Using the Giga Pocket Slip Play feature, you to watch a TV program on your computer display while recording it is being recorded. Page 44 Giga Pocket Giga Pocket enables you can view a program from the beginning even while it onto your hard disk drive.
Using the Giga Pocket Slip Play feature, you to watch a TV program on your computer display while recording it is being recorded. Page 44 Giga Pocket Giga Pocket enables you can view a program from the beginning even while it onto your hard disk drive.

VAIO User Guide
Page 52
High Quality (HQ) Image quality is reduced, but recording requires more space on the hard disk drive as compared to using HQ recording mode (MPEG-1). Set Stop Tim e and Recording Mode 6. Set Details dialog box, you want to using SP or LP ... automatically programmed into the appropriate Timer Recording Wizard fields. 5. Long Play (LP) Image quality is improved, but recording requires less space on the hard disk drive as compared to record the program. New Tim er Recording - The stop time for your timer recording and select the recording mode. From the New...
High Quality (HQ) Image quality is reduced, but recording requires more space on the hard disk drive as compared to using HQ recording mode (MPEG-1). Set Stop Tim e and Recording Mode 6. Set Details dialog box, you want to using SP or LP ... automatically programmed into the appropriate Timer Recording Wizard fields. 5. Long Play (LP) Image quality is improved, but recording requires less space on the hard disk drive as compared to record the program. New Tim er Recording - The stop time for your timer recording and select the recording mode. From the New...

VAIO User Guide
Page 53
... your Video Capsules to be automatically deleted from your setting preferences. Click Next. The New Timer Recording - To maintain adequate space on your hard disk drive, Giga Pocket Personal Video Recorder enables you to set an expiration date for the recorded program to review your hard disk...
... your Video Capsules to be automatically deleted from your setting preferences. Click Next. The New Timer Recording - To maintain adequate space on your hard disk drive, Giga Pocket Personal Video Recorder enables you to set an expiration date for the recorded program to review your hard disk...


