Quick Start Guide
Page 3
..., and keep in which business proprietors can participate voluntarily. Refer to the model and serial numbers when you call your Sony VAIO® computer. The targeted products are trademarks of SRS Labs, Inc. The program backs the development and dissemination of your... serial number are uniform among participating nations. As an ENERGY STAR® Partner, Sony Corporation has determined that effectively reduce energy consumption. Their standards and logos are located inside the lower front panel of products with functions that this product meets the ENERGY STAR® guidelines for ...
..., and keep in which business proprietors can participate voluntarily. Refer to the model and serial numbers when you call your Sony VAIO® computer. The targeted products are trademarks of SRS Labs, Inc. The program backs the development and dissemination of your... serial number are uniform among participating nations. As an ENERGY STAR® Partner, Sony Corporation has determined that effectively reduce energy consumption. Their standards and logos are located inside the lower front panel of products with functions that this product meets the ENERGY STAR® guidelines for ...

Quick Start Guide
Page 9
... Locating Controls And Ports 15 About the Front Panel 16 About the Back Panel 19 About the Remote Control 24 About the Keyboard 28 Setting Up Your Computer 31 Connecting a Display (Monitor 32 Connecting the Speakers 33 Connecting the Keyboard and Mouse 34 Connecting the Telephone and Modem Cables.........35 Connecting the Power...
... Locating Controls And Ports 15 About the Front Panel 16 About the Back Panel 19 About the Remote Control 24 About the Keyboard 28 Setting Up Your Computer 31 Connecting a Display (Monitor 32 Connecting the Speakers 33 Connecting the Keyboard and Mouse 34 Connecting the Telephone and Modem Cables.........35 Connecting the Power...
Quick Start Guide
Page 16
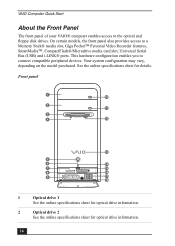
VAIO Computer Quick Start About the Front Panel The front panel of your VAIO® computer enables access to connect compatible peripheral devices. Your system configuration may vary, depending on the model purchased. See the online specifications sheet for optical drive information. 16 Front panel 1 10 2 11 3 4 12 13 5 ... for details. This hardware configuration enables you to the optical and floppy disk drives. On certain models, the front panel also provides access to a Memory Stick® media slot, Giga Pocket™ Personal Video Recorder features, SmartMedia™...
VAIO Computer Quick Start About the Front Panel The front panel of your VAIO® computer enables access to connect compatible peripheral devices. Your system configuration may vary, depending on the model purchased. See the online specifications sheet for optical drive information. 16 Front panel 1 10 2 11 3 4 12 13 5 ... for details. This hardware configuration enables you to the optical and floppy disk drives. On certain models, the front panel also provides access to a Memory Stick® media slot, Giga Pocket™ Personal Video Recorder features, SmartMedia™...

Quick Start Guide
Page 17
... indicator* Reads and writes data from and to a floppy disk. 5 Power button The power button turns the computer on/off. 6 Standby indicator Light is amber when the computer is amber when reading or writing data. 9 S-video In jack∗ Connection for an audio cable (optional)....12 Floppy disk eject button Ejects a floppy disk. 17 Composite audio R In jack∗ Connection for a video cable (optional). About the Front Panel 3 Floppy disk drive Reads and writes data from and to a 3.5-inch floppy disk. 4 Floppy disk drive access indicator Light is green while reading...
... indicator* Reads and writes data from and to a floppy disk. 5 Power button The power button turns the computer on/off. 6 Standby indicator Light is amber when the computer is amber when reading or writing data. 9 S-video In jack∗ Connection for an audio cable (optional)....12 Floppy disk eject button Ejects a floppy disk. 17 Composite audio R In jack∗ Connection for a video cable (optional). About the Front Panel 3 Floppy disk drive Reads and writes data from and to a 3.5-inch floppy disk. 4 Floppy disk drive access indicator Light is green while reading...
Quick Start Guide
Page 18
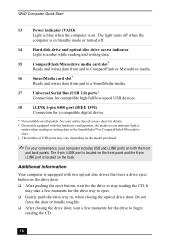
VAIO Computer Quick Start 13 Power indicator (VAIO) Light is blue when the computer is on the back. The 4-pin i.LINK port is located on the front panel and the 6-pin i.LINK port is equipped with this hardware configuration, the media access indicator light is amber while reading and writing ...for details. † On models equipped with two optical disc drives that have a drive eject button on both the front and back panels. The light turns off when the computer is in , when closing the drive door, wait a few moments for the drive to a SmartMedia media. 17 Universal Serial Bus ...
VAIO Computer Quick Start 13 Power indicator (VAIO) Light is blue when the computer is on the back. The 4-pin i.LINK port is located on the front panel and the 6-pin i.LINK port is equipped with this hardware configuration, the media access indicator light is amber while reading and writing ...for details. † On models equipped with two optical disc drives that have a drive eject button on both the front and back panels. The light turns off when the computer is in , when closing the drive door, wait a few moments for the drive to a SmartMedia media. 17 Universal Serial Bus ...

Quick Start Guide
Page 19
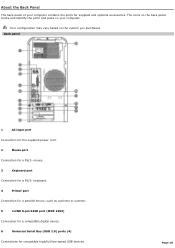
VIDEO1 INPUT - Back panel 12 1 2 3 4 5 6 7 8 9 10 11 USB MONITOR AUDIO AUDIO COMPOSITE S VIDEO - VHF/UHF 13 14 15 16 17 1 AC Input port Connection for the supplied power cord. 2 Mouse port Connection for supplied and optional accessories. The icons on the back panel locate and identify the ports and jacks on the system you purchased. About the Back Panel About the Back Panel The back panel of your computer. ✍ Your configuration may vary based on your computer contains the ports for a PS/2® mouse. 19
VIDEO1 INPUT - Back panel 12 1 2 3 4 5 6 7 8 9 10 11 USB MONITOR AUDIO AUDIO COMPOSITE S VIDEO - VHF/UHF 13 14 15 16 17 1 AC Input port Connection for the supplied power cord. 2 Mouse port Connection for supplied and optional accessories. The icons on the back panel locate and identify the ports and jacks on the system you purchased. About the Back Panel About the Back Panel The back panel of your computer. ✍ Your configuration may vary based on your computer contains the ports for a PS/2® mouse. 19

Quick Start Guide
Page 21
About the Back Panel 13 S/P DIF Optical Out port Connection for a digital audio or optical device. 14 Ethernet port Connection for a 10BASE-T/100BASE-TX Ethernet interface. (The port marked with speakers that use AC power. See your online Specifications sheet for details. † Your computer is supplied with (Network) is for LAN connections...
About the Back Panel 13 S/P DIF Optical Out port Connection for a digital audio or optical device. 14 Ethernet port Connection for a 10BASE-T/100BASE-TX Ethernet interface. (The port marked with speakers that use AC power. See your online Specifications sheet for details. † Your computer is supplied with (Network) is for LAN connections...
Quick Start Guide
Page 22
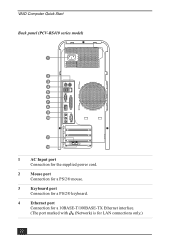
VAIO Computer Quick Start Back panel (PCV-RS410 series model) 1 2 3 4 5 6 7 8 9 10 11 12 1 AC Input port Connection for the supplied power cord. 2 Mouse port Connection for a PS/2® mouse. 3 Keyboard port Connection for a PS/2® keyboard. 4 Ethernet port Connection for a 10BASE-T/100BASE-TX Ethernet interface. (The port marked with (Network) is for LAN connections only.) 22
VAIO Computer Quick Start Back panel (PCV-RS410 series model) 1 2 3 4 5 6 7 8 9 10 11 12 1 AC Input port Connection for the supplied power cord. 2 Mouse port Connection for a PS/2® mouse. 3 Keyboard port Connection for a PS/2® keyboard. 4 Ethernet port Connection for a 10BASE-T/100BASE-TX Ethernet interface. (The port marked with (Network) is for LAN connections only.) 22

Quick Start Guide
Page 23
... (optional). 11 Telephone jack Connection for a telephone cable (optional) to the computer. 12 Modem line jack Connection for the modem cable to the wall jack. ✍ i.LINK is a trademark of Sony used only to designate that came with each other. Please refer to your compatible... i.LINK device for information on the software applications, operating system, and compatible i.LINK devices. About the Back Panel 5 Universal Serial Bus (USB 2.0) ports (2)...
... (optional). 11 Telephone jack Connection for a telephone cable (optional) to the computer. 12 Modem line jack Connection for the modem cable to the wall jack. ✍ i.LINK is a trademark of Sony used only to designate that came with each other. Please refer to your compatible... i.LINK device for information on the software applications, operating system, and compatible i.LINK devices. About the Back Panel 5 Universal Serial Bus (USB 2.0) ports (2)...

Quick Start Guide
Page 33
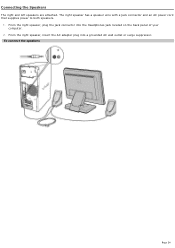
To connect the speakers 33 Connecting the Speakers Connecting the Speakers The right and left speakers are attached. The right speaker has a speaker wire with a jack connector and an AC power cord that supplies power to both speakers. 1 From the right speaker, plug the jack connector into the Headphones jack located on the back panel of your computer. 2 From the right speaker, insert the AC adapter plug into a grounded AC wall outlet or surge suppressor.
To connect the speakers 33 Connecting the Speakers Connecting the Speakers The right and left speakers are attached. The right speaker has a speaker wire with a jack connector and an AC power cord that supplies power to both speakers. 1 From the right speaker, plug the jack connector into the Headphones jack located on the back panel of your computer. 2 From the right speaker, insert the AC adapter plug into a grounded AC wall outlet or surge suppressor.

Quick Start Guide
Page 35
... from the wall jack and plug its cable into the telephone jack located on the back panel of your computer. 2 Plug the modem cable (supplied) into the modem line jack located on the rear panel. For help on connecting to the Ethernet port. Connect only 10BASE-T and 100BASE-TX cables... to a network, see your computer 3 Plug the other cables or a telephone cable may result in an electric current overload that...
... from the wall jack and plug its cable into the telephone jack located on the back panel of your computer. 2 Plug the modem cable (supplied) into the modem line jack located on the rear panel. For help on connecting to the Ethernet port. Connect only 10BASE-T and 100BASE-TX cables... to a network, see your computer 3 Plug the other cables or a telephone cable may result in an electric current overload that...

Quick Start Guide
Page 36
To connect the power cords 36 VAIO Computer Quick Start Connecting the Power Cords 1 Plug the power cord into the AC Input port, located on the back panel of the computer. 2 Plug both the display and computer power cords into a grounded AC wall outlet or a power strip.
To connect the power cords 36 VAIO Computer Quick Start Connecting the Power Cords 1 Plug the power cord into the AC Input port, located on the back panel of the computer. 2 Plug both the display and computer power cords into a grounded AC wall outlet or a power strip.

Quick Start Guide
Page 39
...Troubleshooting This section describes how to use your display for details.) ❑ Confirm that the computer is not in this equipment separately. 39 Check that the power indicator is lit on the front panel of the computer. ❑ Confirm that a disk is not in the floppy disk drive* (unless you...with all of the features or software discussed in stand by mode by pressing any key on the keyboard. * Certain VAIO computers are connected firmly. ❑ If you plugged the computer into a power strip or Uninterruptible Power Supply (UPS), make sure the power strip or UPS is turned on and ...
...Troubleshooting This section describes how to use your display for details.) ❑ Confirm that the computer is not in this equipment separately. 39 Check that the power indicator is lit on the front panel of the computer. ❑ Confirm that a disk is not in the floppy disk drive* (unless you...with all of the features or software discussed in stand by mode by pressing any key on the keyboard. * Certain VAIO computers are connected firmly. ❑ If you plugged the computer into a power strip or Uninterruptible Power Supply (UPS), make sure the power strip or UPS is turned on and ...
Quick Start Guide
Page 43
... questions. The serial number is located on the back panel of the issue. Sony Customer Information Services Center If other support options do not resolve your issue, you to: ❑ quickly find the nearest Sony service center locations. ❑ arrange for repairs or check..., easy-to-understand lessons on a white barcode label. 43 and Canada, contact a Sony Support representative at 1-888-476-6972. * The serial number is on using your computer. For VAIO® computers purchased in the U.S. Resources for the appropriate software contact information.) 6 Brief description of ...
... questions. The serial number is located on the back panel of the issue. Sony Customer Information Services Center If other support options do not resolve your issue, you to: ❑ quickly find the nearest Sony service center locations. ❑ arrange for repairs or check..., easy-to-understand lessons on a white barcode label. 43 and Canada, contact a Sony Support representative at 1-888-476-6972. * The serial number is on using your computer. For VAIO® computers purchased in the U.S. Resources for the appropriate software contact information.) 6 Brief description of ...

VAIO User Guide
Page 6
To view the specific connection capabilities for your computer. Locating Controls And Ports This section is intended to familiarize you with all of these hardware features, and the location of the controls, ports, and jacks may vary from the illustrations shown in this section. Your computer may not be equipped with the controls, ports and jacks on your system, see the online specifications sheet. About the Front Panel About the Back Panel About the Remote Control About the Keyboard Page 6
To view the specific connection capabilities for your computer. Locating Controls And Ports This section is intended to familiarize you with all of these hardware features, and the location of the controls, ports, and jacks may vary from the illustrations shown in this section. Your computer may not be equipped with the controls, ports and jacks on your system, see the online specifications sheet. About the Front Panel About the Back Panel About the Remote Control About the Keyboard Page 6

VAIO User Guide
Page 7
...access indicator Light is green while reading and writing data from and to connect compatible peripheral devices. On certain models, the front panel also provides access to a Memory Stick® media slot, Giga Pocket Personal Video Recorder features, SmartMedia , CompactFlash®/Microdrive ... ports that enable you to a floppy disk. 5 Power button The power button turns the computer on the model purchased. Page 7 About the Front Panel The front panel of your VAIO® computer enables access to the optical and floppy disk drives. System configuration may vary, depending on /off...
...access indicator Light is green while reading and writing data from and to connect compatible peripheral devices. On certain models, the front panel also provides access to a Memory Stick® media slot, Giga Pocket Personal Video Recorder features, SmartMedia , CompactFlash®/Microdrive ... ports that enable you to a floppy disk. 5 Power button The power button turns the computer on the model purchased. Page 7 About the Front Panel The front panel of your VAIO® computer enables access to the optical and floppy disk drives. System configuration may vary, depending on /off...

VAIO User Guide
Page 9
Additional information Your computer is located on the back. The 4-pin i.LINK port is located on the front panel and the 6-pin i.LINK port is equipped ... port (IEEE 1394) Connection for a compatible digital device. 1 N ot available on both the front and back panels. For your convenience, your online Specifications s heet for details . 2 O n models equipped with two optical disc...force the door or handle roughly. After closing the optical drive door. See your computer includes USB and i.LINK ports on all models . 15 CompactFlash/Microdrive media card slot1 Reads ...
Additional information Your computer is located on the back. The 4-pin i.LINK port is located on the front panel and the 6-pin i.LINK port is equipped ... port (IEEE 1394) Connection for a compatible digital device. 1 N ot available on both the front and back panels. For your convenience, your online Specifications s heet for details . 2 O n models equipped with two optical disc...force the door or handle roughly. After closing the optical drive door. See your computer includes USB and i.LINK ports on all models . 15 CompactFlash/Microdrive media card slot1 Reads ...
VAIO User Guide
Page 10
... and identify the ports and jacks on the system you purchased. Back panel 1 AC Input port Connection for the supplied power cord. 2 Mouse port Connection for a PS/2® mouse. 3 Keyboard port Connection for a PS/2® keyboard. 4...LINK 6-pin S400 port (IEEE 1394) Connection for a compatible digital device. 6 Universal Serial Bus (USB 2.0) ports (4) Connections for supplied and optional accessories. About the Back Panel The back panel of your computer. Your configuration may vary based on your computer contains the ports for compatible high/full/low-speed USB devices.
... and identify the ports and jacks on the system you purchased. Back panel 1 AC Input port Connection for the supplied power cord. 2 Mouse port Connection for a PS/2® mouse. 3 Keyboard port Connection for a PS/2® keyboard. 4...LINK 6-pin S400 port (IEEE 1394) Connection for a compatible digital device. 6 Universal Serial Bus (USB 2.0) ports (4) Connections for supplied and optional accessories. About the Back Panel The back panel of your computer. Your configuration may vary based on your computer contains the ports for compatible high/full/low-speed USB devices.

VAIO User Guide
Page 12
... Out (S-Video/video) jack Connection for an S-video cable (optional). 17 VHF/UHF port1 Connection for s tereo s peakers equipped with s peakers that us e A C power. Back panel (PCV- See your online Specifications s heet for the supplied power cord. 2 Mouse port Page 12 T he s peaker DC out jac k provides power for a coaxial cable (supplied...
... Out (S-Video/video) jack Connection for an S-video cable (optional). 17 VHF/UHF port1 Connection for s tereo s peakers equipped with s peakers that us e A C power. Back panel (PCV- See your online Specifications s heet for the supplied power cord. 2 Mouse port Page 12 T he s peaker DC out jac k provides power for a coaxial cable (supplied...
VAIO User Guide
Page 24
To connect the speakers Page 24 Connecting the Speakers The right and left speakers are attached. From the right speaker, insert the AC adapter plug into the Headphones jack located on the back panel of your computer. 2. The right speaker has a speaker wire with a jack connector and an AC power cord that supplies power to both speakers. 1. From the right speaker, plug the jack connector into a grounded AC wall outlet or surge suppressor.
To connect the speakers Page 24 Connecting the Speakers The right and left speakers are attached. From the right speaker, insert the AC adapter plug into the Headphones jack located on the back panel of your computer. 2. The right speaker has a speaker wire with a jack connector and an AC power cord that supplies power to both speakers. 1. From the right speaker, plug the jack connector into a grounded AC wall outlet or surge suppressor.