
Reference Manual
Page 5
... Users ii Safety Information ii Regulatory Information iii FCC Part 68 iv Telephone Consumer Protection Act of 1991 iv Chapter 1 - Configuring Your System Accessing the BIOS Setup Utility 16 Changing the Display's Power-management Settings 17 Configuring the System Board 18 Chapter 3 -
... Users ii Safety Information ii Regulatory Information iii FCC Part 68 iv Telephone Consumer Protection Act of 1991 iv Chapter 1 - Configuring Your System Accessing the BIOS Setup Utility 16 Changing the Display's Power-management Settings 17 Configuring the System Board 18 Chapter 3 -

Reference Manual
Page 6
vi VAIO MicroTower System Reference Reinstalling the Side Panel 27 Installing an Add-In Card 28 Removing an Add-in Card 29 Replacing the Lithium Battery 31 ... 58 Ring Connector 59 Modem In Connector 60 CD In Connector 61 TV Out Connector 62 Configuration Jumpers 63 CPU Speed 63 Clear Password and BIOS Recovery 64 Chapter 5 -
vi VAIO MicroTower System Reference Reinstalling the Side Panel 27 Installing an Add-In Card 28 Removing an Add-in Card 29 Replacing the Lithium Battery 31 ... 58 Ring Connector 59 Modem In Connector 60 CD In Connector 61 TV Out Connector 62 Configuration Jumpers 63 CPU Speed 63 Clear Password and BIOS Recovery 64 Chapter 5 -

Reference Manual
Page 23
Configuring your system. Chapter 2 Configuring Your System This chapter contains information on configuring your system can consist of the following: u Making changes to the BIOS settings u Making changes to the display's power management settings u Changing the system board jumper position 15
Configuring your system. Chapter 2 Configuring Your System This chapter contains information on configuring your system can consist of the following: u Making changes to the BIOS settings u Making changes to the display's power management settings u Changing the system board jumper position 15

Reference Manual
Page 24
...VAIO MicroTower System Reference Accessing the BIOS Setup Utility You must access the BIOS Setup Utility to make changes to modify a setting. The following message appears during the inital boot sequence: Press for information on BIOS settings). Once an item is highlighted, use the plus/minus (+/-) keys to the BIOS settings (see "BIOS... to its left and right arrow keys to select. 4 Once you reach the top level, where the menu bar appears. 5 To exit the BIOS setup utility, press ESC from the menu bar. Use the up and down arrow keys to access a sub-menu. If a submenu contains items ...
...VAIO MicroTower System Reference Accessing the BIOS Setup Utility You must access the BIOS Setup Utility to make changes to modify a setting. The following message appears during the inital boot sequence: Press for information on BIOS settings). Once an item is highlighted, use the plus/minus (+/-) keys to the BIOS settings (see "BIOS... to its left and right arrow keys to select. 4 Once you reach the top level, where the menu bar appears. 5 To exit the BIOS setup utility, press ESC from the menu bar. Use the up and down arrow keys to access a sub-menu. If a submenu contains items ...

Reference Manual
Page 26
... mode. BIOS Recovery mode sets the CPU input clock to 66 MHz (fast mode) and attempts to the failure and the system waits for the insertion of the computer and all attached peripherals, and unplug the power cord. 1 Remove the side panel (see "Removing the Side Panel" on page 22). 2 ... Unit (CPU) input clock is enabled at 66 MHz (fast mode), and the Basic Input/Output System (BIOS) uses the User CMOS settings (as opposed to the System CMOS settings). 18 VAIO MicroTower System Reference Configuring the System Board The system board contains two configuration jumpers that is stored in the...
... mode. BIOS Recovery mode sets the CPU input clock to 66 MHz (fast mode) and attempts to the failure and the system waits for the insertion of the computer and all attached peripherals, and unplug the power cord. 1 Remove the side panel (see "Removing the Side Panel" on page 22). 2 ... Unit (CPU) input clock is enabled at 66 MHz (fast mode), and the Basic Input/Output System (BIOS) uses the User CMOS settings (as opposed to the System CMOS settings). 18 VAIO MicroTower System Reference Configuring the System Board The system board contains two configuration jumpers that is stored in the...
Reference Manual
Page 39
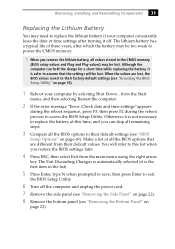
...Otherwise it is not necessary to their default settings (see "Removing the Bottom Panel" on page 23). from their factory-default settings (see "Accessing the BIOS Setup Utility" on page 16). 1 Reboot your computer consistently loses the date or time settings after which the battery may be lost. Although the... computer can skip all remaining steps. 3 Compare all the BIOS options to replace the battery at this list when you can hold the charge for a short time while replacing the battery, it is ...
...Otherwise it is not necessary to their default settings (see "Removing the Bottom Panel" on page 23). from their factory-default settings (see "Accessing the BIOS Setup Utility" on page 16). 1 Reboot your computer consistently loses the date or time settings after which the battery may be lost. Although the... computer can skip all remaining steps. 3 Compare all the BIOS options to replace the battery at this list when you can hold the charge for a short time while replacing the battery, it is ...

Reference Manual
Page 41
...battery replacement and you can skip the remaining steps. 19 Refer to the list you made in step 3 and restore any non-default BIOS settings (see "BIOS Setup Options" on page 69). 20 Press ESC, then select Exit from the main menu using the right arrow key. 21 Select... Installing and Reinstalling Components 33 18 If the error message "Error: Check date and time settings." If no error message displays, the computer's BIOS settings were retained during the reboot sequence, press F3, then press F2 to save the changes and exit the BIOS Setup Utility. The computer's BIOS settings are now restored.
...battery replacement and you can skip the remaining steps. 19 Refer to the list you made in step 3 and restore any non-default BIOS settings (see "BIOS Setup Options" on page 69). 20 Press ESC, then select Exit from the main menu using the right arrow key. 21 Select... Installing and Reinstalling Components 33 18 If the error message "Error: Check date and time settings." If no error message displays, the computer's BIOS settings were retained during the reboot sequence, press F3, then press F2 to save the changes and exit the BIOS Setup Utility. The computer's BIOS settings are now restored.
Reference Manual
Page 42
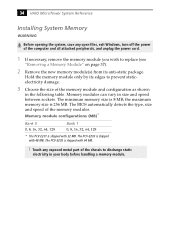
..., 64, 128 Bank 1 0, 8, 16, 32, 64, 128 * The PCV-E201 is 8 MB; The minimum memory size is shipped with 32 MB. The PCV-E203 is shipped with 48 MB. Memory modules can vary in size and speed between sockets. The BIOS automatically detects the type, size and speed of the memory modules...computer and all attached peripherals, and unplug the power cord. 1 If necessary, remove the memory module you wish to replace (see "Removing a Memory Module" on page 37). 2 Remove the new memory module(s) from its edges to discharge static electricity in your body before handling a memory module. 34 VAIO...
..., 64, 128 Bank 1 0, 8, 16, 32, 64, 128 * The PCV-E201 is 8 MB; The minimum memory size is shipped with 32 MB. The PCV-E203 is shipped with 48 MB. Memory modules can vary in size and speed between sockets. The BIOS automatically detects the type, size and speed of the memory modules...computer and all attached peripherals, and unplug the power cord. 1 If necessary, remove the memory module you wish to replace (see "Removing a Memory Module" on page 37). 2 Remove the new memory module(s) from its edges to discharge static electricity in your body before handling a memory module. 34 VAIO...
Reference Manual
Page 51
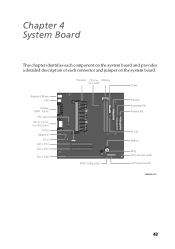
Processor CPU Fan Memory (not used) Power Keyboard, Mouse USB Display, COM1, Printer CPU Speed Mic In, Line In, Line Out, Game TV Out Modem In CD In Slot 3 (PCI) Slot 2 (PCI) Slot 1 (ISA) Fan 2 BIOS Configuration Diskette Secondary IDE Primary IDE PS Fan Battery Ring CHA Fan (not used) Front panel header OM04581.VSD 43 Chapter 4 System Board This chapter identifies each component on the system board and provides a detailed description of each connector and jumper on the system board.
Processor CPU Fan Memory (not used) Power Keyboard, Mouse USB Display, COM1, Printer CPU Speed Mic In, Line In, Line Out, Game TV Out Modem In CD In Slot 3 (PCI) Slot 2 (PCI) Slot 1 (ISA) Fan 2 BIOS Configuration Diskette Secondary IDE Primary IDE PS Fan Battery Ring CHA Fan (not used) Front panel header OM04581.VSD 43 Chapter 4 System Board This chapter identifies each component on the system board and provides a detailed description of each connector and jumper on the system board.

Reference Manual
Page 71
CPU Speed The processor speed jumper (JP1) is a 2 x 5 header that is preconfigured for CPU speed (JP1), password clear (JP2), and BIOS recovery (JP3) selections. System Board 63 Configuration Jumpers The configuration jumpers provide for the appropriate speed, as shown in the following table. JP1 CPU SPEED OM04588.VSD JP1 Position 266 MHz (PCV-E201) 300 MHz (PCV-E203) 333 MHz (PCV-E205) Pins 1 - 2 OFF OFF OFF Pins 3 - 4 ON ON OFF Pins 5 - 6 ON ON ON Pins 7 - 8 ON OFF ON
CPU Speed The processor speed jumper (JP1) is a 2 x 5 header that is preconfigured for CPU speed (JP1), password clear (JP2), and BIOS recovery (JP3) selections. System Board 63 Configuration Jumpers The configuration jumpers provide for the appropriate speed, as shown in the following table. JP1 CPU SPEED OM04588.VSD JP1 Position 266 MHz (PCV-E201) 300 MHz (PCV-E203) 333 MHz (PCV-E205) Pins 1 - 2 OFF OFF OFF Pins 3 - 4 ON ON OFF Pins 5 - 6 ON ON ON Pins 7 - 8 ON OFF ON

Reference Manual
Page 72
The jumper cap should remain in this inactive position unless otherwise directed by a technical support person. 64 VAIO MicroTower System Reference Clear Password and BIOS Recovery The computer is shipped with an unused jumper cap on pins 2 and 3 (pin 3 is floating) for future use. JP3 JP2 1 2 34 5 BIOS RCVRY CLEAR PSWRD JP2, JP3 Position Pins BIOS RCVRY 1 - 2 CLEAR PSWD 4 - 5 Description BIOS recovery mode Password clear mode KY0059.VSD
The jumper cap should remain in this inactive position unless otherwise directed by a technical support person. 64 VAIO MicroTower System Reference Clear Password and BIOS Recovery The computer is shipped with an unused jumper cap on pins 2 and 3 (pin 3 is floating) for future use. JP3 JP2 1 2 34 5 BIOS RCVRY CLEAR PSWRD JP2, JP3 Position Pins BIOS RCVRY 1 - 2 CLEAR PSWD 4 - 5 Description BIOS recovery mode Password clear mode KY0059.VSD

Reference Manual
Page 77
... other options. 69 The item shown in [brackets] in this guide, directly below the default option. Chapter 7 BIOS Setup Options This chapter describes each screen in the PhoenixBIOS Setup Utility (see "Accessing the BIOS Setup Utility" on the menu bar. key to select an option. The PhoenixBIOS setup has six menu items...
... other options. 69 The item shown in [brackets] in this guide, directly below the default option. Chapter 7 BIOS Setup Options This chapter describes each screen in the PhoenixBIOS Setup Utility (see "Accessing the BIOS Setup Utility" on the menu bar. key to select an option. The PhoenixBIOS setup has six menu items...

Reference Manual
Page 81
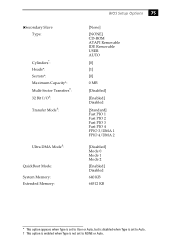
... Slave Type: Cylinders*: Heads*: Sectors*: Maximum Capacity*: Multi-Sector Transfers†: LBA Mode Control†: 32 Bit I/O†: Transfer Mode†: Ultra DMA Mode†: BIOS Setup Options 73 [None] [AUTO] NONE CD-ROM ATAPI Removable IDE Removable USER [0] [1] [0] 0 MB [Disabled] 2 Sectors 4 Sectors 8 Sectors 16 Sectors [Disabled] Enabled [Enabled] Disabled [Standard...
... Slave Type: Cylinders*: Heads*: Sectors*: Maximum Capacity*: Multi-Sector Transfers†: LBA Mode Control†: 32 Bit I/O†: Transfer Mode†: Ultra DMA Mode†: BIOS Setup Options 73 [None] [AUTO] NONE CD-ROM ATAPI Removable IDE Removable USER [0] [1] [0] 0 MB [Disabled] 2 Sectors 4 Sectors 8 Sectors 16 Sectors [Disabled] Enabled [Enabled] Disabled [Standard...
Reference Manual
Page 83
...: Cylinders*: Heads*: Sectors*: Maximum Capacity*: Multi-Sector Transfers†: 32 Bit I/O†: Transfer Mode†: Ultra DMA Mode†: QuickBoot Mode: System Memory: Extended Memory: BIOS Setup Options 75 [None] [NONE] CD-ROM ATAPI Removable IDE Removable USER AUTO [0] [1] [0] 0 MB [Disabled] [Enabled] Disabled [Standard] Fast PIO 1 Fast PIO 2 Fast PIO 3 Fast...
...: Cylinders*: Heads*: Sectors*: Maximum Capacity*: Multi-Sector Transfers†: 32 Bit I/O†: Transfer Mode†: Ultra DMA Mode†: QuickBoot Mode: System Memory: Extended Memory: BIOS Setup Options 75 [None] [NONE] CD-ROM ATAPI Removable IDE Removable USER AUTO [0] [1] [0] 0 MB [Disabled] [Enabled] Disabled [Standard] Fast PIO 1 Fast PIO 2 Fast PIO 3 Fast...

Reference Manual
Page 85
BIOS Setup Options 77 I/O Device Configuration Serial port A: [Auto] Disabled Enabled Base I/O address*: [3F8] 2F8 3E8 2E8 Interrupt*: [IRQ 4] IRQ 3 Parallel port: [Auto] Disabled Enabled Mode&#...
BIOS Setup Options 77 I/O Device Configuration Serial port A: [Auto] Disabled Enabled Base I/O address*: [3F8] 2F8 3E8 2E8 Interrupt*: [IRQ 4] IRQ 3 Parallel port: [Auto] Disabled Enabled Mode&#...

Reference Manual
Page 87
Security Screen User Password Is: Supervisor Password Is: Set User Password Set Supervisor Password Password on boot: BIOS Setup Options 79 Clear Clear [Enter] [Enter] [Disabled] Enabled
Security Screen User Password Is: Supervisor Password Is: Set User Password Set Supervisor Password Password on boot: BIOS Setup Options 79 Clear Clear [Enter] [Enter] [Disabled] Enabled

Reference Manual
Page 89
Keyboard, Mouse, Video PCI Bus Mastering BIOS Setup Options 81 [Enabled] Disabled [Disabled] Enabled
Keyboard, Mouse, Video PCI Bus Mastering BIOS Setup Options 81 [Enabled] Disabled [Disabled] Enabled

Reference Manual
Page 91
Exit Screen Exit Saving Changes Exit Discarding Changes Load Setup Defaults Discard Changes Save Changes BIOS Setup Options 83
Exit Screen Exit Saving Changes Exit Discarding Changes Load Setup Defaults Discard Changes Save Changes BIOS Setup Options 83

Reference Manual
Page 94
... required by most setup options. The User password is optional. No password is required by most setup options. Supervisor password is required at bootup. 86 VAIO MicroTower System Reference About User and Supervisor Passwords The system allows you set , as indicated next. If you to specify up to the...
... required by most setup options. The User password is optional. No password is required by most setup options. Supervisor password is required at bootup. 86 VAIO MicroTower System Reference About User and Supervisor Passwords The system allows you set , as indicated next. If you to specify up to the...
Reference Manual
Page 102
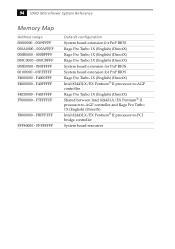
...VAIO MicroTower System Reference Memory Map Address range 00000000 - 0009FFFF 000A0000 - 000AFFFF 000B0000 - 000BFFFF 000C0000 - 000CBFFF 000E0000 - 000FFFFF 00100000 - 03FFFFFF F4000000 - F403FFFF F5000000 - F5FFFFFF F8000000 - F4000FFF F4000000 - FBFFFFFF FFF80000 - F40FFFFF F4020000 - FFFFFFFF Default configuration System board extension for PnP BIOS...1X (English) (DirectX) Rage Pro Turbo 1X (English) (DirectX) System board extension for PnP BIOS System board extension for PnP BIOS Rage Pro Turbo 1X (English) (DirectX) Intel 82443LX/EX Pentium® II processor-to-AGP ...
...VAIO MicroTower System Reference Memory Map Address range 00000000 - 0009FFFF 000A0000 - 000AFFFF 000B0000 - 000BFFFF 000C0000 - 000CBFFF 000E0000 - 000FFFFF 00100000 - 03FFFFFF F4000000 - F403FFFF F5000000 - F5FFFFFF F8000000 - F4000FFF F4000000 - FBFFFFFF FFF80000 - F40FFFFF F4020000 - FFFFFFFF Default configuration System board extension for PnP BIOS...1X (English) (DirectX) Rage Pro Turbo 1X (English) (DirectX) System board extension for PnP BIOS System board extension for PnP BIOS Rage Pro Turbo 1X (English) (DirectX) Intel 82443LX/EX Pentium® II processor-to-AGP ...


