User Manual
Page 4
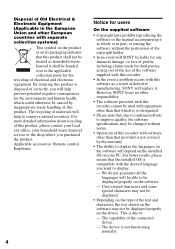
...recorder cannot be used with equipment other than that which could otherwise be handed over to display. - By ensuring this software as household waste. However, SONY bears no event will SONY be displayed. • Depending on its packaging indicates that this product shall not be treated as ...a result of defective manufacturing, SONY will replace it. We do not guarantee all the languages will help...
...recorder cannot be used with equipment other than that which could otherwise be handed over to display. - By ensuring this software as household waste. However, SONY bears no event will SONY be displayed. • Depending on its packaging indicates that this product shall not be treated as ...a result of defective manufacturing, SONY will replace it. We do not guarantee all the languages will help...

User Manual
Page 7
...entire disc (Erase 52 Dividing a track (Divide 54 Combining tracks (Combine 55 Formatting the disc (Format 56 Other operations 57 Changing the displayed menu items (Menu Mode 57 Protecting your hearing (AVLS 57 Turning off the beep sound 57 Preserving battery power (EL Light 58 Storing...Memory 58 Starting the playback quickly (Quick Mode 59 Selecting the disc mode (Disc Mode 60 Changing the operational direction of the display 60 Selecting the display language 61 Using the recorder with a computer 62 What you can do through connection with a computer 62 Connecting the recorder to...
...entire disc (Erase 52 Dividing a track (Divide 54 Combining tracks (Combine 55 Formatting the disc (Format 56 Other operations 57 Changing the displayed menu items (Menu Mode 57 Protecting your hearing (AVLS 57 Turning off the beep sound 57 Preserving battery power (EL Light 58 Storing...Memory 58 Starting the playback quickly (Quick Mode 59 Selecting the disc mode (Disc Mode 60 Changing the operational direction of the display 60 Selecting the display language 61 Using the recorder with a computer 62 What you can do through connection with a computer 62 Connecting the recorder to...
User Manual
Page 10
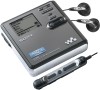
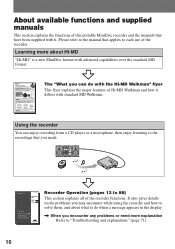
... portable MiniDisc recorder and the manuals that have been supplied with standard MD Walkman. Using the recorder You can do when a message appears in the display. , When you made. Please refer to each use of the recorder functions. The "What you can enjoy recording from a CD player or a microphone, then enjoy...
... portable MiniDisc recorder and the manuals that have been supplied with standard MD Walkman. Using the recorder You can do when a message appears in the display. , When you made. Please refer to each use of the recorder functions. The "What you can enjoy recording from a CD player or a microphone, then enjoy...

User Manual
Page 11
...SonicStage Help This is connected to the recorder with a Hi-MD disc or a standard disc in Hi-MD mode inserted. • The displayed items in this section cover general Hi-MD/Net MD products. You can view on your Hi-MD/Net MD. Using the recorder while ...in this section assume familiarity with basic Windows operations. For this reason, some explanations (and some illustrations) may differ from the actual items displayed by the software. • Explanations in this section may not be applicable to online help explains the detailed operations and information about SonicStage ...
...SonicStage Help This is connected to the recorder with a Hi-MD disc or a standard disc in Hi-MD mode inserted. • The displayed items in this section cover general Hi-MD/Net MD products. You can view on your Hi-MD/Net MD. Using the recorder while ...in this section assume familiarity with basic Windows operations. For this reason, some explanations (and some illustrations) may differ from the actual items displayed by the software. • Explanations in this section may not be applicable to online help explains the detailed operations and information about SonicStage ...

User Manual
Page 14
... dots beside the VOL + button and the MIC (PLUG IN POWER) jack. 2) • indicates a function that requires pressing the button for 2 seconds or more. 14 D Display window E OPEN switch F Jog dial (N (play)/ENT) G . (AMS, fast rewind), > (AMS, fast forward) button H Battery compartment I X (pause) button J VOL (volume) +1), - button K i (earphones) jack L REC(+N)/T MARK...
... dots beside the VOL + button and the MIC (PLUG IN POWER) jack. 2) • indicates a function that requires pressing the button for 2 seconds or more. 14 D Display window E OPEN switch F Jog dial (N (play)/ENT) G . (AMS, fast rewind), > (AMS, fast forward) button H Battery compartment I X (pause) button J VOL (volume) +1), - button K i (earphones) jack L REC(+N)/T MARK...

User Manual
Page 15
...indication Shows the approximate remaining battery power. E Text information display area Displays titles, menu items, error messages, etc. F Time display area Displays the elapsed time, remaining time of each operating condition. D Track number and group number display area Displays the track number or group number. x: stop N: play ...X: pause m: fast rewind M: fast forward ., >: AMS : record/record pause B Selected operating condition display area Displays the operating mode, play mode, or selected menu item, etc. If the batteries are preceded by the following icons. : ...
...indication Shows the approximate remaining battery power. E Text information display area Displays titles, menu items, error messages, etc. F Time display area Displays the elapsed time, remaining time of each operating condition. D Track number and group number display area Displays the track number or group number. x: stop N: play ...X: pause m: fast rewind M: fast forward ., >: AMS : record/record pause B Selected operating condition display area Displays the operating mode, play mode, or selected menu item, etc. If the batteries are preceded by the following icons. : ...

User Manual
Page 17
.... Getting started Charge the rechargeable battery before using. 1 Insert the rechargeable battery. 1 Slide OPEN to a wall outlet. 2 Press x • CANCEL/CHG. "Charging" appears in the display, and charging starts. rechargeable battery E end first. 2 Charging the rechargeable battery. 1 Connect the AC power adaptor to DC IN 3V on the recorder and the...
.... Getting started Charge the rechargeable battery before using. 1 Insert the rechargeable battery. 1 Slide OPEN to a wall outlet. 2 Press x • CANCEL/CHG. "Charging" appears in the display, and charging starts. rechargeable battery E end first. 2 Charging the rechargeable battery. 1 Connect the AC power adaptor to DC IN 3V on the recorder and the...

User Manual
Page 18
Using the alkaline dry battery for the rechargeable battery become sufficiently charged. Rear of the rechargeable battery. z • If the display disappears after a short time, the rechargeable battery is sufficiently charged. • If the rechargeable battery is completely drained at the start of charging, it will ...
Using the alkaline dry battery for the rechargeable battery become sufficiently charged. Rear of the rechargeable battery. z • If the display disappears after a short time, the rechargeable battery is sufficiently charged. • If the rechargeable battery is completely drained at the start of charging, it will ...

User Manual
Page 19
...deterioration in the performance of the rechargeable battery being charged, the charging will be more or less than normal when it is used in the display and the power goes off. HOLD HOLD For models supplied with a dry battery, make sure to unlock the controls. It may be ...smaller than the indication depending on the display window of disuse. Slide HOLD to the opposite direction of the rechargeable battery may be restored. • It is being used for the first...
...deterioration in the performance of the rechargeable battery being charged, the charging will be more or less than normal when it is used in the display and the power goes off. HOLD HOLD For models supplied with a dry battery, make sure to unlock the controls. It may be ...smaller than the indication depending on the display window of disuse. Slide HOLD to the opposite direction of the rechargeable battery may be restored. • It is being used for the first...

User Manual
Page 22
... use the supplied software. 1) Refer to "Selecting the disc mode (Disc Mode)" (page 60) for example to allow the disc to be played on the display window of the recorder. Hi-MD MD , You cannot use this recorder only in MD mode.
... use the supplied software. 1) Refer to "Selecting the disc mode (Disc Mode)" (page 60) for example to allow the disc to be played on the display window of the recorder. Hi-MD MD , You cannot use this recorder only in MD mode.

User Manual
Page 23
Connected component 3 While the recorder is displayed. Press X again to resume recording. Make sure the x indication is stopped, press the jog dial (N/... as a new track. 23 Press x and open the lid. (The lid does not open while "SYSTEM FILE WRITING" is displayed.) 1) A track mark is added at the same point as the sound source, and the contents are automatically added at the point...of the track will be recorded. PAUSE 2 Make sure that the x indication appears in the display window. Press X1). 4 Record a disc. 1 Select and pause the sound source to be counted as a group.
Connected component 3 While the recorder is displayed. Press X again to resume recording. Make sure the x indication is stopped, press the jog dial (N/... as a new track. 23 Press x and open the lid. (The lid does not open while "SYSTEM FILE WRITING" is displayed.) 1) A track mark is added at the same point as the sound source, and the contents are automatically added at the point...of the track will be recorded. PAUSE 2 Make sure that the x indication appears in the display window. Press X1). 4 Record a disc. 1 Select and pause the sound source to be counted as a group.
User Manual
Page 24
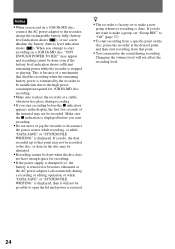
...the high power consumption required for recording. • If the power supply is done. Make sure the x indication is displayed before the x indication appears in the display, the first few seconds of a mechanism that disables recording when the remaining battery power is estimated by the recorder to... from that point. • You can monitor the sound during a recording or editing operation, or while "DATA SAVE" or "SYSTEM FILE WRITING" is displayed. If you do not want to make a new group whenever recording is disrupted (i.e. z • The recorder is factory set "Group REC" to "...
...the high power consumption required for recording. • If the power supply is done. Make sure the x indication is displayed before the x indication appears in the display, the first few seconds of a mechanism that disables recording when the remaining battery power is estimated by the recorder to... from that point. • You can monitor the sound during a recording or editing operation, or while "DATA SAVE" or "SYSTEM FILE WRITING" is displayed. If you do not want to make a new group whenever recording is disrupted (i.e. z • The recorder is factory set "Group REC" to "...

User Manual
Page 25
Press NX on the remote control. X x Jog dial (NENT) ., > 2 Press VOL + or - The volume will automatically turn off in the display. Playback starts from the point you stop play, press x. After you last stopped playing. Turn the VOL +, - VOL +, - VOL +, - control on the remote control. to ...
Press NX on the remote control. X x Jog dial (NENT) ., > 2 Press VOL + or - The volume will automatically turn off in the display. Playback starts from the point you stop play, press x. After you last stopped playing. Turn the VOL +, - VOL +, - VOL +, - control on the remote control. to ...

User Manual
Page 27
Before the menu operation, you can set the menu items, do the following procedure. Refer to "Changing the displayed menu items (Menu Mode)" (page 57) for recording, playback, editing, etc. To return the preceding setting Press x • CANCEL. To set "Menu Mode" to "Advanced" (... . 27 The setting will be entered when you are doing a menu operation for the first time after purchasing the recorder, "Menu Mode" appears in the display. If you press the jog dial (N/ENT) at the last.
Before the menu operation, you can set the menu items, do the following procedure. Refer to "Changing the displayed menu items (Menu Mode)" (page 57) for recording, playback, editing, etc. To return the preceding setting Press x • CANCEL. To set "Menu Mode" to "Advanced" (... . 27 The setting will be entered when you are doing a menu operation for the first time after purchasing the recorder, "Menu Mode" appears in the display. If you press the jog dial (N/ENT) at the last.

User Manual
Page 28
...under "Menu 1" are the selectable items which appear when you select an item in Hi-MD mode only). The items can be displayed in the display window. page 51 Erases tracks, groups, or the entire disc page 52 contents. Repeats playback. List of menus The following table shows... the menu items that you can be set with the recorder only. Menu 1 Edit Display Play Mode Sound Menu 2 Title Input* Group Set* GroupRelease* Move* Erase Format* Lap Time 1 Remain Tr Property REC Remain All Remain ...
...under "Menu 1" are the selectable items which appear when you select an item in Hi-MD mode only). The items can be displayed in the display window. page 51 Erases tracks, groups, or the entire disc page 52 contents. Repeats playback. List of menus The following table shows... the menu items that you can be set with the recorder only. Menu 1 Edit Display Play Mode Sound Menu 2 Title Input* Group Set* GroupRelease* Move* Erase Format* Lap Time 1 Remain Tr Property REC Remain All Remain ...

User Manual
Page 29
... a specific time interval. Selects the language used in Hi-MD mode. Manually adjusts the recording level. Changes the displayed menu items. page 57 Sets a limit on the page 60 display when turning the jog dial. Menu Mode AVLS* Beep* EL Light Disc Memory* Quick Mode* Disc Mode Jog Dial...REC* SYNC REC* - page 36 Selects or deselects creation of the non-audio data page 65 stored on or off . page 57 Turns the display window on or off . page 58 Stores the recorder settings (Disc Memory). page 35 Sets the microphone recording level adjustment mode. page 58 Sets...
... a specific time interval. Selects the language used in Hi-MD mode. Manually adjusts the recording level. Changes the displayed menu items. page 57 Sets a limit on the page 60 display when turning the jog dial. Menu Mode AVLS* Beep* EL Light Disc Memory* Quick Mode* Disc Mode Jog Dial...REC* SYNC REC* - page 36 Selects or deselects creation of the non-audio data page 65 stored on or off . page 57 Turns the display window on or off . page 58 Stores the recorder settings (Disc Memory). page 35 Sets the microphone recording level adjustment mode. page 58 Sets...
User Manual
Page 30
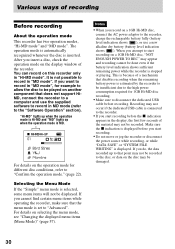
... the high power consumption required for different disc conditions, refer to "Confirm the operation mode." (page 22). Make sure the x indication is displayed before you attempt to be recorded. For details on the operation mode for 1GB Hi-MD disc recording. • Make sure to disconnect the...charge the rechargeable battery fully (battery level indication shows ), or use the supplied software to record in MD mode (refer to record in the display, the first few seconds of recording Before recording About the operation mode This recorder has two operation modes, "Hi-MD mode" and "MD...
... the high power consumption required for different disc conditions, refer to "Confirm the operation mode." (page 22). Make sure the x indication is displayed before you attempt to be recorded. For details on the operation mode for 1GB Hi-MD disc recording. • Make sure to disconnect the...charge the rechargeable battery fully (battery level indication shows ), or use the supplied software to record in MD mode (refer to record in the display, the first few seconds of recording Before recording About the operation mode This recorder has two operation modes, "Hi-MD mode" and "MD...

User Manual
Page 31
.... when recording or during stop. Viewing various information You can check the remaining time, track number, etc. MENU Jog dial 1 Enter the menu and select "Display". 2 Turn the jog dial to select the information you press the jog dial, the selected information appears at A, B and C.
.... when recording or during stop. Viewing various information You can check the remaining time, track number, etc. MENU Jog dial 1 Enter the menu and select "Display". 2 Turn the jog dial to select the information you press the jog dial, the selected information appears at A, B and C.

User Manual
Page 32
... you may not be able to select certain indications or the indications may not match the one displayed by the SonicStage software. 3) Appears for tracks that have time stamp information. 4) The title that is displayed varies according to the selected Main play mode is set to "On". While recording Lap Time A Track...
... you may not be able to select certain indications or the indications may not match the one displayed by the SonicStage software. 3) Appears for tracks that have time stamp information. 4) The title that is displayed varies according to the selected Main play mode is set to "On". While recording Lap Time A Track...

User Manual
Page 34
... supplied software (refer to the "Software Operation" section). on this recorder. Recording from equipment with analog output, such as a cassette recorder, radio, or TV. Recording Display Recording time mode Linear PCM PCM • Approx. 28 min. TV, cassette recorder, etc. Use the appropriate connecting cord to record from a TV or radio...
... supplied software (refer to the "Software Operation" section). on this recorder. Recording from equipment with analog output, such as a cassette recorder, radio, or TV. Recording Display Recording time mode Linear PCM PCM • Approx. 28 min. TV, cassette recorder, etc. Use the appropriate connecting cord to record from a TV or radio...

