Operating Instructions
Page 14
... N* .,> (search/AMS) x • CANCEL/CHG (stop/cancel/ charge) * N has a tactile dot. 14 I REC (record) • T MARK button J USB connecting jack K Handstrap hole Use the hole to attach your own strap. Looking at the bottom) M LINE IN (OPTICAL) jack N HOLD switch To ...prevent the buttons from being accidentally operated when you carry the recorder, use this function. L Battery compartment (at controls The recorder A Display window B GROUP button C X (pause) button D END SEARCH button E MENU button F OPEN button G VOL +*, -
... N* .,> (search/AMS) x • CANCEL/CHG (stop/cancel/ charge) * N has a tactile dot. 14 I REC (record) • T MARK button J USB connecting jack K Handstrap hole Use the hole to attach your own strap. Looking at the bottom) M LINE IN (OPTICAL) jack N HOLD switch To ...prevent the buttons from being accidentally operated when you carry the recorder, use this function. L Battery compartment (at controls The recorder A Display window B GROUP button C X (pause) button D END SEARCH button E MENU button F OPEN button G VOL +*, -
Operating Instructions
Page 16
... - (to slide towards ): tune forward C Display window D x (stop) button E (group) +, - I C J D K E A VOL +, - G Clip H HOLD switch To prevent the buttons from being accidentally operated when you carry the recorder, use this function. buttons Press to slide towards ): tune backward TUNE + (to adjust the volume. buttons F RADIO ON/OFF button Press to turn on or off the radio...
... - (to slide towards ): tune forward C Display window D x (stop) button E (group) +, - I C J D K E A VOL +, - G Clip H HOLD switch To prevent the buttons from being accidentally operated when you carry the recorder, use this function. buttons Press to slide towards ): tune backward TUNE + (to adjust the volume. buttons F RADIO ON/OFF button Press to turn on or off the radio...
Operating Instructions
Page 24
... z • The recording level is disconnected. If the recording does not start from the end of the previously recorded material without pressing the END SEARCH button (page 56). 2) A track mark is the case, connect the AC power adaptor to the portable CD player and use it will begin from the top...
... z • The recording level is disconnected. If the recording does not start from the end of the previously recorded material without pressing the END SEARCH button (page 56). 2) A track mark is the case, connect the AC power adaptor to the portable CD player and use it will begin from the top...

Operating Instructions
Page 26
... with no group settings1)) Remove the MD Operation on the remote control Press the jog lever (NX). Slide the jog lever towards . Slide and hold . button Press x and open the lid. 1) For more details, see "Using the group function" (page 46). 2) Once you open the lid.2) Operation on the recorder Press...
... with no group settings1)) Remove the MD Operation on the remote control Press the jog lever (NX). Slide the jog lever towards . Slide and hold . button Press x and open the lid. 1) For more details, see "Using the group function" (page 46). 2) Once you open the lid.2) Operation on the recorder Press...
Operating Instructions
Page 30
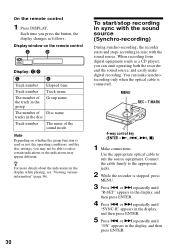
... source (Synchro-recording) During synchro-recording, the recorder starts and stops recording in the display, and then press ENTER. 5 Press . Each time you press the button, the display changes as a CD player), you may not be able to select certain indications or the indications may appear different. On the remote control...
... source (Synchro-recording) During synchro-recording, the recorder starts and stops recording in the display, and then press ENTER. 5 Press . Each time you press the button, the display changes as a CD player), you may not be able to select certain indications or the indications may appear different. On the remote control...
Operating Instructions
Page 36
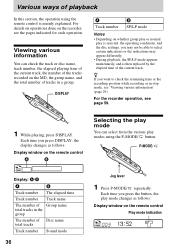
... as follows: Display window on whether group play or normal play is selected, the operating conditions, and the disc settings, you press the button, the play modes using the remote control is then replaced by the elapsed time of Disc name total tracks Track number Sound mode 36 Jog... number of the tracks recorded on the MD, the group name, and the total number of playback In this section, the operation using the P-MODE/ button. P-MODE/ Display: A/B A B Track number The elapsed time Track number Track name The number of Group name total tracks in stop mode, see page 59. ...
... as follows: Display window on whether group play or normal play is selected, the operating conditions, and the disc settings, you press the button, the play modes using the remote control is then replaced by the elapsed time of Disc name total tracks Track number Sound mode 36 Jog... number of the tracks recorded on the MD, the group name, and the total number of playback In this section, the operation using the P-MODE/ button. P-MODE/ Display: A/B A B Track number The elapsed time Track number Track name The number of Group name total tracks in stop mode, see page 59. ...

Operating Instructions
Page 37
...-play, and shuffle play mode. 1 During playback in the selected play mode, press and hold the jog lever for 2 seconds or more . z By pressing P-MODE/ button during repeat play, you want to bookmark other tracks. To bookmark the tracks 1 While playing the track you can bookmark tracks on a disc and play...
...-play, and shuffle play mode. 1 During playback in the selected play mode, press and hold the jog lever for 2 seconds or more . z By pressing P-MODE/ button during repeat play, you want to bookmark other tracks. To bookmark the tracks 1 While playing the track you can bookmark tracks on a disc and play...

Operating Instructions
Page 39
... another Digital Sound Preset during a recording operation will not affect the quality of recorded sound. 39 To cancel the procedure Press and hold the DISPLAY button or x button for 3 minutes, the current setting is not operated approximately for 2 seconds or more. To cancel the setting Press SOUND repeatedly until nothing appears in...
... another Digital Sound Preset during a recording operation will not affect the quality of recorded sound. 39 To cancel the procedure Press and hold the DISPLAY button or x button for 3 minutes, the current setting is not operated approximately for 2 seconds or more. To cancel the setting Press SOUND repeatedly until nothing appears in...
Operating Instructions
Page 41
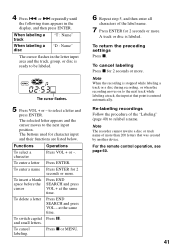
... + at the same time. Press x or MENU. 6 Repeat step 5, and then enter all characters of the "Labeling" (page 40) to the next input position. The buttons used for 2 seconds or more . To switch capital Press X. Re-labeling recordings Follow the procedure of the label name. 7 Press ENTER for character input and...
... + at the same time. Press x or MENU. 6 Repeat step 5, and then enter all characters of the "Labeling" (page 40) to the next input position. The buttons used for 2 seconds or more . To switch capital Press X. Re-labeling recordings Follow the procedure of the label name. 7 Press ENTER for character input and...
Operating Instructions
Page 47
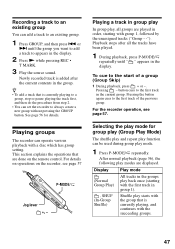
... procedure from step 2. • You can set the recorder to the start of the previous group. For details on operations on the remote control. button cues to an existing group. 1 Press GROUP, and then press . Selecting the play mode. 1 Press P-MODE/ repeatedly. Recording a track to...current group. or > until " " appears in the display. 2 Press N while pressing REC • T MARK. 3 Play the source sound. Pressing the button again cues to appears in the display. z • To add a track that is currently playing, and continues with a disc which has group setting. Playing groups...
... procedure from step 2. • You can set the recorder to the start of the previous group. For details on operations on the remote control. button cues to an existing group. 1 Press GROUP, and then press . Selecting the play mode. 1 Press P-MODE/ repeatedly. Recording a track to...current group. or > until " " appears in the display. 2 Press N while pressing REC • T MARK. 3 Play the source sound. Pressing the button again cues to appears in the display. z • To add a track that is currently playing, and continues with a disc which has group setting. Playing groups...

Operating Instructions
Page 57
...2 Select "RepON" or "RepOFF". 57 Flashing slowly B 007 The first track of a group (Group Skip) 1 Press GROUP. 2 While " " flashing, press . button cues to the first track in step 2. The following group play mode appears after normal play the bookmarked tracks 1 Select " TrPLAY?" Pressing . For more details... selected tracks only (Bookmark Play) To bookmark the tracks 1 While playing the track you play mode selected in the current group. button again cues to the first track of "Selecting the play is currently playing, and continues with group settings. Display Play mode All ...
...2 Select "RepON" or "RepOFF". 57 Flashing slowly B 007 The first track of a group (Group Skip) 1 Press GROUP. 2 While " " flashing, press . button cues to the first track in step 2. The following group play mode appears after normal play the bookmarked tracks 1 Select " TrPLAY?" Pressing . For more details... selected tracks only (Bookmark Play) To bookmark the tracks 1 While playing the track you play mode selected in the current group. button again cues to the first track of "Selecting the play is currently playing, and continues with group settings. Display Play mode All ...

Operating Instructions
Page 58
... menu and select "SOUND" - or > repeatedly to select "SOUND1" or "SOUND2", and then press ENTER. Starting the playback quickly (Quick Mode) After pressing the playback button or cueing to the normal setting Select "NORMAL" in 8 steps (-4, -3, ...±0, ...+2, +3). 4 Press ENTER. "SET". 2 Press . To switch back to the track, the playback can be...
... menu and select "SOUND" - or > repeatedly to select "SOUND1" or "SOUND2", and then press ENTER. Starting the playback quickly (Quick Mode) After pressing the playback button or cueing to the normal setting Select "NORMAL" in 8 steps (-4, -3, ...±0, ...+2, +3). 4 Press ENTER. "SET". 2 Press . To switch back to the track, the playback can be...
Operating Instructions
Page 75
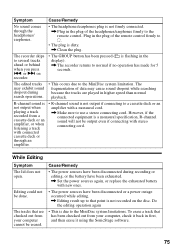
... normal playback. While Editing Symptom The lid does not open. Do the editing operation again • This is not recorded on recorder. • The GROUP button has been pressed ( is not output if connecting to a cassette deck or an amplifier with a monaural cord. , Make sure to use a stereo connecting cord. Symptom...
... normal playback. While Editing Symptom The lid does not open. Do the editing operation again • This is not recorded on recorder. • The GROUP button has been pressed ( is not output if connecting to a cassette deck or an amplifier with a monaural cord. , Make sure to use a stereo connecting cord. Symptom...

Operating Instructions
Page 77
.... • No disc is inserted. , Insert a recorded disc. • The HOLD function is turned on ("HOLD" appears in the display when you press an operation button on the remote control and the radio does not operate. • The rechargeable battery or the alkaline dry battery is used up. - Symptom Cause/Remedy...
.... • No disc is inserted. , Insert a recorded disc. • The HOLD function is turned on ("HOLD" appears in the display when you press an operation button on the remote control and the radio does not operate. • The rechargeable battery or the alkaline dry battery is used up. - Symptom Cause/Remedy...

Operating Instructions
Page 95
... title is labeled, the label information will be transferred to a disc along with the albums. See the online help for details (page 100). ([CD Info]) button for use in the Music Drive window. 2 Double click the desired album name. "All Playlists" appears and all the albums stored on your Net MD...
... title is labeled, the label information will be transferred to a disc along with the albums. See the online help for details (page 100). ([CD Info]) button for use in the Music Drive window. 2 Double click the desired album name. "All Playlists" appears and all the albums stored on your Net MD...
SonicStage v1.5 Operating Instructions
Page 8
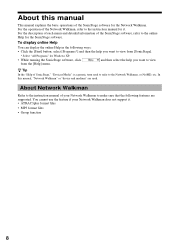
... the SonicStage software for the SonicStage software. To display online Help You can display the online Help in the following ways: • Click the [Start] button, select [Programs*] and then the help you want to make sure that the following features are used to refer to the Network Walkman, or NetMD...
... the SonicStage software for the SonicStage software. To display online Help You can display the online Help in the following ways: • Click the [Start] button, select [Programs*] and then the help you want to make sure that the following features are used to refer to the Network Walkman, or NetMD...

SonicStage v1.5 Operating Instructions
Page 13
Source icons Basic Operations Recording/Transferring audio files Click the Recording button to display the Recording Assistant panel for recording audio files from audio CDs or transferring audio files to your Network Walkman (Check-in/Check-out). 1 .../Transfer window. 13 In the Recording Assistant panel, click icons and select a combination of the window and recording/transferring audio files by using the Recording button. Basic Operations About SonicStage With the SonicStage software, you can easily play audio files by clicking on the Source icons at the top of recording...
Source icons Basic Operations Recording/Transferring audio files Click the Recording button to display the Recording Assistant panel for recording audio files from audio CDs or transferring audio files to your Network Walkman (Check-in/Check-out). 1 .../Transfer window. 13 In the Recording Assistant panel, click icons and select a combination of the window and recording/transferring audio files by using the Recording button. Basic Operations About SonicStage With the SonicStage software, you can easily play audio files by clicking on the Source icons at the top of recording...

SonicStage v1.5 Operating Instructions
Page 14
... Help for the SonicStage software. The audio files in the audio CD will be displayed on the desktop, or click the [Start] button and then select [Programs*], [SonicStage], and [SonicStage]. If you can also transfer audio files from audio CDs to the hard disk ... Starting SonicStage Double-click the [SonicStage] icon on the left side of the window. Record All button Record Setting button Rec Selection button Stop button Select All (Cancel check) button CD Info button 14 If the following Record/Transfer window is not displayed automatically, follow step 2. If the Record/Transfer...
... Help for the SonicStage software. The audio files in the audio CD will be displayed on the desktop, or click the [Start] button and then select [Programs*], [SonicStage], and [SonicStage]. If you can also transfer audio files from audio CDs to the hard disk ... Starting SonicStage Double-click the [SonicStage] icon on the left side of the window. Record All button Record Setting button Rec Selection button Stop button Select All (Cancel check) button CD Info button 14 If the following Record/Transfer window is not displayed automatically, follow step 2. If the Record/Transfer...

SonicStage v1.5 Operating Instructions
Page 16
... to stop recording Click (Stop) at the bottom of the window and then check the CD Track# you want to record. * When the Record All button is completed, the playlist will be registered on the hard disk and the recorded audio files will not be recorded Uncheck the CD Track# that...
... to stop recording Click (Stop) at the bottom of the window and then check the CD Track# you want to record. * When the Record All button is completed, the playlist will be registered on the hard disk and the recorded audio files will not be recorded Uncheck the CD Track# that...

SonicStage v1.5 Operating Instructions
Page 17
... Track Information is displayed. The edit area is displayed. 6 Enter the new title in "All Playlists" at the bottom right of the window. Properties button 4 Select the playlist including the track you want to edit the title in the "Title" field and click [OK]. The track title is not displayed..., click . Edit button 3 Click at the left of the window. Basic Operations Labeling audio files of recorded tracks You can edit the track titles after recording audio files...
... Track Information is displayed. The edit area is displayed. 6 Enter the new title in "All Playlists" at the bottom right of the window. Properties button 4 Select the playlist including the track you want to edit the title in the "Title" field and click [OK]. The track title is not displayed..., click . Edit button 3 Click at the left of the window. Basic Operations Labeling audio files of recorded tracks You can edit the track titles after recording audio files...


