Operating Instructions
Page 4
... used with this software as a result of defective manufacturing, SONY will replace it in whole or in part, or renting the software without notice. • Operation of this recorder with software other than that ... laws prohibit reproducing the software or the manual accompanying it . Program © 2001, 2002 Sony Corporation Documentation © 2003 Sony Corporation 4 • SonicStage, OpenMG and the OpenMG logo, MagicGate, Net MD and the Net MD logo are trademarks of Sony Corporation. • Microsoft, Windows, Windows NT and Windows Media are trademarks or registered trademarks ...
... used with this software as a result of defective manufacturing, SONY will replace it in whole or in part, or renting the software without notice. • Operation of this recorder with software other than that ... laws prohibit reproducing the software or the manual accompanying it . Program © 2001, 2002 Sony Corporation Documentation © 2003 Sony Corporation 4 • SonicStage, OpenMG and the OpenMG logo, MagicGate, Net MD and the Net MD logo are trademarks of Sony Corporation. • Microsoft, Windows, Windows NT and Windows Media are trademarks or registered trademarks ...

Operating Instructions
Page 6
Table of contents Recorder Operations Looking at controls 14 Getting started 18 Recording an MD right away 22 Playing an MD right away 25 Listening to the radio 27 Various ways of recording 29 Viewing various information 29 To start/stop recording in sync with the ...
Table of contents Recorder Operations Looking at controls 14 Getting started 18 Recording an MD right away 22 Playing an MD right away 25 Listening to the radio 27 Various ways of recording 29 Viewing various information 29 To start/stop recording in sync with the ...
Operating Instructions
Page 10
...environment 87 System requirements 87 Installing the software onto your computer 88 Before installing the software 88 Installing SonicStage Ver.1.5 89 Connecting the Net MD to your computer 91 Storing audio data to your computer 92 Starting SonicStage 92 Recording audio CDs to the hard disk drive 93 Labeling...audio data from your computer to the Net MD (Check-out 96 Checking out audio files to the Net MD 96 Listening to an MD 99 Listening to an MD with the Net MD connected to the computer 99 Listening to an MD with the Net MD disconnected from the computer 99 Advanced operations ...
...environment 87 System requirements 87 Installing the software onto your computer 88 Before installing the software 88 Installing SonicStage Ver.1.5 89 Connecting the Net MD to your computer 91 Storing audio data to your computer 92 Starting SonicStage 92 Recording audio CDs to the hard disk drive 93 Labeling...audio data from your computer to the Net MD (Check-out 96 Checking out audio files to the Net MD 96 Listening to an MD 99 Listening to an MD with the Net MD connected to the computer 99 Listening to an MD with the Net MD disconnected from the computer 99 Advanced operations ...
Operating Instructions
Page 11
... For Windows Millennium Edition/Windows 98 Second Edition users 106 For Windows 2000 users 107 Troubleshooting 108 If your computer does not recognize the Net MD 110 If the installation was not successful 110 Information and explanations 112 Net...
... For Windows Millennium Edition/Windows 98 Second Edition users 106 For Windows 2000 users 107 Troubleshooting 108 If your computer does not recognize the Net MD 110 If the installation was not successful 110 Information and explanations 112 Net...
Operating Instructions
Page 12
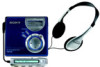
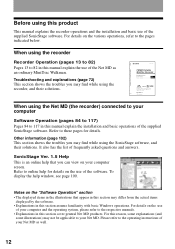
... 117) Pages 84 to 82 in this section may find while using the recorder, and their solutions. MZ-NF610 ©2003 Sony Corporation When using the Net MD (the recorder) connected to the respective manuals. • Explanations in the illustrations that you can view ...using this product This manual explains the recorder operations and the installation and basic use of the Net MD as well. 12 FM/AM Portable MiniDisc Recorder MZ-NF610 3-255-343-11(1) FM/AM Portable MiniDisc Recorder Operating Instructions Recorder Operation p_a_g_e_1_3______ Software Operation p_a_g_e_8_3______ &#...
... 117) Pages 84 to 82 in this section may find while using the recorder, and their solutions. MZ-NF610 ©2003 Sony Corporation When using the Net MD (the recorder) connected to the respective manuals. • Explanations in the illustrations that you can view ...using this product This manual explains the recorder operations and the installation and basic use of the Net MD as well. 12 FM/AM Portable MiniDisc Recorder MZ-NF610 3-255-343-11(1) FM/AM Portable MiniDisc Recorder Operating Instructions Recorder Operation p_a_g_e_1_3______ Software Operation p_a_g_e_8_3______ &#...
Operating Instructions
Page 15
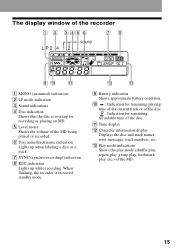
E Level meter Shows the volume of the MD. 15 qa A MONO (monaural) indication B LP mode indication C Sound indications D Disc indication Shows that the disc is in record standby ... battery condition. M Play mode indications Shows the play mode (shuffle play, repeat play, group play, bookmark play, etc.) of the MD being played or recorded. F Disc name/track name indication Lights up while recording. When flashing, the recorder is rotating for remaining recordable ...error messages, track numbers, etc. The display window of the disc : Indication for recording or playing an MD.
E Level meter Shows the volume of the MD. 15 qa A MONO (monaural) indication B LP mode indication C Sound indications D Disc indication Shows that the disc is in record standby ... battery condition. M Play mode indications Shows the play mode (shuffle play, repeat play, group play, bookmark play, etc.) of the MD being played or recorded. F Disc name/track name indication Lights up while recording. When flashing, the recorder is rotating for remaining recordable ...error messages, track numbers, etc. The display window of the disc : Indication for recording or playing an MD.
Operating Instructions
Page 22
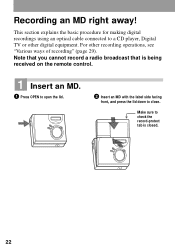
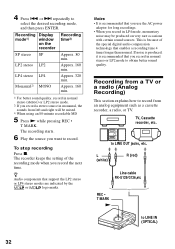
Make sure to check the record-protect tab is being received on the remote control. 1 Insert an MD. 1 Press OPEN to open the lid. 2 Insert an MD with the label side facing front, and press the lid down to a CD player, Digital TV or other recording operations, see "Various ways of recording" (page 29). For other digital equipment. This section explains the basic procedure for making digital recordings using an optical cable connected to close. Note that you cannot record a radio broadcast that is closed. 22 Recording an MD right away!
Make sure to check the record-protect tab is being received on the remote control. 1 Insert an MD. 1 Press OPEN to open the lid. 2 Insert an MD with the label side facing front, and press the lid down to a CD player, Digital TV or other recording operations, see "Various ways of recording" (page 29). For other digital equipment. This section explains the basic procedure for making digital recordings using an optical cable connected to close. Note that you cannot record a radio broadcast that is closed. 22 Recording an MD right away!
Operating Instructions
Page 23
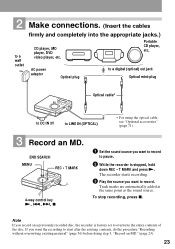
... set to start after the existing contents, do the procedure "Recording without overwriting existing material" (page 56) before doing step 3, "Record an MD." (page 23). 23 Track marks are automatically added at the same point as the sound source. Portable CD player, etc. The recorder starts ...Make connections. (Insert the cables to LINE IN (OPTICAL) ∗ For using the optical cable, see "Optional accessories" (page 71). 3 Record an MD. AC power adaptor Optical plug to a digital (optical) out jack Optical mini-plug Optical cable* to DC IN 3V to a wall outlet firmly and...
... set to start after the existing contents, do the procedure "Recording without overwriting existing material" (page 56) before doing step 3, "Record an MD." (page 23). 23 Track marks are automatically added at the same point as the sound source. Portable CD player, etc. The recorder starts ...Make connections. (Insert the cables to LINE IN (OPTICAL) ∗ For using the optical cable, see "Optional accessories" (page 71). 3 Record an MD. AC power adaptor Optical plug to a digital (optical) out jack Optical mini-plug Optical cable* to DC IN 3V to a wall outlet firmly and...
Operating Instructions
Page 24
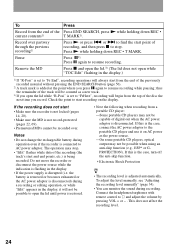
...24 Press N while holding down REC • T MARK. The operation may not be recorded over partway through the previous recording1) Pause Remove the MD Press Press END SEARCH, press N while holding down REC • T MARK1). Do not move the recorder or disconnect the power source while the ... material without pressing the END SEARCH button (page 56). 2) A track mark is not record-protected (pages 22, 69). • Premastered MDs cannot be capable of digital out when the AC power adaptor is adjusted automatically. the battery is removed or becomes exhausted or the AC power...
...24 Press N while holding down REC • T MARK. The operation may not be recorded over partway through the previous recording1) Pause Remove the MD Press Press END SEARCH, press N while holding down REC • T MARK1). Do not move the recorder or disconnect the power source while the ... material without pressing the END SEARCH button (page 56). 2) A track mark is not record-protected (pages 22, 69). • Premastered MDs cannot be capable of digital out when the AC power adaptor is adjusted automatically. the battery is removed or becomes exhausted or the AC power...
Operating Instructions
Page 25
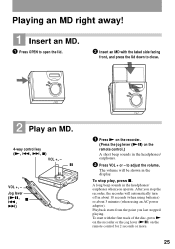
... label side facing front, and press the lid down to close. 2 Play an MD. 4-way control key (N, ., >, x) VOL +, - After you stop play, press x. Playing an MD right away! 1 Insert an MD. 1 Press OPEN to open the lid. 2 Insert an MD with the first track of the disc, press N on the recorder or the jog...
... label side facing front, and press the lid down to close. 2 Play an MD. 4-way control key (N, ., >, x) VOL +, - After you stop play, press x. Playing an MD right away! 1 Insert an MD. 1 Press OPEN to open the lid. 2 Insert an MD with the first track of the disc, press N on the recorder or the jog...

Operating Instructions
Page 26
... X again to resume play. Press x and open the lid, the point to the beginning of the disc with no group settings1)) Remove the MD Operation on the remote control Press the jog lever (NX). Slide and hold the jog lever towards . Slide and hold the jog lever towards .... > while the recorder is played. 26 Note The playback sound may skip if: • the recorder receives stronger continuous shock. • a dirty or scratched MD is stopped. or > while pausing. Slide and hold . or > while pausing. or >. Press the jog lever (NX) again to resume play will change ...
... X again to resume play. Press x and open the lid, the point to the beginning of the disc with no group settings1)) Remove the MD Operation on the remote control Press the jog lever (NX). Slide and hold the jog lever towards . Slide and hold the jog lever towards .... > while the recorder is played. 26 Note The playback sound may skip if: • the recorder receives stronger continuous shock. • a dirty or scratched MD is stopped. or > while pausing. Slide and hold . or > while pausing. or >. Press the jog lever (NX) again to resume play will change ...
Operating Instructions
Page 28
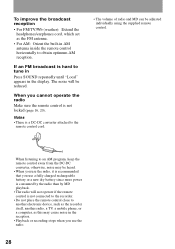
... the DC-DC converter, otherwise, noise may cause noise in the display. When listening to the remote control cord. • The volume of radio and MD can be adjusted individually using the supplied remote control. To improve the broadcast reception • For FM/TV/Wb (weather): Extend the headphones/earphones cord...; Playback or recording stops when you use a fully charged rechargeable battery or a new dry battery since more power is consumed by the radio than by MD playback. • The radio will be reduced.
... the DC-DC converter, otherwise, noise may cause noise in the display. When listening to the remote control cord. • The volume of radio and MD can be adjusted individually using the supplied remote control. To improve the broadcast reception • For FM/TV/Wb (weather): Extend the headphones/earphones cord...; Playback or recording stops when you use a fully charged rechargeable battery or a new dry battery since more power is consumed by the radio than by MD playback. • The radio will be reduced.
Operating Instructions
Page 31
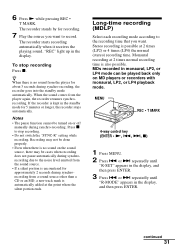
...the recorder resumes synchrorecording. Press x to the noise level emitted from the sound source. • If a silent portion is no sound on MD players or recorders with monaural, LP2, or LP4 playback mode. "REC" light up in monaural, LP2, or LP4 mode can be played ...the recorder goes into the standby mode automatically. MENU REC • T MARK 4-way control key (ENTER • N, ., >, x) 1 Press MENU. 2 Press . MDs recorded in the display. 6 Press N while pressing REC • T MARK. The recorder stands by for about 3 seconds during synchro-recording. To stop recording. • ...
...the recorder resumes synchrorecording. Press x to the noise level emitted from the sound source. • If a silent portion is no sound on MD players or recorders with monaural, LP2, or LP4 playback mode. "REC" light up in monaural, LP2, or LP4 mode can be played ...the recorder goes into the standby mode automatically. MENU REC • T MARK 4-way control key (ENTER • N, ., >, x) 1 Press MENU. 2 Press . MDs recorded in the display. 6 Press N while pressing REC • T MARK. The recorder stands by for about 3 seconds during synchro-recording. To stop recording. • ...
Operating Instructions
Page 32
... produced, it is because of the recording mode when you record in LP4 mode, momentary noise may be mixed. 3) When using an 80-minute recordable MD 5 Press N while pressing REC • T MARK. z Audio components that you record the next time. Recording Display mode1) window on very rare occasions with certain sound...
... produced, it is because of the recording mode when you record in LP4 mode, momentary noise may be mixed. 3) When using an 80-minute recordable MD 5 Press N while pressing REC • T MARK. z Audio components that you record the next time. Recording Display mode1) window on very rare occasions with certain sound...
Operating Instructions
Page 36
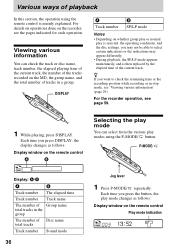
... from the various play is selected, the operating conditions, and the disc settings, you press DISPLAY, the display changes as follows: Display window on the MD, the group name, and the total number of tracks in stop mode, see "Viewing various information" (page 29). For the recorder operation, see the pages...
... from the various play is selected, the operating conditions, and the disc settings, you press DISPLAY, the display changes as follows: Display window on the MD, the group name, and the total number of tracks in stop mode, see "Viewing various information" (page 29). For the recorder operation, see the pages...
Operating Instructions
Page 40
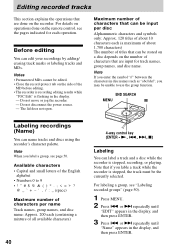
... Press MENU. 2 Press . END SEARCH MENU X Labeling recordings (Name) You can edit your recordings by adding/ erasing track marks or labeling tracks and MDs. Maximum number of characters that can be input per name Track names, group names, and disc name: Approx. 200 each (a maximum of about 1,700 ...characters) The number of the MD before editing. • The recorder is recording editing results while "TOC Edit" is stopped, recording, or playing. Do not disconnect the power source....
... Press MENU. 2 Press . END SEARCH MENU X Labeling recordings (Name) You can edit your recordings by adding/ erasing track marks or labeling tracks and MDs. Maximum number of characters that can be input per name Track names, group names, and disc name: Approx. 200 each (a maximum of about 1,700 ...characters) The number of the MD before editing. • The recorder is recording editing results while "TOC Edit" is stopped, recording, or playing. Do not disconnect the power source....
Operating Instructions
Page 43
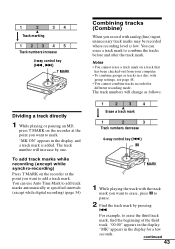
.... "MK" appears in different recording mode. 1 2 34 Track marking 12345 Track numbers increase 4-way control key (., >) T MARK Dividing a track directly 1 While playing or pausing an MD, press T MARK on the recorder at the point you want to add a track mark.
.... "MK" appears in different recording mode. 1 2 34 Track marking 12345 Track numbers increase 4-way control key (., >) T MARK Dividing a track directly 1 While playing or pausing an MD, press T MARK on the recorder at the point you want to add a track mark.
Operating Instructions
Page 45
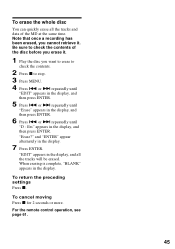
..., and all the tracks and data of the disc before you want to erase to check the contents. 2 Press x to check the contents of the MD at the same time. When erasing is complete, "BLANK" appears in the display, and then press ENTER. 6 Press . To cancel moving Press x for 2 seconds or...
..., and all the tracks and data of the disc before you want to erase to check the contents. 2 Press x to check the contents of the MD at the same time. When erasing is complete, "BLANK" appears in the display, and then press ENTER. 6 Press . To cancel moving Press x for 2 seconds or...
Operating Instructions
Page 46
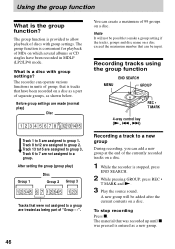
... albums or CD singles have been recorded on a disc exceed the maximum number that was recorded up until x was pressed is convenient for playback of MDs on a disc. that is stopped, press END SEARCH. 2 While pressing GROUP, press REC • T MARK and N. 3 Play the source sound. Note It will be added...
... albums or CD singles have been recorded on a disc exceed the maximum number that was recorded up until x was pressed is convenient for playback of MDs on a disc. that is stopped, press END SEARCH. 2 While pressing GROUP, press REC • T MARK and N. 3 Play the source sound. Note It will be added...

Operating Instructions
Page 56
...". The remaining recordable time on the beep sound Select "ON". "BEEP". 2 Select "OFF". A single track is set to record over the current contents of an MD, do the following procedure.
...". The remaining recordable time on the beep sound Select "ON". "BEEP". 2 Select "OFF". A single track is set to record over the current contents of an MD, do the following procedure.


