Operating Instructions
Page 13
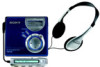
Checking the supplied accessories AC power adaptor (1) NH-7WMAA Nickel metal Headphones with a remote hydride rechargeable control (1) battery (1) (for USA model) Recorder Operation Earphones with a remote control (1) (for Canadian model) Dedicated USB cable (1) Battery carrying case (1) CD-ROM (SonicStage Ver. 1.5) (1)* ∗Do not play a CD-ROM on an audio CD player. 13
Checking the supplied accessories AC power adaptor (1) NH-7WMAA Nickel metal Headphones with a remote hydride rechargeable control (1) battery (1) (for USA model) Recorder Operation Earphones with a remote control (1) (for Canadian model) Dedicated USB cable (1) Battery carrying case (1) CD-ROM (SonicStage Ver. 1.5) (1)* ∗Do not play a CD-ROM on an audio CD player. 13
Operating Instructions
Page 16
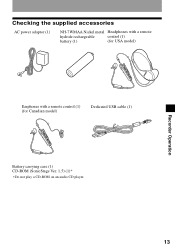
... function. buttons Press to turn on or off the radio. I C J D K E A VOL +, - buttons F RADIO ON/OFF button Press to adjust the volume. The headphones/earphones with a remote control F G A H B I DISPLAY button J P-MODE/ button K SOUND button 16 B Jog lever (. • NX/ENT • >, TUNE - • BAND • TUNE +) NX/ENT (to press): play, pause...
... function. buttons Press to turn on or off the radio. I C J D K E A VOL +, - buttons F RADIO ON/OFF button Press to adjust the volume. The headphones/earphones with a remote control F G A H B I DISPLAY button J P-MODE/ button K SOUND button 16 B Jog lever (. • NX/ENT • >, TUNE - • BAND • TUNE +) NX/ENT (to press): play, pause...
Operating Instructions
Page 17
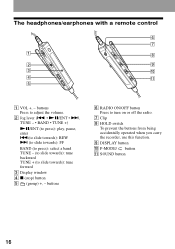
The display window of the remote control A B C D E FG A Disc indication B PRESET indication C Character information display D Play mode indication E SOUND indication H F Battery level indication G Track number/Band/Preset number display H Group indication 17
The display window of the remote control A B C D E FG A Disc indication B PRESET indication C Character information display D Play mode indication E SOUND indication H F Battery level indication G Track number/Band/Preset number display H Group indication 17
Operating Instructions
Page 20
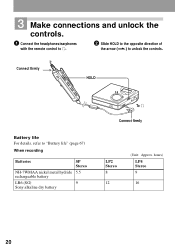
hours) LP4 Stereo 9 16 20 Connect firmly HOLD Battery life For details, refer to unlock the controls. 3 Make connections and unlock the controls. 1 Connect the headphones/earphones with the remote control to i. 2 Slide HOLD to the opposite direction of the arrow (.) to "Battery life" (page 67) When recording Batteries SP Stereo NH-7WMAA nickel metal hydride 5.5 rechargeable battery LR6 (SG) 9 Sony alkaline dry battery To i Connect firmly LP2 Stereo 8 12 (Unit: Approx.
hours) LP4 Stereo 9 16 20 Connect firmly HOLD Battery life For details, refer to unlock the controls. 3 Make connections and unlock the controls. 1 Connect the headphones/earphones with the remote control to i. 2 Slide HOLD to the opposite direction of the arrow (.) to "Battery life" (page 67) When recording Batteries SP Stereo NH-7WMAA nickel metal hydride 5.5 rechargeable battery LR6 (SG) 9 Sony alkaline dry battery To i Connect firmly LP2 Stereo 8 12 (Unit: Approx.
Operating Instructions
Page 22
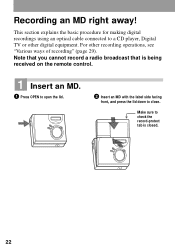
Recording an MD right away! For other digital equipment. Note that you cannot record a radio broadcast that is closed. 22 This section explains the basic procedure for making digital recordings using an optical cable connected to close. Make sure to check the record-protect tab is being received on the remote control. 1 Insert an MD. 1 Press OPEN to open the lid. 2 Insert an MD with the label side facing front, and press the lid down to a CD player, Digital TV or other recording operations, see "Various ways of recording" (page 29).
Recording an MD right away! For other digital equipment. Note that you cannot record a radio broadcast that is closed. 22 This section explains the basic procedure for making digital recordings using an optical cable connected to close. Make sure to check the record-protect tab is being received on the remote control. 1 Insert an MD. 1 Press OPEN to open the lid. 2 Insert an MD with the label side facing front, and press the lid down to a CD player, Digital TV or other recording operations, see "Various ways of recording" (page 29).
Operating Instructions
Page 24
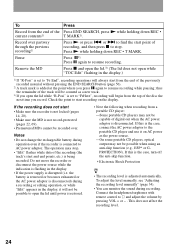
... the display. • If the power supply is connected to AC power adaptor. Press N while holding down REC • T MARK. Connect the headphones/earphones with remote control to resume recording.
... the display. • If the power supply is connected to AC power adaptor. Press N while holding down REC • T MARK. Connect the headphones/earphones with remote control to resume recording.
Operating Instructions
Page 25
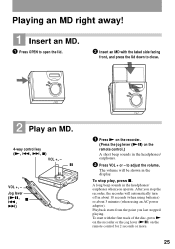
... to open the lid. 2 Insert an MD with the first track of the disc, press N on the recorder or the jog lever (NX) on the remote control.) A short beep sounds in the display. Jog lever (NX, x ., >) 1 Press N on the recorder. (Press the jog lever (NX) on the...
... to open the lid. 2 Insert an MD with the first track of the disc, press N on the recorder or the jog lever (NX) on the remote control.) A short beep sounds in the display. Jog lever (NX, x ., >) 1 Press N on the recorder. (Press the jog lever (NX) on the...

Operating Instructions
Page 26
... - If the play does not start play will change to the beginning of the disc with no group settings1)) Remove the MD Operation on the remote control Press the jog lever (NX). Slide and hold the jog lever towards . Press >. Press and hold . Press and hold the jog lever towards . Press...
... - If the play does not start play will change to the beginning of the disc with no group settings1)) Remove the MD Operation on the remote control Press the jog lever (NX). Slide and hold the jog lever towards . Press >. Press and hold . Press and hold the jog lever towards . Press...

Operating Instructions
Page 27
...select the band. If "PRESET" is being received on the remote control. 1 Turn on . repeatedly to change. To tune in a station quickly In step 3, slide and hold the jog lever until the frequency indication begins to tune in the remote control. To turn off the radio Press RADIO ON/OFF ...or x. The remote control automatically scans the radio frequencies and stops when it disappear from the display. 2 Press the jog lever...
...select the band. If "PRESET" is being received on the remote control. 1 Turn on . repeatedly to change. To tune in a station quickly In step 3, slide and hold the jog lever until the frequency indication begins to tune in the remote control. To turn off the radio Press RADIO ON/OFF ...or x. The remote control automatically scans the radio frequencies and stops when it disappear from the display. 2 Press the jog lever...
Operating Instructions
Page 28
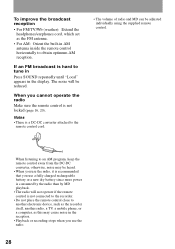
...the recorder itself, another radio, a TV, a mobile phone, or a computer, as the FM antenna. • For AM: Orient the built-in AM antenna inside the remote control horizontally to the remote control cord. • The volume of radio and MD can be reduced. When listening to an AM program, keep the... close to tune in Press SOUND repeatedly until "Local" appears in the display. When you cannot operate the radio Make sure the remote control is a DC-DC converter attached to obtain optimum AM reception. Notes • There is not locked (page 16, 20). To improve the broadcast reception...
...the recorder itself, another radio, a TV, a mobile phone, or a computer, as the FM antenna. • For AM: Orient the built-in AM antenna inside the remote control horizontally to the remote control cord. • The volume of radio and MD can be reduced. When listening to an AM program, keep the... close to tune in Press SOUND repeatedly until "Local" appears in the display. When you cannot operate the radio Make sure the remote control is a DC-DC converter attached to obtain optimum AM reception. Notes • There is not locked (page 16, 20). To improve the broadcast reception...
Operating Instructions
Page 30
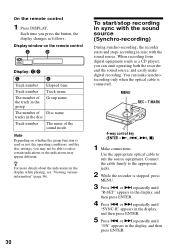
... . or > repeatedly until "R-SET" appears in the display, and then press ENTER. 4 Press . When recording from digital equipment (such as follows: Display window on the remote control C D Display: C/D C D Track number Elapsed time Track number Track name The number of the track in the group Group name The number of the sound... name of Disc name tracks in sync with the sound source. or > repeatedly until "SYNC-R" appears in the display, and then press ENTER. On the remote control 1 Press DISPLAY. Connect the cable firmly to suit the source equipment.
... . or > repeatedly until "R-SET" appears in the display, and then press ENTER. 4 Press . When recording from digital equipment (such as follows: Display window on the remote control C D Display: C/D C D Track number Elapsed time Track number Track name The number of the track in the group Group name The number of the sound... name of Disc name tracks in sync with the sound source. or > repeatedly until "SYNC-R" appears in the display, and then press ENTER. On the remote control 1 Press DISPLAY. Connect the cable firmly to suit the source equipment.

Operating Instructions
Page 33
... setting (Time:) by 1 minute, within the range of time, such as lectures, meetings, etc. 1 While the recorder is recording, press T MARK (press P-MODE/ on the remote control). The recording starts. 3 Play the source you want to 99 minutes. Use the appropriate connecting cord to insert the connectors firmly. ∗ For details...
... setting (Time:) by 1 minute, within the range of time, such as lectures, meetings, etc. 1 While the recorder is recording, press T MARK (press P-MODE/ on the remote control). The recording starts. 3 Play the source you want to 99 minutes. Use the appropriate connecting cord to insert the connectors firmly. ∗ For details...
Operating Instructions
Page 36
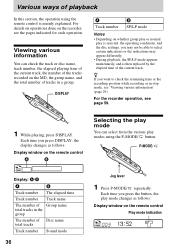
... of tracks in a group. Viewing various information You can select from the various play mode changes as follows: Display window on the remote control A B Selecting the play mode You can check the track or disc name, track number, the elapsed playing time of the current... tracks Track number Sound mode 36 Jog lever 1 Press P-MODE/ repeatedly. DISPLAY A B Track number SP/LP mode Notes • Depending on the remote control Play mode indication For the recorder operation, see the pages indicated for each operation. P-MODE/ Display: A/B A B Track number The elapsed time...
... of tracks in a group. Viewing various information You can select from the various play mode changes as follows: Display window on the remote control A B Selecting the play mode You can check the track or disc name, track number, the elapsed playing time of the current... tracks Track number Sound mode 36 Jog lever 1 Press P-MODE/ repeatedly. DISPLAY A B Track number SP/LP mode Notes • Depending on the remote control Play mode indication For the recorder operation, see the pages indicated for each operation. P-MODE/ Display: A/B A B Track number The elapsed time...
Operating Instructions
Page 40
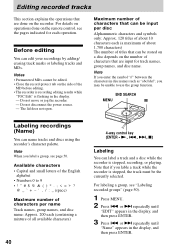
... names, group names, and disc name: Approx. 200 each operation. END SEARCH MENU X Labeling recordings (Name) You can be stored on a disc depends on the remote control, see the pages indicated for track names, group names, and disc name. For labeling a group, see page 50. Note If you lable a track while...
... names, group names, and disc name: Approx. 200 each operation. END SEARCH MENU X Labeling recordings (Name) You can be stored on a disc depends on the remote control, see the pages indicated for track names, group names, and disc name. For labeling a group, see page 50. Note If you lable a track while...
Operating Instructions
Page 41
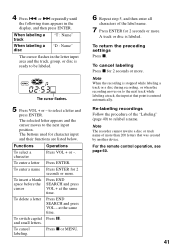
... more . 4 Press . To insert a blank space before the cursor Press END SEARCH and press VOL + at the same time. at the same time. For the remote control operation, see page 60. 41 Press x or MENU. 6 Repeat step 5, and then enter all characters of the label name. 7 Press ENTER for character input...
... more . 4 Press . To insert a blank space before the cursor Press END SEARCH and press VOL + at the same time. at the same time. For the remote control operation, see page 60. 41 Press x or MENU. 6 Repeat step 5, and then enter all characters of the label name. 7 Press ENTER for character input...
Operating Instructions
Page 42
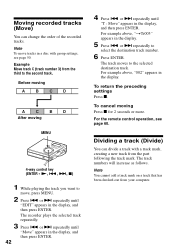
... track repeatedly. 3 Press . For example above , "002" appears in a disc with a track mark, creating a new track from the part following the track mark. For the remote control operation, see page 50. Dividing a track (Divide) You can change the order of the recorded tracks. For example above , "tTr003" appears in the display...
... track repeatedly. 3 Press . For example above , "002" appears in a disc with a track mark, creating a new track from the part following the track mark. For the remote control operation, see page 50. Dividing a track (Divide) You can change the order of the recorded tracks. For example above , "tTr003" appears in the display...
Operating Instructions
Page 44
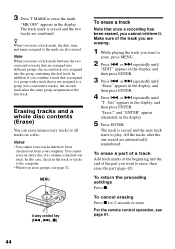
... the track or tracks to erase, then erase the part (page 42). The track is erased and the two tracks are automatically renumbered. For the remote control operation, see page 52. To return the preceding settings Press x. All the tracks after the one erased are combined. The track mark is erased...
... the track or tracks to erase, then erase the part (page 42). The track is erased and the two tracks are automatically renumbered. For the remote control operation, see page 52. To return the preceding settings Press x. All the tracks after the one erased are combined. The track mark is erased...
Operating Instructions
Page 45
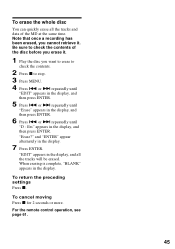
"Erase?" "EDIT" appears in the display, and then press ENTER. For the remote control operation, see page 61. 45 or > repeatedly until "D : Ers" appears in the display, and all the tracks and data of the disc before you ...
"Erase?" "EDIT" appears in the display, and then press ENTER. For the remote control operation, see page 61. 45 or > repeatedly until "D : Ers" appears in the display, and all the tracks and data of the disc before you ...
Operating Instructions
Page 47
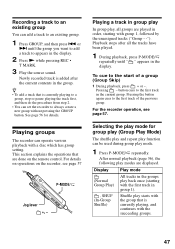
... the display. 2 Press N while pressing REC • T MARK. 3 Play the source sound. button cues to appears in the group. For details on operations on the remote control. For the recorder operation, see page 57 P-MODE/ Jog lever +, - After normal playback (page 36), the following play modes are played in order, starting...
... the display. 2 Press N while pressing REC • T MARK. 3 Play the source sound. button cues to appears in the group. For details on operations on the remote control. For the recorder operation, see page 57 P-MODE/ Jog lever +, - After normal playback (page 36), the following play modes are played in order, starting...
Operating Instructions
Page 49
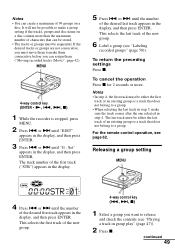
... the one selected in the display, and then press ENTER. continued 49 The track number of characters that does not belong to a group. For the remote control operation, see "Playing a track in the display. 5 Press . This selects the first track of the desired first track appears in step 4. or > until the...
... the one selected in the display, and then press ENTER. continued 49 The track number of characters that does not belong to a group. For the remote control operation, see "Playing a track in the display. 5 Press . This selects the first track of the desired first track appears in step 4. or > until the...
