
Operating Instructions (primary manual)
Page 1
Portable MiniDisc Recorder MZ-B100 3-235-455-11(1) Portable MiniDisc Recorder Operating Instructions G_B_____ Manual de instrucciones E_S_____ __________R_U_____ MZ-B100 ©2001 Sony Corporation
Portable MiniDisc Recorder MZ-B100 3-235-455-11(1) Portable MiniDisc Recorder Operating Instructions G_B_____ Manual de instrucciones E_S_____ __________R_U_____ MZ-B100 ©2001 Sony Corporation

Operating Instructions (primary manual)
Page 2
... not installed and used to operate this product. This equipment generates, uses, and can be determined by one or more of the following two conditions: (1) This device may regulate disposal of optical instruments with the instructions, may cause undesired operation. MZ-B100 Serial No. Owner's Record The serial number is located at the top and bottom. However, there is encouraged to try to Part 15 of...
... not installed and used to operate this product. This equipment generates, uses, and can be determined by one or more of the following two conditions: (1) This device may regulate disposal of optical instruments with the instructions, may cause undesired operation. MZ-B100 Serial No. Owner's Record The serial number is located at the top and bottom. However, there is encouraged to try to Part 15 of...
Operating Instructions (primary manual)
Page 4
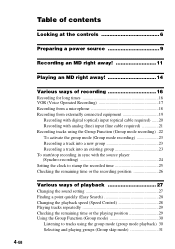
... recording 16 Recording for long times 16 VOR (Voice Operated Recording 17 Recording from a microphone 18 Recording from externally connected equipment 19 Recording with digital (optical) input (optical cable required) ......20 Recording with analog (line) input (line cable required 21 Recording tracks using the Group Function (Group mode recording) .22 To activate the group mode (Group mode recording 23 Recording a track into a new group 23 Recording a track into an existing group 23 To start/stop recording in sync with the source player (Synchro-recording 24 Setting...
... recording 16 Recording for long times 16 VOR (Voice Operated Recording 17 Recording from a microphone 18 Recording from externally connected equipment 19 Recording with digital (optical) input (optical cable required) ......20 Recording with analog (line) input (line cable required 21 Recording tracks using the Group Function (Group mode recording) .22 To activate the group mode (Group mode recording 23 Recording a track into a new group 23 Recording a track into an existing group 23 To start/stop recording in sync with the source player (Synchro-recording 24 Setting...
Operating Instructions (primary manual)
Page 5
... Moving recorded tracks 38 Moving a track to a different group 38 Changing the order of a group on a disc (Group move 39 Erasing tracks 39 To erase a track 39 To erase the whole disc 40 To erase a group 40 Other operations 41 Adjusting the contrast of the display window (Contrast adjustment) .. 41 Locking the controls (HOLD 41 Power sources 42 When to replace the batteries 42 Battery life 42 Using...
... Moving recorded tracks 38 Moving a track to a different group 38 Changing the order of a group on a disc (Group move 39 Erasing tracks 39 To erase a track 39 To erase the whole disc 40 To erase a group 40 Other operations 41 Adjusting the contrast of the display window (Contrast adjustment) .. 41 Locking the controls (HOLD 41 Power sources 42 When to replace the batteries 42 Battery life 42 Using...
Operating Instructions (primary manual)
Page 7
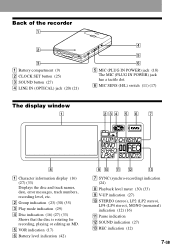
...-recording) indication (24) H Playback level meter (30) (33) I V-UP indication (27) J STEREO (stereo), LP2 (LP2 stereo), LP4 (LP4 stereo), MONO (monaural) indication (12) (16) K Pause indication L SOUND indication (27) M REC indication (12) 7-GB F MIC SENS (H/L) switch (11) (17) The display window 1 234 5 6 7 8 A Character information display (16) (27) (33) Displays the disc and track names, date, error messages, track numbers, recording level, etc. E VOR indication (17) F Battery level indication (42) 9 q; B Group indication (23) (30) (35) C Play mode indication...
...-recording) indication (24) H Playback level meter (30) (33) I V-UP indication (27) J STEREO (stereo), LP2 (LP2 stereo), LP4 (LP4 stereo), MONO (monaural) indication (12) (16) K Pause indication L SOUND indication (27) M REC indication (12) 7-GB F MIC SENS (H/L) switch (11) (17) The display window 1 234 5 6 7 8 A Character information display (16) (27) (33) Displays the disc and track names, date, error messages, track numbers, recording level, etc. E VOR indication (17) F Battery level indication (42) 9 q; B Group indication (23) (30) (35) C Play mode indication...
Operating Instructions (primary manual)
Page 9
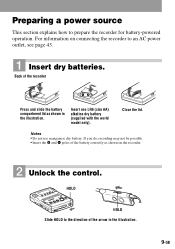
...; Do not use manganese dry battery. Close the lid. Insert one LR6 (size AA) alkaline dry battery (supplied with the world model only). Back of the arrow in the illustration. HOLD HOLD Slide HOLD to the direction of the recorder Ee Press and slide the battery compartment lid as shown on connecting the recorder to prepare the recorder for battery-powered operation. Preparing a power source This section...
...; Do not use manganese dry battery. Close the lid. Insert one LR6 (size AA) alkaline dry battery (supplied with the world model only). Back of the arrow in the illustration. HOLD HOLD Slide HOLD to the direction of the recorder Ee Press and slide the battery compartment lid as shown on connecting the recorder to prepare the recorder for battery-powered operation. Preparing a power source This section...
Operating Instructions (primary manual)
Page 12
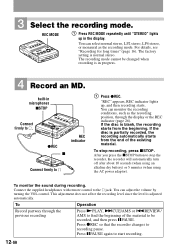
... the recording mode. After you press the xSTOP button to recording pause. To Operation Record partway through the display or the REC indicator (page 26). To stop the recorder, the recorder will automatically turn off after about 10 seconds (when using an alkaline dry battery) or 5 minutes (when using the AC power adaptor). You can adjust the volume by turning the VOL control. If the disc is partially recorded, the recording automatically starts...
... the recording mode. After you press the xSTOP button to recording pause. To Operation Record partway through the display or the REC indicator (page 26). To stop the recorder, the recorder will automatically turn off after about 10 seconds (when using an alkaline dry battery) or 5 minutes (when using the AC power adaptor). You can adjust the volume by turning the VOL control. If the disc is partially recorded, the recording automatically starts...
Operating Instructions (primary manual)
Page 14
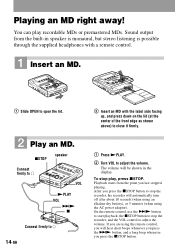
...-in the display. On the remote control, use the >N button to start playback, the xSTOP button to stop the recorder, the recorder will automatically turn off after about 10 seconds (when using an alkaline dry battery), or 5 minutes (when using the remote control, you press the xSTOP button to open the lid. 2 Play an MD. You can play , press xSTOP. If you press the xSTOP button. xSTOP speaker Connect firmly to...
...-in the display. On the remote control, use the >N button to start playback, the xSTOP button to stop the recorder, the recorder will automatically turn off after about 10 seconds (when using an alkaline dry battery), or 5 minutes (when using the remote control, you press the xSTOP button to open the lid. 2 Play an MD. You can play , press xSTOP. If you press the xSTOP button. xSTOP speaker Connect firmly to...

Operating Instructions (primary manual)
Page 15
... track2) Press >N. (Two short beeps) Pause Press XPAUSE. Remove the MD Press xSTOP and open the lid, the point to start Make sure the recorder is restored. 15-GB z Playback will change to the beginning of the last track on the remote control (Beeps in stereo Connect the supplied headphones with a remote control to the sound source. To Operation on the recorder Operation on the disc. 2) If you...
... track2) Press >N. (Two short beeps) Pause Press XPAUSE. Remove the MD Press xSTOP and open the lid, the point to start Make sure the recorder is restored. 15-GB z Playback will change to the beginning of the last track on the remote control (Beeps in stereo Connect the supplied headphones with a remote control to the sound source. To Operation on the recorder Operation on the disc. 2) If you...
Operating Instructions (primary manual)
Page 16
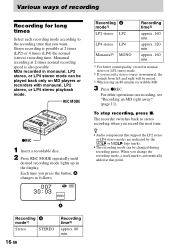
... min. For other operations on MD players or recorders with monaural, LP2 stereo, or LP4 stereo playback mode. The recorder switches back to the recording time that point. Each time you press the button, A changes as follows. 007 30:03 A Recording A mode1) Stereo STEREO 16-GB Recording time3) approx. 80 min. approx. 320 min. REC MODE zREC 1 Insert a recordable disc. 2 Press REC MODE repeatedly until desired recording mode lights up in monaural, the sounds from left and...
... min. For other operations on MD players or recorders with monaural, LP2 stereo, or LP4 stereo playback mode. The recorder switches back to the recording time that point. Each time you press the button, A changes as follows. 007 30:03 A Recording A mode1) Stereo STEREO 16-GB Recording time3) approx. 80 min. approx. 320 min. REC MODE zREC 1 Insert a recordable disc. 2 Press REC MODE repeatedly until desired recording mode lights up in monaural, the sounds from left and...
Operating Instructions (primary manual)
Page 17
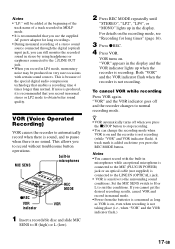
... a stereo sound source connected through the digital (optical) input jack, you can change the recording mode when VOR is on , even when recording is sensitive to H (high) or L (low). 2 Press REC MODE repeatedly until "STEREO", "LP2", "LP4", or "MONO" lights up when the recorder is no sound. This allows you press the REC MODE button. Notes • You cannot record with certain sound sources. Set the MIC SENS switch to H or L to record without troublesome button operations. If noise...
... a stereo sound source connected through the digital (optical) input jack, you can change the recording mode when VOR is on , even when recording is sensitive to H (high) or L (low). 2 Press REC MODE repeatedly until "STEREO", "LP2", "LP4", or "MONO" lights up when the recorder is no sound. This allows you press the REC MODE button. Notes • You cannot record with certain sound sources. Set the MIC SENS switch to H or L to record without troublesome button operations. If noise...
Operating Instructions (primary manual)
Page 18
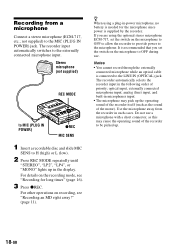
... such cases. Use the microphone away from a microphone Connect a stereo microphone (ECM-717, etc.; Stereo microphone (not supplied) REC MODE to MIC (PLUG IN POWER) zREC MIC SENS 1 Insert a recordable disc and slide MIC SENS to H (high) or L (low). 2 Press REC MODE repeatedly until "STEREO", "LP2", "LP4", or "MONO" lights up in microphones input. • The microphone may cause the operating sound of the recorder to the microphone. If you set the switch on the recording mode, see "Recording an MD right...
... such cases. Use the microphone away from a microphone Connect a stereo microphone (ECM-717, etc.; Stereo microphone (not supplied) REC MODE to MIC (PLUG IN POWER) zREC MIC SENS 1 Insert a recordable disc and slide MIC SENS to H (high) or L (low). 2 Press REC MODE repeatedly until "STEREO", "LP2", "LP4", or "MONO" lights up in microphones input. • The microphone may cause the operating sound of the recorder to the microphone. If you set the switch on the recording mode, see "Recording an MD right...
Operating Instructions (primary manual)
Page 19
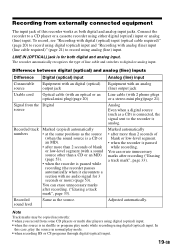
... analog (line) output jack Line cable (with 2 phono plugs or a stereo-mini plug)(page 21) Analog Even when a digital source (such as the source (when the sound source is paused while recording (the recorder pauses automatically when it encounters a section with no audio signal for both digital and analog input jacks. Adjusted automatically. The recorder automatically recognizes the type of line cable and switches to a CD player or a cassette recorder using either digital (optical) input or...
... analog (line) output jack Line cable (with 2 phono plugs or a stereo-mini plug)(page 21) Analog Even when a digital source (such as the source (when the sound source is paused while recording (the recorder pauses automatically when it encounters a section with no audio signal for both digital and analog input jacks. Adjusted automatically. The recorder automatically recognizes the type of line cable and switches to a CD player or a cassette recorder using either digital (optical) input or...

Operating Instructions (primary manual)
Page 24
... noise level emitted from the sound source. • If a silent portion is not connected to the MIC (PLUG IN POWER) jack. • You cannot change the recording mode during synchro- Notes • Do not switch the SYNCHRO REC switch after step 3. To start/stop recording Press xSTOP. Before synchro-recording, make digital recordings of a digital source on the recorder. 24-GB 3 Press zREC. Recording may be done if the connecting cord is not an optical cable...
... noise level emitted from the sound source. • If a silent portion is not connected to the MIC (PLUG IN POWER) jack. • You cannot change the recording mode during synchro- Notes • Do not switch the SYNCHRO REC switch after step 3. To start/stop recording Press xSTOP. Before synchro-recording, make digital recordings of a digital source on the recorder. 24-GB 3 Press zREC. Recording may be done if the connecting cord is not an optical cable...

Operating Instructions (primary manual)
Page 26
... stop mode A B Track number Elapsed time Track name Remaining time for recording RecRemain Current Current time Clock date In stop . DISPLAY REC indicator 1 Press DISPLAY while the recorder is recording or stopped. To know the recording condition The REC indicator lights up Recording standby flashes Less than 3 minutes' recording time available flashes slowly A track mark has been added (when controlling by the recorder only) goes off status, the recorder's operating status, or the recorder settings. number Track number Remaining time for recording...
... stop mode A B Track number Elapsed time Track name Remaining time for recording RecRemain Current Current time Clock date In stop . DISPLAY REC indicator 1 Press DISPLAY while the recorder is recording or stopped. To know the recording condition The REC indicator lights up Recording standby flashes Less than 3 minutes' recording time available flashes slowly A track mark has been added (when controlling by the recorder only) goes off status, the recorder's operating status, or the recorder settings. number Track number Remaining time for recording...

Operating Instructions (primary manual)
Page 46
.... • When recording digitally from a portable CD player, you have made using a connecting cord with an attenuator. , Use a connecting cord without an attenuator (page 21). • The AC power adaptor (not supplied) was unplugged during recording or a power outage occurred. • While operating, the recorder received a mechanical shock, too much static, abnormal power voltage caused by sliding the HOLD switch in the opposite direction of the arrow...
.... • When recording digitally from a portable CD player, you have made using a connecting cord with an attenuator. , Use a connecting cord without an attenuator (page 21). • The AC power adaptor (not supplied) was unplugged during recording or a power outage occurred. • While operating, the recorder received a mechanical shock, too much static, abnormal power voltage caused by sliding the HOLD switch in the opposite direction of the arrow...
Operating Instructions (primary manual)
Page 47
... PLAY MODE repeatedly until the disappears from the source of static. indication Playback sound skips. • The recorder is placed where it came to the last track. , Press .REVIEW/AMS repeatedly or open . • The batteries have been exhausted or the power sources have been disconnected during recording or editing. , Rerecord or reedit again. Plug in the plug of the remote control cord. After charging, set . , Set the...
... PLAY MODE repeatedly until the disappears from the source of static. indication Playback sound skips. • The recorder is placed where it came to the last track. , Press .REVIEW/AMS repeatedly or open . • The batteries have been exhausted or the power sources have been disconnected during recording or editing. , Rerecord or reedit again. Plug in the plug of the remote control cord. After charging, set . , Set the...

Operating Instructions (primary manual)
Page 50
... playback or stop. , Enter a shorter name for the track, group, or disc (page 34), or delete "LP:" from the memory to the disk. , Wait until this fails, rerecord. • There is no recording on it was accessing the recorded data. , Wait until the message goes out (in the display window, check the chart below. LOW BATT MEM OVER MENU • Batteries are weak. , Replace...
... playback or stop. , Enter a shorter name for the track, group, or disc (page 34), or delete "LP:" from the memory to the disk. , Wait until this fails, rerecord. • There is no recording on it was accessing the recorded data. , Wait until the message goes out (in the display window, check the chart below. LOW BATT MEM OVER MENU • Batteries are weak. , Replace...
Marketing Specifications
Page 1
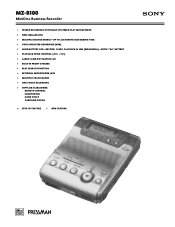
MZ-B100 MiniDisc Business Recorder • STEREO RECORDING WITH BUILT-IN STEREO FLAT MICROPHONE ◗ NEW SMALLER SIZE ◗ MULTIPLE RECORD MODES-UP TO 320 MINUTES RECORDING TIME • VOICE OPERATED RECORDING (VOR) ◗ LONG BATTERY LIFE-RECORD: 12 HRS, PLAYBACK 43 HRS (MONAURAL)-WITH 1 "AA" BATTERY • PLAYBACK SPEED CONTROL (-20% + 10%) ◗ LARGE 3-LINE DOT MATRIX LCD • BUILT-IN FRONT SPEAKER • EASY SEARCH FUNCTION • EXTERNAL MICROPHONE JACK • MULTIPLE TRACK MARKS • ONE TOUCH RECORDING • SUPPLIED ACCESSORIES...
MZ-B100 MiniDisc Business Recorder • STEREO RECORDING WITH BUILT-IN STEREO FLAT MICROPHONE ◗ NEW SMALLER SIZE ◗ MULTIPLE RECORD MODES-UP TO 320 MINUTES RECORDING TIME • VOICE OPERATED RECORDING (VOR) ◗ LONG BATTERY LIFE-RECORD: 12 HRS, PLAYBACK 43 HRS (MONAURAL)-WITH 1 "AA" BATTERY • PLAYBACK SPEED CONTROL (-20% + 10%) ◗ LARGE 3-LINE DOT MATRIX LCD • BUILT-IN FRONT SPEAKER • EASY SEARCH FUNCTION • EXTERNAL MICROPHONE JACK • MULTIPLE TRACK MARKS • ONE TOUCH RECORDING • SUPPLIED ACCESSORIES...
Marketing Specifications
Page 2
... review of recorded information ◗ LARGE 3-LINE DOT MATRIX LCD shows track in use, track remaining and name, disc remaining and name, recording date, play mode, and other functions • BUILT-IN FRONT SPEAKER has excellent sound quality for general monitoring and playback of recordings • EASY SEARCH FUNCTION allows moving forward or backward on the recording at high speed, to locate specific recorded portions for playback • EXTERNAL MICROPHONE JACK allows connection...
... review of recorded information ◗ LARGE 3-LINE DOT MATRIX LCD shows track in use, track remaining and name, disc remaining and name, recording date, play mode, and other functions • BUILT-IN FRONT SPEAKER has excellent sound quality for general monitoring and playback of recordings • EASY SEARCH FUNCTION allows moving forward or backward on the recording at high speed, to locate specific recorded portions for playback • EXTERNAL MICROPHONE JACK allows connection...


