Operating Instructions (primary manual)
Page 1
3-247-850-12(1) Portable MiniDisc Recorder Operating Instructions Recorder Operation p_a_g_e__8______ Troubleshooting and explanations _______p_a_g_e__48______ MZ-B10 ©2003 Sony Corporation
3-247-850-12(1) Portable MiniDisc Recorder Operating Instructions Recorder Operation p_a_g_e__8______ Troubleshooting and explanations _______p_a_g_e__48______ MZ-B10 ©2003 Sony Corporation
Operating Instructions (primary manual)
Page 2
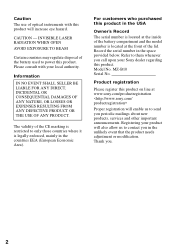
...battery compartment and the model number is legally enforced, mainly in the countries EEA (European Economic Area). Record the serial number in the unlikely event that the product needs adjustment or modification. MZ-B10 Serial No. For customers who purchased this product in the USA Owner's Record The serial number is located at the front of the battery used... FOR ANY DIRECT, INCIDENTAL OR CONSEQUENTIAL DAMAGES OF ANY NATURE, OR LOSSES OR EXPENSES RESULTING FROM ANY DEFECTIVE PRODUCT OR THE USE OF ANY PRODUCT. Refer to power this product on line at www.sony.com/productregistration ...
...battery compartment and the model number is legally enforced, mainly in the countries EEA (European Economic Area). Record the serial number in the unlikely event that the product needs adjustment or modification. MZ-B10 Serial No. For customers who purchased this product in the USA Owner's Record The serial number is located at the front of the battery used... FOR ANY DIRECT, INCIDENTAL OR CONSEQUENTIAL DAMAGES OF ANY NATURE, OR LOSSES OR EXPENSES RESULTING FROM ANY DEFECTIVE PRODUCT OR THE USE OF ANY PRODUCT. Refer to power this product on line at www.sony.com/productregistration ...

Operating Instructions (primary manual)
Page 4
... Long-time recording (MDLP 18 Recording from a stereo microphone 19 Recording from externally connected equipment 20 Recording with digital (optical) input (Digital Recording 21 Recording from a TV or radio (Analog Recording 22 To start/stop recording in sync with the sound source (Synchro-recording 23 Adding track marks while recording 24 Adding track marks manually 24 Adding track marks automatically (Auto Time Mark 24 Various ways of playback 26 Changing the sound mode 26 Changing playback speed (Speed Control 26 Selecting the play mode (Single Play/Repeat Play...
... Long-time recording (MDLP 18 Recording from a stereo microphone 19 Recording from externally connected equipment 20 Recording with digital (optical) input (Digital Recording 21 Recording from a TV or radio (Analog Recording 22 To start/stop recording in sync with the sound source (Synchro-recording 23 Adding track marks while recording 24 Adding track marks manually 24 Adding track marks automatically (Auto Time Mark 24 Various ways of playback 26 Changing the sound mode 26 Changing playback speed (Speed Control 26 Selecting the play mode (Single Play/Repeat Play...

Operating Instructions (primary manual)
Page 5
... (Group Move 36 To erase a group 37 Other operations 38 Useful settings 38 How to use the menu items 38 Creating a new group when recording 39 To select microphone sensitivity 39 Starting an operation quickly (Quick Mode 40 Using an optional foot control unit 40 List of menus 41 Power sources 42 When to replace the batteries 42 Battery life 42 Using house current 43 Additional information 44 Precautions 44 Specifications 47 5
... (Group Move 36 To erase a group 37 Other operations 38 Useful settings 38 How to use the menu items 38 Creating a new group when recording 39 To select microphone sensitivity 39 Starting an operation quickly (Quick Mode 40 Using an optional foot control unit 40 List of menus 41 Power sources 42 When to replace the batteries 42 Battery life 42 Using house current 43 Additional information 44 Precautions 44 Specifications 47 5

Operating Instructions (primary manual)
Page 9
... the playback speed. Front of the recorder 1 234 5 qa qsqd qf Recorder Operation 6 789 q; G GROUP button (32) This button is used when cueing to a group or erasing a group. Looking at the controls See pages in microphone (14) E Speakers (16) F REC MODE button (14) (18) Use this button to add track marks automatically or to divide a track into separate tracks. I N • PLAY (play) button (15) (16) The N • PLAY button has a tactile dot. A Display window...
... the playback speed. Front of the recorder 1 234 5 qa qsqd qf Recorder Operation 6 789 q; G GROUP button (32) This button is used when cueing to a group or erasing a group. Looking at the controls See pages in microphone (14) E Speakers (16) F REC MODE button (14) (18) Use this button to add track marks automatically or to divide a track into separate tracks. I N • PLAY (play) button (15) (16) The N • PLAY button has a tactile dot. A Display window...
Operating Instructions (primary manual)
Page 15
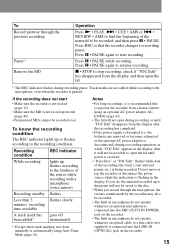
... recorder is paused. If you do not operate whenever an optical cable or a line cable (not supplied) is connected into the MIC (PLUG IN POWER) jack on the recorder. • The built-in microphone do , the material recorded up to that point will not be saved to the disc. • When you power the recorder from the display, and then open the lid. 1) The REC indicator flashes during recording or until power...
... recorder is paused. If you do not operate whenever an optical cable or a line cable (not supplied) is connected into the MIC (PLUG IN POWER) jack on the recorder. • The built-in microphone do , the material recorded up to that point will not be saved to the disc. • When you power the recorder from the display, and then open the lid. 1) The REC indicator flashes during recording or until power...
Operating Instructions (primary manual)
Page 17
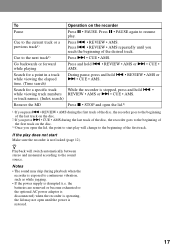
... X • PAUSE again to resume play does not start play will switch automatically between stereo and monaural according to the beginning of the desired track. If the play . the batteries are removed or become exhausted or the optional AC power adaptor is disconnected) when the recorder is restored. 17 Press . • REVIEW • AMS. Press . • REVIEW • AMS repeatedly until the power is operating, the...
... X • PAUSE again to resume play does not start play will switch automatically between stereo and monaural according to the beginning of the desired track. If the play . the batteries are removed or become exhausted or the optional AC power adaptor is disconnected) when the recorder is restored. 17 Press . • REVIEW • AMS. Press . • REVIEW • AMS repeatedly until the power is operating, the...

Operating Instructions (primary manual)
Page 18
... normal (SP) recording time. approx. 160 min. 1) For better sound quality, record in SP or LP2 mode. 2) When using an externally connected stereo microphone (not supplied) or other operations on MD players or recorders with the built-in SP, LP2, or LP4 mode using an 80-minute recordable MD 3 Press REC. approx. 160 min. A 18 Various ways of recording Long-time recording (MDLP) Select each recording mode according to the recording time that support the LP2...
... normal (SP) recording time. approx. 160 min. 1) For better sound quality, record in SP or LP2 mode. 2) When using an externally connected stereo microphone (not supplied) or other operations on MD players or recorders with the built-in SP, LP2, or LP4 mode using an 80-minute recordable MD 3 Press REC. approx. 160 min. A 18 Various ways of recording Long-time recording (MDLP) Select each recording mode according to the recording time that support the LP2...

Operating Instructions (primary manual)
Page 19
... long recordings. • During monaural recording of a stereo sound source connected through the externally connected microphone while an optical cable is connected to OFF during use has a short connector. 19 Please note that the sound of recorder operations may be picked up if the microphone that you are using a plug-in power-type microphone, the microphone can still monitor the recorded sound in microphones input. • The microphone may be operated even when its power switch is turned off since power...
... long recordings. • During monaural recording of a stereo sound source connected through the externally connected microphone while an optical cable is connected to OFF during use has a short connector. 19 Please note that the sound of recorder operations may be picked up if the microphone that you are using a plug-in power-type microphone, the microphone can still monitor the recorded sound in microphones input. • The microphone may be operated even when its power switch is turned off since power...
Operating Instructions (primary manual)
Page 21
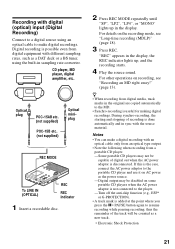
... REC MODE repeatedly until "SP", "LP2", "LP4", or "MONO" lights up , and the recording starts. 4 Play the source sound. For details on recording, see "Long-time recording (MDLP)" (page 18). 3 Press REC. During synchro-recording, the starting and stopping of digital out when the AC power adaptor is disconnected. If this is added at the point where you press the X • PAUSE button again to make a digital recording with an optical cable only...
... REC MODE repeatedly until "SP", "LP2", "LP4", or "MONO" lights up , and the recording starts. 4 Play the source sound. For details on recording, see "Long-time recording (MDLP)" (page 18). 3 Press REC. During synchro-recording, the starting and stopping of digital out when the AC power adaptor is disconnected. If this is added at the point where you press the X • PAUSE button again to make a digital recording with an optical cable only...

Operating Instructions (primary manual)
Page 23
... the display. REC MODE MENU/ENTER REC . • REVIEW • AMS, > • CUE • AMS 1 Press REC MODE repeatedly until "SYNC ON" appears in the display, and then press MENU/ENTER. 5 Press . or > until "SYNC REC" appears in the display, and then press MENU/ENTER. If the recorder is eliminated. This simplifies digital recordings (e.g., from a CD player) since the need to the LINE IN (OPTICAL) jack on the recording mode, see "Long-time recording (MDLP...
... the display. REC MODE MENU/ENTER REC . • REVIEW • AMS, > • CUE • AMS 1 Press REC MODE repeatedly until "SYNC ON" appears in the display, and then press MENU/ENTER. 5 Press . or > until "SYNC REC" appears in the display, and then press MENU/ENTER. If the recorder is eliminated. This simplifies digital recordings (e.g., from a CD player) since the need to the LINE IN (OPTICAL) jack on the recording mode, see "Long-time recording (MDLP...

Operating Instructions (primary manual)
Page 24
...; Do not switch the "SYNC REC" setting while recording. or > until "TIME MARK" appears in the display, and then press MENU/ENTER. 24 This function is convenient when making a long recording, e.g., of a lecture or meeting. 1 While the recorder is recording or in the display, and then press MENU/ENTER. 3 Press . Adding track marks automatically (Auto Time Mark) Use this feature to divide the material into separate parts. . • REVIEW • AMS...
...; Do not switch the "SYNC REC" setting while recording. or > until "TIME MARK" appears in the display, and then press MENU/ENTER. 24 This function is convenient when making a long recording, e.g., of a lecture or meeting. 1 While the recorder is recording or in the display, and then press MENU/ENTER. 3 Press . Adding track marks automatically (Auto Time Mark) Use this feature to divide the material into separate parts. . • REVIEW • AMS...

Operating Instructions (primary manual)
Page 38
... recording, playback, editing, etc. Selecting the microphone sensitivity Sets the microphone sensitivity to enter the selection. . • REVIEW • AMS, > • CUE • AMS 4 Repeat steps 2 and 3. Group recording Sets the recorder to enter the menu 2 Press . Editing Moving Changes the order of tracks or groups. Category Function What it does Site page Recording SynchroRecording Simplifies operations during digital recording. page 39 Playing Changing the sound quality Selects to a groups new...
... recording, playback, editing, etc. Selecting the microphone sensitivity Sets the microphone sensitivity to enter the selection. . • REVIEW • AMS, > • CUE • AMS 4 Repeat steps 2 and 3. Group recording Sets the recorder to enter the menu 2 Press . Editing Moving Changes the order of tracks or groups. Category Function What it does Site page Recording SynchroRecording Simplifies operations during digital recording. page 39 Playing Changing the sound quality Selects to a groups new...

Operating Instructions (primary manual)
Page 40
... playback button or cueing to a track, or an internal recorder operation starts quickly (such as follows: Recording mode SP LP2 LP4 Monaural Approx. The unit, however, will not respond quickly. Starting an operation quickly (Quick Mode) Playback starts quickly after stopping a recording operation). . • REVIEW • AMS, > • CUE • AMS MENU/ ENTER Using an optional foot control unit If you use the optional foot control unit (FS-85B50), you can use your foot to pause or restart recording...
... playback button or cueing to a track, or an internal recorder operation starts quickly (such as follows: Recording mode SP LP2 LP4 Monaural Approx. The unit, however, will not respond quickly. Starting an operation quickly (Quick Mode) Playback starts quickly after stopping a recording operation). . • REVIEW • AMS, > • CUE • AMS MENU/ ENTER Using an optional foot control unit If you use the optional foot control unit (FS-85B50), you can use your foot to pause or restart recording...

Operating Instructions (primary manual)
Page 44
... anything when it is illegal in your recorder at high volume while walking, especially at a moderate level. On power sources • Use LR6 (size AA) batteries, house current, or car battery. • The recorder is not disconnected from the wall outlet, grasp the adaptor plug itself has been turned off until it is connected to the wall outlet, even if...
... anything when it is illegal in your recorder at high volume while walking, especially at a moderate level. On power sources • Use LR6 (size AA) batteries, house current, or car battery. • The recorder is not disconnected from the wall outlet, grasp the adaptor plug itself has been turned off until it is connected to the wall outlet, even if...

Operating Instructions (primary manual)
Page 48
... explanations Troubleshooting If a problem occurs during recording. , The recording result is heard when recording. • Due to the special digital audio compression technology used in LP4 stereo mode, momentary noise may not be done correctly. • Audio sources may occur on the CD player (page 21). • The analog recording was made using a connecting cord with an attenuator. , Use a connecting cord without an attenuator (page 22). • The power...
... explanations Troubleshooting If a problem occurs during recording. , The recording result is heard when recording. • Due to the special digital audio compression technology used in LP4 stereo mode, momentary noise may not be done correctly. • Audio sources may occur on the CD player (page 21). • The analog recording was made using a connecting cord with an attenuator. , Use a connecting cord without an attenuator (page 22). • The power...

Operating Instructions (primary manual)
Page 50
... GROUP button has been pressed and is made for 2 seconds or more to start playing. No sound comes through the headphones/ earphones. • The headphones/earphones plug is not firmly connected. , Plug in digital mode, the recording level is dirty. , Clean the plug. While playing Symptom Cause/Remedy An MD is not played normally. • Repeat play is selected. , Change back to the normal play (page 27). • Playback mode...
... GROUP button has been pressed and is made for 2 seconds or more to start playing. No sound comes through the headphones/ earphones. • The headphones/earphones plug is not firmly connected. , Plug in digital mode, the recording level is dirty. , Clean the plug. While playing Symptom Cause/Remedy An MD is not played normally. • Repeat play is selected. , Change back to the normal play (page 27). • Playback mode...

Operating Instructions (primary manual)
Page 54
... recorded in stereo and in menu - Selection of " : REC" in mono, for "playback"). , Insert a recordable MD. • You tried to record or edit on a premastered MD (P/B stands for example). • You tried to overwrite a track marks. • You tried to make the Auto Time Mark setting while recording through digital connection. • You tried to make the following settings while recording. - Play mode while "End" appears in the display •...
... recorded in stereo and in menu - Selection of " : REC" in mono, for "playback"). , Insert a recordable MD. • You tried to record or edit on a premastered MD (P/B stands for example). • You tried to overwrite a track marks. • You tried to make the Auto Time Mark setting while recording through digital connection. • You tried to make the following settings while recording. - Play mode while "End" appears in the display •...
Marketing Specifications
Page 1
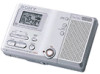
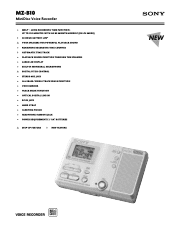
... RECORDING TIME COUNTER ◗ AUTOMATIC TIME TRACK • PLAYBACK SOUND FUNCTION THROUGH THE SPEAKERS • LARGE LCD DISPLAY • BUILT-IN MONAURAL MICROPHONE v DIGITAL PITCH CONTROL • STEREO MIC JACK • ALL ERASE/SINGLE TRACK ERASE FUNCTION • VOICE MIRROR • TRACK MARK FUNCTION • OPTICAL DIGITAL LINE-IN • DC-IN JACK • HAND STRAP • CARRYING POUCH • HEADPHONE/REMOTE JACK • POWER REQUIREMENTS 2 "AA" BATTERIES v STEP-UP FEATURE ◗ NEW FEATURE MZ-B10 MiniDisc Voice Recorder...
... RECORDING TIME COUNTER ◗ AUTOMATIC TIME TRACK • PLAYBACK SOUND FUNCTION THROUGH THE SPEAKERS • LARGE LCD DISPLAY • BUILT-IN MONAURAL MICROPHONE v DIGITAL PITCH CONTROL • STEREO MIC JACK • ALL ERASE/SINGLE TRACK ERASE FUNCTION • VOICE MIRROR • TRACK MARK FUNCTION • OPTICAL DIGITAL LINE-IN • DC-IN JACK • HAND STRAP • CARRYING POUCH • HEADPHONE/REMOTE JACK • POWER REQUIREMENTS 2 "AA" BATTERIES v STEP-UP FEATURE ◗ NEW FEATURE MZ-B10 MiniDisc Voice Recorder...
Marketing Specifications
Page 2
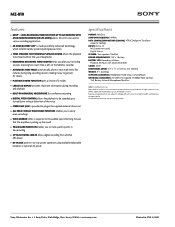
... easily erase recordings • VOICE MIRROR blinks in response to mark specific points in the recording • OPTICAL DIGITAL LINE-IN allows digital recording from another MD device • DC-IN JACK permits two-way power operation using available replaceable batteries or optional AC power specifications FORMAT: MiniDisc SAMPLING FREQUENCY: 44.1kHz DATA COMPRESSION METHOD (CODING): ATRAC (Adaptive Transform Acoustic Coding) INPUTS: DC In, 3V Mic (stereo mini-jack) Digital Line-in USA 2/2003 All rights reserved. MZ-B10...
... easily erase recordings • VOICE MIRROR blinks in response to mark specific points in the recording • OPTICAL DIGITAL LINE-IN allows digital recording from another MD device • DC-IN JACK permits two-way power operation using available replaceable batteries or optional AC power specifications FORMAT: MiniDisc SAMPLING FREQUENCY: 44.1kHz DATA COMPRESSION METHOD (CODING): ATRAC (Adaptive Transform Acoustic Coding) INPUTS: DC In, 3V Mic (stereo mini-jack) Digital Line-in USA 2/2003 All rights reserved. MZ-B10...


