Operating Instructions
Page 1
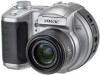
... to your Sony dealer regarding this manual thoroughly, and retain it for future reference. Model No. MVC-CD400/CD250 © 2002 Sony Corporation 3-075-356-12(1) Getting started Shooting still images Viewing still images Deleting still images Copying images to these numbers whenever you call upon your computer _______ Before advanced operations Advanced still image shooting Advanced still image viewing Still image editing Enjoying movies Troubleshooting Additional information Index Digital Still Camera Operating Instructions Before operating the...
... to your Sony dealer regarding this manual thoroughly, and retain it for future reference. Model No. MVC-CD400/CD250 © 2002 Sony Corporation 3-075-356-12(1) Getting started Shooting still images Viewing still images Deleting still images Copying images to these numbers whenever you call upon your computer _______ Before advanced operations Advanced still image shooting Advanced still image viewing Still image editing Enjoying movies Troubleshooting Additional information Index Digital Still Camera Operating Instructions Before operating the...

Operating Instructions
Page 4
... at the specific frequencies may influence the picture and sound of this equipment for the customers in Germany Directive:EMC Directive 89/336/EEC, 92/31/EEC This equipment complies with the limits sets out on the supplied AC power adaptor for your nearest Sony service station. If the plug supplied with BS 1363 is indicated under the lens. For the...
... at the specific frequencies may influence the picture and sound of this equipment for the customers in Germany Directive:EMC Directive 89/336/EEC, 92/31/EEC This equipment complies with the limits sets out on the supplied AC power adaptor for your nearest Sony service station. If the plug supplied with BS 1363 is indicated under the lens. For the...
Operating Instructions
Page 5
... use this camera with other materials may be copyrighted. Unauthorized recording of such materials may be contrary to a malfunction of the copyright laws. 5 Before using your camera This digital still camera uses 8 cm CD-Rs/CDRWs as "disc" in this manual. Notes on image data compatibility • This camera conforms with the Design rule for if recording or playback is being recorded on copyright Television programs, films, video...
... use this camera with other materials may be copyrighted. Unauthorized recording of such materials may be contrary to a malfunction of the copyright laws. 5 Before using your camera This digital still camera uses 8 cm CD-Rs/CDRWs as "disc" in this manual. Notes on image data compatibility • This camera conforms with the Design rule for if recording or playback is being recorded on copyright Television programs, films, video...
Operating Instructions
Page 8
... started Charging the battery pack 13 Using an external power source 16 Using your camera abroad 16 Turning on/off your camera 17 Setting the date and time 17 Shooting still images Inserting a disc 20 Initializing a disc 21 What is initialization 21 Setting the still image size and image quality 22 Basic still image shooting (using auto adjustment mode 24 LCD screen indicators during shooting 26 Checking the last image you shot (Quick Review 27 Using the zoom feature 27 Shooting close-ups (Macro 28 Using the self-timer...
... started Charging the battery pack 13 Using an external power source 16 Using your camera abroad 16 Turning on/off your camera 17 Setting the date and time 17 Shooting still images Inserting a disc 20 Initializing a disc 21 What is initialization 21 Setting the still image size and image quality 22 Basic still image shooting (using auto adjustment mode 24 LCD screen indicators during shooting 26 Checking the last image you shot (Quick Review 27 Using the zoom feature 27 Shooting close-ups (Macro 28 Using the self-timer...
Operating Instructions
Page 9
... Changing image size - Delete 96 In single-image mode 96 In index (nine-image) mode 96 In index (triple-image) mode 97 Troubleshooting Troubleshooting 98 Warnings and messages 106 Self-diagnostics display 108 Additional information Recording modes 109 Menu items 111 SET UP items 116 Precautions 118 On discs 119 On "InfoLITHIUM" battery pack .........120 Specifications 122 The LCD screen 124 Index 127 9 Advanced still image shooting Shooting with the manual adjustments (MVC-CD400 only 64 Shutter speed priority mode 64 Aperture...
... Changing image size - Delete 96 In single-image mode 96 In index (nine-image) mode 96 In index (triple-image) mode 97 Troubleshooting Troubleshooting 98 Warnings and messages 106 Self-diagnostics display 108 Additional information Recording modes 109 Menu items 111 SET UP items 116 Precautions 118 On discs 119 On "InfoLITHIUM" battery pack .........120 Specifications 122 The LCD screen 124 Index 127 9 Advanced still image shooting Shooting with the manual adjustments (MVC-CD400 only 64 Shutter speed priority mode 64 Aperture...

Operating Instructions
Page 14
... indicator on the LCD shows the remaining shooting or viewing time. 60min 640 4 • When charging, the battery remaining indicator shows the time remaining in terms of between 10°C to 30°C (50°F to 86°F). • Charging is complete in approximately 150 minutes. After charging the battery pack, disconnect the AC power adaptor from the DC IN jack of your camera...
... indicator on the LCD shows the remaining shooting or viewing time. 60min 640 4 • When charging, the battery remaining indicator shows the time remaining in terms of between 10°C to 30°C (50°F to 86°F). • Charging is complete in approximately 150 minutes. After charging the battery pack, disconnect the AC power adaptor from the DC IN jack of your camera...

Operating Instructions
Page 17
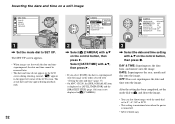
... about three minutes during shooting or viewing or when performing SET UP, the camera turns off . • If you do not operate the camera for the first time, the CLOCK SET screen appears (page 17). The auto power-off function only operates when the camera is operating using a battery pack. Getting started Turning on the power when the mode dial is set the mode dial to SET UP, select [CLOCK SET] in [SETUP 1] (page 117), and perform...
... about three minutes during shooting or viewing or when performing SET UP, the camera turns off . • If you do not operate the camera for the first time, the CLOCK SET screen appears (page 17). The auto power-off function only operates when the camera is operating using a battery pack. Getting started Turning on the power when the mode dial is set the mode dial to SET UP, select [CLOCK SET] in [SETUP 1] (page 117), and perform...

Operating Instructions
Page 25
... shutter sounds. The flash automatically pops up . When the AE/AF lock indicator changes from flashing to prevent wearing down . Shooting still images 60min 640 4 0EV F5.6 50 Flashes green 3 t Lights up , the camera is ready for about three minutes during recording or playback, the camera turns off the power, remove the battery pack or disc, or open the disc cover at this lamp is lit. "RECORDING" appears on the LCD screen, and the image...
... shutter sounds. The flash automatically pops up . When the AE/AF lock indicator changes from flashing to prevent wearing down . Shooting still images 60min 640 4 0EV F5.6 50 Flashes green 3 t Lights up , the camera is ready for about three minutes during recording or playback, the camera turns off the power, remove the battery pack or disc, or open the disc cover at this lamp is lit. "RECORDING" appears on the LCD screen, and the image...
Operating Instructions
Page 32
... day onto the image. Inserting the date and time on a still image DISC TOOL FINALIZE : FORMAT : INITIALIZE : UNFINALIZE : SELECT CAMERA MOVING IMAGE : DAY&TIME DATE/TIME : DATE DIGITAL ZOOM : OFF BRACKET STEP : RED EYE REDUCTION : HOLOGRAM AF : OK CAMERA MOVING IMAGE : MPEG MOVIE DATE/TIME : DATE DIGITAL ZOOM : ON BRACKET STEP : ±0.7EV RED EYE REDUCTION : OFF HOLOGRAM AF : AUTO PAGE SELECT 1 , Set the mode dial to , and shoot the image. • You can also shoot images with v/V on the control button, then press...
... day onto the image. Inserting the date and time on a still image DISC TOOL FINALIZE : FORMAT : INITIALIZE : UNFINALIZE : SELECT CAMERA MOVING IMAGE : DAY&TIME DATE/TIME : DATE DIGITAL ZOOM : OFF BRACKET STEP : RED EYE REDUCTION : HOLOGRAM AF : OK CAMERA MOVING IMAGE : MPEG MOVIE DATE/TIME : DATE DIGITAL ZOOM : ON BRACKET STEP : ±0.7EV RED EYE REDUCTION : OFF HOLOGRAM AF : AUTO PAGE SELECT 1 , Set the mode dial to , and shoot the image. • You can also shoot images with v/V on the control button, then press...

Operating Instructions
Page 36
... zoom W button once. The display switches to the Index (nineimage) screen. Viewing an index screen (nine-image or triple-image) 60min 640 6/8 100-0006 2002 7 4 10:30PM FILE BACK/NEXT VOLUME • SINGLE DISPLAY APERTURE VALUE : F5.6 SHUTTER SPEED : 1/125 EXPOSURE VALUE : 0.0 ISO : 100 100-0003 2002 7 4 10:30PM • SINGLE DISPLAY 2 , Select the desired still image with b/B on the control button. 36 Press v/V on the control button to the single-image screen Press the zoom T button...
... zoom W button once. The display switches to the Index (nineimage) screen. Viewing an index screen (nine-image or triple-image) 60min 640 6/8 100-0006 2002 7 4 10:30PM FILE BACK/NEXT VOLUME • SINGLE DISPLAY APERTURE VALUE : F5.6 SHUTTER SPEED : 1/125 EXPOSURE VALUE : 0.0 ISO : 100 100-0003 2002 7 4 10:30PM • SINGLE DISPLAY 2 , Select the desired still image with b/B on the control button. 36 Press v/V on the control button to the single-image screen Press the zoom T button...

Operating Instructions
Page 49
... uncompressed image file shot in the disc by recording mode. Folder containing still image, Burst mode image, Exposure Bracket mode image, Clip Motion image and Multi Burst image data Folder containing E-MAIL mode and TIFF mode image data Folder containing movie data Folder containing VOICE mode audio data Notes The meanings of your camera are grouped as follows: ssss stands for any number within the range from the disc, the image and sound may break off. • You can view images using a USB connection on a Windows...
... uncompressed image file shot in the disc by recording mode. Folder containing still image, Burst mode image, Exposure Bracket mode image, Clip Motion image and Multi Burst image data Folder containing E-MAIL mode and TIFF mode image data Folder containing movie data Folder containing VOICE mode audio data Notes The meanings of your camera are grouped as follows: ssss stands for any number within the range from the disc, the image and sound may break off. • You can view images using a USB connection on a Windows...

Operating Instructions
Page 63
... the right side of the screen. (When you press FOCUS twice, the 9 (manual focus) indicator appears in the position of the screen. 60min 640 AE S 4 0EV F5.6 50 d Turn the jog dial to select the value you want to set other than SET UP. The displayed value is set . Shooting with the manual adjustment modes (shutter speed priority mode, aperture priority mode, manual exposure mode), EV adjustment or focusing manually. How to use the jog dial (MVC...
... the right side of the screen. (When you press FOCUS twice, the 9 (manual focus) indicator appears in the position of the screen. 60min 640 AE S 4 0EV F5.6 50 d Turn the jog dial to select the value you want to set other than SET UP. The displayed value is set . Shooting with the manual adjustment modes (shutter speed priority mode, aperture priority mode, manual exposure mode), EV adjustment or focusing manually. How to use the jog dial (MVC...

Operating Instructions
Page 77
... work correctly even though you change the white balance mode. This is reduced to 2 frames can shoot a number of paper filling the screen under mercury lamps. Quick flashing: The white balance is not set . Shooting multiple frames - Human eyes can be recorded. To shoot in one -push white balance mode, the LCD screen momentarily turns blue. MOBILE (120×108) Clip Motion of colors for Clip Motion images is suitable for use with portable data terminals. • The file size...
... work correctly even though you change the white balance mode. This is reduced to 2 frames can shoot a number of paper filling the screen under mercury lamps. Quick flashing: The white balance is not set . Shooting multiple frames - Human eyes can be recorded. To shoot in one -push white balance mode, the LCD screen momentarily turns blue. MOBILE (120×108) Clip Motion of colors for Clip Motion images is suitable for use with portable data terminals. • The file size...

Operating Instructions
Page 98
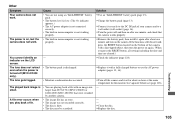
... your camera still not work properly, press the RESET button on the bottom of the camera, then turn on . If code displays "C:ss:ss" appear on the LCD screen, the self-diagnostics display function is turned on the power again. (All the settings including date and time are shooting/viewing images in the remaining battery time. • You are cleared.) RESET button 3 Should your camera still not work properly, consult your Sony dealer or local authorized Sony service facility. 98...
... your camera still not work properly, press the RESET button on the bottom of the camera, then turn on . If code displays "C:ss:ss" appear on the LCD screen, the self-diagnostics display function is turned on the power again. (All the settings including date and time are shooting/viewing images in the remaining battery time. • You are cleared.) RESET button 3 Should your camera still not work properly, consult your Sony dealer or local authorized Sony service facility. 98...

Operating Instructions
Page 104
...; Vibration caused an error during recording. • The disc drive does not support the packet-write system or MultiRead. • The disc may be able to view the image if you view a movie on a disc. CD-ROM Symptom You cannot record on a computer. p Check the printer settings. p Place the disc correctly in the disc tray (page 20). 104 p Copy the file to your computer...
...; Vibration caused an error during recording. • The disc drive does not support the packet-write system or MultiRead. • The disc may be able to view the image if you view a movie on a disc. CD-ROM Symptom You cannot record on a computer. p Check the printer settings. p Place the disc correctly in the disc tray (page 20). 104 p Copy the file to your computer...
Operating Instructions
Page 105
...; The built-in microcomputer is not working properly. - • The battery pack is discharged. • Moisture condensation has occurred. • You are cleared.) p Check the indicator (page 124). A file error occurs when you press the RESET button, all settings including the date and time are playing back a file with a fine-tipped object, then turn on the LCD screen. The lens does not retract even when the...
...; The built-in microcomputer is not working properly. - • The battery pack is discharged. • Moisture condensation has occurred. • You are cleared.) p Check the indicator (page 124). A file error occurs when you press the RESET button, all settings including the date and time are playing back a file with a fine-tipped object, then turn on the LCD screen. The lens does not retract even when the...

Operating Instructions
Page 117
... this time, the zoom or the focus preset function does not work. Set when using the VCL-MHG07 conversion lens (not supplied). Displays the menu items, warnings and messages in Japanese. Selecting [BRIGHT] makes the screen bright and easy to A or M, you press the control button/shutter button. - Turns off the beep/shutter sound. - [SETUP 1] Item FILE NUMBER CONVERSION LENS (MVC-CD400 only) Setting xSERIES RESET ON / xOFF HOT SHOE (MVC-CD400 only) / LANGUAGE CONFIRM B. Turns on the beep/shutter sound...
... this time, the zoom or the focus preset function does not work. Set when using the VCL-MHG07 conversion lens (not supplied). Displays the menu items, warnings and messages in Japanese. Selecting [BRIGHT] makes the screen bright and easy to A or M, you press the control button/shutter button. - Turns off the beep/shutter sound. - [SETUP 1] Item FILE NUMBER CONVERSION LENS (MVC-CD400 only) Setting xSERIES RESET ON / xOFF HOT SHOE (MVC-CD400 only) / LANGUAGE CONFIRM B. Turns on the beep/shutter sound...

Operating Instructions
Page 119
... be sure to a wall outlet (mains) using the camera. However, if you use the camera for only short periods it discharges gradually, and if you do not record the date and time. Charging method Connect the camera to charge this rechargeable button battery before shooting. You can still use a commercially available CD cleaner. 119 Additional information In this rechargeable button battery is continually charged as long as it becomes completely...
... be sure to a wall outlet (mains) using the camera. However, if you use the camera for only short periods it discharges gradually, and if you do not record the date and time. Charging method Connect the camera to charge this rechargeable button battery before shooting. You can still use a commercially available CD cleaner. 119 Additional information In this rechargeable button battery is continually charged as long as it becomes completely...

Operating Instructions
Page 127
... write 83, 117 Control button 12, 62 Conversion lens 117 Copying images 51, 57, 61 D Deleting 39, 96 Digital zoom 27 Disc cleaning 119 finalizing 44 formatting 42 initializing 21 inserting 20 number of images that can be saved or shooting time 24, 110 unfinalizing 46 DPOF 91 E Editing still images Deleting 39 Print mark 91 Protect 89 Resize 91 E-mail 81 Enlarging an image 86 EV adjustment 70 Exposure bracket 75 F File file...
... write 83, 117 Control button 12, 62 Conversion lens 117 Copying images 51, 57, 61 D Deleting 39, 96 Digital zoom 27 Disc cleaning 119 finalizing 44 formatting 42 initializing 21 inserting 20 number of images that can be saved or shooting time 24, 110 unfinalizing 46 DPOF 91 E Editing still images Deleting 39 Print mark 91 Protect 89 Resize 91 E-mail 81 Enlarging an image 86 EV adjustment 70 Exposure bracket 75 F File file...

Operating Instructions
Page 128
... 83 Power AC power adaptor 16 battery pack 13 on/off 17 Precautions 118 Print mark 91 Protect 89 Q Quick Review 27 R Red-eye reduction 30, 116 RESET button 98 Resize 91 Rotate 88 S Scene Selection (SCN 33 Self-diagnostics display 108 Self-timer 29 Setting date and time 17 image quality 22 image size 22, 110 menu items 62, 111 SET UP items 62, 116 Setting the date and time 17 SHARPNESS 112, 113, 114 Shooting mode auto adjustment mode...
... 83 Power AC power adaptor 16 battery pack 13 on/off 17 Precautions 118 Print mark 91 Protect 89 Q Quick Review 27 R Red-eye reduction 30, 116 RESET button 98 Resize 91 Rotate 88 S Scene Selection (SCN 33 Self-diagnostics display 108 Self-timer 29 Setting date and time 17 image quality 22 image size 22, 110 menu items 62, 111 SET UP items 62, 116 Setting the date and time 17 SHARPNESS 112, 113, 114 Shooting mode auto adjustment mode...


