
Operating Instructions
Page 1
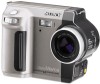
3-060-831-12(1) Digital Still Camera Operating Instructions Before operating the unit, please read this product. Model No Serial No MVC-FD90 MVC-FD85/FD90 ©2000 Sony Corporation Record the serial number in the space provided below. Owner's Record The model and serial numbers are located on the bottom. Refer to these numbers whenever you call upon your Sony dealer regarding this manual thoroughly, and retain it for future reference.
3-060-831-12(1) Digital Still Camera Operating Instructions Before operating the unit, please read this product. Model No Serial No MVC-FD90 MVC-FD85/FD90 ©2000 Sony Corporation Record the serial number in the space provided below. Owner's Record The model and serial numbers are located on the bottom. Refer to these numbers whenever you call upon your Sony dealer regarding this manual thoroughly, and retain it for future reference.

Operating Instructions
Page 3
...Directive 89/336/EEC.92/ 31/EEC This equipment complies with the EMC regulations when used under the following before using your camera, etc. The MVC-FD90 is fitted to this manual, buttons and settings on copyright Television programs, films, video tapes, and other materials may be ...strike the camera In addition to malfunctions and inability to the provision of the recording cannot be used for your nearest Sony service station. NOTICE FOR THE CUSTOMERS IN THE UNITED KINGDOM A moulded plug complying with or mark) must be compensated for the two models: MVC-FD85, MVC-FD90. The...
...Directive 89/336/EEC.92/ 31/EEC This equipment complies with the EMC regulations when used under the following before using your camera, etc. The MVC-FD90 is fitted to this manual, buttons and settings on copyright Television programs, films, video tapes, and other materials may be ...strike the camera In addition to malfunctions and inability to the provision of the recording cannot be used for your nearest Sony service station. NOTICE FOR THE CUSTOMERS IN THE UNITED KINGDOM A moulded plug complying with or mark) must be compensated for the two models: MVC-FD85, MVC-FD90. The...
Operating Instructions
Page 4
... appear on how to direct sunlight for effective use. • Be careful when placing the camera near a window or outdoors. LCD screen and lens • The LCD screen is manufactured using the camera. Exposing the LCD screen or the lens to remove it before using high-precision technology. If.... However, there may cause malfunctions. These points are operational for long periods may be careful not to a disk. 4 Do not get the camera wet When taking pictures outdoors in the rain or under similar conditions, be some tiny black points and/or bright points (red, blue or green...
... appear on how to direct sunlight for effective use. • Be careful when placing the camera near a window or outdoors. LCD screen and lens • The LCD screen is manufactured using the camera. Exposing the LCD screen or the lens to remove it before using high-precision technology. If.... However, there may cause malfunctions. These points are operational for long periods may be careful not to a disk. 4 Do not get the camera wet When taking pictures outdoors in the rain or under similar conditions, be some tiny black points and/or bright points (red, blue or green...
Operating Instructions
Page 5
... the information on your floppy disk (DISK COPY) ......50 Selecting still images to print (PRINT MARK 51 Format 52 Additional information Precautions 53 Using your camera abroad 55 Troubleshooting 56 Warning and notice messages .......59 Self-diagnosis display 61 Specifications 62 LCD screen indicators 63 Index Back cover 5
... the information on your floppy disk (DISK COPY) ......50 Selecting still images to print (PRINT MARK 51 Format 52 Additional information Precautions 53 Using your camera abroad 55 Troubleshooting 56 Warning and notice messages .......59 Self-diagnosis display 61 Specifications 62 LCD screen indicators 63 Index Back cover 5

Operating Instructions
Page 6
... pages in microphone Do not touch while recording. You will be unable to firmly secure the camera to tripods having longer screws, and may damage the camera. I Focus ring (38) (MVC-FD90 only) J FOCUS AUTO/MANUAL switch (37, 38) (MVC-FD90 only) K Lens cap (supplied) L (External flash) jack (MVCFD90 only) M AUDIO (MONO) / VIDEO OUT jack (45...
... pages in microphone Do not touch while recording. You will be unable to firmly secure the camera to tripods having longer screws, and may damage the camera. I Focus ring (38) (MVC-FD90 only) J FOCUS AUTO/MANUAL switch (37, 38) (MVC-FD90 only) K Lens cap (supplied) L (External flash) jack (MVCFD90 only) M AUDIO (MONO) / VIDEO OUT jack (45...
Operating Instructions
Page 8
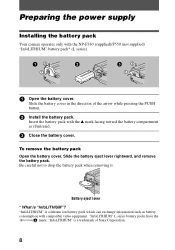
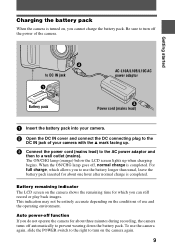
.... To remove the battery pack Open the battery cover. "InfoLITHIUM" is "InfoLITHIUM"? Slide the battery cover in the direction of Sony Corporation. 8 Preparing the power supply Installing the battery pack Your camera operates only with compatible video equipment. "InfoLITHIUM" L series battery packs have the mark. Battery eject lever * What is a trademark of...
.... To remove the battery pack Open the battery cover. "InfoLITHIUM" is "InfoLITHIUM"? Slide the battery cover in the direction of Sony Corporation. 8 Preparing the power supply Installing the battery pack Your camera operates only with compatible video equipment. "InfoLITHIUM" L series battery packs have the mark. Battery eject lever * What is a trademark of...
Operating Instructions
Page 9
...the battery pack. This indication may not be entirely accurate depending on the camera shows the remaining time for about three minutes during recording, the camera turns off , normal charge is turned on the camera again. 9 To use the camera again, slide the POWER switch to the right to turn on , ...the ON/CHG lamp goes off automatically to prevent wearing down the battery pack. Charging the battery pack When the camera is completed. For full charge, which allows you do not operate the camera for about one hour after normal charge is completed. Auto power-off the power of your...
...the battery pack. This indication may not be entirely accurate depending on the camera shows the remaining time for about three minutes during recording, the camera turns off , normal charge is turned on the camera again. 9 To use the camera again, slide the POWER switch to the right to turn on , ...the ON/CHG lamp goes off automatically to prevent wearing down the battery pack. Charging the battery pack When the camera is completed. For full charge, which allows you do not operate the camera for about one hour after normal charge is completed. Auto power-off the power of your...
Operating Instructions
Page 11
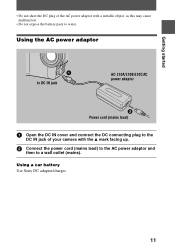
Using the AC power adaptor 1 to DC IN jack AC-L10A/L10B/L10C AC power adaptor 2 Power cord (mains lead) 1 Open the DC IN cover and connect the DC connecting plug to the DC IN jack of the AC power adaptor with the v mark facing up. 2 Connect the power cord (mains lead) to the AC power adaptor and then to water. Using a car battery Use Sony DC adaptor/charger. 11 Getting started • Do not short the DC plug of your camera with a metallic object, as this may cause malfunction. • Do not expose the battery pack to a wall outlet (mains).
Using the AC power adaptor 1 to DC IN jack AC-L10A/L10B/L10C AC power adaptor 2 Power cord (mains lead) 1 Open the DC IN cover and connect the DC connecting plug to the DC IN jack of the AC power adaptor with the v mark facing up. 2 Connect the power cord (mains lead) to the AC power adaptor and then to water. Using a car battery Use Sony DC adaptor/charger. 11 Getting started • Do not short the DC plug of your camera with a metallic object, as this may cause malfunction. • Do not expose the battery pack to a wall outlet (mains).
Operating Instructions
Page 12
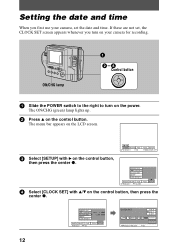
... on the control button. VIDEO OUT /LANGUAGE CLOCK SET BEEP LCD BRIGHT INDEX DELETE FILE TOOL SETUP SELECT CLOSE 4 Select [CLOCK SET] with B on your camera, set , the CLOCK SET screen appears whenever you first use your camera for recording. If these are not set the date and time.
... on the control button. VIDEO OUT /LANGUAGE CLOCK SET BEEP LCD BRIGHT INDEX DELETE FILE TOOL SETUP SELECT CLOSE 4 Select [CLOCK SET] with B on your camera, set , the CLOCK SET screen appears whenever you first use your camera for recording. If these are not set the date and time.
Operating Instructions
Page 15
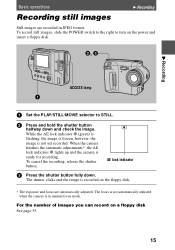
... is frozen, however, the image is ready for recording. To cancel the recording, release the shutter button. When the camera finishes the automatic adjustments*, the AE lock indicator z lights up and the camera is not yet recorded. For the number of images you can record on the power and insert a floppy disk... lamp 1 1 Set the PLAY/STILL/MOVIE selector to STILL. 2 Press and hold the shutter button halfway down . The focus is not automatically adjusted when the camera is recorded on the floppy disk. ∗ The exposure and focus are recorded in manual focus mode.
... is frozen, however, the image is ready for recording. To cancel the recording, release the shutter button. When the camera finishes the automatic adjustments*, the AE lock indicator z lights up and the camera is not yet recorded. For the number of images you can record on the power and insert a floppy disk... lamp 1 1 Set the PLAY/STILL/MOVIE selector to STILL. 2 Press and hold the shutter button halfway down . The focus is not automatically adjusted when the camera is recorded on the floppy disk. ∗ The exposure and focus are recorded in manual focus mode.

Operating Instructions
Page 16
... image (Review) Clear the menu bar (page 29), and press b on the control button, then press the center z. Also, do not shake or strike the camera. To turn the power off the LCD backlight Set the LCD BACKLIGHT switch to OFF to the normal recording mode, press lightly on the shutter...
... image (Review) Clear the menu bar (page 29), and press b on the control button, then press the center z. Also, do not shake or strike the camera. To turn the power off the LCD backlight Set the LCD BACKLIGHT switch to OFF to the normal recording mode, press lightly on the shutter...

Operating Instructions
Page 17
... (subject appears closer) Zoom lever W side: for moving images. 17 Using digital zoom • The maximum zoom magnification is sharp. When digital zoom is not necessary, set [DIGITAL ZOOM] to function when the zoom exceeds 3× (MVC-FD85)/8× (MVC-FD90). Digital zoom function This camera has a digital zoom function. Minimum focal distance to the subject until the focus...
... (subject appears closer) Zoom lever W side: for moving images. 17 Using digital zoom • The maximum zoom magnification is sharp. When digital zoom is not necessary, set [DIGITAL ZOOM] to function when the zoom exceeds 3× (MVC-FD85)/8× (MVC-FD90). Digital zoom function This camera has a digital zoom function. Minimum focal distance to the subject until the focus...
Operating Instructions
Page 21
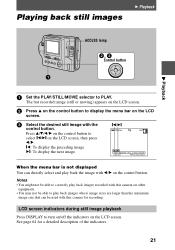
.... Press v/V/b/B on the control button to play back the image with b/B on the LCD screen. 3 Select the desired still image with this camera on other equipment. • You may not be used with the control button. LCD screen indicators during still image playback Press DISPLAY to correctly ...play back images recorded with this camera for a detailed description of the indicators. 21 Notes • You might not be able to turn on/off the indicators on the LCD...
.... Press v/V/b/B on the control button to play back the image with b/B on the LCD screen. 3 Select the desired still image with this camera on other equipment. • You may not be used with the control button. LCD screen indicators during still image playback Press DISPLAY to correctly ...play back images recorded with this camera for a detailed description of the indicators. 21 Notes • You might not be able to turn on/off the indicators on the LCD...

Operating Instructions
Page 24
...except TEXT mode) : JPEG format • Moving image/Voice memo: MPEG format • Still image in the floppy disk used with this camera using PC Exchange with Mac OS system 7.5 or higher. Viewing images using a personal computer You can use the floppy disk recorded with this...or higher, Netscape Navigator, etc. To play back an MPEG file with your personal computer and application software. To display the image list, double-click [Mavica.htm] in TEXT mode : GIF format. Note Data recorded with Windows 3.1. • For Macintosh, you have installed a browser such as a medium for...
...except TEXT mode) : JPEG format • Moving image/Voice memo: MPEG format • Still image in the floppy disk used with this camera using PC Exchange with Mac OS system 7.5 or higher. Viewing images using a personal computer You can use the floppy disk recorded with this...or higher, Netscape Navigator, etc. To play back an MPEG file with your personal computer and application software. To display the image list, double-click [Mavica.htm] in TEXT mode : GIF format. Note Data recorded with Windows 3.1. • For Macintosh, you have installed a browser such as a medium for...

Operating Instructions
Page 26
...mode image data Folder containing voice memo audio data Location 31/2 Floppy [A:] E-mail folder Voice folder File MVC-sssf.JPG MVC-sssf.411 MVC-sssf.MPG MVC-sssT.GIF MVC-sssE.JPG MVC-sssA.MPG Meaning • Still image file recorded normally • Still image file recorded in E-MAIL ...mode (page 36) • Still image file recorded in VOICE mode (page 36) • INDEX display file This file can only be played back on your camera...
...mode image data Folder containing voice memo audio data Location 31/2 Floppy [A:] E-mail folder Voice folder File MVC-sssf.JPG MVC-sssf.411 MVC-sssf.MPG MVC-sssT.GIF MVC-sssE.JPG MVC-sssA.MPG Meaning • Still image file recorded normally • Still image file recorded in E-MAIL ...mode (page 36) • Still image file recorded in VOICE mode (page 36) • INDEX display file This file can only be played back on your camera...
Operating Instructions
Page 28
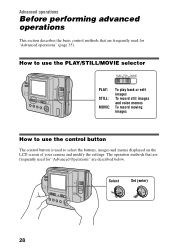
... The control button is used for "Advanced Operations" are frequently used to select the buttons, images and menus displayed on the LCD screen of your camera and modify the settings. The operation methods that are described below. Select Set (enter) 28 Advanced operations Before performing advanced operations This section describes the...
... The control button is used for "Advanced Operations" are frequently used to select the buttons, images and menus displayed on the LCD screen of your camera and modify the settings. The operation methods that are described below. Select Set (enter) 28 Advanced operations Before performing advanced operations This section describes the...
Operating Instructions
Page 30
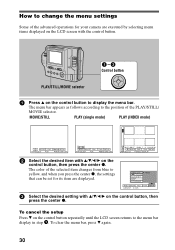
MOVIE/STILL PLAY (single mode) PLAY (INDEX mode) EFFECT FILE CAMERA SETUP SELECT OK MENU BAR OFF INDEX DELETE FILE TOOL SETUP SELECT OK MENU BAR OFF MVC-001F 2000 7 4 10:30PM DELETE FILE TOOL SETUP SELECT SINGLE DISPLAY 2 Select the desired item with v/V/b/B on the control button, then press the ... z. The menu bar appears as follows according to yellow, and when you press the center z, the settings that can be set for your camera are displayed. To cancel the setup Press V on the control button to display the menu bar. How to change the menu settings Some of...
MOVIE/STILL PLAY (single mode) PLAY (INDEX mode) EFFECT FILE CAMERA SETUP SELECT OK MENU BAR OFF INDEX DELETE FILE TOOL SETUP SELECT OK MENU BAR OFF MVC-001F 2000 7 4 10:30PM DELETE FILE TOOL SETUP SELECT SINGLE DISPLAY 2 Select the desired item with v/V/b/B on the control button, then press the ... z. The menu bar appears as follows according to yellow, and when you press the center z, the settings that can be set for your camera are displayed. To cancel the setup Press V on the control button to display the menu bar. How to change the menu settings Some of...
Operating Instructions
Page 33
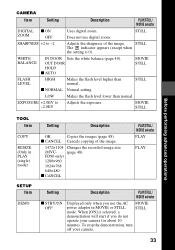
...;1104 Changes the recorded image size (MVC- (page 48). MOVIE STILL Before performing advanced operations TOOL Item COPY RESIZE (Only in MOVIE or STILL STILL mode. When [ON] is 0). CAMERA Item Setting Description PLAY/STILL/ MOVIE selector DIGITAL x ON ZOOM OFF Uses digital zoom. x CANCEL Cancels copying of... Copies the images (page 48). STILL The indicator appears (except when the setting is selected, a demonstration will start if you use digital zoom. FD90 only) 1280×960 1024×768 640×480 x CANCEL PLAY/STILL/ MOVIE selector PLAY PLAY Setting x STBY/ON OFF...
...;1104 Changes the recorded image size (MVC- (page 48). MOVIE STILL Before performing advanced operations TOOL Item COPY RESIZE (Only in MOVIE or STILL STILL mode. When [ON] is 0). CAMERA Item Setting Description PLAY/STILL/ MOVIE selector DIGITAL x ON ZOOM OFF Uses digital zoom. x CANCEL Cancels copying of... Copies the images (page 48). STILL The indicator appears (except when the setting is selected, a demonstration will start if you use digital zoom. FD90 only) 1280×960 1024×768 640×480 x CANCEL PLAY/STILL/ MOVIE selector PLAY PLAY Setting x STBY/ON OFF...
Operating Instructions
Page 40
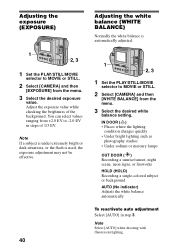
...the exposure value while checking the brightness of 1/3 EV. Adjusting the exposure (EXPOSURE) 1 2, 3 1 Set the PLAY/STILL/MOVIE selector to MOVIE or STILL. 2 Select [CAMERA] and then [EXPOSURE] from the menu. 3 Select the desired white balance setting. Note Select [AUTO] when shooting with fluorescent lighting. Note If a subject is under ... automatically To reactivate auto adjustment Select [AUTO] in steps of the background. You can select values ranging from +2.0 EV to MOVIE or STILL. 2 Select [CAMERA] and then [WHITE BALANCE] from the menu. 3 Select the desired exposure value.
...the exposure value while checking the brightness of 1/3 EV. Adjusting the exposure (EXPOSURE) 1 2, 3 1 Set the PLAY/STILL/MOVIE selector to MOVIE or STILL. 2 Select [CAMERA] and then [EXPOSURE] from the menu. 3 Select the desired white balance setting. Note Select [AUTO] when shooting with fluorescent lighting. Note If a subject is under ... automatically To reactivate auto adjustment Select [AUTO] in steps of the background. You can select values ranging from +2.0 EV to MOVIE or STILL. 2 Select [CAMERA] and then [WHITE BALANCE] from the menu. 3 Select the desired exposure value.
Operating Instructions
Page 45
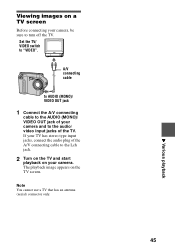
... to the audio/ video input jacks of the A/V connecting cable to the Lch jack. 2 Turn on the TV and start playback on your camera. Set the TV/ VIDEO switch to turn off the TV. Note You cannot use a TV that has an antenna (aerial) connector only. 45 B Various playback .... The playback image appears on a TV screen Before connecting your TV has stereo type input jacks, connect the audio plug of the TV. If your camera, be sure to "VIDEO".
... to the audio/ video input jacks of the A/V connecting cable to the Lch jack. 2 Turn on the TV and start playback on your camera. Set the TV/ VIDEO switch to turn off the TV. Note You cannot use a TV that has an antenna (aerial) connector only. 45 B Various playback .... The playback image appears on a TV screen Before connecting your TV has stereo type input jacks, connect the audio plug of the TV. If your camera, be sure to "VIDEO".


