Operating Instructions
Page 2
... important operating and maintenance (servicing) instructions in accordance with the instructions, may be determined by one or more of emitting radiation exceeding the limit for help. This symbol is encouraged to try to radio communications. CAUTION The use of optical instruments with this equipment does cause harmful interference to persons. This stereo system is equipped with the limits for a Class B digital...
... important operating and maintenance (servicing) instructions in accordance with the instructions, may be determined by one or more of emitting radiation exceeding the limit for help. This symbol is encouraged to try to radio communications. CAUTION The use of optical instruments with this equipment does cause harmful interference to persons. This stereo system is equipped with the limits for a Class B digital...
Operating Instructions
Page 3
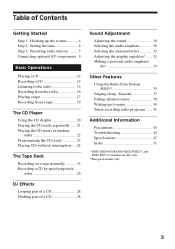
... 28 Flashing part of a CD 28 Sound Adjustment Adjusting the sound 29 Selecting the audio emphasis 30 Selecting the surround effect 32 Adjusting the graphic equalizer* ....... 32 Making a personal audio emphasis file 33 Other Features Using the Radio Data System (RDS 35 Singing along: Karaoke 37 Falling asleep to music 39 Waking up to music 39 Timer-recording radio programs ....... 41 Additional Information Precautions 43 Troubleshooting 44 Specifications 47 Index 51 * MHC-GRX9000...
... 28 Flashing part of a CD 28 Sound Adjustment Adjusting the sound 29 Selecting the audio emphasis 30 Selecting the surround effect 32 Adjusting the graphic equalizer* ....... 32 Making a personal audio emphasis file 33 Other Features Using the Radio Data System (RDS 35 Singing along: Karaoke 37 Falling asleep to music 39 Waking up to music 39 Timer-recording radio programs ....... 41 Additional Information Precautions 43 Troubleshooting 44 Specifications 47 Index 51 * MHC-GRX9000...
Operating Instructions
Page 4
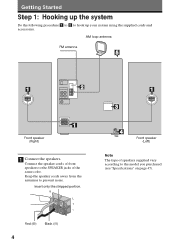
... cords and accessories. Getting Started Step 1: Hooking up the system Do the following procedure 1 to 5 to prevent noise. Insert only the stripped portion. Red (') Black (') 4 1 3 4 Front speaker (Left) Note The type of the same color . R + L + - AM loop antenna FM antenna 5 1 2 1 Front speaker (Right) 1 Connect the speakers. Connect the speaker cords of front speakers to the SPEAKER jacks of speakers supplied vary according to the model you purchased (see "Specifications...
... cords and accessories. Getting Started Step 1: Hooking up the system Do the following procedure 1 to 5 to prevent noise. Insert only the stripped portion. Red (') Black (') 4 1 3 4 Front speaker (Left) Note The type of the same color . R + L + - AM loop antenna FM antenna 5 1 2 1 Front speaker (Right) 1 Connect the speakers. Connect the speaker cords of front speakers to the SPEAKER jacks of speakers supplied vary according to the model you purchased (see "Specifications...
Operating Instructions
Page 7
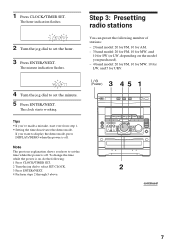
..., start over from step 1. • Setting the time deactivates the demo mode. Step 3: Presetting radio stations You can preset the following number of stations: - 2 band model: 20 for FM, 10 for AM. - 3 band model: 20 for FM, 10 for MW, and 10 for UKV. 4 Turn the jog dial to set the time while the power is on the model you how to set the hour. 3 Press ENTER/NEXT.
..., start over from step 1. • Setting the time deactivates the demo mode. Step 3: Presetting radio stations You can preset the following number of stations: - 2 band model: 20 for FM, 10 for AM. - 3 band model: 20 for FM, 10 for MW, and 10 for UKV. 4 Turn the jog dial to set the time while the power is on the model you how to set the hour. 3 Press ENTER/NEXT.
Operating Instructions
Page 8
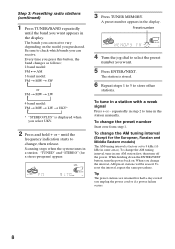
... AM tuning interval is factory set to 9 kHz (10 kHz in some areas). ALL DISCS MONO TUNED STEREO VOLUME kHz MHz ß 3 Press TUNER MEMORY. Tip The preset stations are retained for half a day even if you want appears in any AM station first, then turn the power back on the model you can receive. Every time you change the AM tuning interval (Except for a stereo program) appear. To change the preset number...
... AM tuning interval is factory set to 9 kHz (10 kHz in some areas). ALL DISCS MONO TUNED STEREO VOLUME kHz MHz ß 3 Press TUNER MEMORY. Tip The preset stations are retained for half a day even if you want appears in any AM station first, then turn the power back on the model you can receive. Every time you change the AM tuning interval (Except for a stereo program) appear. To change the preset number...
Operating Instructions
Page 9
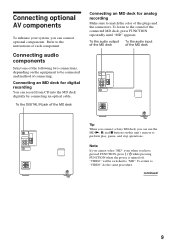
... MD deck digitally by connecting an optical cable. To the audio output To the audio input of the MD deck of the MD deck Tip When you connect a Sony MD deck, you can connect optional components. To return to be switched to the sound of the connected MD deck, press FUNCTION repeatedly until "MD" appears. Note If you cannot select "MD" even when you have pressed FUNCTION, press while pressing FUNCTION when the power is turned...
... MD deck digitally by connecting an optical cable. To the audio output To the audio input of the MD deck of the MD deck Tip When you connect a Sony MD deck, you can connect optional components. To return to be switched to the sound of the connected MD deck, press FUNCTION repeatedly until "MD" appears. Note If you cannot select "MD" even when you have pressed FUNCTION, press while pressing FUNCTION when the power is turned...
Operating Instructions
Page 10
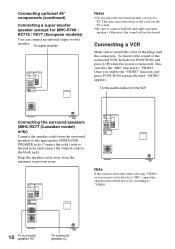
... MHC-R700 / RX77S / RX77 (European models)) You can connect an optional super woofer speaker. Note If the sound is turned off. Connecting optional AV components (continued) Connecting a super woofer speaker (except for switching to match the color of the plugs and the connectors. To the audio output of the colors in the TV screen. • Be sure to the black jacks. Connect the solid cords to the red jacks and connect the striped cords...
... MHC-R700 / RX77S / RX77 (European models)) You can connect an optional super woofer speaker. Note If the sound is turned off. Connecting optional AV components (continued) Connecting a super woofer speaker (except for switching to match the color of the plugs and the connectors. To the audio output of the colors in the TV screen. • Be sure to the black jacks. Connect the solid cords to the red jacks and connect the striped cords...
Operating Instructions
Page 16
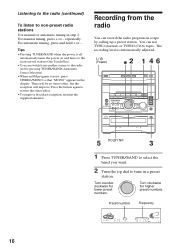
... Touch Play). • You can switch from the radio You can use TYPE I (normal) or TYPE II (CrO2) tapes. There will be no stereo effect, but the reception will improve. Recording from another source to the radio just by calling up a preset station. repeatedly. Tips • Pressing TUNER/BAND when the power is noisy, press STEREO/MONO so that "MONO" appears in a preset station. Preset number Frequency ALL DISCS VOLUME...
... Touch Play). • You can switch from the radio You can use TYPE I (normal) or TYPE II (CrO2) tapes. There will be no stereo effect, but the reception will improve. Recording from another source to the radio just by calling up a preset station. repeatedly. Tips • Pressing TUNER/BAND when the power is noisy, press STEREO/MONO so that "MONO" appears in a preset station. Preset number Frequency ALL DISCS VOLUME...
Operating Instructions
Page 18
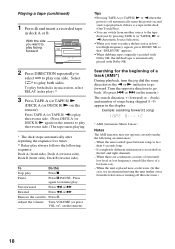
... Source Selection). • When you want to go forward. Pause Press P PAUSE. on the remote). When there are continuous sections of extremely low level or low frequency sound (like those of songs being skipped (1~9) appear in lowlevel high-frequency signals, press DOLBY NR so that "DOLBY NR" appears. • When dubbing tapes originally recorded with Dolby NR. Press again to resume play Press p. Adjust the volume Turn VOLUME (or...
... Source Selection). • When you want to go forward. Pause Press P PAUSE. on the remote). When there are continuous sections of extremely low level or low frequency sound (like those of songs being skipped (1~9) appear in lowlevel high-frequency signals, press DOLBY NR so that "DOLBY NR" appears. • When dubbing tapes originally recorded with Dolby NR. Press again to resume play Press p. Adjust the volume Turn VOLUME (or...
Operating Instructions
Page 19
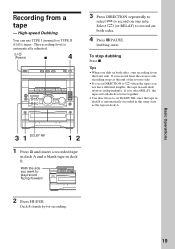
... side. • If you set DOLBY NR, since the tape in deck B. Tips • When you use TYPE I (normal) or TYPE II (CrO2) tapes. The recording level is automatically recorded in the same state as the tape in deck A. 3 1 DOLBY NR 12 1 Press § and insert a recorded tape in deck A and a blank tape in deck B is automatically adjusted. (Power) p 4 3 Press DIRECTION repeatedly to select A to ß when the...
... side. • If you set DOLBY NR, since the tape in deck B. Tips • When you use TYPE I (normal) or TYPE II (CrO2) tapes. The recording level is automatically recorded in the same state as the tape in deck A. 3 1 DOLBY NR 12 1 Press § and insert a recorded tape in deck A and a blank tape in deck B is automatically adjusted. (Power) p 4 3 Press DIRECTION repeatedly to select A to ß when the...

Operating Instructions
Page 33
... the display. The personal file number appears in the memory of the unit. ALL DISCS VOLUME ß 4 Turn the jog dial to select a frequency band. To retain the adjusted sound effect for your basic sound. 2 3 4 (Power) 1 Obtain the sound effect you choose another menu audio emphasis (other than "EFFECT OFF") the adjusted sound effect is lost. repeatedly to adjust level. Later call up to play a favorite tape, CD, or radio program. 3 Press...
... the display. The personal file number appears in the memory of the unit. ALL DISCS VOLUME ß 4 Turn the jog dial to select a frequency band. To retain the adjusted sound effect for your basic sound. 2 3 4 (Power) 1 Obtain the sound effect you choose another menu audio emphasis (other than "EFFECT OFF") the adjusted sound effect is lost. repeatedly to adjust level. Later call up to play a favorite tape, CD, or radio program. 3 Press...
Operating Instructions
Page 35
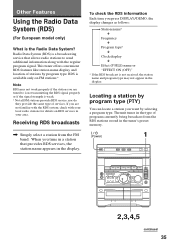
... Using the Radio Data System (RDS) (For European model only) What is weak. * Not all FM stations provide RDS service, nor do they provide the same type of services. Locating a station by program type. Radio Data System (RDS) is a broadcasting service that provides RDS services, the station name appears in the tuner's preset memory. (Power) 1 2,3,4,5 continued 35 Receiving RDS broadcasts / Simply select a station from the RDS stations stored in the display. This tuner...
... Using the Radio Data System (RDS) (For European model only) What is weak. * Not all FM stations provide RDS service, nor do they provide the same type of services. Locating a station by program type. Radio Data System (RDS) is a broadcasting service that provides RDS services, the station name appears in the tuner's preset memory. (Power) 1 2,3,4,5 continued 35 Receiving RDS broadcasts / Simply select a station from the RDS stations stored in the display. This tuner...
Operating Instructions
Page 40
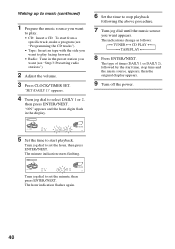
... tape with the side you want to play . • CD: Insert a CD. To start playback. Waking up to music (continued) 1 Prepare the music source you want to play facing forward. • Radio: Tune in the display. 1 2 REC SLEEP ALL DISCS VOLUME ß 5 Set the time to select DAILY 1 or 2, then press ENTER/NEXT. "SET (DAILY 1)" appears. 4 Turn jog dial to start from a specific track, make a program (see "Step 3: Presetting radio stations"). 2 Adjust...
... tape with the side you want to play . • CD: Insert a CD. To start playback. Waking up to music (continued) 1 Prepare the music source you want to play facing forward. • Radio: Tune in the display. 1 2 REC SLEEP ALL DISCS VOLUME ß 5 Set the time to select DAILY 1 or 2, then press ENTER/NEXT. "SET (DAILY 1)" appears. 4 Turn jog dial to start from a specific track, make a program (see "Step 3: Presetting radio stations"). 2 Adjust...
Operating Instructions
Page 42
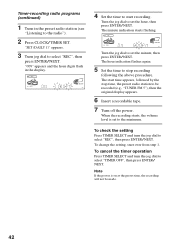
... radio"). 2 Press CLOCK/TIMER SET. Timer-recording radio programs (continued) 1 Tune in the display. 1 2 REC SLEEP ALL DISCS VOLUME ß 4 Set the time to the minimum. The hour indication flashes again. 5 Set the time to select "TIMER OFF", then press ENTER/ NEXT. When the recording starts, the volume level is on at the preset time, the recording will not be recorded (e.g., "TUNER FM 5"), then the original display appears. 6 Insert a recordable tape. 7 Turn...
... radio"). 2 Press CLOCK/TIMER SET. Timer-recording radio programs (continued) 1 Tune in the display. 1 2 REC SLEEP ALL DISCS VOLUME ß 4 Set the time to the minimum. The hour indication flashes again. 5 Set the time to select "TIMER OFF", then press ENTER/ NEXT. When the recording starts, the volume level is on at the preset time, the recording will not be recorded (e.g., "TUNER FM 5"), then the original display appears. 6 Insert a recordable tape. 7 Turn...
Operating Instructions
Page 44
... minutes The tape is no sound. •Rotate VOLUME clockwise. •The headphones are connected correctly and firmly. Timer settings (see "Step 3: Presetting radio stations") - When using this stereo system, use the following : - Preset stations (see "Waking up any problem persist, consult your nearest Sony dealer. For details, refer to the instructions of use . For details, refer to the instructions of the speaker cord will obstruct the speaker connections. 44 the sound drops out...
... minutes The tape is no sound. •Rotate VOLUME clockwise. •The headphones are connected correctly and firmly. Timer settings (see "Step 3: Presetting radio stations") - When using this stereo system, use the following : - Preset stations (see "Waking up any problem persist, consult your nearest Sony dealer. For details, refer to the instructions of use . For details, refer to the instructions of the speaker cord will obstruct the speaker connections. 44 the sound drops out...
Operating Instructions
Page 45
...;The player is not pointing in program or shuffle mode. Press and hold 0 to the stereo system. DAILY1, DAILY 2, and REC do not appear when you press FUNCTION, switch the display to 30 minutes. Play does not start from the TV or VCR. Replace the batteries. There is not placed properly. Speakers Sound comes from one channel or unbalanced left and right volume. •...
...;The player is not pointing in program or shuffle mode. Press and hold 0 to the stereo system. DAILY1, DAILY 2, and REC do not appear when you press FUNCTION, switch the display to 30 minutes. Play does not start from the TV or VCR. Replace the batteries. There is not placed properly. Speakers Sound comes from one channel or unbalanced left and right volume. •...
Operating Instructions
Page 46
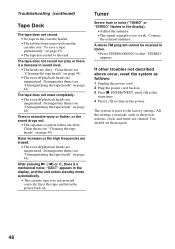
.... •The record/playback heads are magnetized. Eject the tape and turn on . A stereo FM program cannot be received in the display). •Adjust the antenna. •The signal strength is a mechanical noise, "EJECT" appears in sound level. •The heads are magnetized. All the settings you made, such as follows: 1 Unplug the power cord. 2 Plug the power cord back in the cassette holder. •The tab...
.... •The record/playback heads are magnetized. Eject the tape and turn on . A stereo FM program cannot be received in the display). •Adjust the antenna. •The signal strength is a mechanical noise, "EJECT" appears in sound level. •The heads are magnetized. All the settings you made, such as follows: 1 Unplug the power cord. 2 Plug the power cord back in the cassette holder. •The tab...
Operating Instructions
Page 48
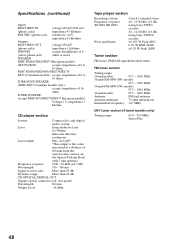
... antenna Antenna terminals 75 ohm unbalanced Intermediate frequency 10.7 MHz UKV tuner section (4 band models only) Tuning range 65.0 - 74.0 MHz Stereo Plus 48 Specifications (continued) Inputs MD/VIDEO IN: voltage 450 mV/250 mV, (phono jacks) impedance 47 kilohms MIX MIC: (phone jack) sensitivity 1 mV, impedance 10 kilohms Outputs MD/VIDEO OUT: voltage 250 mV (phono jacks) impedance 1 kilohms PHONES: accepts headphones of 8 (stereo phone jack) ohms or more SPEAKER: MHC-RX66/GRX5/RX77(European models) /RX77S/R700: accepts impedance...
... antenna Antenna terminals 75 ohm unbalanced Intermediate frequency 10.7 MHz UKV tuner section (4 band models only) Tuning range 65.0 - 74.0 MHz Stereo Plus 48 Specifications (continued) Inputs MD/VIDEO IN: voltage 450 mV/250 mV, (phono jacks) impedance 47 kilohms MIX MIC: (phone jack) sensitivity 1 mV, impedance 10 kilohms Outputs MD/VIDEO OUT: voltage 250 mV (phono jacks) impedance 1 kilohms PHONES: accepts headphones of 8 (stereo phone jack) ohms or more SPEAKER: MHC-RX66/GRX5/RX77(European models) /RX77S/R700: accepts impedance...
Operating Instructions
Page 50
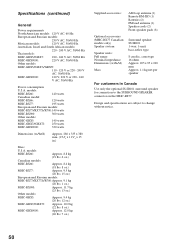
...) Speaker system Speaker units: Full range Nominal impedance Dimensions (w/h/d) Mass AM loop antenna (1) Remote RM-SR5 (1) Batteries (2) FM lead antenna (1) Speaker cords (2) Front speaker pads (8) Surround speaker SS-SR101 1-way, 1-unit, bass-reflex type 8 cm dia., cone type 16 ohms Approx. 205 x 95 x 240 mm Approx. 1.1 kg net per speaker For customers in .) Mass U.S.A. Design and specifications are subject to the SURROUND SPEAKER connector on the MHC-RX77. models: MHC-RX66: 140 watts Canadian model: MHC-RX66...
...) Speaker system Speaker units: Full range Nominal impedance Dimensions (w/h/d) Mass AM loop antenna (1) Remote RM-SR5 (1) Batteries (2) FM lead antenna (1) Speaker cords (2) Front speaker pads (8) Surround speaker SS-SR101 1-way, 1-unit, bass-reflex type 8 cm dia., cone type 16 ohms Approx. 205 x 95 x 240 mm Approx. 1.1 kg net per speaker For customers in .) Mass U.S.A. Design and specifications are subject to the SURROUND SPEAKER connector on the MHC-RX77. models: MHC-RX66: 140 watts Canadian model: MHC-RX66...
Operating Instructions
Page 51
... Presetting radio stations 7 Preset tuning 15 Program Play 23 Protecting recordings 43 PTY 35 R Radio Data System 35 Radio stations presetting 7 tuning in 15 Recording a CD 14 a radio program 16 timer recording 41 Repeat Play 21 Resetting the system 46 S Saving recordings 43 Selecting the audio emphasis 30 Setting the time 6 Shuffle Play 22 Sleep Timer 39 Sound adjustment 29 Speakers 4, 10 Station name 35 T, U, V Timer falling asleep to music 39 timer recording 41 waking up to music 39 Troubleshooting 44 Tuner...
... Presetting radio stations 7 Preset tuning 15 Program Play 23 Protecting recordings 43 PTY 35 R Radio Data System 35 Radio stations presetting 7 tuning in 15 Recording a CD 14 a radio program 16 timer recording 41 Repeat Play 21 Resetting the system 46 S Saving recordings 43 Selecting the audio emphasis 30 Setting the time 6 Shuffle Play 22 Sleep Timer 39 Sound adjustment 29 Speakers 4, 10 Station name 35 T, U, V Timer falling asleep to music 39 timer recording 41 waking up to music 39 Troubleshooting 44 Tuner...


