Operating Instructions
Page 6
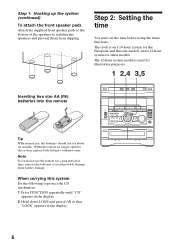
... damage from slipping. The 12-hour system model is on a 24-hour system for the European and Russian models, and a 12-hour system for about six months. The clock is used for illustration purposes. 1 2,4 3,5 Inserting two size AA (R6) batteries into the remote ] }} ] Tip With normal use the remote for a long period of the speakers...
... damage from slipping. The 12-hour system model is on a 24-hour system for the European and Russian models, and a 12-hour system for about six months. The clock is used for illustration purposes. 1 2,4 3,5 Inserting two size AA (R6) batteries into the remote ] }} ] Tip With normal use the remote for a long period of the speakers...
Operating Instructions
Page 9
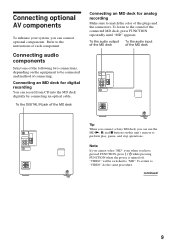
... To the audio input of the MD deck of the MD deck Tip When you connect a Sony MD deck, you can use the MD (, P, and p buttons on the equipment to match...the power is turned off. continued 9 To return to "MD". Connecting optional AV components To enhance your system, you can record from CD into the MD deck digitally by connecting an optical cable. "VIDEO" will be...of each component. Connecting audio components Select one of the following two connections, depending on this unit's remote to the sound of the plugs and the connectors. To the DIGITAL IN jack of the MD deck ...
... To the audio input of the MD deck of the MD deck Tip When you connect a Sony MD deck, you can use the MD (, P, and p buttons on the equipment to match...the power is turned off. continued 9 To return to "MD". Connecting optional AV components To enhance your system, you can record from CD into the MD deck digitally by connecting an optical cable. "VIDEO" will be...of each component. Connecting audio components Select one of the following two connections, depending on this unit's remote to the sound of the plugs and the connectors. To the DIGITAL IN jack of the MD deck ...
Operating Instructions
Page 12
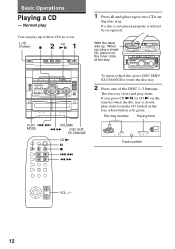
When you press CD (P (or CD ( on the remote) when the disc tray is closed, play a single CD, place it on the tray whose button is not placed properly it will not be recognized. ...
When you press CD (P (or CD ( on the remote) when the disc tray is closed, play a single CD, place it on the tray whose button is not placed properly it will not be recognized. ...
Operating Instructions
Page 13
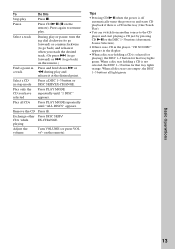
... appears. When all disc trays are empty, the DISC 1~3 buttons all CDs Press PLAY MODE repeatedly until "1 DISC" appears. Pause Press CD (P (P on the remote.) Find a point in a track Press and hold down ) or 0 during play or pause, turn the jog dial clockwise (to go forward) or counterclockwise (to... a CD just by pressing CD (P or the DISC 1~3 buttons (Automatic Source Selection). • If there is off automatically turns the power on the remote). Remove the CD Press §. on and starts CD playback if there is a CD in the tray (One Touch Play). • You can switch...
... appears. When all disc trays are empty, the DISC 1~3 buttons all CDs Press PLAY MODE repeatedly until "1 DISC" appears. Pause Press CD (P (P on the remote.) Find a point in a track Press and hold down ) or 0 during play or pause, turn the jog dial clockwise (to go forward) or counterclockwise (to... a CD just by pressing CD (P or the DISC 1~3 buttons (Automatic Source Selection). • If there is off automatically turns the power on the remote). Remove the CD Press §. on and starts CD playback if there is a CD in the tray (One Touch Play). • You can switch...
Operating Instructions
Page 15
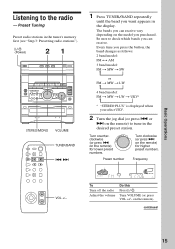
... n MW n LW n UKV* n * "STEREO PLUS" is displayed when you want appears in the desired preset station. Turn counter- + clockwise (or press = = on the remote) to the radio -- Frequency ALL DISCS VOLUME kHz MHz ß To Do this Turn off the radio Press . ◊ Adjust the volume Turn VOLUME (or.../MONO VOLUME TUNER/BAND = + 1 Press TUNER/BAND repeatedly until the band you select UKV. 2 Turn the jog dial (or press = or + on the remote) for higher preset numbers. Basic Operations Listening to tune in the display. The bands you can receive vary depending on the...
... n MW n LW n UKV* n * "STEREO PLUS" is displayed when you want appears in the desired preset station. Turn counter- + clockwise (or press = = on the remote) to the radio -- Frequency ALL DISCS VOLUME kHz MHz ß To Do this Turn off the radio Press . ◊ Adjust the volume Turn VOLUME (or.../MONO VOLUME TUNER/BAND = + 1 Press TUNER/BAND repeatedly until the band you select UKV. 2 Turn the jog dial (or press = or + on the remote) for higher preset numbers. Basic Operations Listening to tune in the display. The bands you can receive vary depending on the...

Operating Instructions
Page 17
... + and - 3 Press § and insert a blank tape into deck B. Tips • If you start from the radio, move the respective antenna to record on the remote. (Power) 3 p = + P PAUSE To stop recording Press p. Playing a tape You can also use the jog dial's AMS* functions to quickly search for recording. 5 Press DIRECTION repeatedly...
... + and - 3 Press § and insert a blank tape into deck B. Tips • If you start from the radio, move the respective antenna to record on the remote. (Power) 3 p = + P PAUSE To stop recording Press p. Playing a tape You can also use the jog dial's AMS* functions to quickly search for recording. 5 Press DIRECTION repeatedly...
Operating Instructions
Page 18
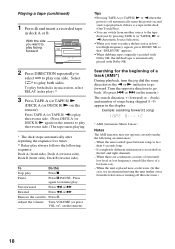
.... - Press TAPE A (or TAPE B) 9 to play the reverse side. (Press DECK A (or DECK B) ( again on the remote to go forward. Fast-forward Press 0 or ). on the remote). Tips • Pressing TAPE A (or TAPE B) ( or 9 when the power is off the television.) 18 Adjust the volume Turn ...(continued) 1 Press § and insert a recorded tape in succession, select RELAY (relay play).** 3 Press TAPE A (or TAPE B) ( (DECK A (or DECK B) ( on the remote). Searching for the beginning of a track (AMS*) During playback, turn the jog dial the same direction as the 9 or ( indicator to go back. (Or press...
.... - Press TAPE A (or TAPE B) 9 to play the reverse side. (Press DECK A (or DECK B) ( again on the remote to go forward. Fast-forward Press 0 or ). on the remote). Tips • Pressing TAPE A (or TAPE B) ( or 9 when the power is off the television.) 18 Adjust the volume Turn ...(continued) 1 Press § and insert a recorded tape in succession, select RELAY (relay play).** 3 Press TAPE A (or TAPE B) ( (DECK A (or DECK B) ( on the remote). Searching for the beginning of a track (AMS*) During playback, turn the jog dial the same direction as the 9 or ( indicator to go back. (Or press...
Operating Instructions
Page 22
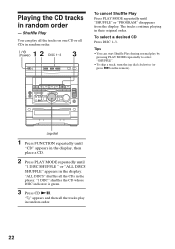
... DISC indicator is green. 3 Press CD (P. Playing the CD tracks in the display. "ALL DISCS" shuffles all the tracks play all the tracks on the remote). The tracks continue playing in the player.
... DISC indicator is green. 3 Press CD (P. Playing the CD tracks in the display. "ALL DISCS" shuffles all the tracks play all the tracks on the remote). The tracks continue playing in the player.
Operating Instructions
Page 24
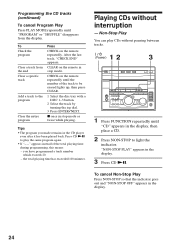
... stop mode or twice while playing. CHECK on the remote repeatedly. Programming the CD tracks (continued) To cancel Program Play Press PLAY MODE repeatedly until "CD" appears in the display, then place a CD. 2 Press NON-... in stop mode. Non-Stop Play You can play CDs without interruption -- Press CD (P to the program Clear the entire program Press CHECK on the remote repeatedly until the number of the total playing time during programming, this means: - Playing CDs without pausing between tracks. 1 2 (Power) 3 1 Press FUNCTION repeatedly until "PROGRAM...
... stop mode or twice while playing. CHECK on the remote repeatedly. Programming the CD tracks (continued) To cancel Program Play Press PLAY MODE repeatedly until "CD" appears in the display, then place a CD. 2 Press NON-... in stop mode. Non-Stop Play You can play CDs without interruption -- Press CD (P to the program Clear the entire program Press CHECK on the remote repeatedly until the number of the total playing time during programming, this means: - Playing CDs without pausing between tracks. 1 2 (Power) 3 1 Press FUNCTION repeatedly until "PROGRAM...
Operating Instructions
Page 26
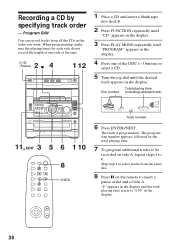
... the desired track appears in the order you want. Recording a CD by the total playing time. 7 To program additional tracks to be recorded on the remote to insert a pause at the end of the DISC 1~3 buttons to select tracks from all the CDs in the display. Program Edit You can record...
... the desired track appears in the order you want. Recording a CD by the total playing time. 7 To program additional tracks to be recorded on the remote to insert a pause at the end of the DISC 1~3 buttons to select tracks from all the CDs in the display. Program Edit You can record...
Operating Instructions
Page 27
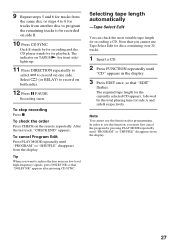
... CD player stands by pressing PLAY MODE repeatedly until "PROGRAM" or "SHUFFLE" disappears from the display. 27 Select ß (or RELAY) to record on the remote repeatedly. Tip When you must first cancel the program by for side A and side B respectively. Selecting tape length automatically -Tape Select Edit You can check...
... CD player stands by pressing PLAY MODE repeatedly until "PROGRAM" or "SHUFFLE" disappears from the display. 27 Select ß (or RELAY) to record on the remote repeatedly. Tip When you must first cancel the program by for side A and side B respectively. Selecting tape length automatically -Tape Select Edit You can check...
Operating Instructions
Page 28
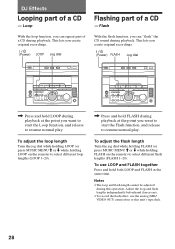
... lets you can repeat part of a CD during playback at the same time. while holding LOOP on the remote) to resume normal play . DJ Effects Looping part of a CD - while holding FLASH on the remote) to resume normal play . Notes • The loop and flash length cannot be adjusted during playback at...
... lets you can repeat part of a CD during playback at the same time. while holding LOOP on the remote) to resume normal play . DJ Effects Looping part of a CD - while holding FLASH on the remote) to resume normal play . Notes • The loop and flash length cannot be adjusted during playback at...
Operating Instructions
Page 31
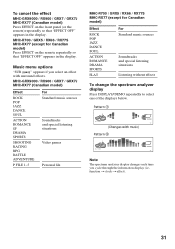
To cancel the effect MHC-GRX9000 / RX900 / GRX7 / GRX7J MHC-RX77 (Canadian model) Press EFFECT on the remote repeatedly so that "EFFECT OFF" appears in the display. Pattern 1 ALL DISCS (Changes with surround effects. MHC-R700 / GRX5 / RX66 / RX77S MHC-RX77 (except for Canadian model) ... 1~5 For Standard music sources Soundtracks and special listening situations Video games Personal file MHC-R700 / GRX5 / RX66 / RX77S MHC-RX77 (except for Canadian model) Press EFFECT on the front panel (or the remote) repeatedly so that "EFFECT OFF" appears in the display. Music menu options ...
To cancel the effect MHC-GRX9000 / RX900 / GRX7 / GRX7J MHC-RX77 (Canadian model) Press EFFECT on the remote repeatedly so that "EFFECT OFF" appears in the display. Pattern 1 ALL DISCS (Changes with surround effects. MHC-R700 / GRX5 / RX66 / RX77S MHC-RX77 (except for Canadian model) ... 1~5 For Standard music sources Soundtracks and special listening situations Video games Personal file MHC-R700 / GRX5 / RX66 / RX77S MHC-RX77 (except for Canadian model) Press EFFECT on the front panel (or the remote) repeatedly so that "EFFECT OFF" appears in the display. Music menu options ...
Operating Instructions
Page 45
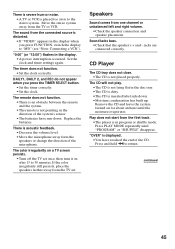
... continued 45 "0:00" (or "12:00") flashes in the display. •A power interruption occurred. The remote does not function. •There is an obstacle between the remote and the system. •The remote is in program or shuffle mode. Speakers Sound comes from the TV set once, then turn it on... after 15 to "MD" (see "Note: Connecting a VCR"). Move the stereo system away from the connected source is placed ...
... continued 45 "0:00" (or "12:00") flashes in the display. •A power interruption occurred. The remote does not function. •There is an obstacle between the remote and the system. •The remote is in program or shuffle mode. Speakers Sound comes from the TV set once, then turn it on... after 15 to "MD" (see "Note: Connecting a VCR"). Move the stereo system away from the connected source is placed ...
Operating Instructions
Page 50
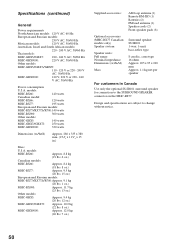
.... 50 models: MHC-RX66: Approx. 8.8 kg (19 lbs. 6 oz.) Canadian models: MHC-RX66: Approx. 8.4 kg (18 lbs. 8 oz.) MHC-RX77: Approx. 9.5 kg (20 lbs. 15 oz.) European and Russian models: MHC-RX77/RX77S/R700:Approx. 9.1 kg (20 lbs. 1 oz.) MHC-RX900: Approx. ...MHC-GRX5: Approx. 9.4 kg (20 lbs. 12 oz.) MHC-GRX7/GRX7J: Approx. 10.2 kg (22 lbs. 8 oz.) MHC-GRX9000: Approx. 12.0 kg (26 lbs. 7 oz.) Supplied accessories: Optional accessories: (MHC-RX77 Canadian models only) Speaker system Speaker units: Full range Nominal impedance Dimensions (w/h/d) Mass AM loop antenna (1) Remote...
.... 50 models: MHC-RX66: Approx. 8.8 kg (19 lbs. 6 oz.) Canadian models: MHC-RX66: Approx. 8.4 kg (18 lbs. 8 oz.) MHC-RX77: Approx. 9.5 kg (20 lbs. 15 oz.) European and Russian models: MHC-RX77/RX77S/R700:Approx. 9.1 kg (20 lbs. 1 oz.) MHC-RX900: Approx. ...MHC-GRX5: Approx. 9.4 kg (20 lbs. 12 oz.) MHC-GRX7/GRX7J: Approx. 10.2 kg (22 lbs. 8 oz.) MHC-GRX9000: Approx. 12.0 kg (26 lbs. 7 oz.) Supplied accessories: Optional accessories: (MHC-RX77 Canadian models only) Speaker system Speaker units: Full range Nominal impedance Dimensions (w/h/d) Mass AM loop antenna (1) Remote...


