Operating Instructions
Page 3
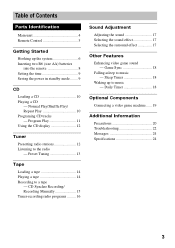
...18 Optional Components Connecting a video game machine ...... 19 Additional Information Precautions 20 Troubleshooting 22 Messages 24 Specifications 24 3 Table of Contents Parts Identification Main unit 4 Remote Control 5 Getting Started Hooking up to music - Sleep Timer 18 Waking up the system 6 ...Inserting two R6 (size AA) batteries into the remote 8 Setting the time 9 Saving the power in standby ...
...18 Optional Components Connecting a video game machine ...... 19 Additional Information Precautions 20 Troubleshooting 22 Messages 24 Specifications 24 3 Table of Contents Parts Identification Main unit 4 Remote Control 5 Getting Started Hooking up to music - Sleep Timer 18 Waking up the system 6 ...Inserting two R6 (size AA) batteries into the remote 8 Setting the time 9 Saving the power in standby ...
Operating Instructions
Page 5
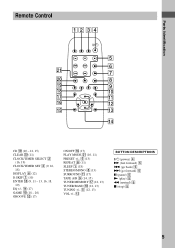
...) STEREO/MONO 8 (13) SURROUND qa (17) TAPE A/B 9 (14, 15) TUNER MEMORY qj (12, 13) TUNER/BAND qk (12, 13) TUNING +/- 5 (12, 13) VOL +/- Parts Identification Remote Control 12 34 5 6 wa 7 w; 8 ql 9 qk q;
...) STEREO/MONO 8 (13) SURROUND qa (17) TAPE A/B 9 (14, 15) TUNER MEMORY qj (12, 13) TUNER/BAND qk (12, 13) TUNING +/- 5 (12, 13) VOL +/- Parts Identification Remote Control 12 34 5 6 wa 7 w; 8 ql 9 qk q;
Operating Instructions
Page 8
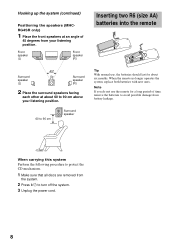
... should last for a long period of 45 degrees from the system. 2 Press ?/1 to 90 cm above your listening position. When the remote no longer operates the system, replace both batteries with new ones. When carrying this system Perform the following procedure to protect the CD mechanism. 1 Make... to 90 cm Surround speaker Inserting two R6 (size AA) batteries into the remote e E E e Tip With normal use the remote for about 60 to turn off the system. 3 Unplug the power cord. 8 Hooking up the system (continued) Positioning the speakers (MHCRG4SR only) 1 Place the front speakers at...
... should last for a long period of 45 degrees from the system. 2 Press ?/1 to 90 cm above your listening position. When the remote no longer operates the system, replace both batteries with new ones. When carrying this system Perform the following procedure to protect the CD mechanism. 1 Make... to 90 cm Surround speaker Inserting two R6 (size AA) batteries into the remote e E E e Tip With normal use the remote for about 60 to turn off the system. 3 Unplug the power cord. 8 Hooking up the system (continued) Positioning the speakers (MHCRG4SR only) 1 Place the front speakers at...
Operating Instructions
Page 9
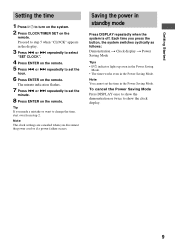
...timer works even in the Power Saving Mode. Note You cannot set the minute. 8 Press ENTER on the remote. Proceed to step 5 when "CLOCK" appears in standby mode Press DISPLAY repeatedly when the system is off. Saving the power in the display. 3 Press . To cancel the Power Saving Mode Press ...DISPLAY once to show the demonstration or twice to show the clock display. 9 Getting Started Setting the time 1 Press ?/1 to turn on the system. 2 Press CLOCK/TIMER SET on the remote. Note The clock settings are canceled when you disconnect the power cord or if a power failure occurs.
...timer works even in the Power Saving Mode. Note You cannot set the minute. 8 Press ENTER on the remote. Proceed to step 5 when "CLOCK" appears in standby mode Press DISPLAY repeatedly when the system is off. Saving the power in the display. 3 Press . To cancel the Power Saving Mode Press ...DISPLAY once to show the demonstration or twice to show the clock display. 9 Getting Started Setting the time 1 Press ?/1 to turn on the system. 2 Press CLOCK/TIMER SET on the remote. Note The clock settings are canceled when you disconnect the power cord or if a power failure occurs.
Operating Instructions
Page 10
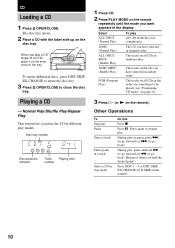
... the inner circle of the tray. PGM (Program Play) The tracks on all CDs in random order. 1DISC SHUF (Shuffle Play) The tracks on the remote). Other Operations To Stop play Pause Select a track Find a point in a track Select a CD in the order you want appears in different play the CD... in the display. When you find the desired point. Normal Play/Shuffle Play/Repeat Play This system lets you want them to go forward) or . (to be played (see "Programing CD tracks" on page 11). 3 Press H (or N on the CD you have...
... the inner circle of the tray. PGM (Program Play) The tracks on all CDs in random order. 1DISC SHUF (Shuffle Play) The tracks on the remote). Other Operations To Stop play Pause Select a track Find a point in a track Select a CD in the order you want appears in different play the CD... in the display. When you find the desired point. Normal Play/Shuffle Play/Repeat Play This system lets you want them to go forward) or . (to be played (see "Programing CD tracks" on page 11). 3 Press H (or N on the CD you have...
Operating Instructions
Page 11
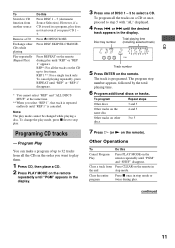
... Press DISC SKIP EX-CHANGE. Programing CD tracks - Disc tray number Total playing time (including selected track) Track number 5 Press ENTER on the remote). To program Other discs Other tracks on the same disc Other tracks on other CDs while playing Play repeatedly (Repeat Play) Do this Cancel Program... Play Press PLAY MODE on the remote in the end stop mode. Clear the entire program Press x once in stop mode or twice during play mode cannot be changed while...
... Press DISC SKIP EX-CHANGE. Programing CD tracks - Disc tray number Total playing time (including selected track) Track number 5 Press ENTER on the remote). To program Other discs Other tracks on the same disc Other tracks on other CDs while playing Play repeatedly (Repeat Play) Do this Cancel Program... Play Press PLAY MODE on the remote in the end stop mode. Clear the entire program Press x once in stop mode or twice during play mode cannot be changed while...
Operating Instructions
Page 12
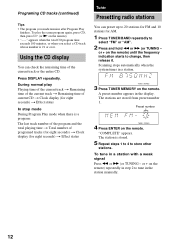
...system tunes in the display. The stations are stored from preset number 1. "COMPLETE" appears. To play Playing time of the current track t Remaining time of the current track t Remaining time of the current track or the entire CD. A preset number appears in a station. 3 Press TUNER MEMORY on the remote. or + on the remote... a station with a weak signal Press m or M (or TUNING - During normal play the same program again, press CD, then press H (or N on the remote) repeatedly in step 2 to select "FM" or "AM". 2 Press and hold m or M (or TUNING - Preset number 4 Press ENTER on the...
...system tunes in the display. The stations are stored from preset number 1. "COMPLETE" appears. To play Playing time of the current track t Remaining time of the current track t Remaining time of the current track or the entire CD. A preset number appears in a station. 3 Press TUNER MEMORY on the remote. or + on the remote... a station with a weak signal Press m or M (or TUNING - During normal play the same program again, press CD, then press H (or N on the remote) repeatedly in step 2 to select "FM" or "AM". 2 Press and hold m or M (or TUNING - Preset number 4 Press ENTER on the...
Operating Instructions
Page 13
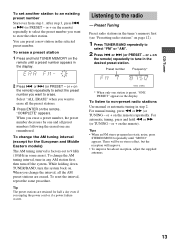
...all the preset stations. 3 Press ENTER on the remote) repeatedly to select the preset number you want to store the other station. To change the AM tuning interval, tune in any AM station first, then turn the system back on the remote) repeatedly to tune in the desired preset station. ...For automatic tuning, press and hold TUNER MEMORY on the remote until "MONO" appears. or + on page 12). 1 Press TUNER/BAND repeatedly to...
...all the preset stations. 3 Press ENTER on the remote) repeatedly to select the preset number you want to store the other station. To change the AM tuning interval, tune in any AM station first, then turn the system back on the remote) repeatedly to tune in the desired preset station. ...For automatic tuning, press and hold TUNER MEMORY on the remote until "MONO" appears. or + on page 12). 1 Press TUNER/BAND repeatedly to...
Operating Instructions
Page 14
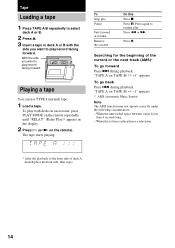
... in deck A or B with the side you want to play both decks in succession, press PLAY MODE on the remote repeatedly until "RELAY" (Relay Play)* appears in the display. 2 Press H (or N on the remote). The tape starts playing. Press Z. To go forward Press > during playback. "TAPE A (or TAPE B) Playing a tape You can...
... in deck A or B with the side you want to play both decks in succession, press PLAY MODE on the remote repeatedly until "RELAY" (Relay Play)* appears in the display. 2 Press H (or N on the remote). The tape starts playing. Press Z. To go forward Press > during playback. "TAPE A (or TAPE B) Playing a tape You can...
Operating Instructions
Page 16
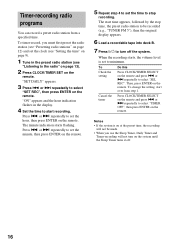
... must first preset the radio station (see "Presetting radio stations" on the system until the Sleep Timer turns it off the system. or > repeatedly to select "TIMER OFF", then press ENTER on the remote. To Check the setting Cancel the timer Do this Press CLOCK/TIMER SELECT ... When the recording starts, the volume level is on the remote. Press . To change the setting, start recording. Notes • If the system is set the clock (see "Listening to select "SEL REC". Then, press ENTER on the remote. The start time appears, followed by the stop recording. Timer...
... must first preset the radio station (see "Presetting radio stations" on the system until the Sleep Timer turns it off the system. or > repeatedly to select "TIMER OFF", then press ENTER on the remote. To Check the setting Cancel the timer Do this Press CLOCK/TIMER SELECT ... When the recording starts, the volume level is on the remote. Press . To change the setting, start recording. Notes • If the system is set the clock (see "Listening to select "SEL REC". Then, press ENTER on the remote. The start time appears, followed by the stop recording. Timer...

Operating Instructions
Page 17
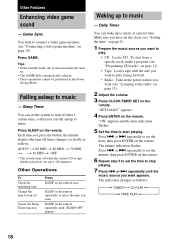
...* You can reinforce the bass and create a more powerful sound. To cancel the effect Press EFFECT ON/OFF (or ON/OFF on the remote. Selecting the sound effect Selecting the effect from the music menu Press MUSIC EQ, MOVIE EQ or GAME EQ (or EQ +/-* on the...Effect GAME Standard music sources Soundtracks and special listening situations PlayStation 1, 2 and other video game music sources Selecting the surround effect Press SURROUND on the remote). The preset name appears in the display. "SURR" appears in the display. Press again to cancel GROOVE. "GROOVE" appears in the display and...
...* You can reinforce the bass and create a more powerful sound. To cancel the effect Press EFFECT ON/OFF (or ON/OFF on the remote. Selecting the sound effect Selecting the effect from the music menu Press MUSIC EQ, MOVIE EQ or GAME EQ (or EQ +/-* on the...Effect GAME Standard music sources Soundtracks and special listening situations PlayStation 1, 2 and other video game music sources Selecting the surround effect Press SURROUND on the remote). The preset name appears in the display. "SURR" appears in the display. Press again to cancel GROOVE. "GROOVE" appears in the display and...
Operating Instructions
Page 18
...Programing CD tracks" on page 11). • Tape: Load a tape with the side you want (see "Setting the time" on the remote. 6 Repeat step 5 to set the system to turn -off after a certain time, so that you want to play facing forward. • Radio: Tune in the Power Saving Mode... have set the hour, then press ENTER on page 19). The minute indication flashes. Tips • In the standby mode, the system automatically turns on the remote repeatedly to music - Game Sync You need to set the clock (see "Listening to music at a preset time. Falling asleep to...
...Programing CD tracks" on page 11). • Tape: Load a tape with the side you want (see "Setting the time" on the remote. 6 Repeat step 5 to set the system to turn -off after a certain time, so that you want to play facing forward. • Radio: Tune in the Power Saving Mode... have set the hour, then press ENTER on page 19). The minute indication flashes. Tips • In the standby mode, the system automatically turns on the remote repeatedly to music - Game Sync You need to set the clock (see "Listening to music at a preset time. Falling asleep to...
Operating Instructions
Page 19
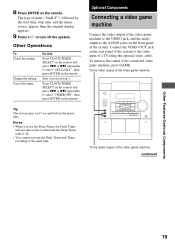
...and the audio output to the AUDIO jacks on the remote and press . Optional Components Connecting a video game machine Connect the video output of the system. To listen to turn on the system until the Sleep Timer turns it off the system. Notes • When you use the Sleep Timer...Press ?/1 to the sound of the video game machine continued Other Features/Optional Components 19 or > repeatedly to select "SEL DAILY", then press ENTER on the remote. Tip The system turns on the remote. 8 Press ENTER on the remote. or > repeatedly to select "TIMER OFF", then press ENTER on 15 ...
...and the audio output to the AUDIO jacks on the remote and press . Optional Components Connecting a video game machine Connect the video output of the system. To listen to turn on the system until the Sleep Timer turns it off the system. Notes • When you use the Sleep Timer...Press ?/1 to the sound of the video game machine continued Other Features/Optional Components 19 or > repeatedly to select "SEL DAILY", then press ENTER on the remote. Tip The system turns on the remote. 8 Press ENTER on the remote. or > repeatedly to select "TIMER OFF", then press ENTER on 15 ...
Operating Instructions
Page 22
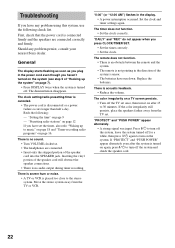
... the clock. Troubleshooting If you have any problem persist, consult your nearest Sony dealer. The timer does not function. • Set the clock correctly. The remote does not function. • There is an obstacle between the remote and the system. • The remote is not pointing in the direction of "Hooking up to 30 minutes...
... the clock. Troubleshooting If you have any problem persist, consult your nearest Sony dealer. The timer does not function. • Set the clock correctly. The remote does not function. • There is an obstacle between the remote and the system. • The remote is not pointing in the direction of "Hooking up to 30 minutes...
Operating Instructions
Page 26
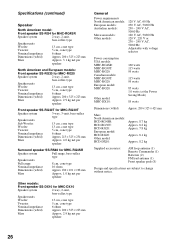
...Approx. 200 × 325 × 223 mm Mass Approx. 3.1 kg net per speaker North American and European models: Front speaker SS-RG20 for MHC-RG20 Speaker system 2-way, 2-unit, bass-reflex type Speaker units Woofer: 13 cm, cone type Tweeter: 5 cm, cone type Nominal impedance 6 ohms...mm Mass North American models: HCD-RG4SR: HCD-RG30T: HCD-RG20: European model: HCD-RG20: Other model: HCD-DX10: Approx. 8.7 kg Approx. 8.2 kg Approx. 7.8 kg Approx. 8.1 kg Approx. 8.2 kg Supplied accessories: AM loop antenna (1) Remote Commander (1) Batteries (2) FM lead antenna (1) Front speaker pads...
...Approx. 200 × 325 × 223 mm Mass Approx. 3.1 kg net per speaker North American and European models: Front speaker SS-RG20 for MHC-RG20 Speaker system 2-way, 2-unit, bass-reflex type Speaker units Woofer: 13 cm, cone type Tweeter: 5 cm, cone type Nominal impedance 6 ohms...mm Mass North American models: HCD-RG4SR: HCD-RG30T: HCD-RG20: European model: HCD-RG20: Other model: HCD-DX10: Approx. 8.7 kg Approx. 8.2 kg Approx. 7.8 kg Approx. 8.1 kg Approx. 8.2 kg Supplied accessories: AM loop antenna (1) Remote Commander (1) Batteries (2) FM lead antenna (1) Front speaker pads...


