Operating Instructions
Page 1
Model No. MHC-RG4SR MHC-RG30T MHC-RG20/DX10 © 2001 Sony Corporation 1 Serial No. Refer to them whenever you call upon your Sony dealer regarding this product. Record the serial number in the space provided below. 4-235-103-11(1) Mini Hi-Fi Component System Operating Instructions Owner's Record The model and serial numbers are located on the rear panel of the unit.
Model No. MHC-RG4SR MHC-RG30T MHC-RG20/DX10 © 2001 Sony Corporation 1 Serial No. Refer to them whenever you call upon your Sony dealer regarding this product. Record the serial number in the space provided below. 4-235-103-11(1) Mini Hi-Fi Component System Operating Instructions Owner's Record The model and serial numbers are located on the rear panel of the unit.
Operating Instructions
Page 2
... alert the user to the presence of important operating and maintenance (servicing) instructions in a particular installation. This symbol is classified as the injurious wastes. However, there is encouraged to try to persons. Connect the equipment into an outlet on a circuit different from that to which can radiate radio frequency energy and, if not installed and used in a residential installation. Consult the...
... alert the user to the presence of important operating and maintenance (servicing) instructions in a particular installation. This symbol is classified as the injurious wastes. However, there is encouraged to try to persons. Connect the equipment into an outlet on a circuit different from that to which can radiate radio frequency energy and, if not installed and used in a residential installation. Consult the...
Operating Instructions
Page 3
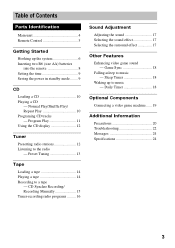
... Optional Components Connecting a video game machine ...... 19 Additional Information Precautions 20 Troubleshooting 22 Messages 24 Specifications 24 3 Normal Play/Shuffle Play/ Repeat Play 10 Programing CD tracks - CD Synchro Recording/ Recording Manually 15 Timer-recording radio programs ......... 16 Sound Adjustment Adjusting the sound 17 Selecting the sound effect 17 Selecting the surround effect 17 Other Features Enhancing video game sound - Table of Contents Parts Identification Main unit 4 Remote Control 5 Getting Started Hooking up to music - Preset Tuning 13 Tape...
... Optional Components Connecting a video game machine ...... 19 Additional Information Precautions 20 Troubleshooting 22 Messages 24 Specifications 24 3 Normal Play/Shuffle Play/ Repeat Play 10 Programing CD tracks - CD Synchro Recording/ Recording Manually 15 Timer-recording radio programs ......... 16 Sound Adjustment Adjusting the sound 17 Selecting the sound effect 17 Selecting the surround effect 17 Other Features Enhancing video game sound - Table of Contents Parts Identification Main unit 4 Remote Control 5 Getting Started Hooking up to music - Preset Tuning 13 Tape...
Operating Instructions
Page 5
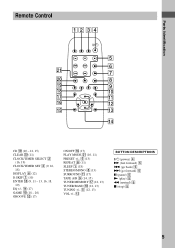
..., 13) TUNING +/- 5 (12, 13) VOL +/- qj qa qh qs qg qd qf CD ql (10 - 12, 15) CLEAR w; (11) CLOCK/TIMER SELECT 2 (16, 19) CLOCK/TIMER SET 3 (9, 16, 18) DISPLAY 6 (12) D.SKIP 7 (10) ENTER qg (9, 11 - 13, 16, 18, 19) EQ +/- qs BUTTON DESCRIPTIONS ?/1 (power) 4 M (fast forward) 5 . (go back) 5 > (go forward) 5 X (pause) 5 N (play) 5 m (rewind) 5 x (stop) 5 5 Parts Identification Remote Control 12...
..., 13) TUNING +/- 5 (12, 13) VOL +/- qj qa qh qs qg qd qf CD ql (10 - 12, 15) CLEAR w; (11) CLOCK/TIMER SELECT 2 (16, 19) CLOCK/TIMER SET 3 (9, 16, 18) DISPLAY 6 (12) D.SKIP 7 (10) ENTER qg (9, 11 - 13, 16, 18, 19) EQ +/- qs BUTTON DESCRIPTIONS ?/1 (power) 4 M (fast forward) 5 . (go back) 5 > (go forward) 5 X (pause) 5 N (play) 5 m (rewind) 5 x (stop) 5 5 Parts Identification Remote Control 12...
Operating Instructions
Page 6
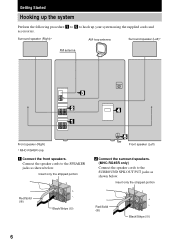
... Hooking up the system Perform the following procedure 1 to 5 to the SURROUND SPK OUT PUT jacks as shown below . Insert only the stripped portion R + L + Red/Solid - (3) Black/Stripe (#) 5 Front speaker (Left) 2 Connect the surround speakers. (MHC-RG4SR only) Connect the speaker cords to hook up your system using the supplied cords and accessories. Red/Solid (3) Black/Stripe (#) 6 Surround speaker (Right)* AM loop antenna Surround speaker (Left)* FM antenna 3 2 4 1 Front speaker (Right) * MHC-RG4SR only 1 Connect the front speakers...
... Hooking up the system Perform the following procedure 1 to 5 to the SURROUND SPK OUT PUT jacks as shown below . Insert only the stripped portion R + L + Red/Solid - (3) Black/Stripe (#) 5 Front speaker (Left) 2 Connect the surround speakers. (MHC-RG4SR only) Connect the speaker cords to hook up your system using the supplied cords and accessories. Red/Solid (3) Black/Stripe (#) 6 Surround speaker (Right)* AM loop antenna Surround speaker (Left)* FM antenna 3 2 4 1 Front speaker (Right) * MHC-RG4SR only 1 Connect the front speakers...
Operating Instructions
Page 8
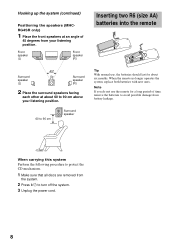
... front speakers at about six months. When carrying this system Perform the following procedure to protect the CD mechanism. 1 Make sure that all discs are removed from your listening position. 60 to 90 cm Surround speaker Inserting two R6 (size AA) batteries into the remote e E E e Tip With normal use the remote for about 60 to turn off the system. 3 Unplug the power cord. 8
... front speakers at about six months. When carrying this system Perform the following procedure to protect the CD mechanism. 1 Make sure that all discs are removed from your listening position. 60 to 90 cm Surround speaker Inserting two R6 (size AA) batteries into the remote e E E e Tip With normal use the remote for about 60 to turn off the system. 3 Unplug the power cord. 8
Operating Instructions
Page 9
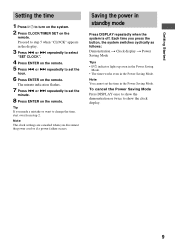
... the Power Saving Mode. • The timer works even in the display. 3 Press . Note You cannot set the time in standby mode Press DISPLAY repeatedly when the system is off. Note The clock settings are canceled when you disconnect the power cord or if a power failure occurs. Getting Started Setting the time 1 Press ?/1 to turn on the system. 2 Press CLOCK/TIMER SET on the remote. 5 Press . or > repeatedly to select "SET CLOCK...
... the Power Saving Mode. • The timer works even in the display. 3 Press . Note You cannot set the time in standby mode Press DISPLAY repeatedly when the system is off. Note The clock settings are canceled when you disconnect the power cord or if a power failure occurs. Getting Started Setting the time 1 Press ?/1 to turn on the system. 2 Press CLOCK/TIMER SET on the remote. 5 Press . or > repeatedly to select "SET CLOCK...
Operating Instructions
Page 12
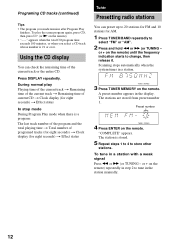
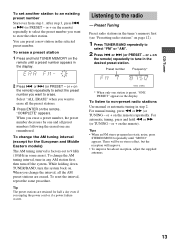
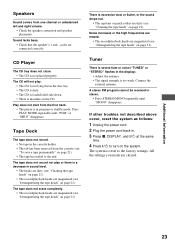
... select a CD track whose number is 21 or over. Using the CD display You can check the remaining time of programed tracks (for eight seconds) t Clock display (for eight seconds) t Effect status Tuner Presetting radio stations You can preset up to 20 stations for FM and 10 stations for eight seconds) t Effect status In stop mode During Program Play mode when there is stored. 5 Repeat steps 1 to 4 to change...
... select a CD track whose number is 21 or over. Using the CD display You can check the remaining time of programed tracks (for eight seconds) t Clock display (for eight seconds) t Effect status Tuner Presetting radio stations You can preset up to 20 stations for FM and 10 stations for eight seconds) t Effect status In stop mode During Program Play mode when there is stored. 5 Repeat steps 1 to 4 to change...
Operating Instructions
Page 13
... remote) repeatedly to select the preset number you erase a preset number, the preset number decreases by one and all the AM preset stations are renumbered. When you unplug the power cord or if a power failure occurs. * When only one are erased. For manual tuning, press m or M (or TUNING - Listening to non-preset radio stations Use manual or automatic tuning in some areas). To change the interval, all preset numbers following the erased one station is factory-set another station...
... remote) repeatedly to select the preset number you erase a preset number, the preset number decreases by one and all the AM preset stations are renumbered. When you unplug the power cord or if a power failure occurs. * When only one are erased. For manual tuning, press m or M (or TUNING - Listening to non-preset radio stations Use manual or automatic tuning in some areas). To change the interval, all preset numbers following the erased one station is factory-set another station...
Operating Instructions
Page 14
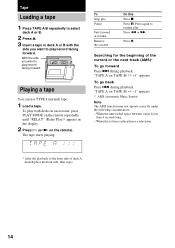
... the cassette Do this Press x. Press m or M. Tape Loading a tape 1 Press TAPE A/B repeatedly to select deck A or B. 2 Press Z. 3 Insert a tape in the display. 2 Press H (or N on the remote repeatedly until "RELAY" (Relay Play)* appears in deck A or B with the side you want to resume play /record facing forward. Press again to play . The tape starts playing. Searching for the beginning of the current or...
... the cassette Do this Press x. Press m or M. Tape Loading a tape 1 Press TAPE A/B repeatedly to select deck A or B. 2 Press Z. 3 Insert a tape in the display. 2 Press H (or N on the remote repeatedly until "RELAY" (Relay Play)* appears in deck A or B with the side you want to resume play /record facing forward. Press again to play . The tape starts playing. Searching for the beginning of the current or...
Operating Instructions
Page 16
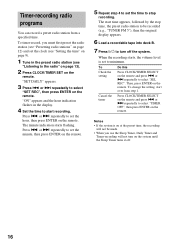
... turn on at the preset time, the recording will not be recorded (e.g., "TUNER FM 5"), then the original display appears. 6 Load a recordable tape into deck B. 7 Press ?/1 to turn off . 16 Press . Press CLOCK/TIMER SELECT on the remote. or > repeatedly to stop time, the preset radio station to be made. • When you must first preset the radio station (see "Presetting radio stations" on the remote and press . The minute indication starts flashing...
... turn on at the preset time, the recording will not be recorded (e.g., "TUNER FM 5"), then the original display appears. 6 Load a recordable tape into deck B. 7 Press ?/1 to turn off . 16 Press . Press CLOCK/TIMER SELECT on the remote. or > repeatedly to stop time, the preset radio station to be made. • When you must first preset the radio station (see "Presetting radio stations" on the remote and press . The minute indication starts flashing...
Operating Instructions
Page 18
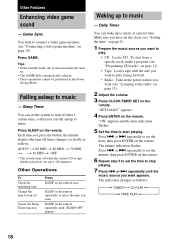
...; Radio: Tune in the Power Saving Mode. or > repeatedly to stop playing. 7 Press . The minute indication flashes. t 10 MIN t OFF * The system turns off after a certain time, so that you want to music - SLEEP on . • The GAME EQ is automatically selected. • These operations cannot be performed in the preset station you want appears. "SET DAILY" appears. 4 Press ENTER on the remote. Press . The indication changes...
...; Radio: Tune in the Power Saving Mode. or > repeatedly to stop playing. 7 Press . The minute indication flashes. t 10 MIN t OFF * The system turns off after a certain time, so that you want to music - SLEEP on . • The GAME EQ is automatically selected. • These operations cannot be performed in the preset station you want appears. "SET DAILY" appears. 4 Press ENTER on the remote. Press . The indication changes...
Operating Instructions
Page 19
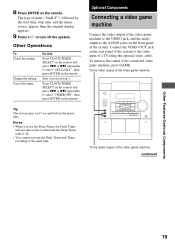
... off the system. The type of the video game machine continued Other Features/Optional Components 19 Tip The system turns on the remote and press . Other Operations To Check the setting Change the setting Cancel the timer Do this Press CLOCK/TIMER SELECT on 15 seconds before the preset time. or > repeatedly to turn on the rear panel of the system to the sound of a TV using the optional video cable.
... off the system. The type of the video game machine continued Other Features/Optional Components 19 Tip The system turns on the remote and press . Other Operations To Check the setting Change the setting Cancel the timer Do this Press CLOCK/TIMER SELECT on 15 seconds before the preset time. or > repeatedly to turn on the rear panel of the system to the sound of a TV using the optional video cable.
Operating Instructions
Page 20
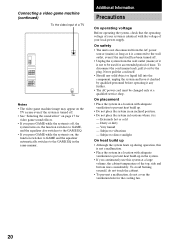
... Before operating the system, check that the operating voltage of your local power supply. To disconnect the cord (mains lead), pull it out by qualified personnel before operating it is turned off , the system turns on , the function switches to GAME and the equalizer automatically switches to the GAME EQ. • If you continuously use this system at a qualified service shop. Dusty or dirty - Subject to direct...
... Before operating the system, check that the operating voltage of your local power supply. To disconnect the cord (mains lead), pull it out by qualified personnel before operating it is turned off , the system turns on , the function switches to GAME and the equalizer automatically switches to the GAME EQ. • If you continuously use this system at a qualified service shop. Dusty or dirty - Subject to direct...
Operating Instructions
Page 21
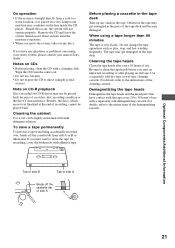
... direct sunlight or heat sources. Wipe the CD from side A or B as play, stop, and fast-winding frequently. Remove the CD and leave the system turned on CDs • Before playing, clean the CD with adhesive tape. Note on CD-R playback Discs recorded on the lens inside the CD player. Use a separately sold demagnetizing cassette. For details, refer to the instructions...
... direct sunlight or heat sources. Wipe the CD from side A or B as play, stop, and fast-winding frequently. Remove the CD and leave the system turned on CDs • Before playing, clean the CD with adhesive tape. Note on CD-R playback Discs recorded on the lens inside the CD player. Use a separately sold demagnetizing cassette. For details, refer to the instructions...
Operating Instructions
Page 22
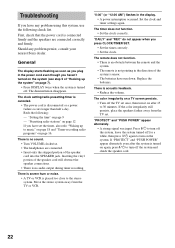
... the power cord is no sound. • Turn VOLUME clockwise. • The headphones are connected correctly and firmly. "Setting the time" on page 7). • Press DISPLAY twice when the system is no audio output during timer recording. "Presetting radio stations" on a TV screen persists. • Turn off for a while, then press ?/1 again to the stereo system. Inserting the vinyl portion of the speaker cord will obstruct the speaker connections. • There is connected firmly...
... the power cord is no sound. • Turn VOLUME clockwise. • The headphones are connected correctly and firmly. "Setting the time" on page 7). • Press DISPLAY twice when the system is no audio output during timer recording. "Presetting radio stations" on a TV screen persists. • Turn off for a while, then press ?/1 again to the stereo system. Inserting the vinyl portion of the speaker cord will obstruct the speaker connections. • There is connected firmly...
Operating Instructions
Page 23
... high frequencies are erased. • The record/playback heads are magnetized (see "Demagnetizing the tape heads" on the CD. If other troubles not described above occur, reset the system as follows: 1 Unplug the power cord. 2 Plug the power cord back in program or shuffle mode. jacks are cleared. 23 All the settings you made are connected correctly. Sound lacks bass. • Check that the speaker's + and - CD Player The...
... high frequencies are erased. • The record/playback heads are magnetized (see "Demagnetizing the tape heads" on the CD. If other troubles not described above occur, reset the system as follows: 1 Unplug the power cord. 2 Plug the power cord back in program or shuffle mode. jacks are cleared. 23 All the settings you made are connected correctly. Sound lacks bass. • Check that the speaker's + and - CD Player The...
Operating Instructions
Page 24
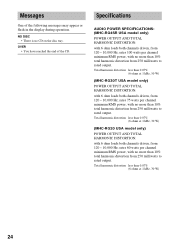
... watts per channel minimum RMS power, with no more than 0.07% (6 ohms at 1 kHz, 30 W) 24 Total harmonic distortion less than 0.07% (6 ohms at 1 kHz, 30 W) (MHC-RG20 USA model only) POWER OUTPUT AND TOTAL HARMONIC DISTORTION: with no CD on the disc tray. Total harmonic distortion less than 10% total harmonic distortion from 120 - 10,000 Hz; Specifications AUDIO POWER SPECIFICATIONS: (MHC-RG4SR USA model only) POWER OUTPUT...
... watts per channel minimum RMS power, with no more than 0.07% (6 ohms at 1 kHz, 30 W) 24 Total harmonic distortion less than 0.07% (6 ohms at 1 kHz, 30 W) (MHC-RG20 USA model only) POWER OUTPUT AND TOTAL HARMONIC DISTORTION: with no CD on the disc tray. Total harmonic distortion less than 10% total harmonic distortion from 120 - 10,000 Hz; Specifications AUDIO POWER SPECIFICATIONS: (MHC-RG4SR USA model only) POWER OUTPUT...
Operating Instructions
Page 25
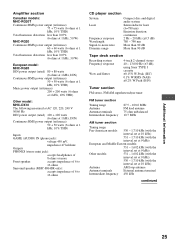
... DIN power output (rated) 100 + 100 watts (6 ohms at 1 kHz, DIN) Continuous RMS power output (reference) 50 + 50 watts (6 ohms at 1 kHz, 10% THD) Inputs GAME (AUDIO) IN (phono jack): voltage 450 mV, impedance 47 kilohms Outputs PHONES (stereo mini jack): accepts headphones of 8 ohms or more Front speaker: accepts impedance of 6 to 16 ohms Surround speaker (MHC-RG4SR only): accepts impedance of 6 to 16 ohms CD player section System Laser Frequency response Wavelength Signal-to-noise ratio Dynamic range Compact disc and digital audio system...
... DIN power output (rated) 100 + 100 watts (6 ohms at 1 kHz, DIN) Continuous RMS power output (reference) 50 + 50 watts (6 ohms at 1 kHz, 10% THD) Inputs GAME (AUDIO) IN (phono jack): voltage 450 mV, impedance 47 kilohms Outputs PHONES (stereo mini jack): accepts headphones of 8 ohms or more Front speaker: accepts impedance of 6 to 16 ohms Surround speaker (MHC-RG4SR only): accepts impedance of 6 to 16 ohms CD player section System Laser Frequency response Wavelength Signal-to-noise ratio Dynamic range Compact disc and digital audio system...
Operating Instructions
Page 26
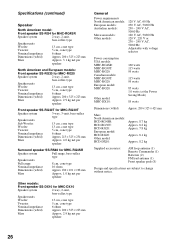
... watts 115 watts 95 watts 115 watts 95 watts 85 watts 1.0 watts (at the Power Saving Mode) 85 watts Dimensions (w/h/d) Approx. 280 × 325 × 421 mm Mass North American models: HCD-RG4SR: HCD-RG30T: HCD-RG20: European model: HCD-RG20: Other model: HCD-DX10: Approx. 8.7 kg Approx. 8.2 kg Approx. 7.8 kg Approx. 8.1 kg Approx. 8.2 kg Supplied accessories: AM loop antenna (1) Remote Commander (1) Batteries (2) FM lead antenna (1) Front speaker pads (8) Design and specifications are subject to change...
... watts 115 watts 95 watts 115 watts 95 watts 85 watts 1.0 watts (at the Power Saving Mode) 85 watts Dimensions (w/h/d) Approx. 280 × 325 × 421 mm Mass North American models: HCD-RG4SR: HCD-RG30T: HCD-RG20: European model: HCD-RG20: Other model: HCD-DX10: Approx. 8.7 kg Approx. 8.2 kg Approx. 7.8 kg Approx. 8.1 kg Approx. 8.2 kg Supplied accessories: AM loop antenna (1) Remote Commander (1) Batteries (2) FM lead antenna (1) Front speaker pads (8) Design and specifications are subject to change...


