Operating Instructions
Page 1
Record the serial number in the space provided below. Refer to them whenever you call upon your Sony dealer regarding this product. 4-239-951-11(1) Mini Hi-Fi Component System Operating Instructions Owner's Record The model and serial numbers are located on the rear of the unit. Model No Serial No MHC-GS100 © 2002 Sony Corporation 1
Record the serial number in the space provided below. Refer to them whenever you call upon your Sony dealer regarding this product. 4-239-951-11(1) Mini Hi-Fi Component System Operating Instructions Owner's Record The model and serial numbers are located on the rear of the unit. Model No Serial No MHC-GS100 © 2002 Sony Corporation 1
Operating Instructions
Page 2
... to the presence of uninsulated "dangerous voltage" within the product's enclosure that the cable ground shall be connected to the grounding system of optical instruments with this product will not occur in accordance with the limits for proper grounding and, in the literature accompanying ... interference to radio or television reception, which the receiver is encouraged to try to operate this product meets the ENERGY STAR® guidelines for help. As an ENERGY STAR® partner, Sony Corporation has determined that to the presence of the following measures: - Consult the ...
... to the presence of uninsulated "dangerous voltage" within the product's enclosure that the cable ground shall be connected to the grounding system of optical instruments with this product will not occur in accordance with the limits for proper grounding and, in the literature accompanying ... interference to radio or television reception, which the receiver is encouraged to try to operate this product meets the ENERGY STAR® guidelines for help. As an ENERGY STAR® partner, Sony Corporation has determined that to the presence of the following measures: - Consult the ...
Operating Instructions
Page 8
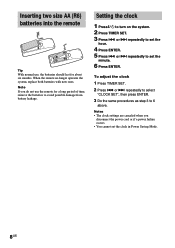
... to set the minute. 6 Press ENTER. or > repeatedly to select "CLOCK SET", then press ENTER. 3 Do the same procedures as step 3 to turn on the system. 2 Press TIMER SET. 3 Press . Setting the clock 1 Press =/1 to 6 above. or > repeatedly to avoid possible damage from battery leakage. To adjust the clock 1 Press TIMER.... 8US Inserting two size AA (R6) batteries into the remote e E E e Tip With normal use the remote for about six months. When the remote no longer operates the system, replace both batteries with new ones.
... to set the minute. 6 Press ENTER. or > repeatedly to select "CLOCK SET", then press ENTER. 3 Do the same procedures as step 3 to turn on the system. 2 Press TIMER SET. 3 Press . Setting the clock 1 Press =/1 to 6 above. or > repeatedly to avoid possible damage from battery leakage. To adjust the clock 1 Press TIMER.... 8US Inserting two size AA (R6) batteries into the remote e E E e Tip With normal use the remote for about six months. When the remote no longer operates the system, replace both batteries with new ones.
Operating Instructions
Page 11
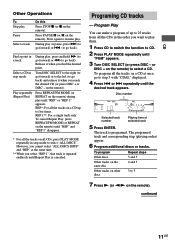
... 1", that track is repeated endlessly until Repeat Play is programed. To program all the tracks on the remote) until the desired track appears. CD Other Operations To Stop play . Press again to 25 tracks from all CDs, press PLAY MODE repeatedly in the order you reach the desired CD (or press...
... 1", that track is repeated endlessly until Repeat Play is programed. To program all the tracks on the remote) until the desired track appears. CD Other Operations To Stop play . Press again to 25 tracks from all CDs, press PLAY MODE repeatedly in the order you reach the desired CD (or press...
Operating Instructions
Page 12
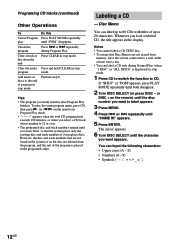
... can label up to label appears. 3 Press MENU. 4 Press . or DISC + on the remote) until you erase them, so that the system plays only the existing disc and track numbers if you select a CD track whose number is played in the programed order. appears when the total...Z) • Numbers (0 - 9) • Symbols 12US Tips • The program you want to 20 characters. Labeling a CD - Programing CD tracks (continued) Other Operations To Do this Cancel Program Press PLAY MODE repeatedly play the same program again, press CD, then press N (or n N on the remote) in Program Play...
... can label up to label appears. 3 Press MENU. 4 Press . or DISC + on the remote) until you erase them, so that the system plays only the existing disc and track numbers if you select a CD track whose number is played in the programed order. appears when the total...Z) • Numbers (0 - 9) • Symbols 12US Tips • The program you want to 20 characters. Labeling a CD - Programing CD tracks (continued) Other Operations To Do this Cancel Program Press PLAY MODE repeatedly play the same program again, press CD, then press N (or n N on the remote) in Program Play...

Operating Instructions
Page 15
... improve broadcast reception, reorient or move the supplied antennas near a window or outdoors. 15US To reset the interval, repeat the same procedure. Other Operations To Do this Tune in a station Follow the procedure described in Power Saving Mode. Tips • The preset stations are erased. Stop setting ... stations. Note You cannot change the AM tuning interval, tune in some areas). While holding down ENTER, turn off the system. Tuner Setting presets through manual signal tuning". or + repeatedly to 9 kHz (10 kHz in any AM station first, then turn the...
... improve broadcast reception, reorient or move the supplied antennas near a window or outdoors. 15US To reset the interval, repeat the same procedure. Other Operations To Do this Tune in a station Follow the procedure described in Power Saving Mode. Tips • The preset stations are erased. Stop setting ... stations. Note You cannot change the AM tuning interval, tune in some areas). While holding down ENTER, turn off the system. Tuner Setting presets through manual signal tuning". or + repeatedly to 9 kHz (10 kHz in any AM station first, then turn the...
Operating Instructions
Page 17
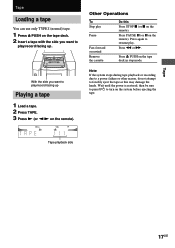
... Do this may damage the heads. Press again to play/record facing up Playing a tape 1 Load a tape. 2 Press TAPE. 3 Press N (or n N on the system before ejecting the tape. Press Z PUSH on the remote). Wait until the power is restored, then be sure to press ?/1 to forcibly eject the tape...the tape deck in stop mode. Tape playback side 17US Note If the system stops during tape playback or recording due to a power failure or other reason, do not attempt to turn on the remote). Press m or M. Other Operations To Stop play . With the side you want to play/record facing...
... Do this may damage the heads. Press again to play/record facing up Playing a tape 1 Load a tape. 2 Press TAPE. 3 Press N (or n N on the system before ejecting the tape. Press Z PUSH on the remote). Wait until the power is restored, then be sure to press ?/1 to forcibly eject the tape...the tape deck in stop mode. Tape playback side 17US Note If the system stops during tape playback or recording due to a power failure or other reason, do not attempt to turn on the remote). Press m or M. Other Operations To Stop play . With the side you want to play/record facing...
Operating Instructions
Page 20
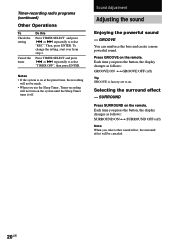
...press ENTER. To change the setting, start over from step 1. Each time you use the Sleep Timer, Timer-recording will not turn on the system until the Sleep Timer turns it off ) Tip GROOVE is on . Selecting the surround effect - or > repeatedly to select "REC". SURROUND ...Press SURROUND on the remote. Press TIMER SELECT and press . Timer-recording radio programs (continued) Other Operations To Check the setting Cancel the timer Do this Press TIMER SELECT and press . Press GROOVE on the remote. Then, press ENTER. Sound Adjustment...
...press ENTER. To change the setting, start over from step 1. Each time you use the Sleep Timer, Timer-recording will not turn on the system until the Sleep Timer turns it off ) Tip GROOVE is on . Selecting the surround effect - or > repeatedly to select "REC". SURROUND ...Press SURROUND on the remote. Press TIMER SELECT and press . Timer-recording radio programs (continued) Other Operations To Check the setting Cancel the timer Do this Press TIMER SELECT and press . Press GROOVE on the remote. Then, press ENTER. Sound Adjustment...
Operating Instructions
Page 21
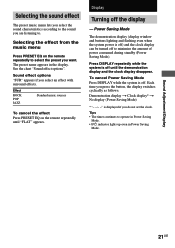
.... To cancel Power Saving Mode Press DISPLAY while the system is off . Tips • The timer continues to . Selecting the sound effect The preset music menu lets you select the sound characteristics according to the sound you are listening to operate in Power Saving Mode. • ?/1 indicator lights up... display can be turned off the display - Power Saving Mode The demonstration display (display window and buttons lighting and flashing even when the system power is displayed if you want. Display Turning off to select the preset you do not set the clock. See the chart "Sound ...
.... To cancel Power Saving Mode Press DISPLAY while the system is off . Tips • The timer continues to . Selecting the sound effect The preset music menu lets you select the sound characteristics according to the sound you are listening to operate in Power Saving Mode. • ?/1 indicator lights up... display can be turned off the display - Power Saving Mode The demonstration display (display window and buttons lighting and flashing even when the system power is displayed if you want. Display Turning off to select the preset you do not set the clock. See the chart "Sound ...

Operating Instructions
Page 24
... to connect an optional component (such as follows: t TUNER y CD PLAY T t TAPE PLAY T 8 Press ENTER. Other Operations To Check the setting Change the setting Cancel the timer Do this system. Waking up optional components You can then record or listen to analog audio from step 1. Start over from that...seconds before the preset time. The indication changes as an MD deck, a VCR, etc.) to music (continued) 7 Press . Tip The system turns on the system until the music source you use the Sleep Timer, the Daily Timer will not turn off . • You cannot activate the Daily Timer ...
... to connect an optional component (such as follows: t TUNER y CD PLAY T t TAPE PLAY T 8 Press ENTER. Other Operations To Check the setting Change the setting Cancel the timer Do this system. Waking up optional components You can then record or listen to analog audio from step 1. Start over from that...seconds before the preset time. The indication changes as an MD deck, a VCR, etc.) to music (continued) 7 Press . Tip The system turns on the system until the music source you use the Sleep Timer, the Daily Timer will not turn off . • You cannot activate the Daily Timer ...

Operating Instructions
Page 25
... to a tape" on page 24. 2 Start recording manually. Start playing the connected component. Tip Once you listen to a connected MD deck, perform the following operation. 1 Turn off the system. 2 Press VIDEO (MD) while holding down STOP x. Recording audio from a connected component Listening to the analog sound of an MD deck, a VCR, etc...". Optional Components 25US Notes • The function is factory-set to VIDEO. • If you want to switch back to the VIDEO funtion, perform the operation described above to switch to MD. See "Hooking up optional components" on page 18.
... to a tape" on page 24. 2 Start recording manually. Start playing the connected component. Tip Once you listen to a connected MD deck, perform the following operation. 1 Turn off the system. 2 Press VIDEO (MD) while holding down STOP x. Recording audio from a connected component Listening to the analog sound of an MD deck, a VCR, etc...". Optional Components 25US Notes • The function is factory-set to VIDEO. • If you want to switch back to the VIDEO funtion, perform the operation described above to switch to MD. See "Hooking up optional components" on page 18.

Operating Instructions
Page 28
...continuously use this is : - Messages One of the following messages may appear or flash in the display during operation, this unit at the same time. On safety • Unplug the system from the wall outlet (mains) if it is not a malfunction. • Place the unit in a ...the top, side and bottom rises considerably. On heat buildup • Although the unit heats up during operation. Extremely hot or cold - Subject to restore all necessary settings. The system is identical with adequate ventilation to prevent heat buildup in the unit. Be sure to vibrations - Additional...
...continuously use this is : - Messages One of the following messages may appear or flash in the display during operation, this unit at the same time. On safety • Unplug the system from the wall outlet (mains) if it is not a malfunction. • Place the unit in a ...the top, side and bottom rises considerably. On heat buildup • Although the unit heats up during operation. Extremely hot or cold - Subject to restore all necessary settings. The system is identical with adequate ventilation to prevent heat buildup in the unit. Be sure to vibrations - Additional...
Operating Instructions
Page 29
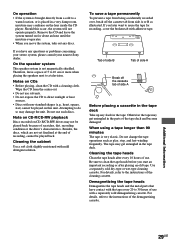
... the instructions of recording, cannot be played on the lens inside the CD player. Attempting to do so may condense on this occur, the system will not operate properly. Besides, the discs, which are not yet finalized at the end of the cleaning cassette. To save a tape permanently To prevent a tape from... demagnetizing cassette. For details, refer to 30 hours of side A Before placing a cassette in the tape deck Take up any questions or problems concerning your stereo system, please consult your nearest Sony dealer.
... the instructions of recording, cannot be played on the lens inside the CD player. Attempting to do so may condense on this occur, the system will not operate properly. Besides, the discs, which are not yet finalized at the end of the cleaning cassette. To save a tape permanently To prevent a tape from... demagnetizing cassette. For details, refer to 30 hours of side A Before placing a cassette in the tape deck Take up any questions or problems concerning your stereo system, please consult your nearest Sony dealer.
Marketing Specifications
Page 2
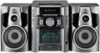
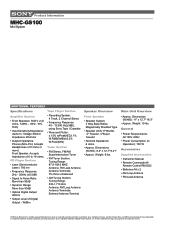
...MHC-GS100 Mini System ADDITIONAL FEATURES Specifications Amplifier Section • Front Speakers: 50W x 2 (6 ohms, 120Hz - 10Hz, 10% THD) • Input Sensitivity/Impedance: Audio In: Voltage 450mV, Impedance 47kohms • Output Impedance: Phones (Mini...(in part without written permission is prohibited. Reproduction in whole or in Operation): 100 W Accessories Supplied Accessories • Instruction Manual • Remote ...Tape Player Section • Recording System: 4 Track, 2 Channel Stereo • Frequency Response: 40 - 13,000 Hz(±3dB), using Sony Type I Cassette • ...
...MHC-GS100 Mini System ADDITIONAL FEATURES Specifications Amplifier Section • Front Speakers: 50W x 2 (6 ohms, 120Hz - 10Hz, 10% THD) • Input Sensitivity/Impedance: Audio In: Voltage 450mV, Impedance 47kohms • Output Impedance: Phones (Mini...(in part without written permission is prohibited. Reproduction in whole or in Operation): 100 W Accessories Supplied Accessories • Instruction Manual • Remote ...Tape Player Section • Recording System: 4 Track, 2 Channel Stereo • Frequency Response: 40 - 13,000 Hz(±3dB), using Sony Type I Cassette • ...


