Operating Instructions
Page 2
..., there is connected. - CAUTION • The use of important operating and maintenance (servicing) instructions in particular, specifies that this product will not occur in a residential installation. registered mark. As an ENERGY STAR® partner, Sony Corporation has determined that the cable ground shall be determined by one or more of cable entry as close to provide reasonable protection against harmful...
..., there is connected. - CAUTION • The use of important operating and maintenance (servicing) instructions in particular, specifies that this product will not occur in a residential installation. registered mark. As an ENERGY STAR® partner, Sony Corporation has determined that the cable ground shall be determined by one or more of cable entry as close to provide reasonable protection against harmful...
Operating Instructions
Page 3
Preset Tuning/ Manual Tuning 16 Labeling the preset stations - Power Saving Mode 21 Using the display 22 Other Features Falling asleep to the radio - Disc Memo 12 Tuner Presetting radio stations 14 Listening to music - CD Synchro Recording/ Recording Manually/ Program Edit 18 Timer-recording radio programs ......... 19 Sound Adjustment Adjusting the sound - Program Play 11 Labeling a CD - Station Name 16 Tape Loading a tape 17 Playing a tape 17 Recording to audio from a connected component 25 Recording audio from a connected component 25 Troubleshooting Problems and ...
Preset Tuning/ Manual Tuning 16 Labeling the preset stations - Power Saving Mode 21 Using the display 22 Other Features Falling asleep to the radio - Disc Memo 12 Tuner Presetting radio stations 14 Listening to music - CD Synchro Recording/ Recording Manually/ Program Edit 18 Timer-recording radio programs ......... 19 Sound Adjustment Adjusting the sound - Program Play 11 Labeling a CD - Station Name 16 Tape Loading a tape 17 Playing a tape 17 Recording to audio from a connected component 25 Recording audio from a connected component 25 Troubleshooting Problems and ...
Operating Instructions
Page 4
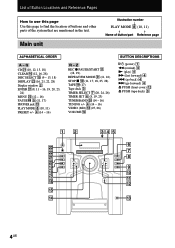
... Illustration number r PLAY MODE 8 (10, 11) R R Name of the system that are mentioned in the text. Z REC z PAUSE/START qa (18, 19) REPEAT/FM MODE 9 (11, 16) STOP x 0 (11, 17, 18, 25, 28) TAPE ql (17) Tape deck 3 TIMER SELECT 7 (20, 24, 26) TIMER SET 6 (8, 19, 23) TUNER/BAND w; (14 - 16) TUNING +/- 4 (14 - 16) VIDEO (MD) qk (25, 26) VOLUME qf BUTTON DESCRIPTIONS =/1 (power) 1 m (rewind) 4 N (play) 4 M (fast...
... Illustration number r PLAY MODE 8 (10, 11) R R Name of the system that are mentioned in the text. Z REC z PAUSE/START qa (18, 19) REPEAT/FM MODE 9 (11, 16) STOP x 0 (11, 17, 18, 25, 28) TAPE ql (17) Tape deck 3 TIMER SELECT 7 (20, 24, 26) TIMER SET 6 (8, 19, 23) TUNER/BAND w; (14 - 16) TUNING +/- 4 (14 - 16) VIDEO (MD) qk (25, 26) VOLUME qf BUTTON DESCRIPTIONS =/1 (power) 1 m (rewind) 4 N (play) 4 M (fast...
Operating Instructions
Page 7
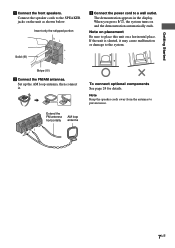
Connect the speaker cords to the SPEAKER jacks on a horizontal place. Insert only the stripped portion R L + Solid (3) - 3 Connect the power cord to prevent noise. 7US Note on placement Be sure to the system. ANATMENNA U FM75Ω U Extend the FM antenna horizontally AM loop antenna To connect optional components See page 24 for details. The demonstration appears in the display. Stripe (#) 2 Connect the FM/AM antennas. Set up the...
Connect the speaker cords to the SPEAKER jacks on a horizontal place. Insert only the stripped portion R L + Solid (3) - 3 Connect the power cord to prevent noise. 7US Note on placement Be sure to the system. ANATMENNA U FM75Ω U Extend the FM antenna horizontally AM loop antenna To connect optional components See page 24 for details. The demonstration appears in the display. Stripe (#) 2 Connect the FM/AM antennas. Set up the...
Operating Instructions
Page 14
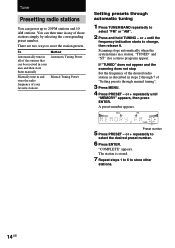
... then store them manually Manually tune in and store the radio frequency of your favorite stations Method Automatic Tuning Preset Manual Tuning Preset Setting presets through manual tuning". 3 Press MENU. 4 Press PRESET - "TUNED" and "ST" (for a stereo program) appear. Preset number 5 Press PRESET - Scanning stops automatically when the system tunes in steps 2 through 7 of "Setting presets through automatic tuning 1 Press TUNER/BAND repeatedly to change, then release it. The station is stored. 7 Repeat steps 1 to 6 to store the station presets. or + until "MEMORY...
... then store them manually Manually tune in and store the radio frequency of your favorite stations Method Automatic Tuning Preset Manual Tuning Preset Setting presets through manual tuning". 3 Press MENU. 4 Press PRESET - "TUNED" and "ST" (for a stereo program) appear. Preset number 5 Press PRESET - Scanning stops automatically when the system tunes in steps 2 through 7 of "Setting presets through automatic tuning 1 Press TUNER/BAND repeatedly to change, then release it. The station is stored. 7 Repeat steps 1 to 6 to store the station presets. or + until "MEMORY...

Operating Instructions
Page 15
..., tune in with a weak "Setting presets through manual tuning 1 Press TUNER/BAND repeatedly to tune in Power Saving Mode. or + repeatedly until "MEMORY" appears, then press ENTER. Tips • The preset stations are erased. To change the AM tuning interval in the desired station. 3 Press MENU. 4 Press PRESET - Other Operations To Do this Tune in a station Follow the procedure described in any AM station first, then turn the system back on. To reset...
..., tune in with a weak "Setting presets through manual tuning 1 Press TUNER/BAND repeatedly to tune in Power Saving Mode. or + repeatedly until "MEMORY" appears, then press ENTER. Tips • The preset stations are erased. To change the AM tuning interval in the desired station. 3 Press MENU. 4 Press PRESET - Other Operations To Do this Tune in a station Follow the procedure described in any AM station first, then turn the system back on. To reset...
Operating Instructions
Page 16
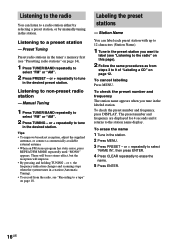
..., adjust the supplied antennas, or connect a commercially available external antenna. • When an FM stereo program has static noise, press REPEAT/FM MODE repeatedly until "MONO" appears. Labeling the preset stations - To check the preset number and frequency The station name appears when you want to label (see "Presetting radio stations" on page 14). 1 Press TUNER/BAND repeatedly to select "FM" or "AM". 2 Press PRESET - To erase the name 1 Tune...
..., adjust the supplied antennas, or connect a commercially available external antenna. • When an FM stereo program has static noise, press REPEAT/FM MODE repeatedly until "MONO" appears. Labeling the preset stations - To check the preset number and frequency The station name appears when you want to label (see "Presetting radio stations" on page 14). 1 Press TUNER/BAND repeatedly to select "FM" or "AM". 2 Press PRESET - To erase the name 1 Tune...
Operating Instructions
Page 18
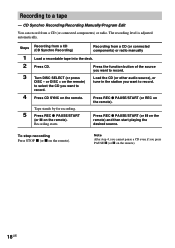
.... Press REC z PAUSE/START (or REC on the remote) and then start playing the desired source. Press the function button of the source you want to record. Press REC z PAUSE/START (or X on the remote). Press CD SYNC on the remote. CD Synchro Recording/Recording Manually/Program Edit You can record from a CD (or connected components) or radio manually Load a recordable tape into the deck. Turn DISC SELECT (or press...
.... Press REC z PAUSE/START (or REC on the remote) and then start playing the desired source. Press the function button of the source you want to record. Press REC z PAUSE/START (or X on the remote). Press CD SYNC on the remote. CD Synchro Recording/Recording Manually/Program Edit You can record from a CD (or connected components) or radio manually Load a recordable tape into the deck. Turn DISC SELECT (or press...
Operating Instructions
Page 19
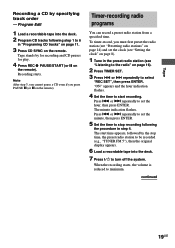
... and the hour indication flashes. 4 Set the time to be recorded (e.g., "TUNER FM 5"), then the original display appears. 6 Load a recordable tape into the deck. 2 Program CD tracks following the procedure in "Programing CD tracks" on page 11. 3 Press CD SYNC on the remote). or > repeatedly to set the minute, then press ENTER. 5 Set the time to stop time, the preset radio station to start time appears, followed by for...
... and the hour indication flashes. 4 Set the time to be recorded (e.g., "TUNER FM 5"), then the original display appears. 6 Load a recordable tape into the deck. 2 Program CD tracks following the procedure in "Programing CD tracks" on page 11. 3 Press CD SYNC on the remote). or > repeatedly to set the minute, then press ENTER. 5 Set the time to stop time, the preset radio station to start time appears, followed by for...
Operating Instructions
Page 20
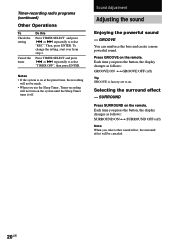
... Timer turns it off ) Tip GROOVE is on . To change the setting, start over from step 1. GROOVE You can reinforce the bass and create a more powerful sound. Selecting the surround effect - Each time you use the Sleep Timer, Timer-recording will not be canceled. 20US Then, press ENTER. or > repeatedly to select "TIMER OFF", then press ENTER. Timer-recording radio programs (continued) Other Operations...
... Timer turns it off ) Tip GROOVE is on . To change the setting, start over from step 1. GROOVE You can reinforce the bass and create a more powerful sound. Selecting the surround effect - Each time you use the Sleep Timer, Timer-recording will not be canceled. 20US Then, press ENTER. or > repeatedly to select "TIMER OFF", then press ENTER. Timer-recording radio programs (continued) Other Operations...

Operating Instructions
Page 22
.... Each time you press the button, the display changes cyclically as follows: Elapsed playing time of the current track t Remaining time of the current track* t Remaining time of the disc** t Track title (CD-TEXT disc only) t Clock display t Effect status appears when you check the remaining time of a CD track whose number is selected. Checking the total playing time Press DISPLAY repeatedly in stop mode. displays current disc number, total number of...
.... Each time you press the button, the display changes cyclically as follows: Elapsed playing time of the current track t Remaining time of the current track* t Remaining time of the disc** t Track title (CD-TEXT disc only) t Clock display t Effect status appears when you check the remaining time of a CD track whose number is selected. Checking the total playing time Press DISPLAY repeatedly in stop mode. displays current disc number, total number of...
Operating Instructions
Page 23
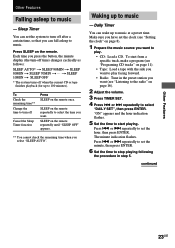
... radio" on the remote repeatedly to select the time you select "SLEEP AUTO". Waking up to stop playing following the procedure in the preset station you want . or > repeatedly to music - SLEEP on page 16). 2 Adjust the volume. 3 Press TIMER SET. 4 Press . or > repeatedly to set the minute, then press ENTER. 6 Set the time to music at a preset time. The minute indication flashes. or > repeatedly to start from a specific track, make a program...
... radio" on the remote repeatedly to select the time you select "SLEEP AUTO". Waking up to stop playing following the procedure in the preset station you want . or > repeatedly to music - SLEEP on page 16). 2 Adjust the volume. 3 Press TIMER SET. 4 Press . or > repeatedly to set the minute, then press ENTER. 6 Set the time to music at a preset time. The minute indication flashes. or > repeatedly to start from a specific track, make a program...

Operating Instructions
Page 24
... time, stop time, and the music source, appear, then the original display appears. 9 Press ?/1 to analog audio from step 1. or > repeatedly to these jacks. Notes • When you want appears. Other Operations To Check the setting Change the setting Cancel the timer Do this system. The type of an MD deck, a VCR, etc. VIDEO (MD) IN Use audio cords (not supplied) to connect an optional component (such as follows: t TUNER y CD PLAY T t TAPE PLAY...
... time, stop time, and the music source, appear, then the original display appears. 9 Press ?/1 to analog audio from step 1. or > repeatedly to these jacks. Notes • When you want appears. Other Operations To Check the setting Change the setting Cancel the timer Do this system. The type of an MD deck, a VCR, etc. VIDEO (MD) IN Use audio cords (not supplied) to connect an optional component (such as follows: t TUNER y CD PLAY T t TAPE PLAY...

Operating Instructions
Page 25
... function is factory-set to VIDEO. • If you listen to a connected MD deck, perform the following operation. 1 Turn off the system. 2 Press VIDEO (MD) while holding down STOP x. Optional Components 25US See "Hooking up optional components" on page 24. 2 Press VIDEO (MD) to MD. The function switches to select "VIDEO" or "MD". Tip Once you enable the MD function, just press VIDEO (MD). Recording audio from a connected component Listening to the analog sound of...
... function is factory-set to VIDEO. • If you listen to a connected MD deck, perform the following operation. 1 Turn off the system. 2 Press VIDEO (MD) while holding down STOP x. Optional Components 25US See "Hooking up optional components" on page 24. 2 Press VIDEO (MD) to MD. The function switches to select "VIDEO" or "MD". Tip Once you enable the MD function, just press VIDEO (MD). Recording audio from a connected component Listening to the analog sound of...
Operating Instructions
Page 26
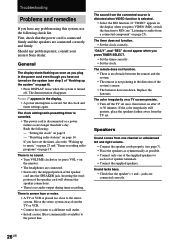
... press VIDEO (MD), switch the function to MD (see step 3 of "Hooking up to each set . Inserting the vinyl portion of speaker terminals. • Connect the supplied speakers. The sound from the TV set of the speaker cord will obstruct the speaker connections. • There is connected firmly and the speakers are connected correctly and firmly. Replace the batteries. Sound lacks bass. • Check that the power cord is no sound. • Turn VOLUME clockwise...
... press VIDEO (MD), switch the function to MD (see step 3 of "Hooking up to each set . Inserting the vinyl portion of speaker terminals. • Connect the supplied speakers. The sound from the TV set of the speaker cord will obstruct the speaker connections. • There is connected firmly and the speakers are connected correctly and firmly. Replace the batteries. Sound lacks bass. • Check that the power cord is no sound. • Turn VOLUME clockwise...
Operating Instructions
Page 27
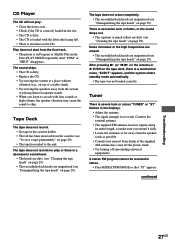
...; Replace the CD. • Try moving the system to skip. Press PLAY MODE repeatedly until "PGM" or "SHUF" disappears. Noise increases or the high frequencies are erased. • The record/playback heads are magnetized (see "To save a tape permanently" on page 29). Tuner There is severe hum or noise ("TUNED" or "ST" flashes in the display). • Adjust the antenna. • The signal...
...; Replace the CD. • Try moving the system to skip. Press PLAY MODE repeatedly until "PGM" or "SHUF" disappears. Noise increases or the high frequencies are erased. • The record/playback heads are magnetized (see "To save a tape permanently" on page 29). Tuner There is severe hum or noise ("TUNED" or "ST" flashes in the display). • Adjust the antenna. • The signal...

Operating Instructions
Page 28
...) If other troubles not described above occur, reset the system as follows: 1 Unplug the power cord. 2 Plug the power cord back in the display during operation, this unit at the same time. NO DISC • There is no CD in locations where it is not a malfunction. • Place the unit in a location with the voltage of your system is reset to be used for the...
...) If other troubles not described above occur, reset the system as follows: 1 Unplug the power cord. 2 Plug the power cord back in the display during operation, this unit at the same time. NO DISC • There is no CD in locations where it is not a malfunction. • Place the unit in a location with the voltage of your system is reset to be used for the...
Operating Instructions
Page 30
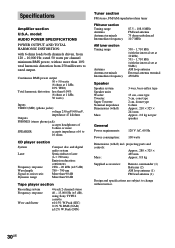
... lead antenna 75 ohms unbalanced 10.7 MHz AM tuner section Tuning range Antenna Antenna terminals Intermediate frequency 530 - 1,710 kHz (with the interval set at 1 kHz, 30 watts) Inputs VIDEO (MD) (phono jacks): voltage 250 mV/450 mV, impedance 47 kilohms Outputs PHONES (stereo phone jack): accepts headphones of 8 ohms or more SPEAKER: accepts impedance of 6 to 16 ohms CD player section System Laser Frequency response Wavelength Signal-to change without notice. 30US rated 50 watts per speaker General Power...
... lead antenna 75 ohms unbalanced 10.7 MHz AM tuner section Tuning range Antenna Antenna terminals Intermediate frequency 530 - 1,710 kHz (with the interval set at 1 kHz, 30 watts) Inputs VIDEO (MD) (phono jacks): voltage 250 mV/450 mV, impedance 47 kilohms Outputs PHONES (stereo phone jack): accepts headphones of 8 ohms or more SPEAKER: accepts impedance of 6 to 16 ohms CD player section System Laser Frequency response Wavelength Signal-to change without notice. 30US rated 50 watts per speaker General Power...
Marketing Specifications
Page 1
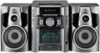
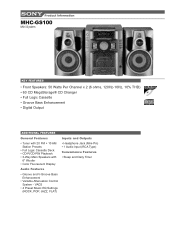
Product Information MHC-GS100 Mini System KEY FEATURES • Front Speakers: 50 Watts Per Channel x 2 (6 ohms, 120Hz-10Hz, 10% THD) • 60 CD MegaStorage® CD Changer • Full Logic Cassette • Groove Bass Enhancement • Digital Output ADDITIONAL FEATURES General Features • Tuner with 20 FM + 10 AM Station Presets • Full Logic Cassette Deck • CD-R/CD-RW Playback • 3-Way Main Speakers with 6" Woofer •...
Product Information MHC-GS100 Mini System KEY FEATURES • Front Speakers: 50 Watts Per Channel x 2 (6 ohms, 120Hz-10Hz, 10% THD) • 60 CD MegaStorage® CD Changer • Full Logic Cassette • Groove Bass Enhancement • Digital Output ADDITIONAL FEATURES General Features • Tuner with 20 FM + 10 AM Station Presets • Full Logic Cassette Deck • CD-R/CD-RW Playback • 3-Way Main Speakers with 6" Woofer •...
Marketing Specifications
Page 2
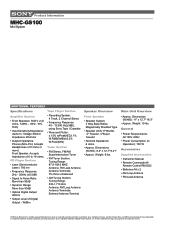
... Sony. dts is prohibited. Dolby Digital is a registered trademark of Digital Output: -18dBm Tape Player Section • Recording System: 4 Track, 2 Channel Stereo • Frequency Response: 40 - 13,000 Hz(±3dB), using Sony Type I Cassette • Wow and Flutter: ±.15% w/Peak(IEC)/.1% W.RMS(NAB)/±0.2% W.Peak(DIN) Tuner Section • FM Stereo, FM/AM Superheterodyne Tuner • FM Tuner Section: Tuning Range: 87.5-108.0 MHZ Antenna: FM Lead Antenna Antenna Terminals: 75 ohms...
... Sony. dts is prohibited. Dolby Digital is a registered trademark of Digital Output: -18dBm Tape Player Section • Recording System: 4 Track, 2 Channel Stereo • Frequency Response: 40 - 13,000 Hz(±3dB), using Sony Type I Cassette • Wow and Flutter: ±.15% w/Peak(IEC)/.1% W.RMS(NAB)/±0.2% W.Peak(DIN) Tuner Section • FM Stereo, FM/AM Superheterodyne Tuner • FM Tuner Section: Tuning Range: 87.5-108.0 MHZ Antenna: FM Lead Antenna Antenna Terminals: 75 ohms...


