
Operating Instructions
Page 3
...Error displays/Messages 22 3 BAL/FAD 15 Customizing the equalizer curve - Table of Contents Welcome 4 Getting Started Resetting the unit 5 Preparing the card remote commander 5 Setting the clock 6 Adjusting the volume level of each device . . . . 6 Detaching the front panel 6 Attaching the front panel 7 Location of all paired devices. . .... output of this unit 14 Deleting registration of controls and basic operations Main unit 8 Card remote commander RM-X304 8 CD Display items 10 Repeat and shuffle play 10 Radio Storing and receiving stations 10 Storing automatically -
...Error displays/Messages 22 3 BAL/FAD 15 Customizing the equalizer curve - Table of Contents Welcome 4 Getting Started Resetting the unit 5 Preparing the card remote commander 5 Setting the clock 6 Adjusting the volume level of each device . . . . 6 Detaching the front panel 6 Attaching the front panel 7 Location of all paired devices. . .... output of this unit 14 Deleting registration of controls and basic operations Main unit 8 Card remote commander RM-X304 8 CD Display items 10 Repeat and shuffle play 10 Radio Storing and receiving stations 10 Storing automatically -
Operating Instructions
Page 5
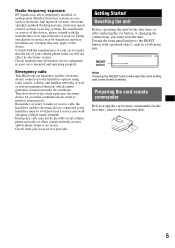
...of your car is mounted and operating properly. Check with adequate cellular signal strength. Preparing the card remote commander Before using radio signals, cellular, and landline networks as well as medical emergencies). Getting Started Resetting the unit Before operating the unit for ... equipment in your cellular phone in the car will erase the clock setting and some stored contents. Faulty installation or service may be possible on in a service area with your car. Radio frequency exposure RF signals may affect improperly installed or inadequately shielded electronic...
...of your car is mounted and operating properly. Check with adequate cellular signal strength. Preparing the card remote commander Before using radio signals, cellular, and landline networks as well as medical emergencies). Getting Started Resetting the unit Before operating the unit for ... equipment in your cellular phone in the car will erase the clock setting and some stored contents. Faulty installation or service may be possible on in a service area with your car. Radio frequency exposure RF signals may affect improperly installed or inadequately shielded electronic...
Operating Instructions
Page 6
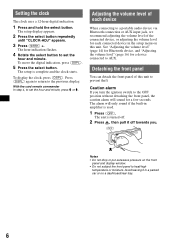
.... See "Adjusting the volume level" (page 14) for Bluetooth device, and "Adjusting the volume level" (page 16) for a device connected to the previous display. Setting the clock The clock uses a 12-hour digital indication. 1 Press and hold the select button. To move the digital indication, press (DSPL). 5 Press the select button. Press (DSPL...
.... See "Adjusting the volume level" (page 14) for Bluetooth device, and "Adjusting the volume level" (page 16) for a device connected to the previous display. Setting the clock The clock uses a 12-hour digital indication. 1 Press and hold the select button. To move the digital indication, press (DSPL). 5 Press the select button. Press (DSPL...
Operating Instructions
Page 10
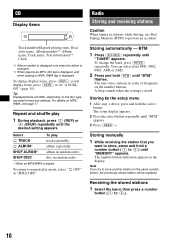
...appears in random order. CD Display items Track number/Elapsed playing time, Disc/ artist name, Album number*1, Album name, Track name, Text information*2, Clock *1 Album number is ...displayed only when the album is changed. *2 When playing an MP3, ID3 tag is displayed, and when playing a WMA, WMA tag is stored. Radio ...REP) or (4) (SHUF) repeatedly until "TUNER" appears. BTM 1 Press (SOURCE) repeatedly until the desired setting appears. The setup display appears. 2 Press the select button repeatedly until "MEMORY" appears. Receiving the stored stations...
...appears in random order. CD Display items Track number/Elapsed playing time, Disc/ artist name, Album number*1, Album name, Track name, Text information*2, Clock *1 Album number is ...displayed only when the album is changed. *2 When playing an MP3, ID3 tag is displayed, and when playing a WMA, WMA tag is stored. Radio ...REP) or (4) (SHUF) repeatedly until "TUNER" appears. BTM 1 Press (SOURCE) repeatedly until the desired setting appears. The setup display appears. 2 Press the select button repeatedly until "MEMORY" appears. Receiving the stored stations...
Operating Instructions
Page 11
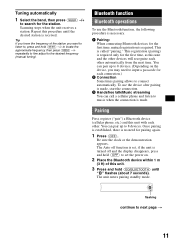
... Bluetooth devices for the first time, mutual registration is required. The Auto off function is set, if the unit is turned off and the display disappears, press and hold (OFF) to set the power on the device, you want to listen to, press and hold (EQ/BLUETOOTH..." " flashes (about 7 seconds). The unit enters pairing standby mode. Bluetooth function Bluetooth operations To use the device after pairing is received. Be sure the clock or the demonstration appears. flashing continue to 8 devices. (Depending on . 2 Place the Bluetooth device within 1 m (3 ft) of the station you may...
... Bluetooth devices for the first time, mutual registration is required. The Auto off function is set, if the unit is turned off and the display disappears, press and hold (OFF) to set the power on the device, you want to listen to, press and hold (EQ/BLUETOOTH..." " flashes (about 7 seconds). The unit enters pairing standby mode. Bluetooth function Bluetooth operations To use the device after pairing is received. Be sure the clock or the demonstration appears. flashing continue to 8 devices. (Depending on . 2 Place the Bluetooth device within 1 m (3 ft) of the station you may...
Operating Instructions
Page 15
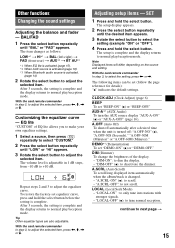
... 1 Press the select button repeatedly until "BAL" or "FAD" appears. With the card remote commander In step 2, to normal play/reception mode. After 3 seconds, the setting is activated. (page 14) 2 Rotate the select button to adjust the selected item. The item changes as follows: LOW*1 t HI*1 t BAL (left-right) t FAD (front...
... 1 Press the select button repeatedly until "BAL" or "FAD" appears. With the card remote commander In step 2, to normal play/reception mode. After 3 seconds, the setting is activated. (page 14) 2 Rotate the select button to adjust the selected item. The item changes as follows: LOW*1 t HI*1 t BAL (left-right) t FAD (front...

