

Operating Instructions
Page 1
Model No. 4-238-809-11 (4) Compact Hi-Fi Stereo System Operating Instructions Owner's Record The model and serial numbers are located on the rear panel of the unit. Refer to them whenever you call upon your Sony dealer regarding this product. Serial No. Record the serial number in the space provided below. LBT-XGR80 LBT-XGR60 LBT-XGR6 © 2002 Sony Corporation
Model No. 4-238-809-11 (4) Compact Hi-Fi Stereo System Operating Instructions Owner's Record The model and serial numbers are located on the rear panel of the unit. Refer to them whenever you call upon your Sony dealer regarding this product. Serial No. Record the serial number in the space provided below. LBT-XGR80 LBT-XGR60 LBT-XGR6 © 2002 Sony Corporation

Operating Instructions
Page 2
... radio frequency energy and, if not installed and used in the literature accompanying the appliance. And don't place lighted candles on the apparatus. Reorient or relocate the receiving antenna. - CAUTION You are designed to persons. For the customers in this product will not occur in a residential installation. WARNING This equipment has been tested and found to comply with the instructions...
... radio frequency energy and, if not installed and used in the literature accompanying the appliance. And don't place lighted candles on the apparatus. Reorient or relocate the receiving antenna. - CAUTION You are designed to persons. For the customers in this product will not occur in a residential installation. WARNING This equipment has been tested and found to comply with the instructions...

Operating Instructions
Page 3
Power Saving Mode 23 Using the CD display 23 Optional Components Hooking up to audio from a connected component 26 Recording audio from a connected component 27 Recording on a connected component 27 Troubleshooting Problems and remedies 28 Messages 30 Additional Information Precautions 30 Specifications 32 3GB Personal File 17 Selecting the surround effect 18 Timer Falling asleep to a tape -- CD Synchro Recording/High Speed Dubbing/Recording Manually/ Program Edit 14 Timer-recording radio programs ......... 15 Sound Adjustment Adjusting the sound 16...
Power Saving Mode 23 Using the CD display 23 Optional Components Hooking up to audio from a connected component 26 Recording audio from a connected component 27 Recording on a connected component 27 Troubleshooting Problems and remedies 28 Messages 30 Additional Information Precautions 30 Specifications 32 3GB Personal File 17 Selecting the surround effect 18 Timer Falling asleep to a tape -- CD Synchro Recording/High Speed Dubbing/Recording Manually/ Program Edit 14 Timer-recording radio programs ......... 15 Sound Adjustment Adjusting the sound 16...
Operating Instructions
Page 4
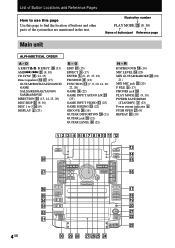
... the location of buttons and other parts of button/part Reference page Main unit ALPHABETICAL ORDER A - PLAY MODE es (9, 10) POWER SAVE/DEMO (STANDBY) 3 (23) Power stream indicator 6 PUSH OPEN wj (9) REPEAT es (10) 123 4 567890 qa qs qd qf ek qg ej qh eh qj eg qk ef ql ed w; Illustration number r PLAY MODE es (9, 10) R R Name of the system that are mentioned...
... the location of buttons and other parts of button/part Reference page Main unit ALPHABETICAL ORDER A - PLAY MODE es (9, 10) POWER SAVE/DEMO (STANDBY) 3 (23) Power stream indicator 6 PUSH OPEN wj (9) REPEAT es (10) 123 4 567890 qa qs qd qf ek qg ej qh eh qj eg qk ef ql ed w; Illustration number r PLAY MODE es (9, 10) R R Name of the system that are mentioned...

Operating Instructions
Page 6
Front speaker (right) AM loop antenna FM antenna Front speaker (left) 1 Connect the speakers. Red (3) Black (#) 2 Connect the speakers for LBT-XGR80 as below . Connect the speaker cords to the FRONT SPEAKER jacks for LBT-XGR60 and LBT-XGR6 or TWEETER & WOOFER jacks for biamplification system (LBT-XGR80 only) Connect the speaker cord to the SUPER WOOFER jacks as below . Solid (3) Stripe (#) Note Keep the speaker cords away from the antennas to hook up your system using the supplied cords and accessories. Insert only the...
Front speaker (right) AM loop antenna FM antenna Front speaker (left) 1 Connect the speakers. Red (3) Black (#) 2 Connect the speakers for LBT-XGR80 as below . Connect the speaker cords to the FRONT SPEAKER jacks for LBT-XGR60 and LBT-XGR6 or TWEETER & WOOFER jacks for biamplification system (LBT-XGR80 only) Connect the speaker cord to the SUPER WOOFER jacks as below . Solid (3) Stripe (#) Note Keep the speaker cords away from the antennas to hook up your system using the supplied cords and accessories. Insert only the...
Operating Instructions
Page 11
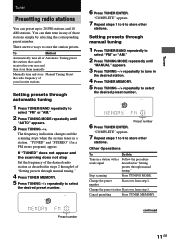
... desired radio station as described in steps 2 through 6 of "Setting presets through manual tuning." Stop scanning Press TUNING MODE. The frequency indication changes and the scanning stops when the system tunes in any of your favorite stations Setting presets through automatic tuning 1 Press TUNER/BAND repeatedly to select "FM" or "AM." 2 Press TUNING MODE repeatedly until "MANUAL" appears. 3 Press TUNING -/+ repeatedly to tune in "Setting presets through manual tuning." 4 Press TUNER MEMORY. 5 Press TUNING -/+ repeatedly to store other stations. Preset number continued...
... desired radio station as described in steps 2 through 6 of "Setting presets through manual tuning." Stop scanning Press TUNING MODE. The frequency indication changes and the scanning stops when the system tunes in any of your favorite stations Setting presets through automatic tuning 1 Press TUNER/BAND repeatedly to select "FM" or "AM." 2 Press TUNING MODE repeatedly until "MANUAL" appears. 3 Press TUNING -/+ repeatedly to tune in "Setting presets through manual tuning." 4 Press TUNER MEMORY. 5 Press TUNING -/+ repeatedly to store other stations. Preset number continued...
Operating Instructions
Page 12
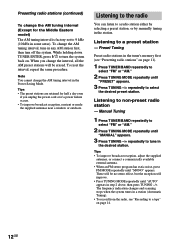
... to non-preset radio station - Tips • The preset stations are retained for the Middle Eastern model) The AM tuning interval is factory-set to select the desired preset station. Tips • To improve broadcast reception, adjust the supplied antennas, or connect a commercially available external antenna. • When an FM stereo program has static noise, press FM MODE repeatedly until "AUTO" appears in any AM station first, then turn the system back on...
... to non-preset radio station - Tips • The preset stations are retained for the Middle Eastern model) The AM tuning interval is factory-set to select the desired preset station. Tips • To improve broadcast reception, adjust the supplied antennas, or connect a commercially available external antenna. • When an FM stereo program has static noise, press FM MODE repeatedly until "AUTO" appears in any AM station first, then turn the system back on...

Operating Instructions
Page 14
... from the radio, move the respective antenna to record. Press z REC. Press FUNCTION or TUNER/BAND repeatedly until the source or band you want to record appears, and then load the CD/ tape (or other music source), or tune to the station you want to reduce the noise. 14GB CD Synchro Recording/High Speed Dubbing/Recording Manually/ Program Edit You can use have...
... from the radio, move the respective antenna to record. Press z REC. Press FUNCTION or TUNER/BAND repeatedly until the source or band you want to record appears, and then load the CD/ tape (or other music source), or tune to the station you want to reduce the noise. 14GB CD Synchro Recording/High Speed Dubbing/Recording Manually/ Program Edit You can use have...

Operating Instructions
Page 15
... DIRECTION repeatedly to select g to select "REC SET," then press ENTER. After clearing the entire program, follow the above procedure. Tape Recording a CD by the total playing time for discs containing over 20 tracks. • You cannot use this function when Program Play mode has been set. Deck B stands by the stop recording following step 1 to 6 in the preset radio station (see "Setting the clock" on page 8) beforehand. 1 Tune in "Programming the...
... DIRECTION repeatedly to select g to select "REC SET," then press ENTER. After clearing the entire program, follow the above procedure. Tape Recording a CD by the total playing time for discs containing over 20 tracks. • You cannot use this function when Program Play mode has been set. Deck B stands by the stop recording following step 1 to 6 in the preset radio station (see "Setting the clock" on page 8) beforehand. 1 Tune in "Programming the...

Operating Instructions
Page 16
... y MODE MUSIC For a powerful sound (GROOVE) The volume switches to the previous volume. Notes • The system turns on the system until the Sleep Timer turns it off the power. Each time you press this button, the super woofer mode display changes as follows: SUPER WOOFER FLAT t LOW t HIGH Tip SUPER WOOFER button lights up when super woofer mode is activated. Press R/r to cancel the reinforcement. Cancel timer operation Press TIMER SELECT (or CLOCK/TIMER SELECT on the remote...
... y MODE MUSIC For a powerful sound (GROOVE) The volume switches to the previous volume. Notes • The system turns on the system until the Sleep Timer turns it off the power. Each time you press this button, the super woofer mode display changes as follows: SUPER WOOFER FLAT t LOW t HIGH Tip SUPER WOOFER button lights up when super woofer mode is activated. Press R/r to cancel the reinforcement. Cancel timer operation Press TIMER SELECT (or CLOCK/TIMER SELECT on the remote...

Operating Instructions
Page 17
... operating, first select the basic audio emphasis you can create a personal file of audio patterns (surround effect and graphic equalizer) and store them in the system's memory. To Call up an audio pattern when playing a favorite tape, CD, or radio program. See the chart "Music menu options." Sound Adjustment Selecting the audio emphasis effect Selecting the preset effect from the music menu Press a direct equalizer button you select an effect with surround effects. The preset effect name appears. Music menu...
... operating, first select the basic audio emphasis you can create a personal file of audio patterns (surround effect and graphic equalizer) and store them in the system's memory. To Call up an audio pattern when playing a favorite tape, CD, or radio program. See the chart "Music menu options." Sound Adjustment Selecting the audio emphasis effect Selecting the preset effect from the music menu Press a direct equalizer button you select an effect with surround effects. The preset effect name appears. Music menu...

Operating Instructions
Page 19
... SELECT on the remote). Press R/r to select "DAILY SELECT". Timer 19GB Waking up to music at the same time. "ON" appears and the hour digits flash in the display. 4 Press ENTER. Tip The power turns on page 8). 1 Prepare the music source you want to play. • CD: Load a CD. Daily Timer You can wake up to play facing forward. • Radio: Tune in the preset station you want (see "Setting...
... SELECT on the remote). Press R/r to select "DAILY SELECT". Timer 19GB Waking up to music at the same time. "ON" appears and the hour digits flash in the display. 4 Press ENTER. Tip The power turns on page 8). 1 Prepare the music source you want to play. • CD: Load a CD. Daily Timer You can wake up to play facing forward. • Radio: Tune in the preset station you want (see "Setting...

Operating Instructions
Page 20
... follows: MIX GUITAR/KARAOKE y EFFECT OFF* or audio emphasis name* The m indicator appears when karaoke mode is activated. * Karaoke mode is canceled. 4 Start playing the music. 5 Adjust the microphone volume by turning down the microphone control level. 2 Connect an optional microphone to start playing the CD (or H on the source is being played. - Mixing and recording sounds 1 Do the procedure for "Singing along with any stereo CD or tape by turning MIC LEVEL.
... follows: MIX GUITAR/KARAOKE y EFFECT OFF* or audio emphasis name* The m indicator appears when karaoke mode is activated. * Karaoke mode is canceled. 4 Start playing the music. 5 Adjust the microphone volume by turning down the microphone control level. 2 Connect an optional microphone to start playing the CD (or H on the source is being played. - Mixing and recording sounds 1 Do the procedure for "Singing along with any stereo CD or tape by turning MIC LEVEL.

Operating Instructions
Page 21
... select your preferred sound characteristics by selecting the CD function and not playing a CD. • When high level sound signals are input, the unit automatically adjusts the recording level to the GUITAR jack on the front panel. Note Playing a guitar with any stereo CD or tape. To turn off . Tips • If acoustic feedback (howling) occurs, move the microphone away from the speakers. - The indicator on the GUITAR DISTORTION button lights...
... select your preferred sound characteristics by selecting the CD function and not playing a CD. • When high level sound signals are input, the unit automatically adjusts the recording level to the GUITAR jack on the front panel. Note Playing a guitar with any stereo CD or tape. To turn off . Tips • If acoustic feedback (howling) occurs, move the microphone away from the speakers. - The indicator on the GUITAR DISTORTION button lights...

Operating Instructions
Page 24
... then output audio to that component from this system. Optional TV To the video input of a TV Optional mixer Optional turntable To the inputs From the outputs of a mixer of a mixer From the outputs of a turntable G F E B C D A To the input of a digital component Optional digital component To the inputs of an analog component From the outputs of an analog component Optional analog component Optional analog component A CD DIGITAL OUT jack Use a digital optical cable (square, not supplied) to connect an optional digital component (such...
... then output audio to that component from this system. Optional TV To the video input of a TV Optional mixer Optional turntable To the inputs From the outputs of a mixer of a mixer From the outputs of a turntable G F E B C D A To the input of a digital component Optional digital component To the inputs of an analog component From the outputs of an analog component Optional analog component Optional analog component A CD DIGITAL OUT jack Use a digital optical cable (square, not supplied) to connect an optional digital component (such...

Operating Instructions
Page 25
... to analogue audio from this system. To avoid this system. You can then output video to the turntable. 2 Stop using the surround effect. 3 Install the speakers or the turntable on a firm and stable surface. 4 Press SUPER WOOFER repeatedly until the indicator on this button goes off. • Replace the jumpers when the mixer is often caused by the bass sound from that component through this...
... to analogue audio from this system. To avoid this system. You can then output video to the turntable. 2 Stop using the surround effect. 3 Install the speakers or the turntable on a firm and stable surface. 4 Press SUPER WOOFER repeatedly until the indicator on this button goes off. • Replace the jumpers when the mixer is often caused by the bass sound from that component through this...

Operating Instructions
Page 28
... that the power cord is placed too close to the stereo system. Should any problem using this unit, use the following check list. Redo "Setting the clock" (on page 11). Redo "Presetting radio stations" (on page 8). There is no microphone sound. • Turn VOLUME or MIC LEVEL to adjust the microphone volume. • Make sure the microphone is connected to the MIX MIC jack correctly. Troubleshooting Problems and remedies If you press FUNCTION repeatedly, switch the display to "MD...
... that the power cord is placed too close to the stereo system. Should any problem using this unit, use the following check list. Redo "Setting the clock" (on page 11). Redo "Presetting radio stations" (on page 8). There is no microphone sound. • Turn VOLUME or MIC LEVEL to adjust the microphone volume. • Make sure the microphone is connected to the MIX MIC jack correctly. Troubleshooting Problems and remedies If you press FUNCTION repeatedly, switch the display to "MD...

Operating Instructions
Page 29
... tape has reeled to the end. Speakers "PROTECT" and "PUSH POWER" appear alternately. • A strong signal was input. Sound comes from the cassette (see "Demagnetizing the tape heads" on page 32). Tape Deck The tape does not record. • The tab has been removed from one channel or unbalanced left and right volume. • Check the speaker connection and speaker placement. Noise increases or the high frequencies...
... tape has reeled to the end. Speakers "PROTECT" and "PUSH POWER" appear alternately. • A strong signal was input. Sound comes from the cassette (see "Demagnetizing the tape heads" on page 32). Tape Deck The tape does not record. • The tab has been removed from one channel or unbalanced left and right volume. • Check the speaker connection and speaker placement. Noise increases or the high frequencies...

Operating Instructions
Page 30
Problems and remedies (continued) Tuner Severe hum or noise ("TUNED" or "STEREO" flashes in the display). • Adjust the antenna. • The signal strength is : - Press m. STEP FULL You tried to direct sunlight • Use caution when placing the unit or speakers on the power. On placement • Do not place the unit in an inclined position. • Do not place the unit in...
Problems and remedies (continued) Tuner Severe hum or noise ("TUNED" or "STEREO" flashes in the display). • Adjust the antenna. • The signal strength is : - Press m. STEP FULL You tried to direct sunlight • Use caution when placing the unit or speakers on the power. On placement • Do not place the unit in an inclined position. • Do not place the unit in...

Operating Instructions
Page 33
... & WOOFER) accepts impedance of 6 to 16 ohms * North American and Mexican models only CD player section System Compact disc and digital audio system Laser Semiconductor laser (λ=795 nm), Emission duration: continuous Frequency response 2 Hz - 20 kHz (±0.5 dB) Signal-to-noise ratio More than 90 dB Dynamic range More than 90 dB CD OPTICAL DIGITAL OUT (Square optical connector jack, rear panel) Wavelength: 660 nm Output level -18 dBm Tape player section Recording system Frequency...
... & WOOFER) accepts impedance of 6 to 16 ohms * North American and Mexican models only CD player section System Compact disc and digital audio system Laser Semiconductor laser (λ=795 nm), Emission duration: continuous Frequency response 2 Hz - 20 kHz (±0.5 dB) Signal-to-noise ratio More than 90 dB Dynamic range More than 90 dB CD OPTICAL DIGITAL OUT (Square optical connector jack, rear panel) Wavelength: 660 nm Output level -18 dBm Tape player section Recording system Frequency...


